- How to switch iPhones
- How to transfer data from one iPhone to another
- Step 1. Back up your old iPhone
- Step 2. Turn off your old iPhone
- Step 3. Turn on your new device
- Step 4. Restore your new iPhone from the backup
- How to transfer data to new iPhone
- ⭐ Why people choose CopyTrans Shelbee ⭐:
- How to switch iPhones
- How to transfer music from iPhone to iPhone?
- How to transfer apps from iPhone to iPhone?
- Not all my photos were transferred to my new iPhone. What to do?
- Conclusion
- iPhone to Android: The ultimate switching guide
- Ready to make the move from iOS to Android? Here’s everything you need to successfully switch from an iPhone to a Samsung Galaxy, Google Pixel or any other Android device.
- All-in-one iOS-to-Android switching tools
- Calendar, contacts, and photos
- Messaging
- Files
- Music
- Welcome to Android
How to switch iPhones
Wondering how to switch iPhones without losing the most valuable information? This guide covers all the points you need to know on how to transfer data from one iPhone to another.
Here is a brief overview of what we are going to do to switch iPhones:
How to transfer data from one iPhone to another
You are sure to be faced with a number of questions before we learn how to transfer data to new iPhone.
- I don’t want to cram my new iPhone with all the data from my old iPhone. I want to transfer data from one iPhone to another selectively. But iTunes and iCloud can’t do that. What should I do?
- How to transfer music from iPhone to iPhone? Restoring from iCloud or iTunes backup doesn’t do that.
- How to transfer apps from iPhone to iPhone? Again, iCloud and iTunes are of little help.

In a nutshell, switching iPhones is done in 4 steps:
- Back up your old iPhone.
- Turn off your old iPhone.
- Turn on your new device.
- Restore a new iPhone from the backup you made.
To transfer data to new iPhone you can use iCloud, iTunes or a third-party app (like CopyTrans Shelbee).
Step 1. Back up your old iPhone
Make sure you back up your iPhone on the day of the transfer so that you do not lose any recent changes.
There is more than one way to back up your iPhone. We described all of them in detail in our article “How to back up your iPhone”:
| CopyTrans Shelbee (for Windows users only) | iTunes | iCloud | |
| Advantages | ✔ Doesn’t store your data on a remote server; ✔ Automatically encrypts your backup and lets you validate the password; ✔ You can select data types to restore; ✔ Can restore apps that are no longer on the AppStore (provided that you backed them up when they still were); ✔ One of the lowest prices on the market (here’s the store). | ✔ Doesn’t store your data on a remote server; ✔ It is free; | ✔ Automatically encrypts your backup, ensuring data safety. |
| Disadvantages | ❌ Paid software with a trial mode (backing up is possible in trial mode if you uncheck the “save the apps” box – we only allow that in full mode). | ❌ iTunes restore will overwrite all iPhone data; ❌ Can’t restore apps. | ❌ Requires a Wi-Fi connection; ❌ Your data will be stored on the Apple servers; ❌ Restoring from iCloud overwrites all iPhone data; ❌ iCloud backup doesn’t include the data that are synced to iCloud; ❌ You only have 5 Gb of free storage. If you need more, you have to pay. |
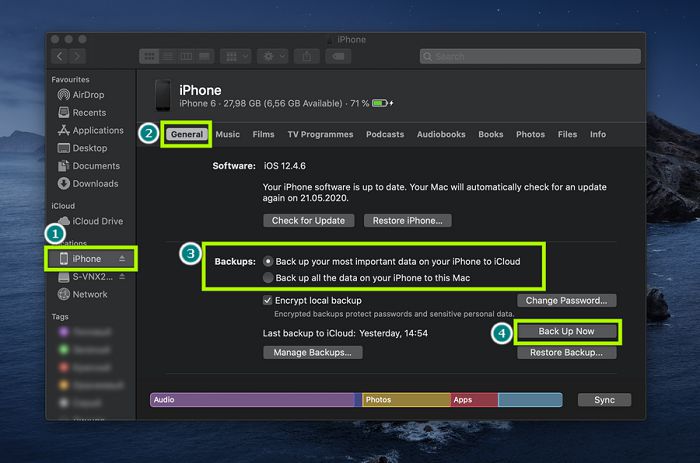
For MacOS Catalina users: don’t panic if you can’t find iTunes on your Mac. In this OS, you will need to use the Finder app instead of iTunes.
The Finder app icon looks like this: 
To back up your iPhone with the help of this little guy, do the following:
- Connect your device to Mac.
- Click on the Finder App.
- Select your device on the left side of the Finder App.
- Click on “General”.
- Select where you want the backup to be placed: on your Mac or in iCloud. To protect your data with a password, tick the checkbox next to “Encrypt local backup”.
- Click on “Back up now”
Step 2. Turn off your old iPhone
Before turning off your old iPhone:
- Prepare your Apple ID and password. You will be prompted to enter your credentials.
- Unpair your Apple Watch: once you unpair your Apple watch, it will be backed up automatically with all your health data.
Turn off your old device. If you have a SIM card you want to use, you can switch that from your old iPhone to the new one now.
Step 3. Turn on your new device
Turn on and set up your new iPhone over a Wi-Fi connection. You can read more about how to set up a new iPhone from the Apple support article.
You’ll be asked whether you want to set up your iPhone as a new device or restore it from a backup. If you choose the latter option, select either “restore from iCloud” or “restore from Mac or PC” and follow the instructions to get the data onto your new iPhone.
You can also leave restoring from a local backup (made with iTunes or CopyTrans Shelbee) for later. Just select “Don’t transfer Apps and Data” upon startup and then restore your iPhone following guides described in the next section.
Step 4. Restore your new iPhone from the backup
There are several methods you can use to restore your iPhone when switching iPhones. We described all of these methods in our article How to restore iPhone. Just click on the link you are interested in: they contain detailed guides for each restore method and their pros and cons.
| Restore without iTunes (CopyTrans Shelbee) | Restore iPhone from iTunes | Restore from iCloud | |
| Advantages | ✔ Doesn’t require Internet connection; ✔ You can select the data type to restore; ✔ Can restore apps, even if they are no longer on the AppStore. | ✔ It’s free; ✔ Overwrites all iPhone data; ✔ Can’t restore apps. | ✔ Restores WhatsApp; |
| Disadvantages | ❌ Not free, but has a trial mode (one of the lowest prices on the market). | ❌ Overwrites all iPhone data; ❌ Can’t restore apps. | ❌ Overwrites all iPhone data; ❌ Requires a Wi-Fi connection; ❌ Can’t restore apps and data that are already stored in iCloud. |
How to transfer data to new iPhone
selectively | without iTunes
Imagine a situation: you bought an iPhone and have been using it for a while. You have taken some cool photos and got some important messages. Now it is time to transfer data from one iPhone to another.
❗ Restoring with iCloud or iTunes will completely overwrite the data, which means goodbye to the new photos and messages.
To avoid this, use CopyTrans Shelbee: it has a custom restore feature. You can select the types of data to transfer to your new iPhone.
⭐ Why people choose CopyTrans Shelbee ⭐:
▪ Choose any folder to store your backup, as well as change the default backup folder set by iTunes.;
▪ Validate integrity of the backup file after each backup*;
▪ Add a password protection at any time to encrypt your backup;
▪ Choose between a full Backup or only latest changes backup;
▪ Set up reminders when it’s time to do a backup;
▪ Restore selected data;
▪ Restore apps to any iOS device with ease even if they have been removed from the App Store after **;
▪ Restore data from a corrupted iTunes backup.
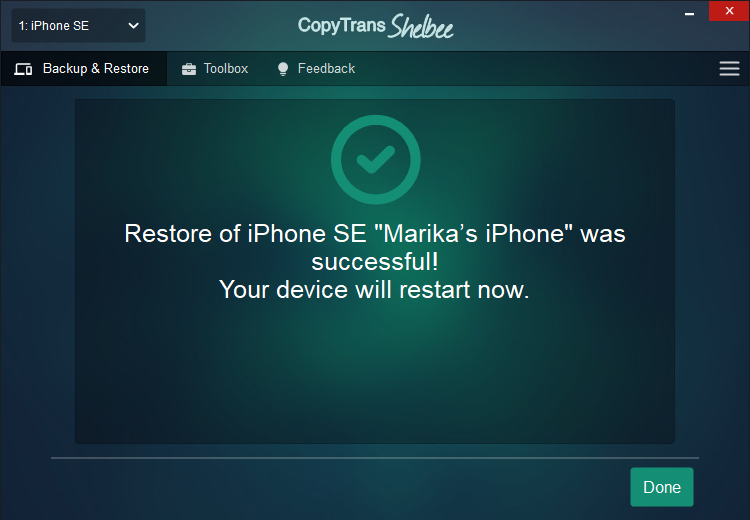
With CopyTrans Shelbee, you can choose which type of data you want to restore. Here’s how to swap data to new iPhone selectively:
- Download CopyTrans Shelbee from the following page:Download CopyTrans Shelbee
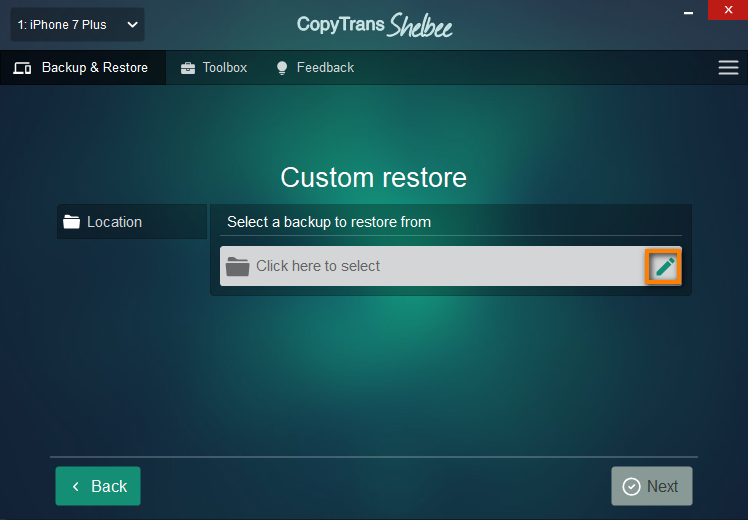
- Click on “Custom Restore”.
![]()
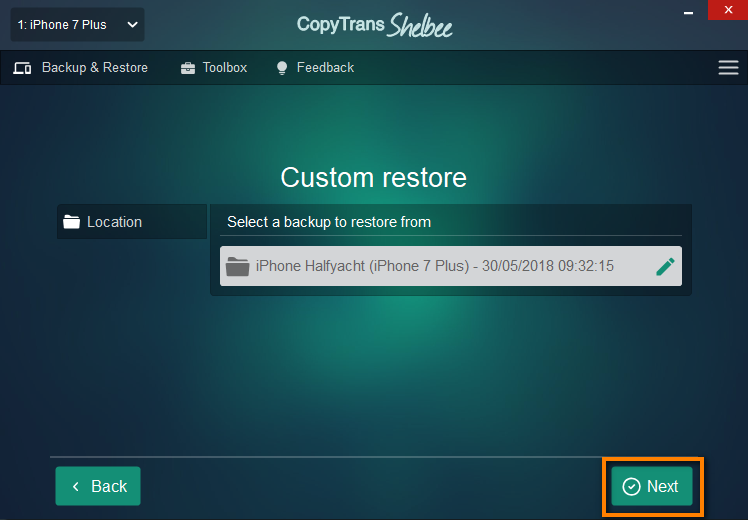
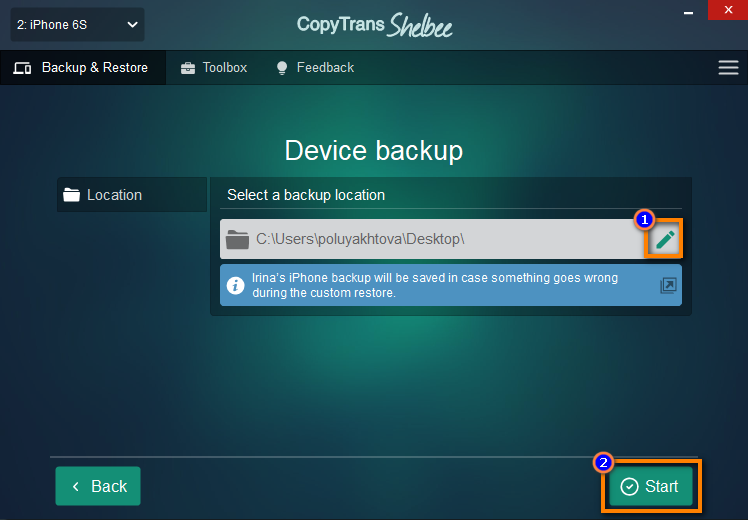
Click on the pencil icon to select the backup with the data you need.
Once you have chosen the backup, click on “Next”.
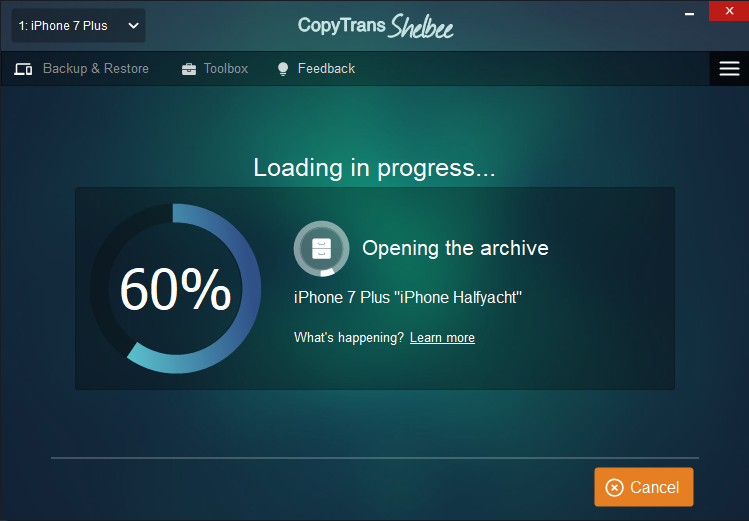
Wait until the loading process finishes.
Select the data type (or types) for restore. For example you can choose to restore contacts only. Just select “Contacts”, then click on “Next”. You will also be offered to restore calendars, notes, WhatsApp etc., in the same way.
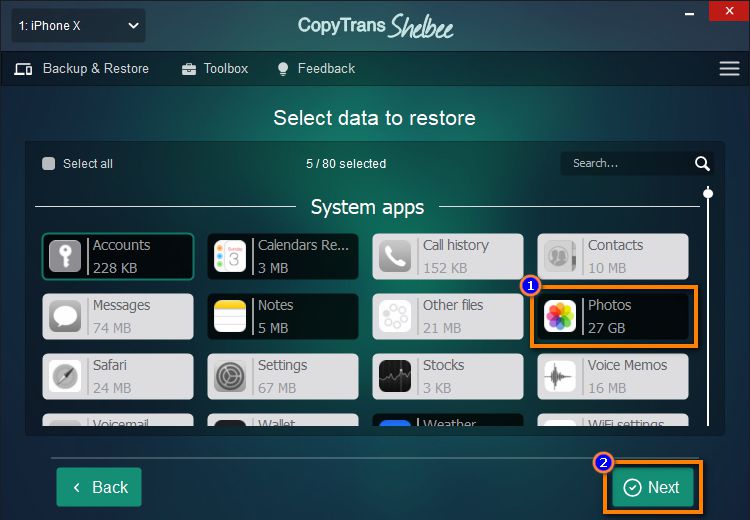
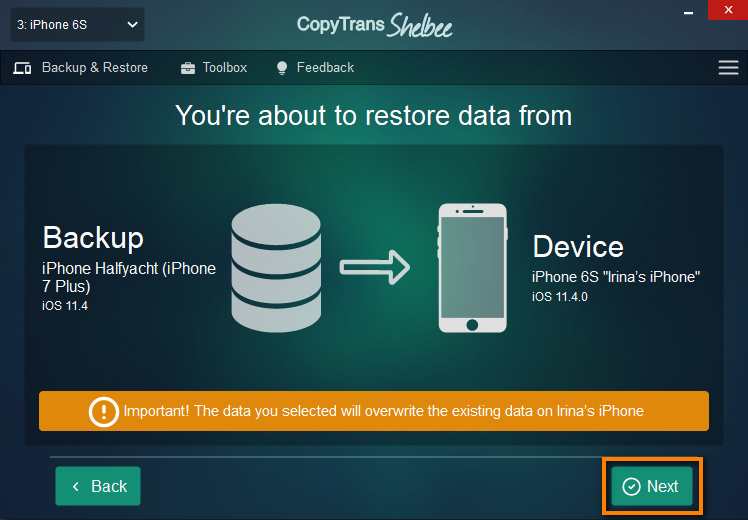
Press “Next”. Please note that the data you selected will be overwritten. This way, if you restore contacts, the old contact set will be replaced with that from the backup.

We have prepared a little summary of all the methods that prove helpful in switching iPhones:
| 🖥️ iTunes | ⭐CopyTrans Shelbee | ☁️ iCloud | |
| Requirements | iPhone and lightning cable, uses PC space | iPhone and lightning cable, uses PC space | iPhone and Wi-Fi, uses iCloud space |
| Full backup | ✔️ | ✔️ | ✔️ |
| Incremental backup (with latest changes) | ✔️ *you can’t choose the type of backup | ✔️ *choose the type of backup | ❌ |
| Encrypted backup | ✔️ | ✔️ | ❌ |
| Backup passwords, Wi-Fi settings, browsing history | ✔️ *backup should be encrypted | ✔️ *backup should be encrypted | ✔️ |
| Backup apps in .ipa format | ❌ | ✔️ | ❌ |
| Full restore | ✔️ | ✔️ | ✔️ |
| Custom restore (only photos, only messages, etc.) | ❌ | ✔️ | ❌ |
| Restore apps which are no longer on the App Store | ❌ | ✔️ **the apps should be backed up before removal 💡 To sum up: iCloud and iTunes are both suitable methods to switch iPhones, but only if you have a brand new device. They don’t have a selective restore feature: so, all the data on the iPhone will be replaced with that from the backup. If you already have some data on your new iPhone and you would rather not lose it – our advice is to to use CopyTrans Shelbee instead. How to switch iPhoneswithout backup | Quick start Starting from iOS 11, you will be offered a new option upon initial iPhone startup: Quick Start. It is very similar to iCloud restore, only it saves you time and effort. All you need is to place the older and newer iPhones next to each other, ensuring they have a stable Wi-Fi connection. Note: both of your devices should run iOS 11 or later. How to transfer music from iPhone to iPhone?You will not be able to transfer music from iPhone to iPhone using any of the above methods. How to transfer apps from iPhone to iPhone?You will not be able to transfer your apps from iPhone to iPhone using iCloud or iTunes. If you need to migrate them, CopyTrans Shelbee will come to rescue. Not all my photos were transferred to my new iPhone. What to do?The methods above will help you transfer the photos that are part of the Camera Roll. However, if you have iCloud Photos enabled on your device, the originals of your images may be stored in Cloud. In such case, you will need to get them from iCloud directly: ConclusionThis is how to switch iPhones. We hope that the guide was helpful to you when transferring data to new iPhone. Which method to transfer data from one iPhone to another is the most convenient to you? Let us know in the comments section below. Vlada is a tech support specialist who believes that the world is beautiful as long as it has dogs, Tarantino movies and mom’s pancakes. Источник iPhone to Android: The ultimate switching guideReady to make the move from iOS to Android? Here’s everything you need to successfully switch from an iPhone to a Samsung Galaxy, Google Pixel or any other Android device.
Contributing Editor, Computerworld | So, you’re ready to leave your iPhone for greener pastures — specifically, the bright green hue of Google’s Android ecosystem. It’s a major move, to be sure, but it doesn’t have to be daunting. Beneath the surface-level differences, Android and iOS actually have a lot in common — and with the right steps, you can switch from an iPhone to an Android device without losing anything significant (including your sanity). Make your way through this easy-to-follow guide, and you’ll be happily settled in your new high-tech home in no time. All-in-one iOS-to-Android switching toolsFirst things first: Some Android devices, like Samsung’s Galaxy phones and Google’s Pixel products, ship with their own all-in-one iPhone-to-Android switching systems. These systems may include special software and possibly even physical cables for moving a bunch of data from your iPhone to your new Android device in one fell swoop. If your Android phone offers such a service, it’s a smart place to start. Of course, these all-in-one methods aren’t available for every phone, and they don’t always work flawlessly or across all of the areas relevant to your needs. Next, we’ll get into the step-by-step details of how you can get every important category of data moved over on your own, bit by bit, without giving yourself a migraine. Calendar, contacts, and photosWe’ll start with a simple three-for-one special. Believe it or not, the core categories of calendar, contacts, and photos are among the easiest things to migrate from iOS to Android. All you’ve gotta do is install the Google Drive app onto your iPhone, then sign into the app using your primary Google account. (If you don’t yet have a Google account, the app will give you the opportunity to create one.) On your iPhone, open the Drive app’s menu, select «Settings» and then «Backup.» If you’re interested in moving over some but not all of the available areas, you can tap whichever area you want to handle individually. If you want to move them all at once, just tap the blue «Start Backup» button to let the app deal with everything together. Google Drive for iOS provides an easy way to move your calendar, contacts, and photos data over to Android. This process may take a while and burn through a fair amount of data, so you’ll probably want to save it for a time when your phone can be plugged in, connected to a reliable Wi-Fi network, and not immediately needed for anything else. That being said, you can always hit pause and start things up again later, so don’t worry too much about the timing. All done? Excellent: Now just sign into your new Android phone with that same Google account. You should be able to find your calendar data in the Google Calendar app, your contacts data in the Google Contacts app, and all of your photos and videos in the Google Photos app. (Depending on your device, some or all of those apps may be preinstalled by default; if any of them is not, you can simply download and install it from the Google Play Store.) One exception to the rule: If your contacts or calendar data is connected to a Microsoft Exchange account, it won’t be moved over as part of this process. In that scenario, you’ll need to add your Exchange account into the Gmail app on your Android phone (see the next section for more detail), and your contacts and calendar info should then automatically show up in the appropriate apps. All right — ready to bring all of your email over to your shiny new smartphone? That migration will range from «ridiculously simple» to «relatively hassle-free,» depending on the specifics of your setup. Choose your own adventure: If you’re currently using Gmail: There’s nothing to do; just make sure you sign into your Android device with the same Google account associated with your Gmail address, and all your mail will automatically appear in the Android Gmail app and be waiting for you. If you have more than one Gmail address and want to be able to access them all on the phone, open the Gmail app’s settings and look for the «Add account» option, then follow the steps to add any additional Google accounts into the mix. If you’re currently using a webmail provider like Outlook.com, Hotmail, or Yahoo: Add the account into the Gmail app on your new phone, using the same steps described above but selecting the appropriate account option on the «Add account» screen. The Gmail app provides options for connecting different types of email accounts to your Android device. If you’re currently using Apple Mail: Once again, just add the account into the Gmail app on your Android phone. There’s a little more to it this time, though: After you select «Add account» within the app’s settings, tap the line labeled «Other,» type in your email address, and then select «Personal (IMAP).» When prompted, put in the various mail server settings provided on Apple’s support site. If you’re currently using Exchange: Same basic deal, but select the option for «Exchange and Office 365» in the «Add account» section of the Gmail app’s settings. The app will walk you through the rest of the setup procedure. Of course, you can also opt to use Microsoft’s official Outlook Android app if you’re accustomed to that program and want a consistent experience. One final option to consider: If you’re using any of the aforementioned non-Gmail account types and want to ditch your old address and move entirely into Gmail, you can import all of your old account’s email into Gmail by following the steps on this Google support page. You may also want to instruct your old mail service to forward all new messages to your Gmail address so you don’t miss any important missives from people who haven’t yet learned about your move. MessagingNot surprisingly, Apple’s iMessage system doesn’t play nicely with non-Apple platforms. But that doesn’t mean it’s impossible to leave; you just have to take the right set of steps to avoid missing-message misery. First, go into Settings on your iPhone, tap «Messages,» and then toggle «iMessage» to off. While you’re in Settings, you’ll probably want to look for the «FaceTime» option and toggle it to off, too, since you presumably won’t be active on that platform anymore. Second, open Apple’s «Deregister iMessage» web page and scroll down to the section labeled «No longer have your iPhone?» Put in your phone number, click the link to send a confirmation code, and then type the confirmation code you receive into the page. Both of these steps are critical; if you don’t complete them, Apple will likely intercept at least some of your incoming text messages, and you’ll never even know you missed ’em. Get your phone number out of the iMessage system or forever wonder if Apple is snatching your messages. If you want to keep all of your existing text messages and bring them over to your new phone, an app called iSMS2droid can get the job done. The process is a bit gnarly and involves manually backing up your iPhone to a computer, then finding specific files and transferring them onto your Android phone — but if you really need to save all your old messages, it’s about the best option you have. The silver lining is that once you’re on Android, keeping your messages synced and available on any device can be thought-free. Just be sure to pick a messaging app that automatically backs up and restores data from the get-go, and you’ll be fine as wine. FilesSo long, iCloud Drive — hello, Google Drive. The most direct way to get all your data off of Apple’s cloud storage service and onto Google’s is to install the desktop apps for both iCloud Drive and Google Drive on your Mac or Windows PC. Then, open Finder or File Explorer windows for both locations, select everything from iCloud Drive, and drag it over to Google Drive. Wait for the transfer to finish, and that’s it: Every one of your precious files is now available via Google Drive on Android (as well as on iOS and the web). The bad news: Any apps you’ve installed on your iPhone won’t automatically transfer over to Android, and any apps you’ve paid for on iOS will likely have to be purchased again. The good news: These days, most major productivity apps are readily available on both platforms. And once you’re all set up with Android, all of your apps and app data will automatically sync with Google’s servers and follow you to any future Android devices. Take a few minutes to go through Google’s Play Store — either on your Android phone or via a web browser on any computer — and search for the apps you want. If you install an app onto your phone and it asks you to sign in when you first open it, make sure to use the same username or email address you used on your iPhone so that any data tied to your account will carry over. After you’ve settled in, you may want to explore a bit further beyond the apps you already know. Unlike iOS, Android allows all sorts of clever tools for customizing and controlling the core user interface, and some of them can enhance your efficiency in pretty interesting ways. MusicThank your lucky stars, because bringing music over from iOS to Android is no longer the absolute nightmare it once was. There’s nothing to it if you use a streaming service like Spotify, Pandora, Google Play Music, or even — amazingly — Apple Music; just download the equivalent app from the Google Play Store, sign in, and your entire collection will be at your fingertips in seconds. If you have your own personal music collection, your best bet is to download the Mac- or Windows-based Music Manager app for Google Play Music. It can find and import any music stored on your computer as well as in iTunes, in formats ranging from MP3 to WMA, FLAC, and OGG — and even AAC files without digital rights management (DRM) protection. (Google has said this personal music storage feature will eventually be brought over to the newer YouTube Music service — which is expected to replace Google Play Music at some point in the foreseeable future — but we’ve seen no signs of that happening just yet.) The Music Manager app for Google Play Music can import songs from iTunes and elsewhere on your computer. The one lingering exception is any music purchased from iTunes prior to 2009, as such songs were encoded into a proprietary and DRM-protected version of the AAC format. Those files, by design, won’t be compatible with any other music service. If you want to pay $25 for a year of Apple’s iTunes Match service, you can «exchange» those files for non-DRM-protected versions that’ll work anywhere. Otherwise, your only real option is to employ the old-school workaround of burning those tracks to a CD (assuming your computer still has a CD burner, of course), then putting the CD back into the computer and ripping the songs into a standard unlocked format. That’ll result in lower-quality audio than you’d get purchasing the tunes directly from almost any music service nowadays, but it is what it is. Welcome to AndroidWell, wouldya look at that? You’ve done it! All your important info is now off your iPhone and on your new Android device, and you’re ready to start anew as a card-carrying Android phone owner. Before we bid adieu and send you scampering off on your new adventure, let’s take a moment to go over a few things of note as you learn your way around this wild new world. First, the getting-around basics: No matter where you are in Android, you can always swipe down once from the top of the screen to see any pending notifications and swipe down a second time to see the full Quick Settings panel. And speaking of notifications, Android makes them exceptionally easy to control — so learn the ins and outs of notification management and don’t let your phone’s alerts control you. Android’s notifications panel (left) and Quick Settings panel (right) are never more than a swipe away. (Their exact appearance may vary from one phone to the next.) If your device shipped with Android 10, you’ll find what’s sure to be a somewhat familiar-seeming gesture-driven system for getting around your phone: From anywhere in the operating system, you can flick your finger upward from the bottom of the screen to return to your home screen, swipe upward about an inch from the bottom of the screen and then stop to open the system Overview interface and browse through your recently used apps, and swipe toward the right on the bottom of the screen to flip back quickly through those same recently used apps. You can also swipe up diagonally from either lower corner of the screen to summon Google Assistant, and anytime you want to move back one step in whatever you’re doing, you can swipe inward from the left or right edge of your phone’s display. On phones with older Android versions — or those where gesture navigation isn’t enabled — you’ll find three buttons along the bottom of your screen that provide tap-friendly ways of accessing those same basic functions. In that arrangement, Assistant is typically accessible by pressing and holding the Home key. One more thing: You’ve no doubt seen some scary-seeming stories about Android security. Be aware: Most of that stuff is overly sensationalized and woefully misleading. Malware really isn’t a real-world issue on Android, and Google has its own multilayer security system in place to protect you from all sorts of threats — including the most realistic one of all: a lost phone. Craving even more practical tips and foundational knowledge? My, aren’t you a tenacious little monkey! Check out the following Computerworld guides to continue your Android optimization education: This article was originally published in August 2017 and most recently updated in February 2020. Contributing Editor JR Raphael serves up tasty morsels about the human side of technology. Hungry for more? Join him on Twitter or sign up for his weekly newsletter to get fresh tips and insight in your inbox every Friday. Источник  Введение Технологии развиваются с невероятной скоростью  Введение: Apple является одной из самых известных и  Кастомизация гаджетов Apple – это процесс изменения |


