- Use Switch Control to navigate your iPhone, iPad, or iPod touch
- Add a new switch
- Turn Switch Control on or off
- Use Switch Control
- Use item scanning
- Use point scanning
- Use Head Tracking on devices with a TrueDepth camera
- Use manual scanning
- Choose an action after you select an item
- Tap an item
- Use a gesture
- Exit the control menu
- Scroll up or down
- Press a button or flip a switch
- Change your settings and adjust how each switch works
- Fine tune Switch Control
- If your Mac doesn’t turn on
- Force your Mac to turn off and back on
- Revive the firmware, if applicable
- How to Turn On a Mac Computer
- How to manually update apps on your Apple device
- Update your apps manually
- How to manually update apps on your iPhone or iPad
- How to manually update apps on your Mac
- How to manually update apps on your Apple Watch
- Turn on or turn off automatic updates
- How to turn on or turn off automatic updates on your iPhone or iPad
- How to turn on or turn off automatic updates on your Mac
- How to turn on or turn off automatic updates on your Apple Watch
- How to turn on or turn off automatic updates on your Apple TV HD or 4K
Use Switch Control to navigate your iPhone, iPad, or iPod touch
Use Switch Control to control your iPhone, iPad, or iPod touch using a single switch or multiple switches.
With Switch Control, you can use switches to select, tap, or drag items, type, and even freehand draw. Just use a switch to select an item or location on the screen, then use the switch to choose an action.
Add a new switch
Before you add an external switch, you need to connect it to your device before it will show in the list of switches. You can use any of these options as a switch:
- External: Choose a Bluetooth switch or Made for iPhone switch.
- Screen: Tap the screen to use a switch or press and hold.
- Camera: Move your head to use the iPhone front-facing camera as a switch. You can use the camera as two switches: One when you move your head to the left, and the other when you move your head to the right.
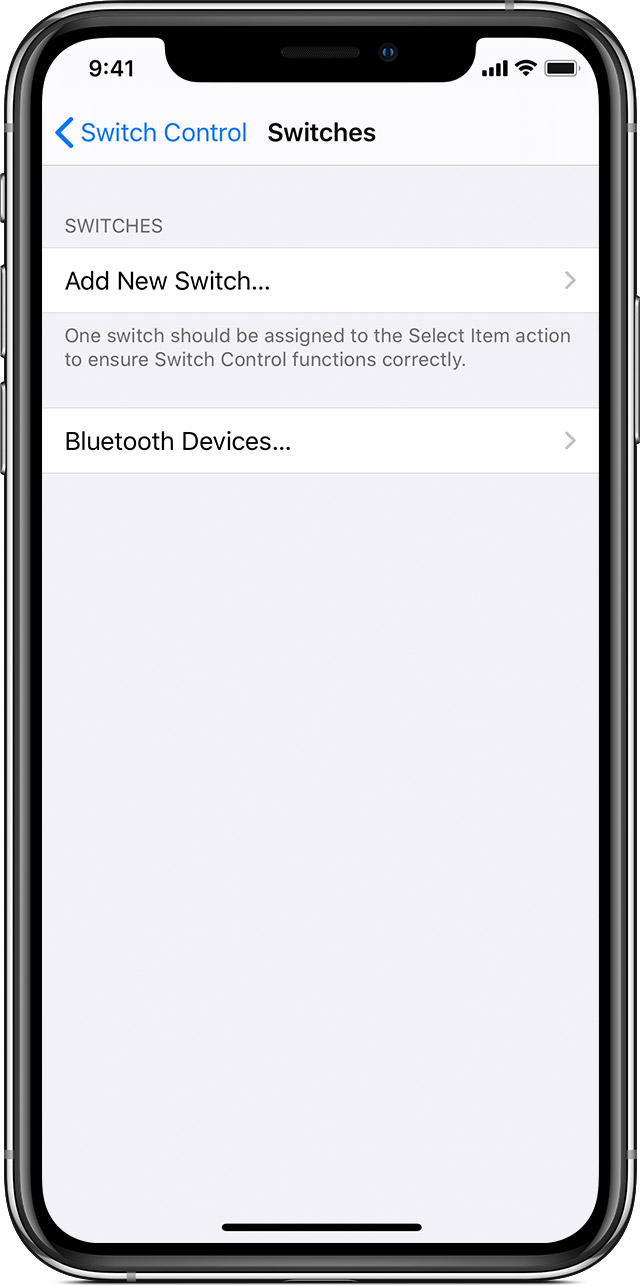
Add a switch and choose its action:
- Go to Settings > Accessibility > Switch Control > Switches.

- Tap Add New Switch and choose a source.
- Follow the onscreen steps to choose how you want the switch to work.
- Remember to turn on Switch Control, so you can use your new switch.

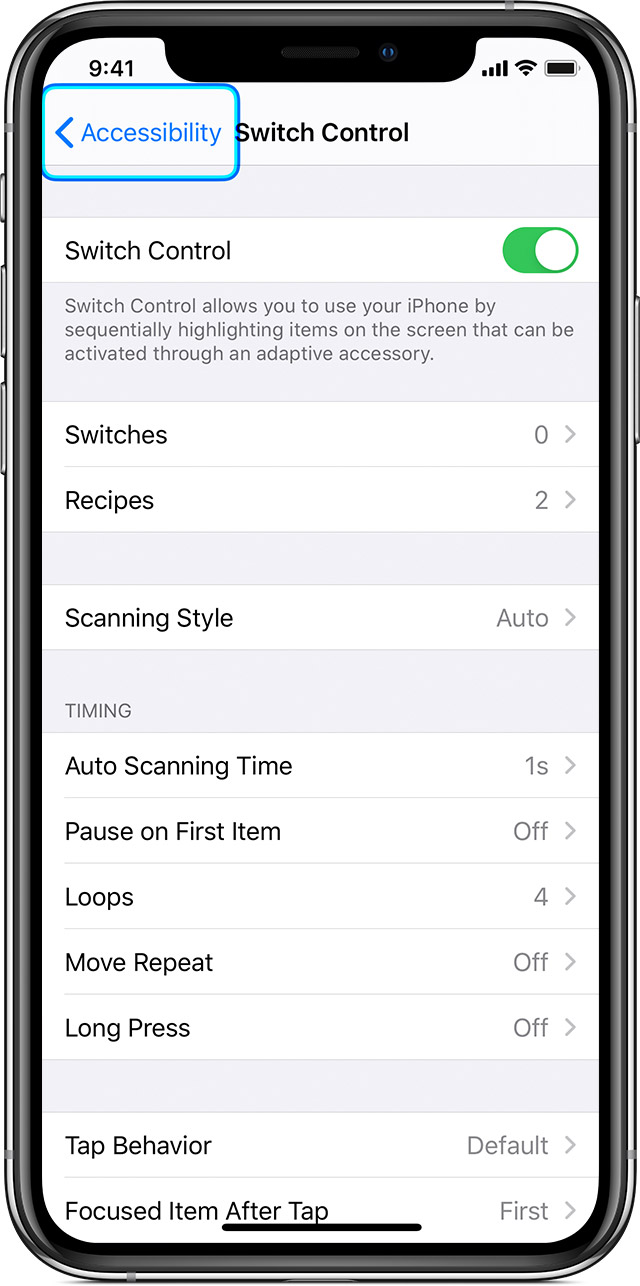
Turn Switch Control on or off
Go to Settings > Accessibility > Switch Control and turn the setting on or off. You can also triple-click the Home button or the Side button on certain models at any time to exit Switch Control.
Use Switch Control
There are three ways to select items on the screen: Item scanning, point scanning, and manual selection. Item scanning is the default when you turn on Switch Control.
After you select an item, a menu appears that lets you choose an action.
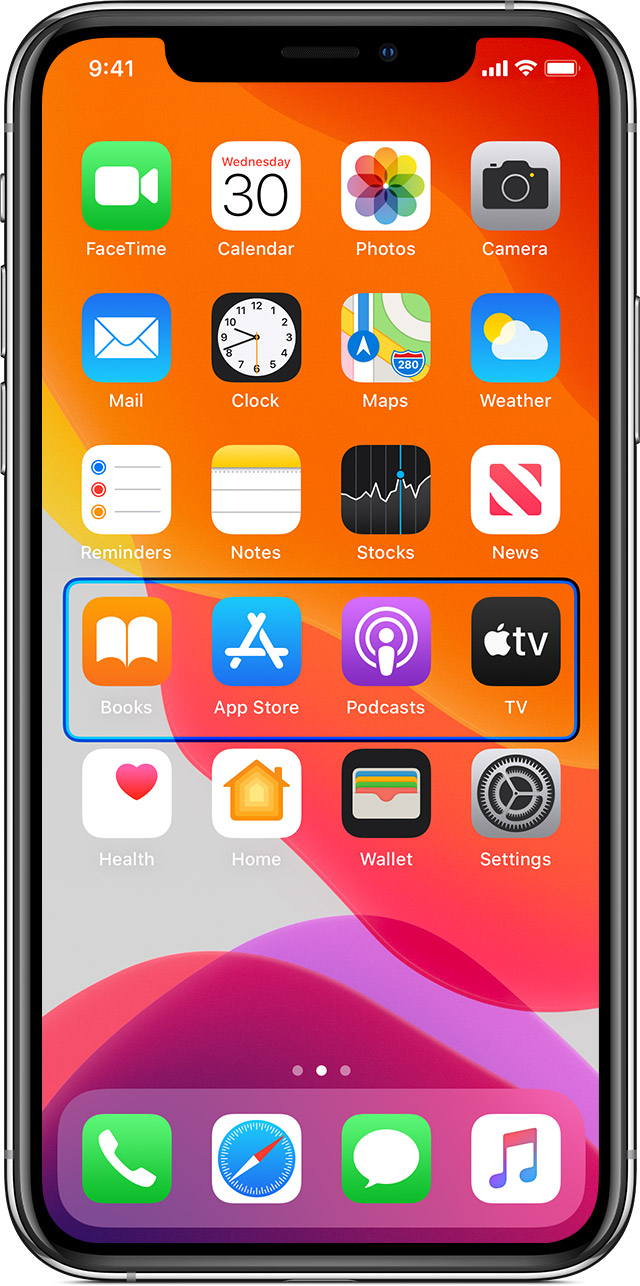
Use item scanning
Item scanning highlights items or groups on the screen one at a time. Here’s how to use item scanning:
- To select an item or a group, watch (or listen) as items are highlighted. While an item is highlighted, choose it with the switch that you set up as your Select Item switch. When you select a group, highlighting continues with the items in the group.
- To exit a group, use your switch when the dashed highlight around the group or item appears.
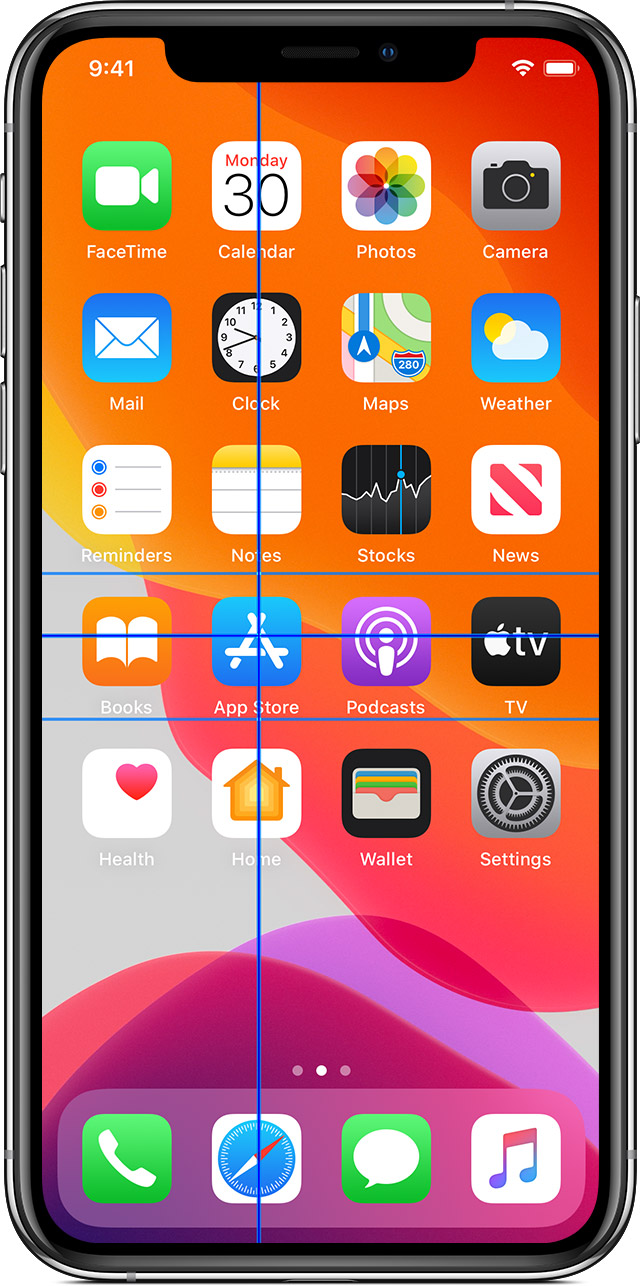
Use point scanning
Point scanning lets you select an item on the screen by pinpointing it with scanning crosshairs. To turn on point scanning:
- Use item scanning to select an item.
- Wait for the menu to appear.
- Select Point Mode. The wide vertical crosshairs appear when you close the menu.
To select an item with point scanning:
- Use your select switch to stop the wide vertical crosshairs. The fine vertical crosshair appears.
- Use your select switch again to stop the fine vertical crosshair. The fine scanning line will appear next.
- Repeat to stop and refine the vertical crosshairs.
To turn off point scanning:
- Use point scanning to select an item.
- Wait for the menu to appear.
- Select Item Mode.
Use Head Tracking on devices with a TrueDepth camera
Head Tracking uses the camera on your device to track the movement of your head to control a pointer on your screen, and tracks your facial movements to perform actions. You can use Head Tracking on devices with a front-facing TrueDepth camera. * Here’s how to turn it on:
- Go to Settings > Accessibility, and select Switch Control.
- Tap to turn on Head Tracking. From here, you can select certain actions, pointer speed, and your tracking mode.
The TrueDepth camera is supported on iPhone X and later, and iPad Pro 12-inch (3rd generation) and iPad Pro 11 inch.
Use manual scanning
If you use multiple switches, you can set up each switch to perform a specific action and customize how you select items. For example, instead of automatically scanning items, you can set up switches to move to the next or previous item on demand. If you just have one switch, keep using Auto Scanning.
To use manual scanning:
- Go to Settings > Accessibility > Switch Control.
- Tap Scanning Style, then select Manual Scanning.
Choose an action after you select an item
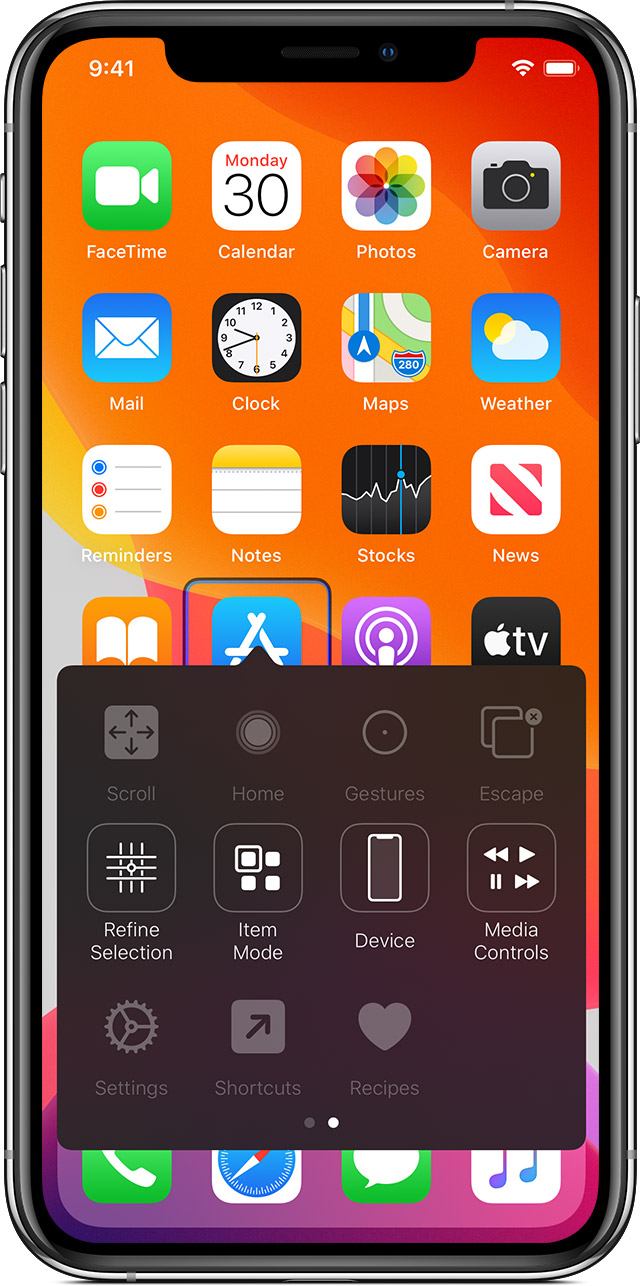
After you select an item with your switch, the possible actions for that item appear in a new menu. Select the dots at the bottom of the menu to see more options.
Tap an item
You can tap an item three different ways:
- Choose Tap from the menu that appears when you select the item.
- Turn on Auto Tap at Settings > Accessibility > Switch Control > Tap Behavior > Auto Tap. After you turn on Auto Tap, you can select an item and wait for the Auto Tap interval to finish.
- Set up a switch to perform the tap gesture at Settings > Accessibility > Switch Control > Switches.
Use a gesture
Select the gesture or action from the menu that appears when you select the item. If you turned on Auto Tap, use your switch within the Auto Tap interval, then select the gesture. If more than one page of actions is available, select the dots at the bottom of the menu to go to another page.
Exit the control menu
Use your switch while all the icons in the menu are dimmed.
Scroll up or down
Select any item on the screen, then choose Scroll from the menu.
Press a button or flip a switch
Select any item, select the dots at the bottom of the menu, then select Device from the menu that appears. You can use the menu to mimic these actions:
- Click the Home button.
- Double-click the Home button for multitasking.
- Open Notification Center or Control Center.
- Press the Sleep/Wake button to lock the device.
- Rotate the device.
- Flip the Mute switch.
- Press the volume buttons.
- Hold down the Home button to open Siri.
- Triple-click the Home button.
- Shake the device.
- Press Home and Sleep/Wake buttons simultaneously to take a screenshot.
Change your settings and adjust how each switch works
To change your settings, go to Settings > Accessibility > Switch Control. Then make your changes:
- Add switches and specify their function
- Choose, create, and edit recipes
- Choose a scanning style
- Adjust how rapidly items are scanned
- Turn off auto scanning (only if you’ve added a Move to Next Item switch)
- Set scanning to pause on the first item in a group
- Choose how many times to cycle through the screen before hiding Switch Control
- Choose a tap behavior and set the interval for performing a second switch action to show the control menu
- Choose whether Switch Control resumes scanning at an item you tap or from the beginning
- Set whether a movement action is repeated when you press and hold a switch, and how long to wait before repeating
- Add another action to a switch by pressing and holding the switch for a long duration
- Choose which items appear in menus and the order in which they appear
- Set whether and how long you need to hold a switch down before it’s accepted as a switch action
- Have Switch Control ignore accidental repeated switch triggers
- Adjust the point scanning speed
- Turn on sound effects or have items read aloud as they are scanned
- Choose what to include in the Switch Control menu
- Set whether items should be grouped while item scanning
- Make the selection cursor larger or a different color
- Save custom gestures to the control menu (in Gestures > Saved)
FaceTime isn’t available in all countries or regions.
Fine tune Switch Control
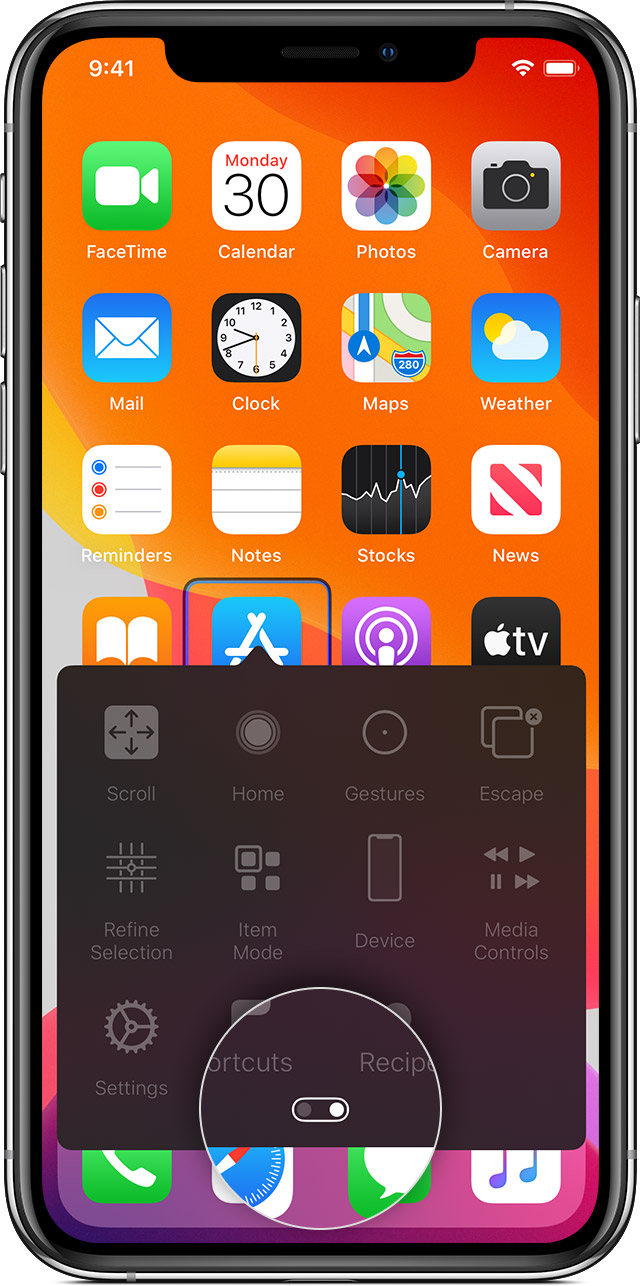
Choose Settings from the control menu to:
- Adjust scanning speed
- Change the location of the control menu
- Turn sound or speech accompaniment on or off
- Turn off groups to scan items one at a time
Источник
If your Mac doesn’t turn on
If your Mac doesn’t seem to turn on after you press the power button, follow these steps.
Force your Mac to turn off and back on
Your Mac might be turned on but appear to be turned off, even though it’s connected to AC power and a working display. Follow these steps.
- Press and hold the power button on your Mac for at least 10 seconds, then release. If your Mac is turned on, this forces it to turn off.
- If you see no change on your Mac, press and release the power button.
- If your Mac now turns on but stops at some other screen during startup, follow the steps for when your Mac doesn’t start up all the way.
Revive the firmware, if applicable
If you’re using a Mac with Apple silicon or a Mac with the Apple T2 Security Chip, in rare circumstances the firmware stored in your computer’s memory might need to be revived or restored. To do that, you need these items:
- Another Mac with macOS Catalina 10.15.6 or later and the latest Apple Configurator app, available free of charge from the App Store.
- A USB-C to USB-C cable or USB-A to USB-C cable to connect the computers to each other. The cable must support both power and data. Thunderbolt 3 cables aren’t supported.
If you have those items, follow the appropriate steps:
If your Mac still doesn’t turn on, you need help with these instructions, or you don’t have the items you need, please contact Apple Support.
Источник
How to Turn On a Mac Computer
This article was co-authored by Chiara Corsaro and by wikiHow staff writer, Nicole Levine. Chiara Corsaro is the General Manager and Apple Certified Mac & iOS Technician for macVolks, Inc., an Apple Authorized Service Provider located in the San Francisco Bay Area. macVolks, Inc. was founded in 1990, is accredited by the Better Business Bureau (BBB) with an A+ rating, and is part of the Apple Consultants Network (ACN).
This article has been viewed 504,903 times.
If you have a Mac laptop, you can usually press the power button at the top-right corner of the keyboard to turn it on. On a Mac desktop, just push the power button on the computer itself. Well, that sounds easy enough, but what if your Mac still won’t turn on? This wikiHow teaches you the proper way to turn on your Mac, as well as how to deal with some of the most common start-up problems.

\u00a9 2021 wikiHow, Inc. All rights reserved. wikiHow, Inc. is the copyright holder of this image under U.S. and international copyright laws. This image is not licensed under the Creative Commons license applied to text content and some other images posted to the wikiHow website. This image may not be used by other entities without the express written consent of wikiHow, Inc.
\n

I edited this screenshot of a Windows icon.\n
Источник
How to manually update apps on your Apple device
You can turn off automatic updates and update apps manually. Or you can turn on automatic updates so that you don’t need to manually update each app.
Update your apps manually
On your iPhone and iPad, apps that you download from the App Store are automatically updated by default. But if there’s an issue, you can update an app manually.
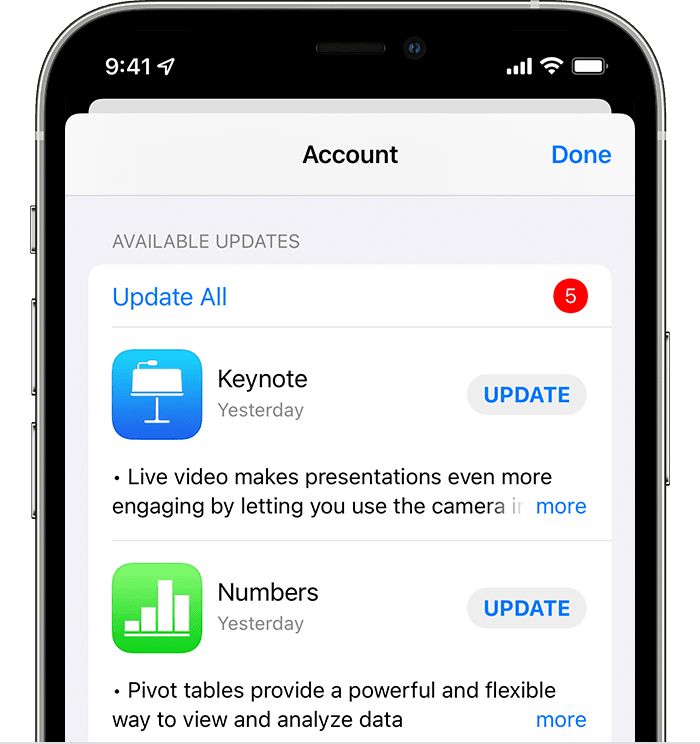
How to manually update apps on your iPhone or iPad
- Open the App Store.
- Tap your profile icon at the top of the screen.
- Scroll to see pending updates and release notes. Tap Update next to an app to update only that app, or tap Update All.
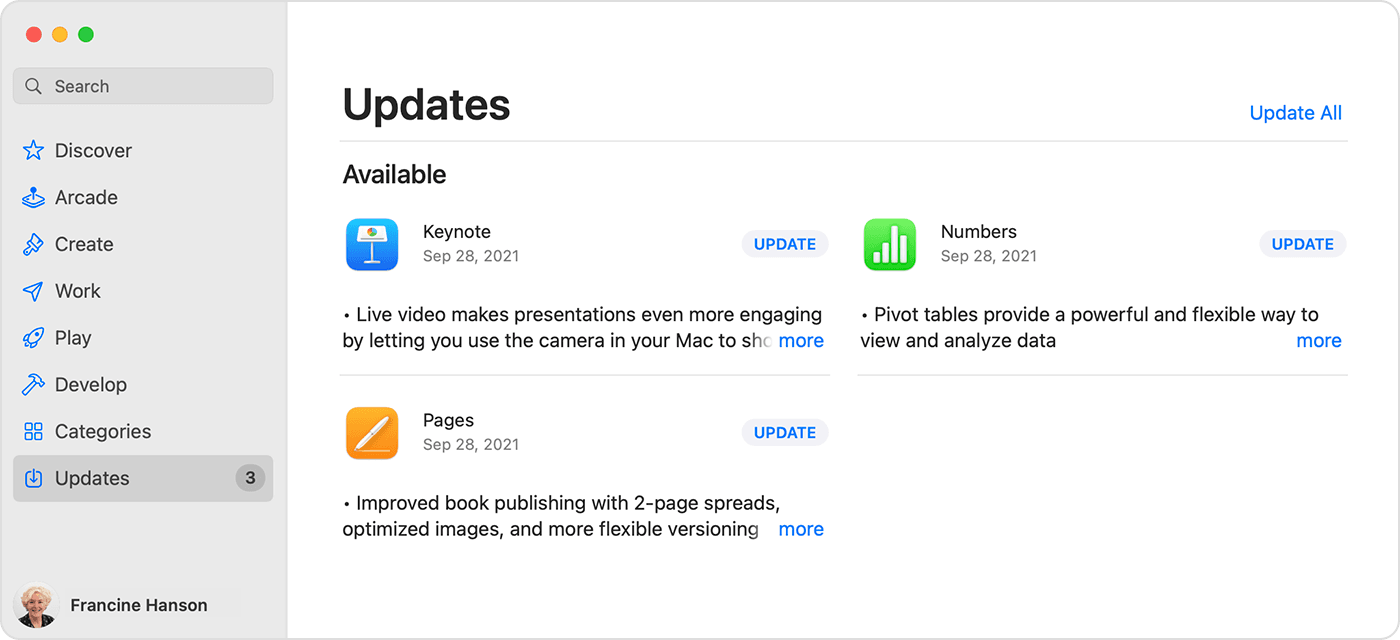
How to manually update apps on your Mac
- Open the App Store.
- In the sidebar, click Updates.
- Click Update next to an app to update only that app, or click Update All.
If you didn’t get the app from the App Store on your Mac, contact the app developer to get help with updates.
How to manually update apps on your Apple Watch
- Open the App Store and scroll down to the bottom.
- Tap Account.
- Tap Updates.
- Tap Update next to an app to update only that app, or tap Update All.
Turn on or turn off automatic updates
If you prefer to manually update all your apps, turn off automatic updates. When you do this, you receive notifications from the App Store each time an update for one of your apps is released.
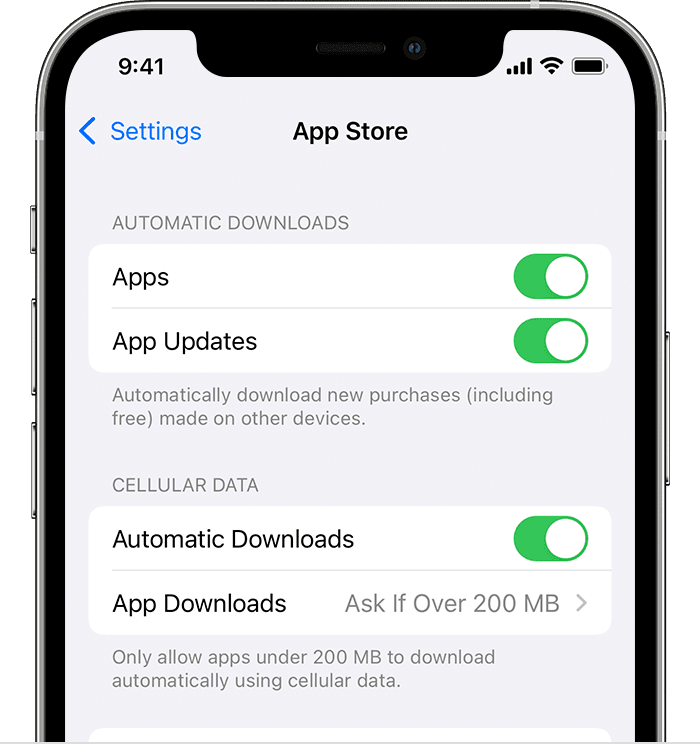
How to turn on or turn off automatic updates on your iPhone or iPad
- Go to Settings.
- Tap App Store.
- Turn on or turn off App Updates.
How to turn on or turn off automatic updates on your Mac
- Open the App Store.
- From the menu bar at the top of the screen, choose App Store > Preferences.
- Select or deselect Automatic Updates.
How to turn on or turn off automatic updates on your Apple Watch
- Go to Settings > App Store.
- Turn on or turn off Automatic Updates.
You can also open the Watch app on your iPhone, scroll to App Store and tap it, then turn on or turn off Automatic Updates.
How to turn on or turn off automatic updates on your Apple TV HD or 4K
- Go to Settings > Apps.
- Select or deselect Automatically Update Apps.
Information about products not manufactured by Apple, or independent websites not controlled or tested by Apple, is provided without recommendation or endorsement. Apple assumes no responsibility with regard to the selection, performance, or use of third-party websites or products. Apple makes no representations regarding third-party website accuracy or reliability. Contact the vendor for additional information.
Источник


