- 3 Methods To Unroot An Android Device
- Method 1: Using ES File Explorer
- Method 2: Using SuperSU App
- Method 3: Using KingoRoot App on Windows PC
- How to Unroot Android Devices Manually
- Unroot Android Devices Manually
- Method 1: Using Root File Browser
- Method 2: Unrooting Using Apps
- Method 3: From within SuperSU App
- Method 4: By Installing OTA Update
- Method 5: By Installing Stock Firmware
- How to Unroot your Android phone
- What is Unrooting?
- How to unroot
- Unroot by uninstalling Magisk
- Unroot by flashing the original boot image
- Unroot by installing an OTA update
- Unroot by installing the stock firmware
- Verification
3 Methods To Unroot An Android Device
Download and try Outbyte PC Repair right now to see what it can do for your Windows.
Rooting an Android phone allows users to unlock their device’s full potential. Even though this task does come with a few risks, many users still choose to root their devices, as doing so lets them do things and apply changes on their devices that an unrooted device will otherwise not allow. Rooting an Android nowadays has also been made more accessible, thanks to the growing number of resources and rooting apps.
But what if your device begins to exhibit problems after rooting itself? What if there’s an app that you really want or need to use but it requires a non-rooted device? What if Android simply refuses to work after you root it? What if you need to have your phone serviced under warranty? What if you just want to make your device secure again? Now, this is where learning how to unroot Android comes in handy. In this post, we’ll share with you three proven methods for Android unrooting.
Method 1: Using ES File Explorer
Since root access is just a bunch of files that work together to bypass the restrictions imposed by Google and your device’s manufacturer on the OS, getting rid of the files will basically get rid of the root, too. To do this, you’ll need a file manager with root access.

ES File Explorer is one of the most popular file management apps in Google Play Store today, with over 5 million downloads. This app works on both rooted and unrooted Android devices. Now, let’s get on with the unrooting.
- Download and install ES File Explorer.
- Launch the app.
- Tap the Menu button, then scroll down to Tools.
- Turn on Root Explorer.
- Grant the root privileges permissions when asked.
- On the main screen, access your device’s main drive or the root folder. It will most likely have a / at the beginning.
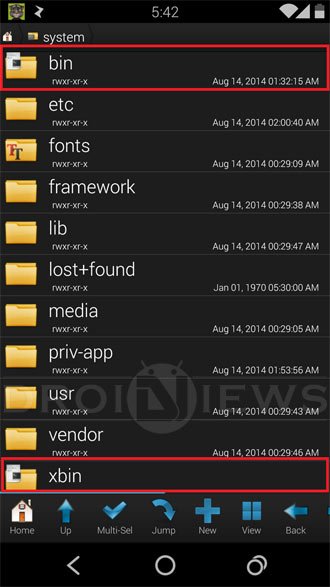
- Inside the root folder, locate the folder ‘system,’ then ‘bin.’
- Look for ‘busybox’ and ‘su.’ Delete them. (If you can’t find the folders, go back to the system folder, then look for ‘xbin’ and delete that. You might also find there ‘busybox’ and ‘su.’ Delete them.)
- Navigate back to the system folder or root folder (/). Open the folder named ‘app.’
- Look for ‘superuser.apk.’ Delete it.
- Restart the device and enjoy your newly unrooted Android!
Method 2: Using SuperSU App

SuperSU is a superuser access management tool specially made for rooted Android devices. The app allows for advanced management of superuser access rights for all the apps that require root on your device. Among its features is the Full Unroot option. Here’s how to unroot phone with SuperSU:
- Download and install SuperSU if you haven’t yet.
- Launch the app, then go to the settings tab.
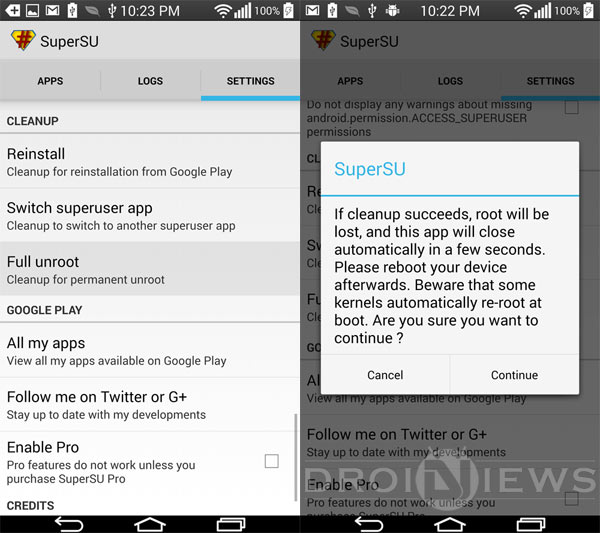
- Scroll down to ‘Cleanup’ where you will find ‘Full unroot.’ Tap it.
- A window will appear saying that when the cleanup succeeds, the root will be lost and the app itself will close. If you agree with the conditions, tap Continue.
- Restart your device to finish the unrooting process.
Method 3: Using KingoRoot App on Windows PC

KingoRoot has been known for its one-click rooting feature. But aside from its rooting function, it’s also commended for its one-click unrooting feature. Let’s get started:
- Install KingoRoot on your Windows PC. You can get the program here.
- Make sure USB Debugging mode is enabled on your Android device.
- After installation, launch KingoRoot.
- Connect your device via USB cable. KingoRoot should now detect your device.
- You will see two options: Remove Root and Root Again. Click Remove Root.
- Wait for the unrooting to finish. You should see the progress on the app’s primary interface.
- When the process is done, you’ll get a message: Remove Root Succeed.
You probably didn’t expect that unrooting an Android device could be this easy, did you? We’re pretty sure that at least one of the methods above will help you get your Android back to its original state.
One more thing: after you’ve unrooted your device, we suggest that you start taking better care of it. Installing Android cleaning tool can help you with that. This app is designed to get rid of junk files and boost its RAM so that you can do more with your device even if it’s no longer rooted.
Источник
How to Unroot Android Devices Manually

The true charm of Android lies in its power of customization. While most other mobile platforms are closed to third-party modification of system files, Android is open to all kinds of custom development activities. Having rooted your Android device you can modify its default settings, codes and graphics to get faster performance, better battery life, and UI customization. Let’s see how we can unroot Android devices manually using SuperSU app.
There is a large group of Android users who refrain from rooting their devices for fear of losing the warranty and putting it into risk in the procedure. Then there are others who find it hard to keep an unrooted device. Having once enjoyed the privileges of root access, one cannot live without it.
However, there are certain circumstances when you might consider unrooting your phone, especially if you want to claim the warranty and, in some cases, to receive OTA updates. Whatever the case, if you want to unroot your Android device here is how you can do it.
The most popular method used for unrooting Android devices is flashing the stock firmware not because it’s easy, but because people are hardly aware of other easier methods. Restoring a device to stock is certainly not an easy task and if you do not have a custom recovery installed, you do not need to download bulky firmware packages and make a lot of preparations.
Unroot Android Devices Manually
Method 1: Using Root File Browser
- Download and install a root file manager app from the Play Store. We recommend Root Browser: [googleplay url=”https://play.google.com/store/apps/details?id=com.jrummy.root.browserfree”]
- Look for /system/ folder and open /bin/

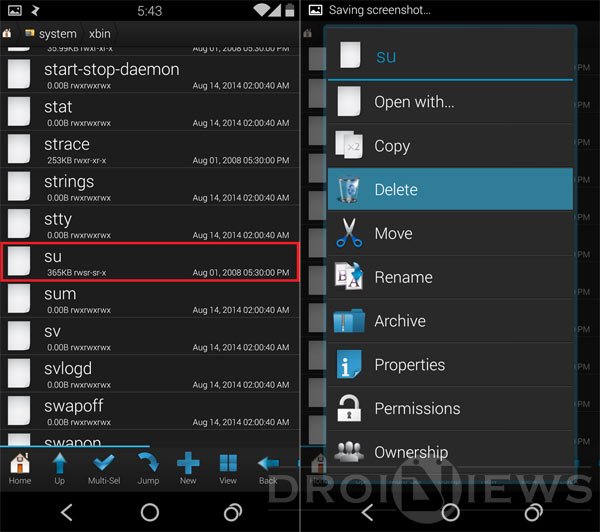
- Now look for a file called su, press and hold it and select the Delete option. If you do not find su file here, skip to the next step (I did not find this file on devices like LG G3 and HTC One M8 but it was present on Nexus 5.
- Then open /system/xbin/ folder and delete su file from here too.
- Having deleted that file open /system/app/ folder, look for Superuser.apk and delete it.
- Now exit Root Browser and reboot your device.
Done! We just hope you found the above method easy but if that does not work for you, try something else from below.
Method 2: Unrooting Using Apps
There is another easier method for unrooting your Android phone or tablet. It works on the device running Android 4.2.2 or older. Just download the Universal Unroot or Ginger Unroot app from the Google Play store and run the app:
[googleplay url=”https://play.google.com/store/apps/details?id=com.universal.unroot”] [googleplay url=”https://play.google.com/store/apps/details?id=com.darkslide.unroot”]
Method 3: From within SuperSU App
If you have not installed a custom recovery on your device and want to unroot it easily, you can do it from within the SuperSU app settings itself.
- Just open SuperSU app on your device.
- Tap Settings tab.
- Scroll down to Full unroot option and tap it.
- SuperSU will prompt you if you really want to continue with unrooting your device. Tap Continue.
- Now reboot your device and when it boots up, uninstall SuperSU app by selecting Uninstall option on the SuperSU app page on Google Play Store.
Your phone or tablet should now be unrooted. Enjoy!
Method 4: By Installing OTA Update
If you are able to get a software update notification from your device OEM while being rooted, just accept the OTA and install it. When the new software is installed, your device will lose root privilege. You can uninstall SuperSU/Superuser app after the software update is done. Please make sure not to take official OTA updates only if your device has a custom recovery like CWM or TWRP. To install the OTA software update successfully, you must have stock recovery.
If you have downloaded the stock OTA update, here’s how you can check if your phone has been unrooted or not. It works only on rooted phones with stock recovery. You must have ADB and Fastboot on your computer to perform the commands.
- Reboot your device.
- Check for system updates from Settings> About device> Software update, and download the update if it’s available.
- Wait until your device reboots.
- Now reboot your phone into the recovery mode.
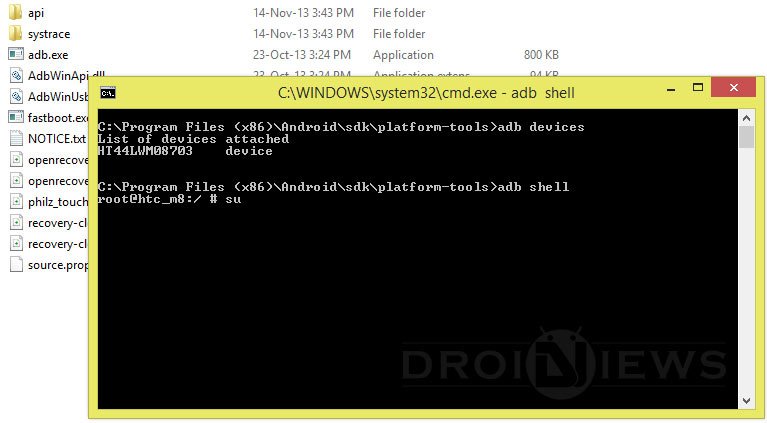
- Open a command window
- Type the following command and hit the Enter key:
- You will see “#”. Now type this:
- If you get “permission denied” or something like that as a result, your device has been successfully unrooted.
- Your next step should be to uninstall the SuperUser app from your phone.
Method 5: By Installing Stock Firmware
The most popular way to unroot Android devices is flashing the stock/official firmware. This method works even on devices that have a custom recovery or kernel installed on them. Since firmware is a full package containing all system partitions, it does not matter whether your phone has CWM/TWP or even a custom ROM on it. We have a good number of tutorials that will help you restore Android devices to the stock firmware on your device.
Источник
How to Unroot your Android phone
Do you want to root your Android smartphone so you can unleash the true power of your device? Thankfully, the process isn’t as difficult as you may think. But what happens when things change and you find you just don’t use root applications as much as you thought you would? If you’re in a situation like this, unrooting your phone actually makes sense. In this tutorial, you’ll learn how to unroot any Android device.
Table of Contents:
What is Unrooting?
Unrooting an Android device is the process of retracting all the elevated permissions and access as a root user. Since rooting usually involves modifying the boot partition, you might just want to unroot to take an over-the-air update because it would otherwise fail on a tampered system. Or perhaps you’re trying to sell your device, so you need to restore it to factory settings.
Whatever your reasons are, removing root access isn’t that difficult – as long as you follow the correct procedure.
How to unroot
Like rooting, there are a few different methods of unrooting your phone, and which one you choose depends on the maker of the target device, the version of Android installed on the device, and of course, the method of rooting.
Unroot by uninstalling Magisk
Since there aren’t many alternatives to Magisk when it comes to rooting, your only real option for unrooting is to remove any traces of Magisk from your device. Thankfully, you have two methods you can pick from.
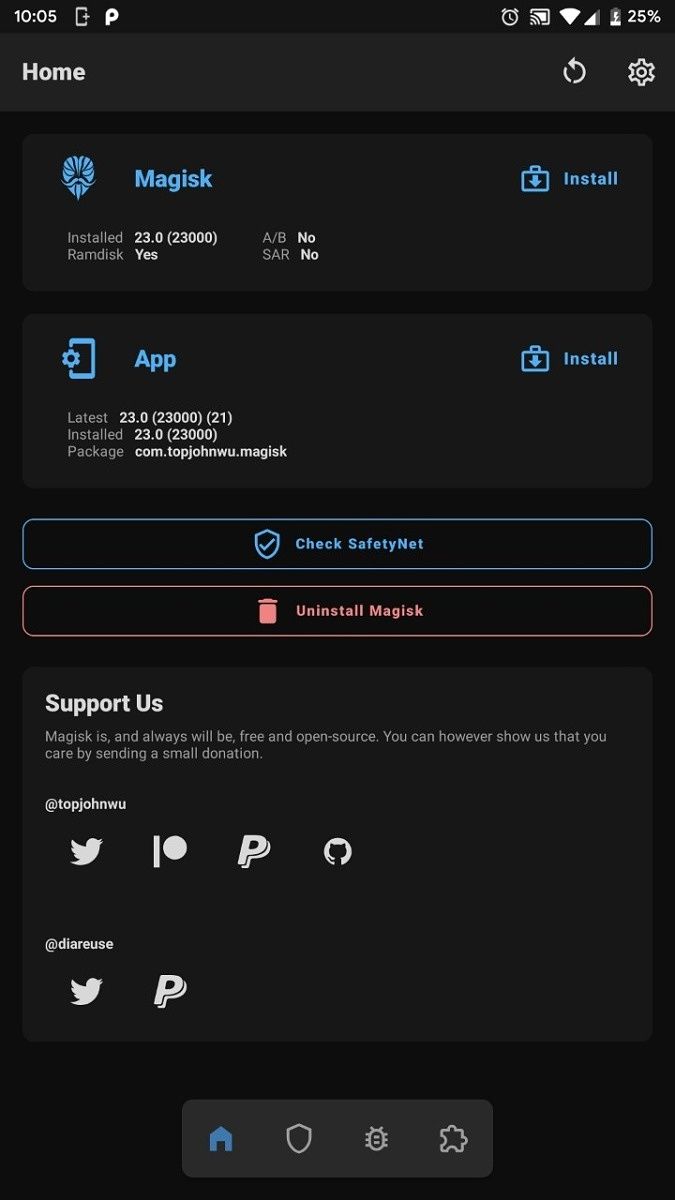
1. Uninstall Magisk from the app
To fully unroot a device originally rooted using Magisk, the most straightforward way is to opt for the built-in “Uninstall” option available on the application itself. After tapping the button, you’ll be greeted with the option to restore the stock partition images and completely uninstall Magisk. To remove Magisk and all modules, tap on “COMPLETE UNINSTALL”.
The Magisk app will run the necessary scripts to remove Magisk from your phone and restore your device’s original boot image. As soon as the process ends, the phone will automatically reboot and you’re finished.

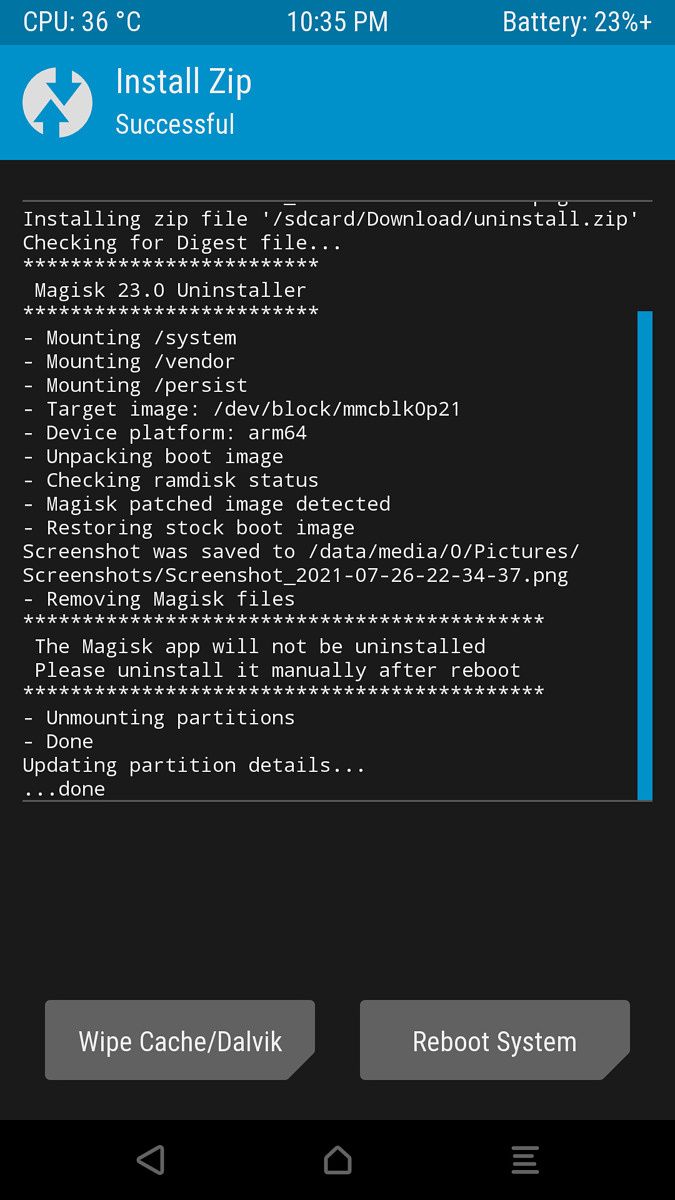
2. Uninstall Magisk from TWRP
In case you can’t boot to Android, but have access to a custom recovery like TWRP, you can still uninstall Magisk. To do so, rename the Magisk APK to uninstall.zip , boot to recovery mode, and flash it like any other ordinary flashable zip.

Unroot by flashing the original boot image
Magisk always creates a backup of the stock boot image before patching it. As a result, you can use the Magisk app to restore the backup as shown below. You may need to manually reboot the phone in order for the changes to take effect.
In case you have access to the factory firmware of the exact build installed on your phone prior to rooting, you can also extract the stock boot image and flash it manually to regain the unrooted status. On most devices, you may end up with a file named boot.img which can be flashed using the regular Fastboot utility. However, OEMs like Samsung need special utilities to flash the factory firmware — the details of which are out of the scope of this article.
Unroot by installing an OTA update
Another method to unroot is to install an official OTA update. Google, OnePlus, Xiaomi, and many other Android OEMs offer official download repositories that contain full (i.e. non-incremental) OTA ZIP packages. This is also true for most custom ROMs such as LineageOS. As the full update package can always rewrite the underlying firmware — no matter how far modified it is — end users can utilize this method to restore the stock partition images and get unrooted.
You just have to pick the appropriate OTA ZIP file for your device and install it through the built-in update installer of the OS or using the recovery mode. This is probably the best way to restore your phone if you don’t like mucking around in the Magisk app.
Unroot by installing the stock firmware
While the aforementioned methods of unrooting should theoretically work just fine on devices that have been rooted using the systemless method, it’s still good to know what to do in a situation where restoring the stock boot image may not be able to fully unroot the device. Perhaps you caught up with a bootloop, or you messed up your Wi-Fi connectivity by restoring a wrong boot image?
The good news is reinstalling the stock firmware should do the trick. You’ll need to download the factory image for your device. For Pixel devices, this is provided by Google. Other device images should be provided by their manufacturer. Then use the OEM-described method to install the device software and start from scratch. Keep in mind you will lose your personal data if you follow this route without taking an off-site backup beforehand.
Verification
At this point, you can double-check the root status of the device by using the Magisk app. If its status comes back as not installed, then you’re done!

You can also use an app named Root Checker to do the job. Once installed, open the app and check the status section under the “VERIFY ROOT” tab. You should see something like the following if you’re unrooted.
Источник


