- Transfer photos and videos from your iPhone, iPad, or iPod touch
- Use iCloud Photos
- Import to your Mac
- Import to your Windows PC
- How to Move Photos to iCloud
- About iCloud
- Part 1. How to Move Photos to iCloud from iPhone, iPad, and iPod
- Part 2. How to Clear iPhone Storage Without iCloud
- Part 3. Bonus Tips
- Tip 1. How to Upload Photos to iCloud from Mac/PC
- Tip 2. How to Access iCloud Photos
- Tip 3. How to Download iCloud Photos to PC
- The Bottom Line
- Set up and use iCloud Photos
- How iCloud Photos works
- Turn on iCloud Photos
- On your iPhone, iPad, or iPod touch
- On your Mac
- On Apple TV 4K and Apple TV HD
- On your Windows PC
- What happens when you edit or delete photos
- Edits show up on all of your devices
- Photos delete from all of your devices
- Download copies of your photos and videos
- Download your photos and videos from iCloud.com
- Download photos and videos from your iPhone, iPad, or iPod touch
- Download photos and videos from your Mac
- Make sure that you have enough storage
- If you need more iCloud storage
- If you need more device storage
- On your iPhone, iPad or iPod touch
- On your Mac
- Pause library uploads to iCloud
- Learn more
Transfer photos and videos from your iPhone, iPad, or iPod touch
Learn how to transfer photos and videos from your iPhone, iPad, or iPod touch to your Mac or PC. You can also make your photos available on all your devices with iCloud Photos.
Use iCloud Photos
iCloud Photos keeps your photos and videos safe, up to date, and available automatically on all of your Apple devices, on iCloud.com, and even your PC. When you use iCloud Photos, you don’t need to import photos from one iCloud device to another. iCloud Photos always uploads and stores your original, full-resolution photos. You can keep full-resolution originals on each of your devices, or save space with device-optimized versions instead. Either way, you can download your originals whenever you need them. Any organizational changes or edits you make are always kept up to date across all your Apple devices. Learn how to set up and use iCloud Photos.
The photos and videos that you keep in iCloud Photos use your iCloud storage. Before you turn on iCloud Photos, make sure that you have enough space in iCloud to store your entire collection. You can see how much space you need and then upgrade your storage plan if necessary.
Import to your Mac
You can use the Photos app to import photos from your iPhone, iPad, or iPod touch to your Mac.
- Connect your iPhone, iPad, or iPod touch to your Mac with a USB cable.
- Open the Photos app on your computer.
- The Photos app shows an Import screen with all the photos and videos that are on your connected device. If the Import screen doesn’t automatically appear, click the device’s name in the Photos sidebar.
- If asked, unlock your iOS or iPadOS device using your passcode. If you see a prompt on your iOS or iPadOS device asking you to Trust This Computer, tap Trust to continue.
- Choose where you want to import your photos. Next to «Import to,» you can choose an existing album or create a new one.
- Select the photos you want to import and click Import Selected, or click Import All New Photos.

- Wait for the process to finish, then disconnect your device from your Mac.
Import to your Windows PC
You can import photos to your PC by connecting your device to your computer and using the Windows Photos app:
- Make sure that you have the latest version of iTunes on your PC. Importing photos to your PC requires iTunes 12.5.1 or later.
- Connect your iPhone, iPad, or iPod touch to your PC with a USB cable.
- If asked, unlock your iOS or iPadOS device using your passcode.
- If you see a prompt on your iOS or iPadOS device asking you to Trust This Computer, tap Trust or Allow to continue.
If you have iCloud Photos turned on, you need to download the original, full resolution versions of your photos to your iPhone before you import to your PC. Find out how.
When you import videos from your iOS or iPadOS device to your PC, some might be rotated incorrectly in the Windows Photos app. You can add these videos to iTunes to play them in the correct orientation.
If you’re having trouble importing photos from your iOS or iPadOS device to Windows 10, try these steps:
- On your iOS or iPadOS device, open the Settings app. Tap Camera, then tap Formats.
- Tap Most Compatible. From now on, your camera will create photos and videos in JPEG and H.264 formats.
Источник
How to Move Photos to iCloud
About iCloud
iCloud is a cloud-based file sharing service from Apple. ItВ is built into every Apple device, like iPhone, iPad, iPod, Mac, Apple Watch, and Apple TV, and is also available on PC via iCloud.com or iCloud for Windows. iCloud allows you to share files like photos, videos, contacts, documents, and more between your iCloud devices that use the same Apple ID and enables you to make a backup of your precious files in the cloud storage.
Thus, it’s a good choice to use iCloud to share images and videos across your devices or make a backup of your precious iPhone photos. If that’s what you want, learn how to upload photos from your iPhone to iCloud from the steps below.
Part 1. How to Move Photos to iCloud from iPhone, iPad, and iPod
«How to move photos from iPhone to iCloud storage?»
Acturally, this question is quite easy to answer. By turning on iCloud Photos on your device, the pictures will be moved to iCloud automatically under a Wi-Fi connection.
Before you start, you should know that, to store all photos from your iPhone to iCloud successfully, you need to make sure there is enough iCloud storage to save the items. Apple provides 5GB of iCloud space for free. If you need extra storage, you need to pay for it.
To upload photos to iCloud from an iPhone, iPad, or iPod:
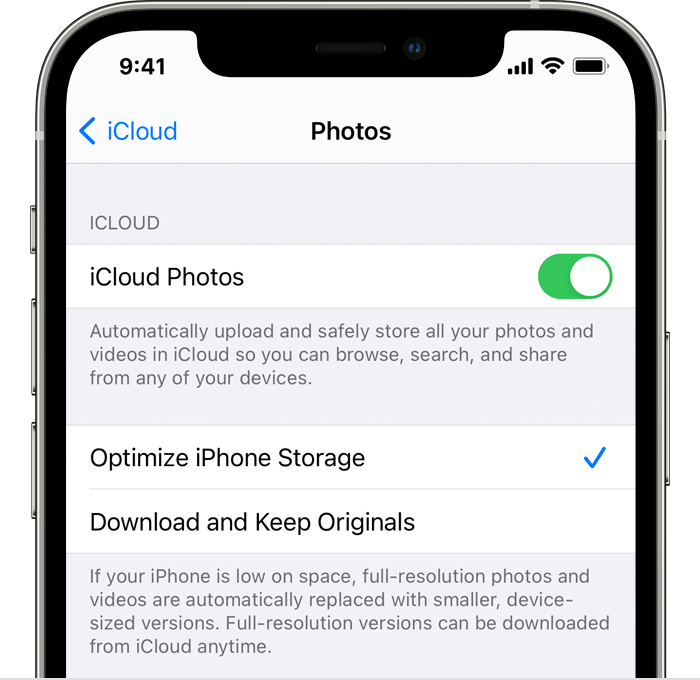
Step 1. Go to «Settings» > [your name] > «iCloud».
Step 2. Tap the «Photos» option and enable «iCloud Photos». (Enable «iCloud Photo Library» in earlier iOS versions.)
Step 3. Depending on your need, select «Optimize iPhone Storage» or «Download and Keep Originals».
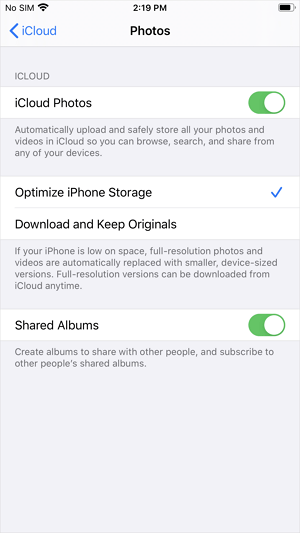
With iCloud Photos turned on, your iPhone photos will be saved to iCloud automatically under Wi-Fi. Easy? Via a few simple clicks, you can move photos from iPhone to iCloud storage successfully.
However, you should know that the cloud-service will move all photos to iCloud and you can’t upload photos selectively from your iOS device. Besides, if you delete photos or videos on your mobile device, the items will disappear in Cloud, too. Because iCloud works by syncing. Thus, if you upload photos to iCloud to free up your iPhone storage, it won’t help.В
Part 2. How to Clear iPhone Storage Without iCloud
Then how to free up your iPhone storage without losing your precious photos, videos, or other types of content. One workable way is to transfer these files from your iPhone to computer first and then remove them from your iPhone. By doing so, you can get much more free space on your iPhone without data loss.
To transfer files from iPhone to computer, be it a Mac or PC, you will need iPhone transfer software — EaseUS MobiMover. It allows you to:
- Access and view iPhone files on PC/Mac
- Transfer files between an iPhone/iPad/iPod and a computer
- Transfer files from one iDevice to another
Besides, since it also serves the function of a video downloader, you can apply it to download YouTube videos to iPhone or save Facebook videos to computer.
To transfer photos from iPhone to computer:
Step 1. Connect your iPhone to your computer running Windows 7 and later or Mac OS X 10.7 and later. Launch EaseUS MobiMover, choose «Phone to PC» on the main screen and click the «Next» button to move on.В

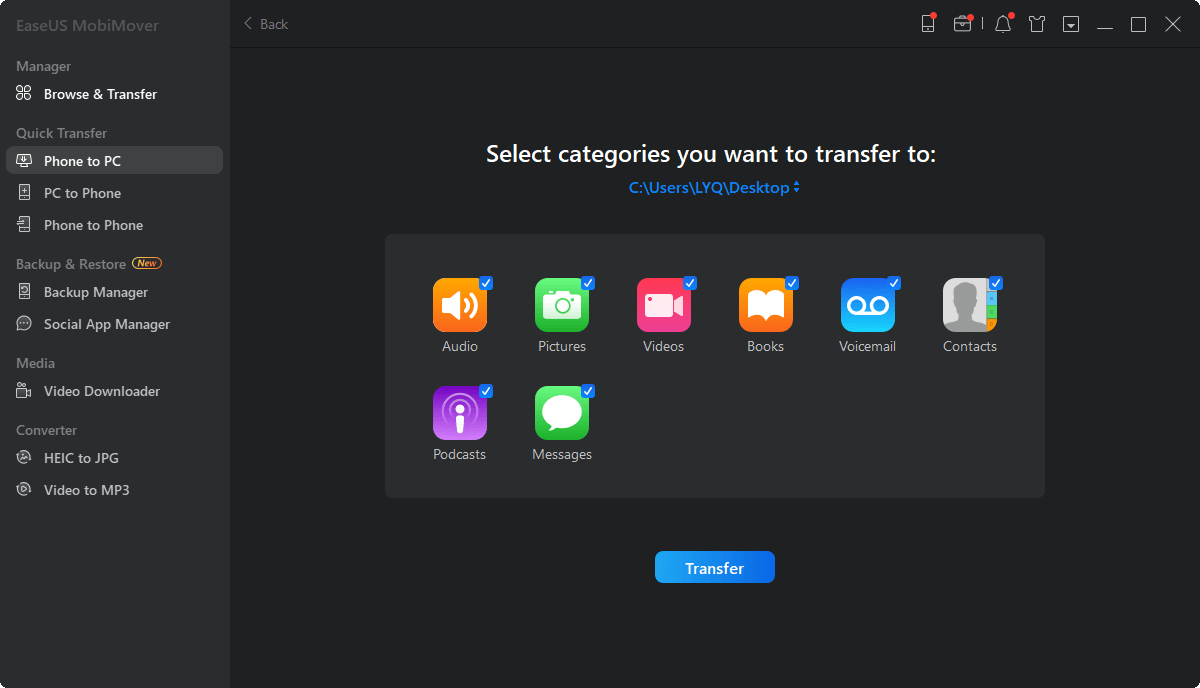
Step 2. Select the «Pictures» category as you want to copy from your iPhone to your computer. It’s the right choice for you to transfer other supported file types together with photos from your iPhone to the computer to make a backup.В
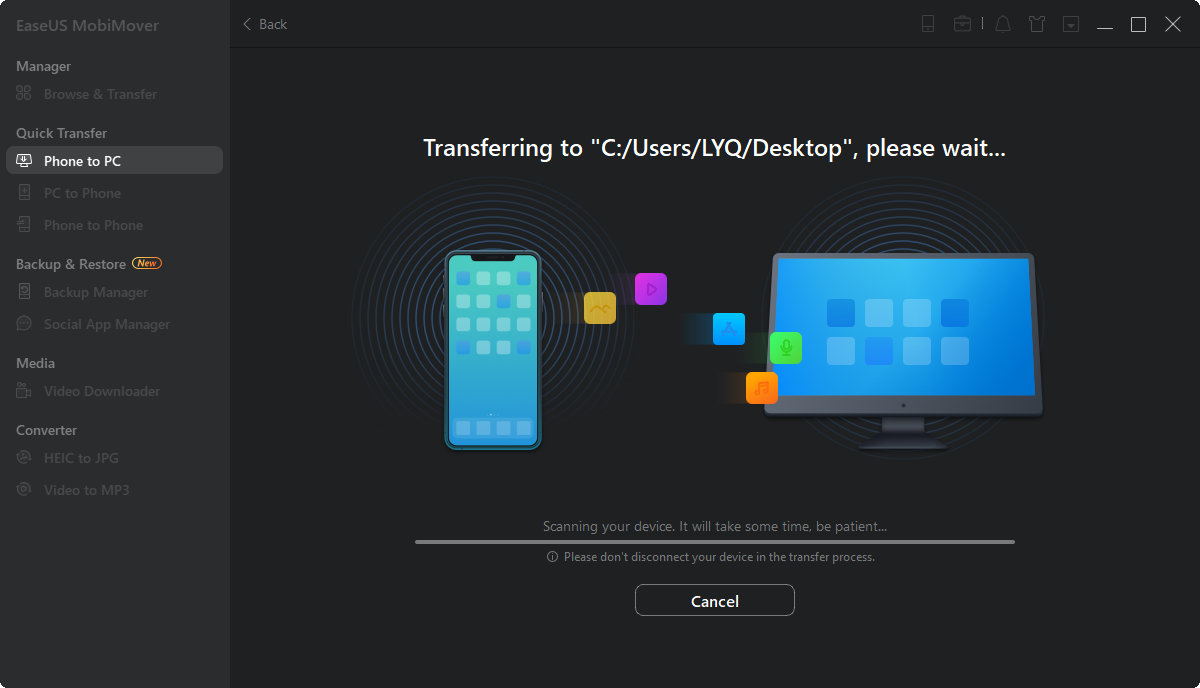
Step 3. Click the «Transfer» button to start transferring photos from your iPhone to the computer.В Depending on the size of the files, it may take seconds or a while to import pictures from your iPhone to yourВ computer. Wait patiently for the process to finish and check the items in the selected folder after that.
After transferring photos from iPhone to computer, you can now delete photos on iPhone to get more storage.
Part 3. Bonus Tips
Uploading photos from iPhone to iCloud is just one of the many things you can do with iCloud. To fully use iCloud, there are some tips you need to command.
Tip 1. How to Upload Photos to iCloud from Mac/PC
As mentioned, you can also upload photos to iCloud from Mac or PC. That is necessary when you want to share photos between your computer and mobile devices.
To upload photos to iCloud from Mac: Go to «System Preferences» > «Apple ID», click «iCloud» in the sidebar, and then select «Photos».
To move photos to iCloud from PC:В
- Using iCloud.com: Go to visit iCloud.com on your PC, sign in, and choose «Photos». Click the «Upload» button, select the items you want to move, and choose «Open» to start uploading photos to iCloud.
- Using iCloud for Windows: Right-click the iCloud icon in the taskbar and choose «Open iCloud Settings». Click «Options» next to «Photos» and enable «iCloud Photo Library». Make sure the option «Upload new photos and videos from my PC» is checked and copy the photos you want to upload to the folder shown under the option.
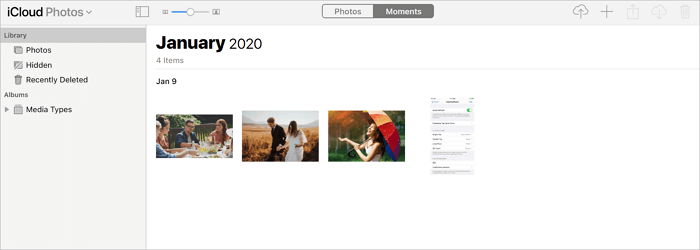
Tip 2. How to Access iCloud Photos
iCloud Photo Library/iCloud Photos is a part of the Apple iCloud online storage service. You could visit iCloud Photo Library/iCloud Photos via iPhone/iPad, computer, or any other kind of device with App or browser at iCloud.com.В
Tip 3. How to Download iCloud Photos to PC
After you move photos from iPhone to iCloud, you may need to download photos from iCloud to PC, which is one of the methods to transfer photos from iPhone to PC.
If you do, read the guide on how to transfer photos from iCloud to PC for reference.
The Bottom Line
iCloud allows you to transfer photos and videos via an Internet connection. Now you not only know how to move photos to iCloud from various devices but also learn the steps to access and download photos from iCloud. CommandВ these skills and make iCloud your good helper.
о™љо™љо™љо™љо™љ
4.5 out of 5 stars, based on 10 votes
EaseUS MobiMover allows you to easily transfer all data from your iPhone to your PC. The app is available for both Windows and Macs so irrespective of which platform you use, you are covered.

EaseUs MobiMover solves this problem as it allows you to transfer data from an iPhone to a Mac, Mac to an iPhone, or from one iPhone to another iPhone fast.

EaseUS MobiMover is a program that allows you to share files between your iOS device and your PC in an easy manner. This is very useful, since both operative systems are not compatible.

EaseUS MobiMover for Mac and PC is a powerful tool for transferring data from your Apple mobile device to your computer, managing the variety of files that you create, and moving those huge videos quickly.

Related Articles — ALSO ON EaseUS SOFTWARE
Источник
Set up and use iCloud Photos
iCloud Photos works with the Photos app to keep your photos and videos securely stored in iCloud, and up to date on your iPhone, iPad, iPod touch, Mac, Apple TV, and iCloud.com.

How iCloud Photos works
iCloud Photos automatically keeps every photo and video you take in iCloud, so you can access your library from any device, anytime you want. Any changes you make to your collection on one device change on your other devices too. Your photos and videos are organized into Years, Months, Days, and All Photos. And all of your Memories and People are updated everywhere. That way you can quickly find the moment, family member, or friend you’re looking for.
Depending on your internet speed, the time it takes for you to see your photos and videos on all of your devices and iCloud.com might vary.
Turn on iCloud Photos
Make sure that you set up iCloud and sign in to iCloud with the same Apple ID on all of your devices. If you have a PC, you need Windows 7 or later and iCloud for Windows.
On your iPhone, iPad, or iPod touch
- Go to Settings > [your name].
- Tap iCloud.
- Tap Photos, then turn on iCloud Photos.
On your Mac
- Choose Apple menu > System Preferences.
- Click Apple ID.
- Click iCloud in the sidebar, then select Photos.
If you have an earlier version of macOS, go to System Preferences > iCloud. Click Options next to Photos, then select iCloud Photos.
On Apple TV 4K and Apple TV HD
- Go to Settings > Users and Accounts.
- Select iCloud.
- Turn on iCloud Photos.
On your Windows PC
What happens when you edit or delete photos
Your photos and videos are stored in iCloud in their original formats at full resolution. This includes HEIF, JPEG, RAW, PNG, GIF, TIFF, HEVC, and MP4 as well as special formats you capture with your iPhone or iPad, like slo-mo, time-lapse, 4K videos, and Live Photos. The photos and videos you capture with these devices are in HEIF and HEVC format. When you edit or delete photos or videos, it’s reflected across all of your devices.
Edits show up on all of your devices
When you make edits in the Photos app on your iPhone, iPad, or iPod touch or on your Mac, the photo automatically updates across all your devices, including your Apple TV. So when you crop or enhance a photo from your iPhone, you see the changes when you access your library from your Mac. Your original photos and videos are stored in iCloud and you can go back to them at any time, and revert any changes you made.
Photos delete from all of your devices
The photos and videos that you delete on one device are deleted everywhere that you use iCloud Photos. Photos and videos stay in the Recently Deleted folder for 30 days before they’re deleted permanently.
Download copies of your photos and videos
When you turn on iCloud Photos, your photos and videos automatically upload to iCloud. They’re not duplicated in your iCloud backup, so you should keep backup copies of your library. Use the steps below to download copies of your photos and videos to your Mac or PC. Or you can import your library to your Mac or PC.
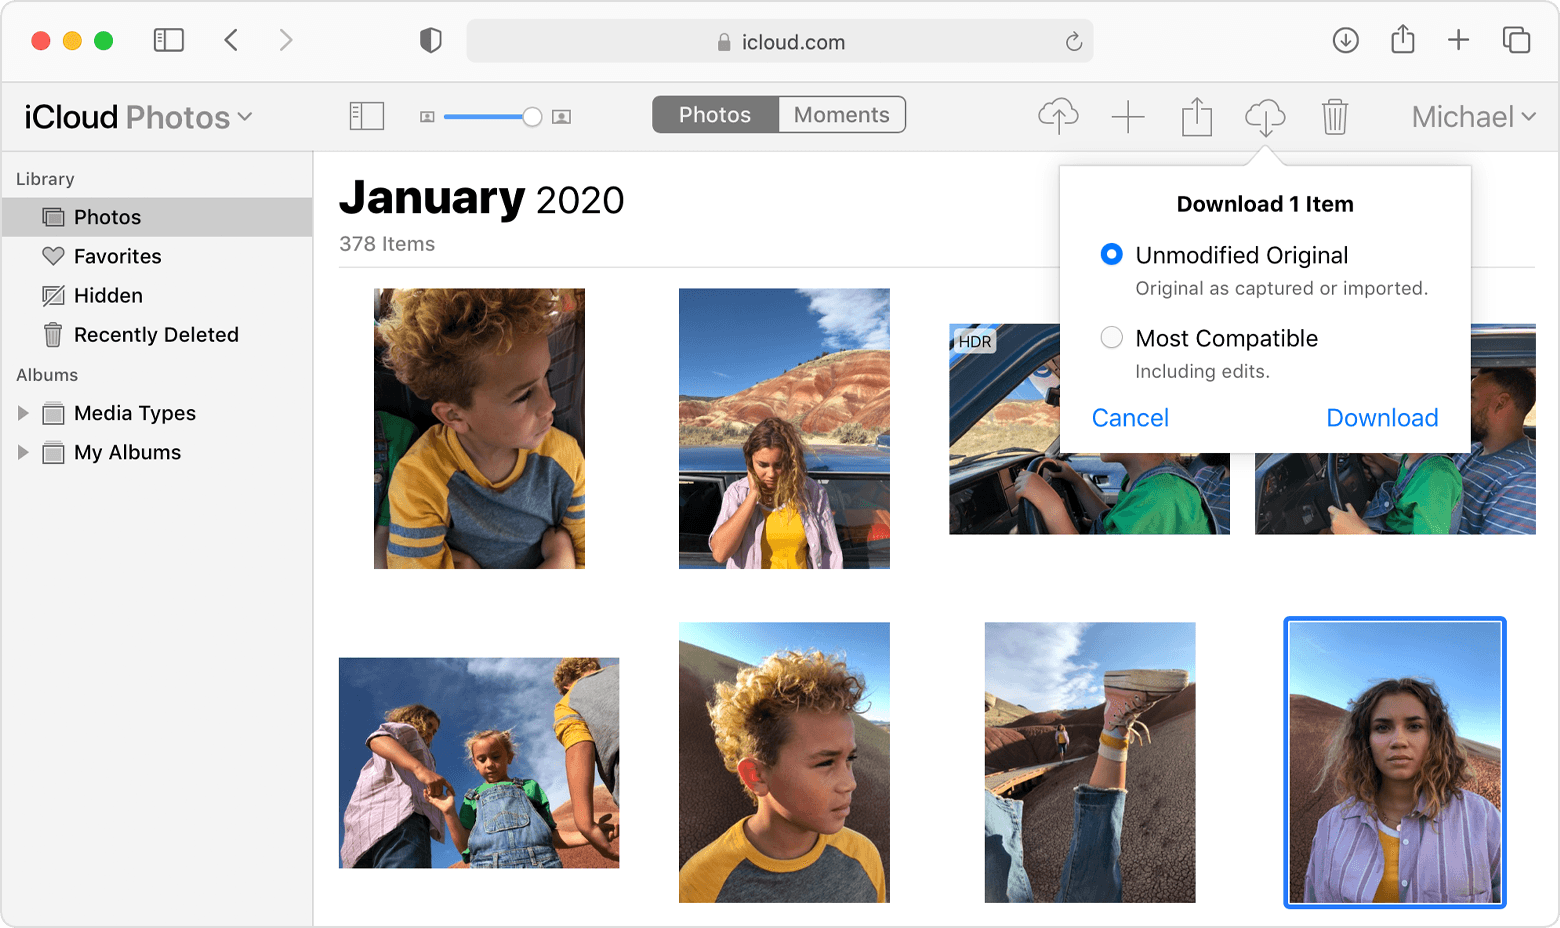
Download your photos and videos from iCloud.com
- On iCloud.com, click Photos.
- Select the photos and videos that you want to download.
- Click and hold the download button in the upper-right corner of the window. If you want to download your content as it was originally captured or imported, choose Unmodified Original. For JPEG or H.264 format — including edits, and even if it was orginally in HEIF or HEVC format — choose Most Compatible.
- Click download.
Download photos and videos from your iPhone, iPad, or iPod touch
- Open the Photos app, then select one or more photos or videos.
- Tap the share button .
- Tap AirDrop, then select the device that you want to share with. Learn more about using AirDrop.
Download photos and videos from your Mac
- On your Mac, open the Photos app.
- Select one or more photos or videos.
- Drag the content to your desktop, or Control-click and select Share > AirDrop.

Make sure that you have enough storage
The photos and videos that you keep in iCloud Photos use your iCloud storage and your device storage. And as long as you have enough space in iCloud and on your device, you can store as many photos and videos as you like. Learn more about iCloud storage and device storage.
If you need more iCloud storage
When you sign up for iCloud, you automatically get 5GB of free storage. If you need more space, you can buy more iCloud storage. Plans start at 50GB for $0.99 (USD) a month. If you choose 200GB or 2TB plans, you can share your storage with family. Learn how to buy more iCloud storage.
If you need more device storage
iCloud Photos keeps all your photos and videos in their original, high-resolution version. To save storage space on your device, you can turn on Optimize Storage.
If you turn on Optimize Storage, iCloud Photos automatically manages the size of your library on your device. Your original photos and videos are stored in iCloud and space-saving versions are kept on your device. Your library is optimized only when you need space, starting with the photos and videos you access least. You can download the original photos and videos over Wi-Fi or cellular when you need them.
If you turn on Download Originals, iCloud Photos keeps your original, full-resolution photos and videos in iCloud and on your device.
On your iPhone, iPad or iPod touch
- Go to Settings > [your name] > iCloud.
- Tap Photos.
- Choose Optimize [device] Storage.
On your Mac
- Open the Photos app and click Photos in the menu bar.
- Click Preferences.
- Go to the iCloud tab and choose a storage setting.
Pause library uploads to iCloud
When you turn on iCloud Photos, the time it takes for your photos and videos to upload to iCloud depends on the size of your collection and your internet speed. If you have a large collection of photos and videos, your upload might take more time than usual. You can see the status and pause the upload for one day.
- On your iPhone, iPad, or iPod touch, open the Photos app, go to the Library tab, and tap All Photos. Then scroll to the bottom of your screen.
- On your Mac, open the Photos app. Select Library in the sidebar, then click All Photos in the list of tabs in the toolbar. Scroll to the bottom of your photos and click Pause.
Learn more
- Rediscover favorite and forgotten occasions from your photo library with Memories.
- Get help with iCloud Photos.
- Learn what to do if you’re missing photos in the Photos app.
- Learn about deleting photos on your iPhone, iPad, or iPod touch.
Information about products not manufactured by Apple, or independent websites not controlled or tested by Apple, is provided without recommendation or endorsement. Apple assumes no responsibility with regard to the selection, performance, or use of third-party websites or products. Apple makes no representations regarding third-party website accuracy or reliability. Contact the vendor for additional information.
Источник


