- HTTP-запрос в Котлине
- 8 ответов
- How to make POST, GET, PUT and DELETE requests with Retrofit using Kotlin
- Adding the libraries
- Adding Permissions & Preparing the Files
- Adding data using POST method
- • Uploading JSON data (application/json)
- • Uploading Files (multipart/form-data)
- • Uploading with parameters encoded in the URL (application/x-www-form-urlencoded)
- Retrieving data using GET method
- Android Networking With Kotlin Tutorial: Getting Started
- Version
- Getting Started
- Enabling Auto Import
- Including Permissions
- Making a Network Request
- Initiating a Request on a Background Thread
- Reading the URL Content
- Checking the Network Availability
- Confirming Network Connection
- Using a Network Connectivity Helper Method
- Updating the UI
- Defining a Data Model
- Updating the RecyclerView Adapter
- Adding the GSON Library
- Updating the Network Call
- Lengthening Your Search Result
- Updating Your App With Retrofit
- Introducing Retrofit
- Using Retrofit Service to Make Network Calls
- Using Retrofit to Handle Requests and Responses
- Using Retrofit With Coroutines
- Simplifying Retrofit With Coroutines
- Making the Network Call With Coroutines
- Network Profiling
- Using the Network Profiler
- Exploring Network Profiler
- Adding Images
- Where to Go From Here?
HTTP-запрос в Котлине
Я совершенно новичок в Kotlin. Я хочу сделать проверку логина с помощью метода POST и получить некоторую информацию с помощью метода GET. У меня есть URL, имя пользователя сервера и пароль уже моего предыдущего проекта. Я не нашел ни одного правильного примера проекта, который бы использовал эту вещь. Кто-нибудь, пожалуйста, предложите мне любой рабочий пример, где я могу использовать метод GET и POST в HTTP-запросе
8 ответов
Для Android можно начать с Volley. Для всех платформ вы также можете проверить клиент ktor.
Однако вы также можете использовать стандартные библиотеки Java, такие как java.net.HttpURLConnection который является частью Java SDK:
Просмотрите библиотеку Fuel, пример запроса GET
Пример POST-запроса
Их документацию можно найти здесь.
Без добавления дополнительных зависимостей это работает. Для этого вам не нужен залп. Это работает с использованием текущей версии Kotlin по состоянию на декабрь 2018 года: Kotlin 1.3.10
Если вы используете Android Studio, вам нужно добавить это объявление в ваш AndroidManifest.xml:
Вы должны вручную объявить импорт здесь. Инструмент автоматического импорта вызвал у меня много конфликтов.
Вы не можете выполнять сетевые запросы в фоновом потоке. Вы должны подкласс AsyncTask .
Чтобы вызвать метод:
Метод без излишеств по Котлину 1.13:
Подождите, что происходит? Мы определяем сопрограмму и немедленно запустить его в потоке ввода-вывода ( launch ), оставив поток пользовательского интерфейса для ответа на ввод пользователя. Сопрограмма возобновится (проснется) только тогда, когда поступят запрошенные данные. Однако мы можем изменять только элементы пользовательского интерфейса из основного потока / потока пользовательского интерфейса, поэтому нам действительно нужен блок runOnUiThread . Это планирует синхронный код для запуска в потоке пользовательского интерфейса вскоре после завершения сопрограммы.
Асинхронное программирование — сложная концепция, и ее слишком много, чтобы подробно объяснить этот ответ. Вы можете прочитать мой пост в блоге, который уходит вглубь.
Зачем использовать try / catch? Без try / catch ваше приложение будет зависать, если вы отправите запрос с отключенным интернетом на телефоне.
Как мне включить это? Добавьте это в свой app/build.gradle :
Какой импорт мне нужен?
Откуда появился readText() ? .readText() не является частью java.net библиотеки, а является котлинским метод расширения (Котлин» приклеивает «этот метод к URL )
Зачем мне вообще нужны сопрограммы? Веб-запросы должны выполняться в фоновом режиме, поскольку в противном случае поток пользовательского интерфейса блокируется, в результате чего пользовательский интерфейс выглядит «замороженным».
Источник
How to make POST, GET, PUT and DELETE requests with Retrofit using Kotlin
Retrofit is the most popular HTTP library and one of the most popular 3rd party libraries on Android.
Today, I’ll to show you how to do the following HTTP requests using Retrofit:
- POST request with the most commonly used MIME types:
- application/json: Upload JSON data
- multipart/form-data: Upload files (images, texts e.t.c)
- application/x-www-form-urlencoded: Upload with the parameters encoded in the URL, for example https://myrestapi.com/post?name=Jack&age=45
- GET request and how to use @Path and @Query
- PUT request
- DELETE request
Retrofit not only can make HTTP requests but can also parse the JSON simultaneously.
I’m NOT going to show you how to parse the JSON data in this tutorial, but only how to make HTTP requests and print the results.
If you want to parse JSON with Retrofit, you need to read the current article first and then follow this.
Adding the libraries
Go to your app-level build.gradle file and add the following dependencies:
at the same file, at the bottom of the android section, add:
Adding Permissions & Preparing the Files
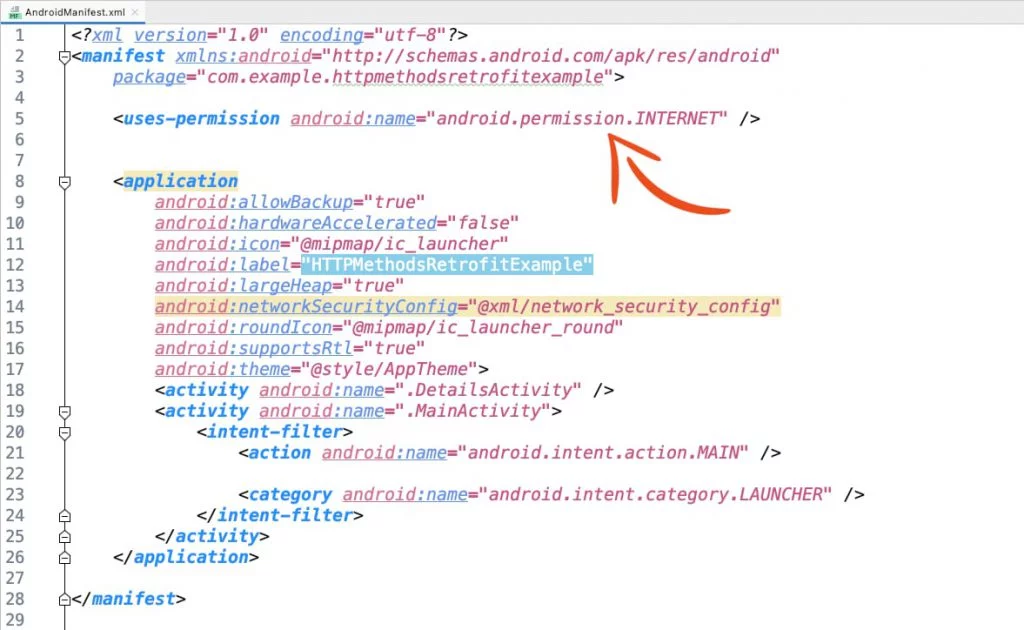
Go to the AndroidManifest.xml file and add the following permission:
Now, create a new Kotlin Interface file to put our @POST , @GET , @PUT , and @DELETE annotations later.
Right-click on your project name > New > Kotlin File/Class
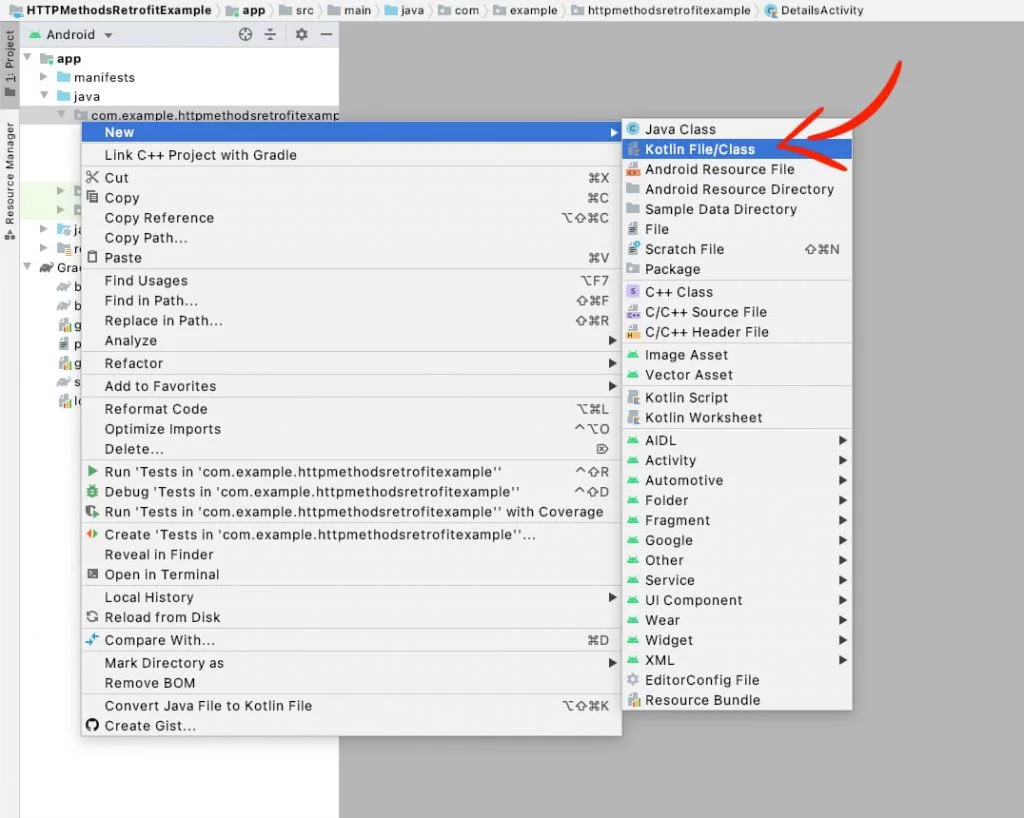
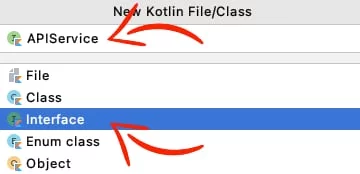
Select Interface, name the file APIService and press Enter
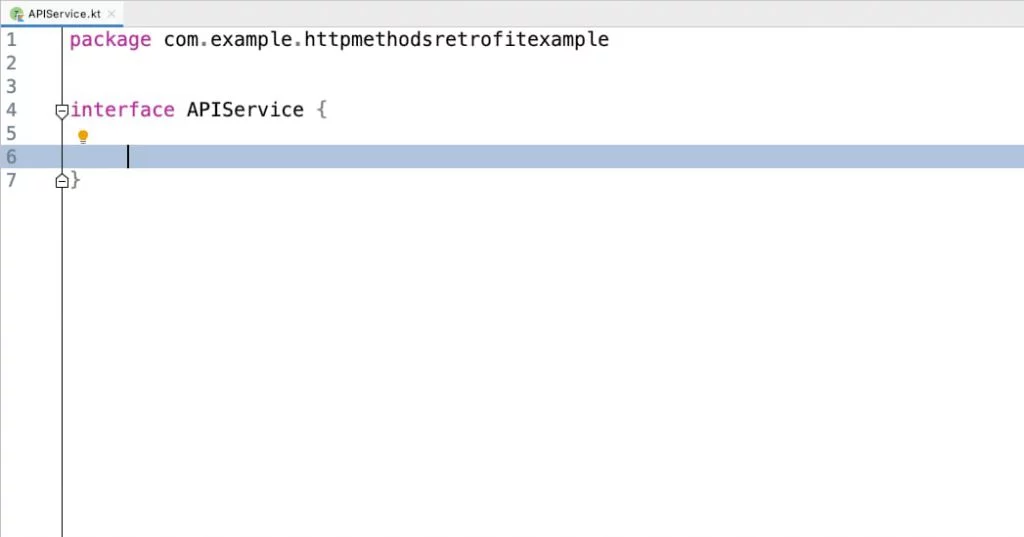
After that, the file will look like this:
Adding data using POST method
To add data to the server, you need to use the HTTP request method POST.
Before you upload the data, you have to define what type of data you are uploading (e.g., raw JSON, media e.t.c). To do that, you need to set the MIME type.
- application/json for raw JSON data
- multipart/form-data for files, like images, pdfs, texts e.t.c
- application/x-www-form-urlencoded for passing the paramers encoded in the URL
• Uploading JSON data (application/json)
In this example, we’re going to POST the following data as raw JSON data in the URL: http://dummy.restapiexample.com/api/v1/create
- name: Jack
- salary: 3540
- age: 23
First, in the APIService.kt file add the following @POST annotation:
Then, to create the JSON we’ll use the JSONObject() class and add the data we want to upload.
So, at the end, the POST request will look like this:
• Uploading Files (multipart/form-data)
In this example, we’re going to POST a String value and a .txt file in the URL: https://httpbin.org/post
- email: jack@email.com
- file: lorem_ipsum.txt
First, in the APIService.kt file add:
As you see, we’re using HashMap to add the data (string and .txt file), alongside with Retrofit’s @PartMap annotation
…and the POST request will be:
• Uploading with parameters encoded in the URL (application/x-www-form-urlencoded)
To have the parameters encoded in the URL, all you have to do is to add the @FormUrlEncoded annotation in the APIService.kt file and use HashMap with the @FieldMap annotation.
And when you make the POST request, create a HashMap and add the parameters you want:
Retrieving data using GET method
To retrieve the data from the server, you need to use the HTTP request method GET.
Источник
Android Networking With Kotlin Tutorial: Getting Started
In this tutorial, you’ll get started with Android networking by creating a simple app to retrieve and display a list of GitHub repositories.

Version
- Kotlin 1.3, Android 6.0, Android Studio 3.5

Update note: Fuad Kamal updated this tutorial for Android Studio 3.5.3, Kotlin 1.3.61, and coroutines. Eunice Obugyei wrote the original.
Few apps work in isolation. Most connect to an online service to retrieve data or perform other networking functions. As such, networking plays a critical role in developing Android apps.
In this Android networking tutorial, you’ll create a simple app that connects to the GitHub API to retrieve and display a list of repositories.
During the process, you’ll learn how to:
- Check your network connection status.
- Perform network operations.
- Leverage open source libraries to perform network operations.
- Profile the network performance of your app.
- Use the modern approach to asynchronous programming in Android and Kotlin with coroutines
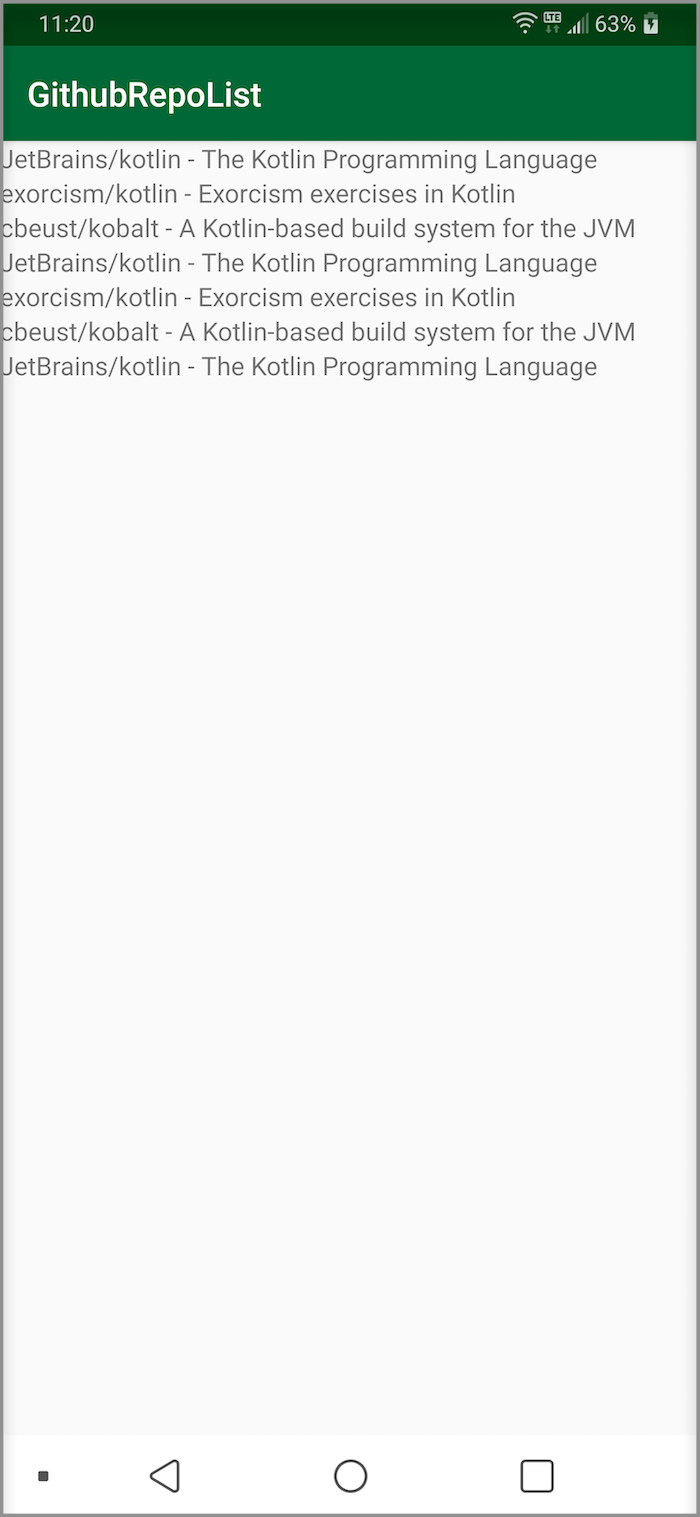
By the end, you’ll have built a GitHubRepoList app that runs a search query against the GitHub API and displays the results:

Getting Started
Download the starter project by clicking the Download Materials button at the top or bottom of the tutorial.
Once your download completes, unzip the file. Open the starter project in Android Studio 3.1.2 or greater by selecting Open an existing Android Studio project from the Welcome to Android Studio window:

You can also use File ▸ Open in Android Studio.
Then browse to the starter directory in the downloaded materials and click Open.
Open MainActivity.kt from the ui.activities package and explore the code. It uses a simple RecyclerView named repoList . RecyclerView contains a hard-coded list of repository names.
Build and run to preview what you have to work with:
Enabling Auto Import
Before adding any Kotlin code, configure Android Studio to insert import statements automatically. This step saves you from having to add individual import statements.
Go to either Android Studio ▸ Preferences on macOS or File ▸ Settings on PC. Then go to Editor ▸ General ▸ Auto Import and check the Add unambiguous imports on the fly checkbox. Check the Optimize imports on the fly (for current project) checkbox, too. Finally, click OK.

Including Permissions
Your app must include certain permissions to perform network operations in Android. Open manifests/AndroidManifest.xml and add the following permissions above the application tag:
ACCESS_NETWORK_STATE checks the network state of the device. INTERNET accesses the Internet.
Making a Network Request
Now that you have your permissions set up, you can move on to making your first network request!
Initiating a Request on a Background Thread
MainActivity.kt defines a value url that contains the first network request. It queries the GitHub API for repositories written in Kotlin that contain the phrase “super mario”. Start with a narrow search at first so you aren’t overwhelmed with too much data. Add the following code below url and inside onCreate() :
Network requests are not allowed on the app’s main thread, also called the UI thread. If you block the main thread, Android causes the app to throw an exception. doAsync() is part of a domain-specific language (DSL) provided by the Kotlin library, Anko. You can include Anko by including following line in app level build.gradle:
Anko provides a way to execute code on a separate worker thread and to return the control flow back to the main thread by calling uiThread() .
Reading the URL Content
Open Request.kt and replace the TODO comment in run() with the following:
readText() makes the network request by opening an InputStream from url and return as String. Log.d() writes the network response to Logcat.
Please note that readText() does have an internal limit of 2 GB. In most cases, this limit should suffice. But if you anticipate exceeding that amount, there are other options. For example, you can use BufferedReader.forEachLine() or a third party networking library — as discussed later in this tutorial.
Build and run. The UI shouldn’t change, but check the Logcat window at the bottom of Android Studio. It should show a JSON response to the network request. To better see the JSON response, click the Use Soft Wraps button on the left toolbar.

Congrats! You’ve completed your first network request with Android and Kotlin.
Checking the Network Availability
Before you can make a network request, you have to be sure that there is a network available. Your next steps will be to verify the user’s connection.
Confirming Network Connection
Before making a request, you should check whether the user has a network connection. This step will ensure a pleasant user experience. This will ensure your users to signal that internet connectivity is needed and they should turn on data connectivity if the device is not connected to internet.
Add the following to MainActivity.kt:
isNetworkConnected() checks that the device has an active Internet connection by:
- Retrieving an instance of ConnectivityManager from the current application context. ConnectivityManager is used to query the state of network.
- Getting a reference to the active network the device is using.
- Getting the capabilities of the active network.
- Checking if the active network can reach the Internet.
Using a Network Connectivity Helper Method
Now replace doAsync <…>in onCreate() with the following:
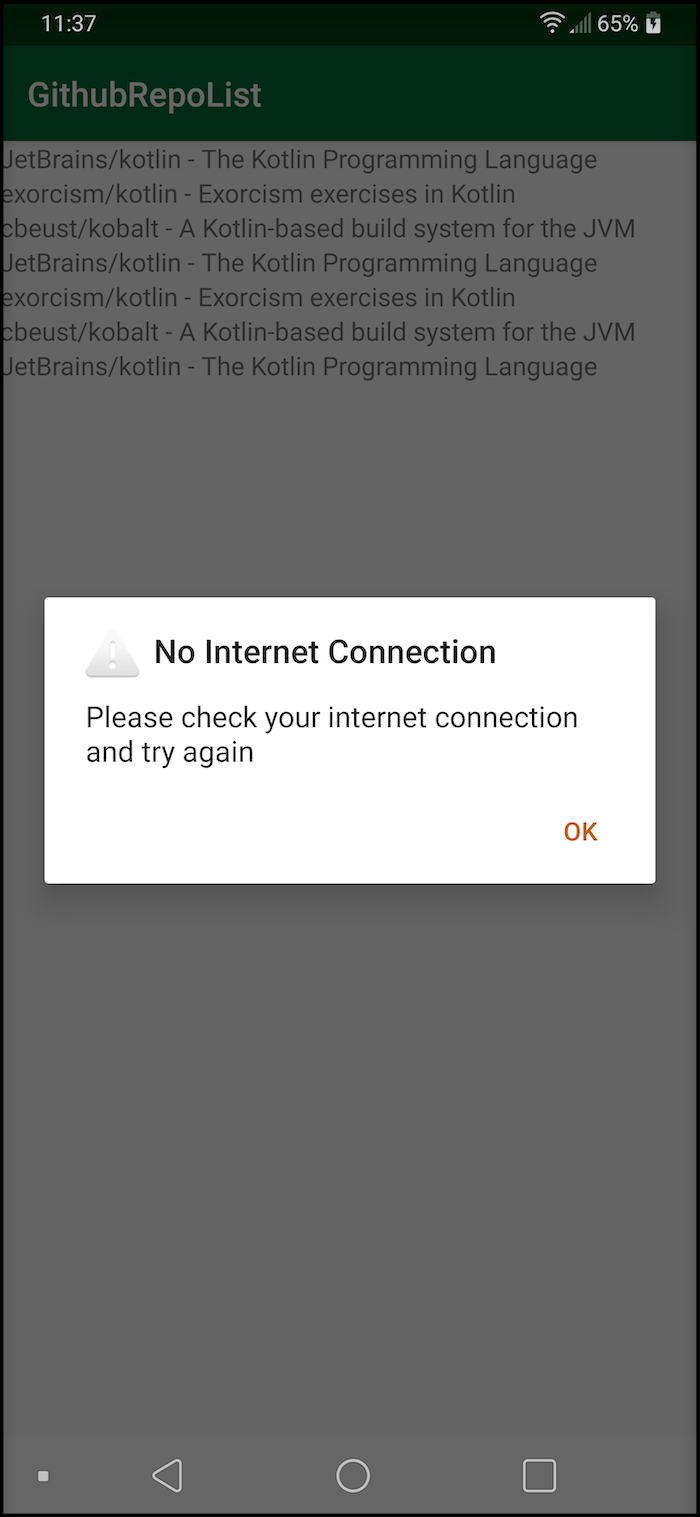
This code first checks whether there is a network connection. If there is, the app makes the network request. If not, it displays an alert to the user.
You can further explore the logic by setting a breakpoint on if . Click the debug button on the toolbar. It’s highlighted in the image below:
Android Studio will build and run then pause execution at if . You can step over the code by pressing the Step Over button in the debug pane. If your emulator has a network connection, doAsync will execute, and you’ll see the resulting JSON response in the Logcat tab.
Now, disable internet access by toggling Airplane Mode on:

Debug your app again. This time, the control will go into else , and an alert will appear on the emulator:
Be sure to turn off Airplane Mode for the rest of this tutorial. :]
Updating the UI
You have successfully made a network request when the user’s device has connectivity. The next step is to update the UI to see the results on the screen.
Defining a Data Model
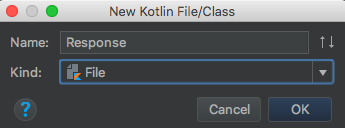
Get started by defining a data model that makes sense of the JSON response. Right-click on the data package in the project materials. From the context menu, select New ▸ Kotlin File/Class. In the dialog, name it Response and choose File for the type.
The file Response.kt will open. Enter the following code:
In Kotlin, data class offers a convenient way to express a value object. RepoResult is a list of Item objects from your JSON response. You can convert your JSON response to model representation from external Android Studio plugins and web plugin like : jsonschema2pojo.
Updating the RecyclerView Adapter
The next step is to open the RepoListAdapter.kt file. You’ll notice that the Adapter accepts a list of hard-coded strings in the parameter. You’ll modify the Adapter for your RecyclerView to accept this more complex object instead from network.
To accomplish this, replace the contents of the file below package with the following:
Here’s what’s happening:
- The import statement uses Kotlin Android Extensions. This allows you to reference components from the XML layout directly in your Kotlin code.
- R.layout.item_repo provides the layout defined in item_repo.xml
- You reference your position in Item rather than the position in the hard-coded list.
- This response sets the list size rather than the hard-coded list.
- You pass Item , as defined earlier in your data class.
- Then you populate the username text defined in item_repo.xml with the owner.login , defined in your data class definitions.
- Finally, you populate the name of the repository and the repository description.
An important best practice when dealing with JSON responses from an API: Don’t assume every value will be non-empty. If there’s no value for the field, make it an empty string. This practice also illustrates some of Kotlin’s safety features. Your app will no longer crash because it tried to access a null value.
Adding the GSON Library
In this section, you will now use a library to simplify the serialization and deserialization. GSON can be used to change JSON string to your model objects and model back to JSON string. Now, open the build.gradle file of the app module and add the following dependency:
This addition lets you use the GSON library in your code.
Click on sync project at the top of Android Studio to resolve dependency. Now in the next section you will be using GSON to resolve the model objects from your JSON string.
Updating the Network Call
Open Request.kt. Then replace the entire class definition of Request with the following:
Here’s what’s happening in the code above:
- You define a companion object to hold the API endpoint (URL), a search term and a concatenated string of the two.
- run() now returns a data structure, RepoResult , which you defined in Response.kt.
- You execute the actual request using readText() .
- You use the GSON library to parse the JSON into your model.
Open MainActivity.kt. In onCreate() , remove repoList.adapter near the top of the method. Then update the code inside the first if with the following:
This code replaces the toast message with a single line of code. That line updates RecyclerView with the response from your network call.
Delete the declaration for items as you’re no longer using the hard-coded list.
Build and run. You’ll see a list of repositories from GitHub in your UI:

Cool! Your app connected to the GitHub API and retrieved a list of repositories for your perusal.
Lengthening Your Search Result

Logcat has a size limit, which may prevent you from seeing the entire JSON if you have a large number of results. But if you’re populating the UI with your actual search results, you can scroll to see them in your UI. Here’s how.
Open the Request class and replace search with the following:
This line will change the search query for the API to give you 50 results for one request. Hence, this will populate list with 50 items.
Build and run. You should see more search results now.

Updating Your App With Retrofit
In the days of Java, performing network operations on Android was tedious. It’s much simpler with Kotlin. The URL APIs has its own limitations for example it does not offers you good exception handling API. This brings you the need of a better shaped APIs.
Hence next, you’ll update your app to use the most popular third-party library, Retrofit from Square. As a bonus, you’ll glam up your UI with some images, too.
Introducing Retrofit
Retrofit is an Android and Java library that excels at retrieving and uploading structured data, such as JSON and XML. This library makes HTTP requests using OkHttp, another library from Square.
OkHttp is an efficient HTTP client that supports synchronous and asynchronous calls. It handles the opening and closing of connections along with InputStream-to-string conversion. It’s compatible with Android 2.3 and above.
With Retrofit, you can specify any of the following libraries for the data serialization and deserialization:
To use Retrofit, add the following dependencies to build.gradle in the app module:
This will add the retrofit dependency for creating network requests and the second dependency adds a converter which automatically integrates GSON to deserialize the JSON and get the model and vice-versa.
Finally, delete the GSON dependency you added earlier: implementation ‘com.google.code.gson:gson:2.8.6’ . You no longer need it because the libraries specified with Retrofit handle the parsing and integrates GSON . Then, resync your Gradle files.
For all these dependencies, the version numbers above represent availability at the time of writing. Double-check the current versions, and use those in your build.gradle file.
Click to the sync project button at the top of Android Studio to resolve the dependencies.
Using Retrofit Service to Make Network Calls
Now, you’ll create a new package in your app called api by right-clicking on the root package and picking New ▸ Package.
Right-click on api . From the context menu, select New ▸ Kotlin File/Class. Give it the name GithubService, and select Interface for Kind :

Replace the contents of GithubService.kt below the package statement with the following:
This code creates an interface that lets Retrofit connect to the GitHub API. You’ve also added two methods to the interface with @GET annotations that specify the GitHub endpoints to make GET requests.
Make a second file in api . Select Class for Kind , and name it RepositoryRetriever. Replace the empty class with the following:
Here’s what RepositoryRetriever does:
- Specifies the base URL.
- Creates a Retrofit object.
- Specifies GsonConverterFactory as the converter, which uses Gson for its JSON deserialization.
- Generates an implementation of the GithubService interface using the Retrofit object.
- Has a method to create a Retrofit Call , on which enqueue() makes a network call and passes in a Retrofit callback. A successful response body type is set to RepoResult .
The Retrofit enqueue() will perform your network call off the main thread.
Using Retrofit to Handle Requests and Responses
Finally, you need to modify MainActivity.kt to use Retrofit to make the network request and handle the response.
First, add the following to properties at the top of MainActivity.kt:
Your two properties are:
- A RepositoryRetriever object.
- A Retrofit Callback that has two overrides: onFailure() and onResponse() .
In the successful callback method, you update the RecyclerView adapter with the items in the response.
Update onCreate() to delete doAsync <…>in isNetworkConnected . Replace it with a call to RepositoryRetriever :
If Android Studio has trouble generating the imports, add the following three imports to the class:
Build and run to verify everything works. Your app should look the same, but now Retrofit handles networking under the hood.
Using Retrofit With Coroutines
Up to this point, you’ve used the old way of making network calls with Retrofit: callbacks. But the scale and code of the app can grow more complex. This can lead to “callback hell” – when there are multiple API calls and callbacks are wrapped inside callbacks which can be very difficult to maintain.
Thankfully, Retrofit has built-in support for Kotlin’s coroutines.
Simplifying Retrofit With Coroutines
Time to simplify your Retrofit API service. To do so, you’ll replace the callback and interfaces with coroutines and exception handling.
Open app build.gradle and add the following to the dependencies section:
Open GithubService.kt and replace the content of the interface with the following:
Notice that suspend appears in front of the function names. Also, there’s no need to wrap the return value in Call anymore. This transforms the functions into coroutines. So simple!
Next, open RepositoryRetriever.kt. You’ve modified GithubService to use Kotlin coroutines, so you now need to mark getRepositories with suspend . Add suspend before this function to fix the error. However, you won’t need any of this callbacks anymore! Just simplify the function as follows:
Notice that coroutines need to be run within a specific scope. This is part of what makes them so powerful and thread-safe.
Actually, that’s an oversimplification. If you want to dig into the technical details, see the official documentation regarding thread safety and coroutines.
In more complex apps, you may want to use Android Architecture components and scope your coroutines within ViewModel . But this tutorial will keep things simple, so you’ll leave the network call within the Activity and its lifecycle scope.
Making the Network Call With Coroutines
Open MainActivity.kt and replace the entire class with the following:
Here what’s going on in that code:
- You create a coroutine scope by using a job to cancel when needed.
- Then you create CoroutineExceptionHandler to handle any exceptions.
- The coroutine runs using the Main (UI) dispatcher. For a better understanding of how coroutines handle background threading, see the “Where to Go From Here?” section.
- The coroutine execution is called.
Step 4 demonstrates the beauty of coroutines. You write them like synchronous code even though they’re asynchronous, making them easier to read and understand!
Now build and run the app. It should work exactly as before. The only difference being that Kotlin coroutines simplify the code and optimize the performance.
Network Profiling
OkHttp contains a logging interceptor. You can use it to log and debug the network requests and responses that you make with Retrofit. However, Android Studio 3.0 introduced the Android Network Profiler. It replaces the need for the OkHttp logging interceptor. Instead of running or debugging your app, click the Android Profiler icon at the top right corner in Android Studio, as highlighted in the image below.

Your app will build and run like before, but now the Android Profiler tab will also open.
Using the Network Profiler
If you don’t see the Profiler icon on the toolbar, run the app normally then go to View ▸ Tool Windows ▸ Profile to open the profiler:

The profiler displays real-time data of your app’s performance. You can toggle the feedback by either selecting the Pause button in the Profiler or pressing the space bar. What you see is a shared timeline that includes data for the CPU, memory, network and battery usage.
Exploring Network Profiler
To access the detailed profiling tools, select the corresponding graph. If you select the network graph, you will see detailed network performance from the time your app made the network request and received the response:

As you watch the live network data, rotate your device or emulator. Note the network traffic spike! When the device rotates, Android OS destroys and recreates the activity.
This is one reason why putting your network code directly in the UI view is not a good idea. A better solution: Make use of Android Architecture Components such as ViewModel.
The profiler sometimes has trouble when a network call occurs when your app first starts. Just in case, add a refresh button so you can refresh the data and make a second call after the app launches.
Open res/layout/activity_main.xml and update the content as follows:
You’ve converted to LinearLayout and added a button to refresh the screen.
To handle the click of the button, open MainActivity.kt and go to onCreate() . Then add the following:
This adds a click listener for the refresh button at the end of the method.
Now build and run using the Profile button. After the app starts, tap the refresh button on the app screen. You’ll notice a second network call made to the GitHub API on the Android Studio profiler.
Click inside the network profiler, and drag to select the second network call. A panel will open with more details for the selected network call.

Double-click the network call. A panel will open with Overview, Response, Request and Call Stack tabs.

These tabs give you the information you need to debug any issues that may occur when calling a back-end API.
Adding Images
Time to spice things up! Complete your app by bringing in icons for each repository.
Use the Picasso library, also from Square. To use Picasso, you need to modify the app’s build.gradle file by adding the following dependency:
Open the RepoListAdapter and populate the icon by adding the following statement at the end of bindRepo() in the ViewHolder:
Build and run. It should look like:
Where to Go From Here?
Congrats! You’ve completed this tutorial on network operations in Android. Download the completed project files by clicking the Download Materials button at the top or bottom of the tutorial.
For more information on the open-source projects this tutorial uses, head to Retrofit and Picasso on GitHub.
You can also check out the following Android Developer site pages.
- Android Profiler digs deep into how to measure your app’s performance.
- Reducing Network Battery Drain discusses how to reduce device battery drain and the importance of optimizing your app’s network activity.
Explore this Android Networking video course for more details on Android networking and Retrofit. This ViewModel screencast has more details on using ViewModel.
Finally, the following resources can help you gain mastery of Kotlin’s coroutines:
If you have any questions or comments, please join the forum discussion below!
Источник


