- Read books and more with Apple Books
- Buy books on your iPhone, iPad, iPod touch, or Mac
- Read books
- Organize your library
- Sort your books
- See your books as a list
- If you don’t see a book in your library
- Discover more ways to read
- Sync content between your Mac and iPhone or iPad over Wi-Fi
- Back up and restore your iPhone or iPad to your Mac or to iCloud
- Back up your device
- Restore your device from a backup
- Restore your device to its factory settings
- Top 5 Options to Sync iBooks Between Mac and iPhone or iPad
- Option 1: The Best Way to Transfer iBooks Between Mac and iPhone/iPad without iTunes
- Advantages of Using iOS Data Manager to Sync iBooks
- Steps to Sync Books on iPhone/iPad/iPod
- Option 2: Sync iBooks from iPhone to Mac
- Option 3: Sync iBooks Between Mac and iPhone/iPad via Finder
- Option 4: iBooks Sync on Mac via Books App
- Option 5: Sync iBooks Between Mac and iPhone/iPad via iCloud
- Bottom Line
Read books and more with Apple Books
Buy and download books and personalize your reading experience with Apple Books.
Buy books on your iPhone, iPad, iPod touch, or Mac
- Open the Books app.
- Tap or click Book Store.
- Browse for a book, or search for a specific one. When you find a book that you’re interested in, tap or click it.
- To buy a book, tap or click the price.
- The book appears in your library in the Books app.
Read books
Organize your library
In the Books app, you can find all the books, book series, PDFs, and audiobooks that you purchased from the Book Store or Audiobook Store or manually added to your device.
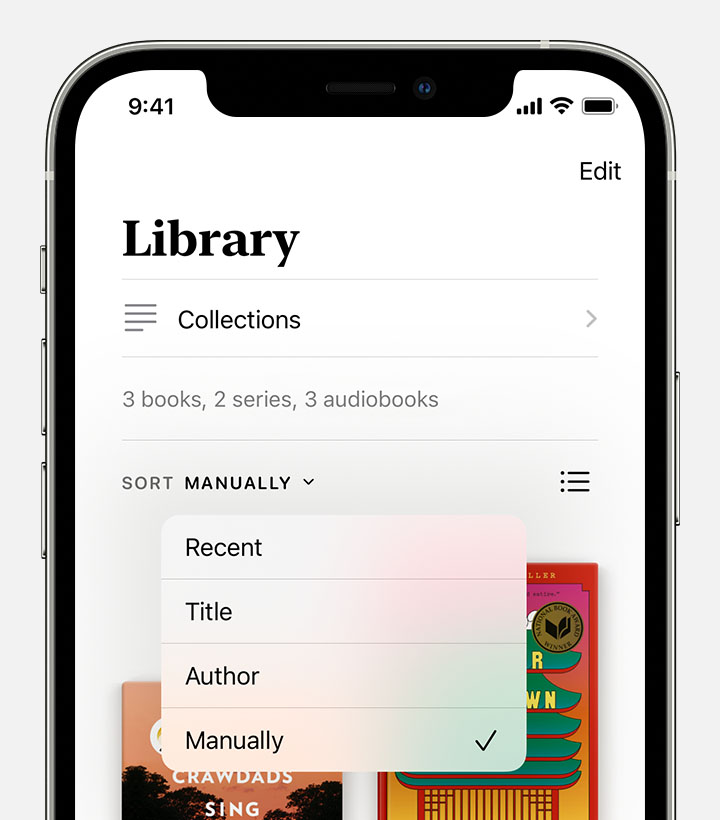
Sort your books
- Open the Books app.
- On your iPhone or iPad, tap Library. Or on your Mac, click All under Library.
- Tap or click Manually.

- Choose a sort option, such as Title, Author, or Recent. Don’t see Sort Manually on your iPhone or iPad? Just swipe down on your screen, then the Sort Manually option appears.
See your books as a list
To see your books as a list instead of a grid:
- On your iPhone or iPad, tap the List View button .
- Or on your Mac, click View > View As from the menu bar, then click List View.
If you don’t see a book in your library
If you don’t see a book in your library:
- Turn on iCloud on your iPhone, iPad, or iPod touch. Go to Settings, tap your name, tap iCloud, then turn on both iCloud Drive and Books. Then go to Settings > Books. Under Syncing, turn on iCloud Drive.
- Update your iPhone, iPad, or iPod touch, or update your Mac.
- If you previously deleted the book, redownload the book.
- If you previously hid a book, unhide the book.
Discover more ways to read
- You can listen to audiobooks in the Books app on your iPhone, iPad, iPod touch, or Mac. Or use iTunes on a PC.
- You can save copies of PDFs from emails and webpages into the Books app.
- You can also add DRM-free EPUB file format books, books that you create with Pages, MP3 audiobooks, AAC audiobooks, and Audible.com audiobooks to your library.
Information about products not manufactured by Apple, or independent websites not controlled or tested by Apple, is provided without recommendation or endorsement. Apple assumes no responsibility with regard to the selection, performance, or use of third-party websites or products. Apple makes no representations regarding third-party website accuracy or reliability. Contact the vendor for additional information.
Источник
Sync content between your Mac and iPhone or iPad over Wi-Fi
You can sync your Mac and device when they’re connected over same Wi-Fi network. To set up Wi-Fi syncing, first connect your device to your Mac using a USB or USB-C cable. You then turn on Wi-Fi syncing and choose the settings you want. Whenever your device connects to your Mac over Wi-Fi, you can select it in the sidebar and sync it. (You can turn on automatic syncing if you want.) Your device must have iOS 5 or later or iPadOS 13 or later.
Connect your device to your Mac using a USB or USB-C cable.
In the Finder  on your Mac, select the device in the Finder sidebar.

If you connect your device to your Mac using a USB cable and can’t see the device in the Finder sidebar, see If your device doesn’t appear in the sidebar.
Click General in the button bar.

Select the “Show this [device] when on Wi-Fi” tickbox.

Use the button bar to turn on and select sync settings.
Whenever your device connects to your Mac, the device’s icon appears in the sidebar. Select the device in the Finder sidebar to view or change syncing options.
Important: If you can’t see your device in the sidebar, choose Finder > Preferences, then select the CDs, DVDs and iOS Devices tickbox.
You can choose to sync your Mac and your device automatically whenever you connect them. See Turn automatic syncing on or off on Mac.
Before disconnecting your device from your Mac, click the Eject button  in the Finder sidebar. The device icon disappears, but Wi-Fi syncing remains turned on. The icon reappears automatically the next time your Mac and device are connected to the same WI-Fi network.
Note: To restore your iPhone or iPad and revert it to its factory settings, you must connect the device to your Mac using a USB or USB-C cable.
Syncing over Wi-Fi is slower than syncing over a cable. If you connect a device to your Mac while the device is syncing over Wi-Fi, syncing continues over the cable. If you disconnect the device’s cable from the Mac while syncing, syncing stops even if Wi-Fi syncing is on. Syncing resumes when you reconnect the device using a cable or over Wi-Fi.
Источник
Back up and restore your iPhone or iPad to your Mac or to iCloud
One of the best ways of safeguarding the information on an iPhone or iPad against damage or loss is backing up or copying your files and settings to either your Mac or to iCloud. Backing up is also useful if you get a new device and want to transfer your previous settings to it.
After you back up your device, you can use the backup to restore the information on your device whenever needed. If your device has issues that can’t be fixed by restoring from a backup, you can also restore your device to its factory settings and then restore a recent backup to see if that fixes the problem.
Back up your device
Connect your device to your Mac.
You can connect your device using a USB or USB-C cable or using a Wi-Fi connection. See Sync content between your Mac and iPhone or iPad over Wi-Fi.
In the Finder on your Mac, select the device in the Finder sidebar.
If you connect your device to your Mac using a USB cable and can’t see the device in the Finder sidebar, see If your device doesn’t appear in the sidebar.
Click General in the button bar.
To select backup options, do any of the following:

Select the “Back up your most important data on your [device] to iCloud” button to store backup data on iCloud and not on your Mac.
Select the “Back up all the data on your [device] to this Mac” to store backups on your Mac.
Select the “Encrypt local backup” tickbox to encrypt your backup data and protect it with a password. To change your password later, click Change Password.
Click Back Up Now.
Restore your device from a backup
If your device has an issue, you can use a recent backup to restore the information on the device.
Connect your device to your Mac.
You can connect your device using a USB or USB-C cable or using a Wi-Fi connection. See Sync content between your Mac and iPhone or iPad over Wi-Fi.
In the Finder on your Mac, select the device in the Finder sidebar.
Click General in the button bar.
Click Restore Backup.
Click the Backup pop-up menu, choose the backup you want to restore to the device, then click Restore.
If your backup is encrypted, you must enter the password before restoring your files and settings.
Restore your device to its factory settings
You can reinstall the software originally on your device and restore it to its factory settings. You might need to do this if you’re having problems with the device (for example, if it freezes or crashes frequently) of if you’re getting ready to sell or give it away.
Important: Restoring a device to its factory settings deletes all your information and settings. However, before doing so, your Mac backs up your device. You can use this backup to restore your information and settings on the device.
Note: You must turn off the Find My app in iCloud Settings on your device before you can restore your device.
Connect your device to your Mac using a USB or USB-C cable.
You can’t restore your device using a Wi-Fi connection.
In the Finder on your Mac, select the device in the Finder sidebar.
Click General in the button bar.
Click “Restore [device]”, then follow the onscreen instructions.
Источник
Top 5 Options to Sync iBooks Between Mac and iPhone or iPad
The iBooks app could be installed on iPhone, iPad or Mac. However, if you have bought books from iBooks Store on iPhone/iPad, you won’t see it on Mac, and vice versa. Apple doesn’t automatically sync these libraries. Fortunately, you can follow the below options to learn how to sync iBooks from iPhone to Mac, also guide of how to sync iBooks from Mac to iPhone. After that, all the content in iBooks, such as your favorite books, audiobooks and PDF files, may be read in different platforms.
Option 1: The Best Way to Transfer iBooks Between Mac and iPhone/iPad without iTunes
Compared to using Finder or other methods, there are disadvantages to a certain extent, the fastest and most effective way I recommend is the third-party software to sync iBooks across iOS and Mac with just one click. UltFone iOS Data Manager is a well-known iOS file manager to manage files in iOS devices, including iPhone, iPad and iPod touch.
Advantages of Using iOS Data Manager to Sync iBooks
- Transfer all books without limitation.
- Remove protection on purchased books after sync.
- Supports PDF or ePub files, free or purchased.
- Works on iOS 14 devices and macOS 11 (Big Sur)
Steps to Sync Books on iPhone/iPad/iPod
Download and install UltFone iOS Data Manager to Mac, and connect your device to Mac with a USB cable.
Step 1 Start UltFone iOS Data Manager, choose «Manage» function from the top menu.
Step 2 This program will display all data on your device. Tap on iBooks from the sidebar.
Step 3 Then you can see all the iBooks documents in your iPhone. Just select your target one and then click Export button.
Step 4 Choose the correct path that you are willing to save iBooks file, and then it starts to sync iBooks from iPhone to Mac. If you want to import books from Mac to iPhone, just click Import button to upload.
This is about how to sync iBooks from iPhone/iPad to Mac, to sync iBooks from Mac to iPhone or iPad, just click the Import button and follow the similar steps above.
Option 2: Sync iBooks from iPhone to Mac
Follow the steps below to transfer iBooks from iPhone to Mac.
Step 1: Open Settings in iPhone/iPad. Find out iBooks option.
Step 2: Turn on Sync Bookmarks and Notes and Sync Collections on iBooks settings.
After that, your iBooks should now sync.
Option 3: Sync iBooks Between Mac and iPhone/iPad via Finder
The iBooks application on Mac system is set to sync with Finder and all iOS devices by default. Every time when you update iBooks information on any iOS device, they will sync to Mac. So just see how to set up sync iBooks in Mac.
- Step 1. Connect your device to Mac using a USB or USB-C cable or using a Wi-Fi connection.
Step 2. In the Finder on your Mac, select the device in the Finder sidebar.
Step 3: Select Books from the menu bar.
Step 4: Select the «Sync books onto [device name]» tickbox to turn on syncing of your books. There are two options, «All books» or «Selected books», tick the option you prefer.
Option 4: iBooks Sync on Mac via Books App
The iBooks application on Mac system is set to sync with iTunes and all iOS devices by default. Every time when you update iBooks information on any iOS device, they will sync to Mac. So just see how to set up sync iBooks in Mac.
Step 1: Open iBooks app on Mac and go to Preferences from the upper-left menu.
Step 2: After that, tap on General Preferences tab and then make sure Sync bookmarks, highlights, and collections across devices option is selected.
Option 5: Sync iBooks Between Mac and iPhone/iPad via iCloud
You can use iCloud to sync ebooks throughout all of the Apple devices. When you open iBooks and log into it on an iOS device, it will ask you whether to sync iBooks bookmarks, notes and collections between devices or not. At this time, just tap on Sync when you see this window pop up.
Bottom Line
Now these are the ways you can enjoy to sync iBooks to iPad or iPhone, as well as transfer books from iPhone to Mac. Hope you enjoy reading books everywhere on every device. Is there anything else you’d like to know about iBooks? Welcome to share them with us in the comment below.
Источник


