- Use iCloud to transfer data from your previous iOS or iPadOS device to your new iPhone, iPad, or iPod touch
- How to transfer your iCloud backup to your new device
- Finish up
- Transfer photos and videos from your iPhone, iPad, or iPod touch
- Use iCloud Photos
- Import to your Mac
- Import to your Windows PC
- Настройка iCloud на компьютере Mac
- Использование последней версии macOS
- Вход в iCloud
- Настройка параметров iCloud
- Дополнительная информация
- Access iCloud Drive files from your iPhone and other devices
- Use iCloud Drive on your iPhone, iPad, iPod touch, Mac, or PC
- Automatically save Pages, Numbers, and Keynote files to iCloud Drive
- Add Desktop and Documents files to iCloud Drive
- Manage your iCloud Drive files while offline
- How to access files while you’re offline
- Upload files to iCloud Drive to save changes made offline
- When changes to your files upload to iCloud
- Where to find missing files
- If your files don’t update to iCloud Drive
- How to address a Resolve Conflict message
- Резервное копирование и восстановление iPhone или iPad на Mac или в iCloud
- Резервное копирование данных на устройстве
- Восстановление устройства с помощью резервной копии
- Восстановление заводских настроек на устройстве
Use iCloud to transfer data from your previous iOS or iPadOS device to your new iPhone, iPad, or iPod touch
Transfer your personal data and purchased content to your new device using your previous device’s iCloud backup.
How to transfer your iCloud backup to your new device
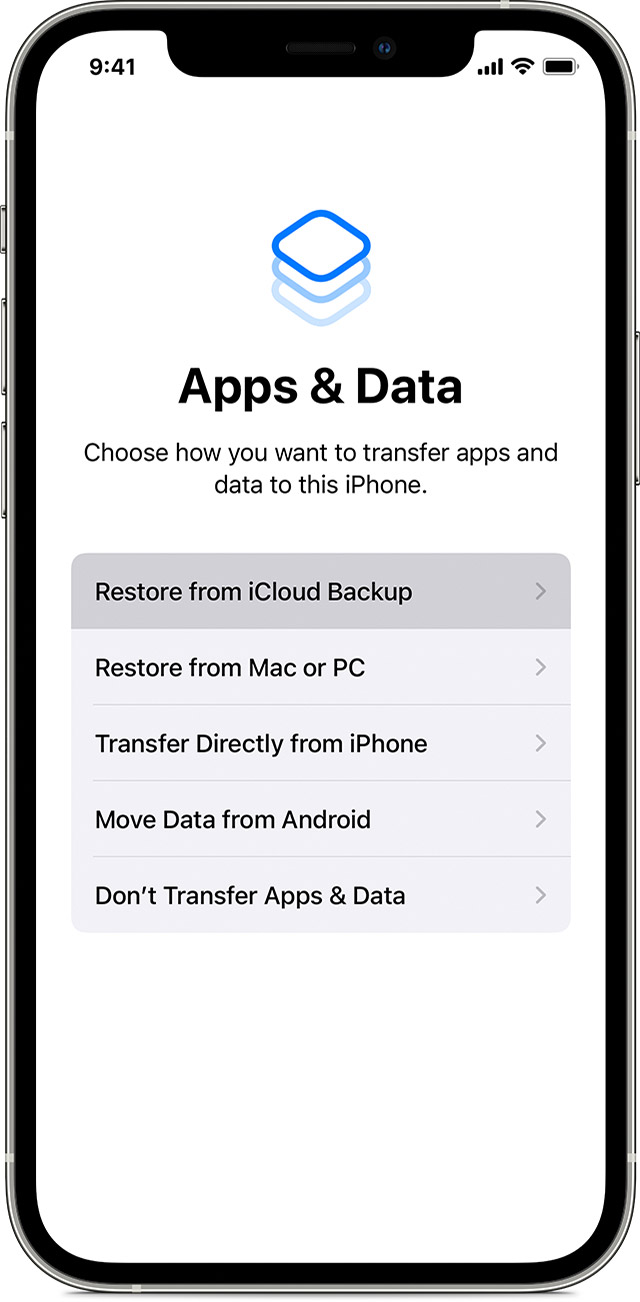
- Turn on your new device. A «Hello» screen should appear. If you’ve already set up your new device, you need to erase it before you can use these steps.*
- Follow the steps until you see the Wi-Fi screen.
- Tap a Wi-Fi network to join. Follow the steps until you see the Apps & Data screen, then tap Restore from iCloud Backup.
- Sign in to iCloud with your Apple ID and password.
- When asked, choose a backup. Make sure that it’s the correct one by checking the date and size of each. Learn what to do if you’re asked to update to a newer version of iOS or iPadOS.
- If you purchased iTunes or App Store content using multiple Apple IDs, sign in to each. If you can’t remember the passwords, you can skip this step by tapping «Don’t have an Apple ID or forgot it.»
- Stay connected and wait for the restore process to finish, then complete the rest of the onscreen setup steps. If possible, keep your device connected to Wi-Fi and plugged into power after setup. This allows content like your photos, music, and apps stored in iCloud to automatically download back to your device.
* To erase your device that’s using iOS or iPadOS 15 or later, tap Settings > General > Transfer or Reset [Device] > Erase All Content and Settings. On iOS or iPadOS 14 or earlier, tap Settings > General > Reset > Erase All Content and Settings. This erases all data on your device. After you erase it, your device restarts and the «Hello» screen appears.
Finish up
After you transfer to your new iOS or iPadOS device, you might need to complete a few more steps to finish the process. If you have an Apple Watch, learn how to restore it from a backup and pair it with your new iPhone.
Источник
Transfer photos and videos from your iPhone, iPad, or iPod touch
Learn how to transfer photos and videos from your iPhone, iPad, or iPod touch to your Mac or PC. You can also make your photos available on all your devices with iCloud Photos.
Use iCloud Photos
iCloud Photos keeps your photos and videos safe, up to date, and available automatically on all of your Apple devices, on iCloud.com, and even your PC. When you use iCloud Photos, you don’t need to import photos from one iCloud device to another. iCloud Photos always uploads and stores your original, full-resolution photos. You can keep full-resolution originals on each of your devices, or save space with device-optimized versions instead. Either way, you can download your originals whenever you need them. Any organizational changes or edits you make are always kept up to date across all your Apple devices. Learn how to set up and use iCloud Photos.
The photos and videos that you keep in iCloud Photos use your iCloud storage. Before you turn on iCloud Photos, make sure that you have enough space in iCloud to store your entire collection. You can see how much space you need and then upgrade your storage plan if necessary.
Import to your Mac
You can use the Photos app to import photos from your iPhone, iPad, or iPod touch to your Mac.
- Connect your iPhone, iPad, or iPod touch to your Mac with a USB cable.
- Open the Photos app on your computer.
- The Photos app shows an Import screen with all the photos and videos that are on your connected device. If the Import screen doesn’t automatically appear, click the device’s name in the Photos sidebar.
- If asked, unlock your iOS or iPadOS device using your passcode. If you see a prompt on your iOS or iPadOS device asking you to Trust This Computer, tap Trust to continue.
- Choose where you want to import your photos. Next to «Import to,» you can choose an existing album or create a new one.
- Select the photos you want to import and click Import Selected, or click Import All New Photos.

- Wait for the process to finish, then disconnect your device from your Mac.
Import to your Windows PC
You can import photos to your PC by connecting your device to your computer and using the Windows Photos app:
- Make sure that you have the latest version of iTunes on your PC. Importing photos to your PC requires iTunes 12.5.1 or later.
- Connect your iPhone, iPad, or iPod touch to your PC with a USB cable.
- If asked, unlock your iOS or iPadOS device using your passcode.
- If you see a prompt on your iOS or iPadOS device asking you to Trust This Computer, tap Trust or Allow to continue.
If you have iCloud Photos turned on, you need to download the original, full resolution versions of your photos to your iPhone before you import to your PC. Find out how.
When you import videos from your iOS or iPadOS device to your PC, some might be rotated incorrectly in the Windows Photos app. You can add these videos to iTunes to play them in the correct orientation.
If you’re having trouble importing photos from your iOS or iPadOS device to Windows 10, try these steps:
- On your iOS or iPadOS device, open the Settings app. Tap Camera, then tap Formats.
- Tap Most Compatible. From now on, your camera will create photos and videos in JPEG and H.264 formats.
Источник
Настройка iCloud на компьютере Mac
Узнайте, как войти в iCloud и задать нужные настройки.
Для оптимальной работы iCloud устройство должно соответствовать минимальным системным требованиям.
Использование последней версии macOS
Обновите macOS до последней версии. Выберите меню Apple () > «Об этом Mac» > «Обновление ПО». Если используется macOS Mojave или более ранней версии, выберите меню Apple () > App Store. Проверьте, доступно ли обновление.
Вход в iCloud
Выберите меню Apple () > «Системные настройки» и нажмите Apple ID. Если вы используете macOS Mojave или более раннюю версию, щелкните iCloud. Введите идентификатор Apple ID. После входа служба iCloud включается автоматически.
Настройка параметров iCloud
Выберите меню Apple () > «Системные настройки», затем щелкните идентификатор Apple ID. Если вы используете macOS Mojave или более раннюю версию, щелкните iCloud. Выберите приложения, например «Заметки», «Фото» и iCloud Drive, которые вы хотите использовать с iCloud.
Дополнительная информация
Информация о продуктах, произведенных не компанией Apple, или о независимых веб-сайтах, неподконтрольных и не тестируемых компанией Apple, не носит рекомендательного или одобрительного характера. Компания Apple не несет никакой ответственности за выбор, функциональность и использование веб-сайтов или продукции сторонних производителей. Компания Apple также не несет ответственности за точность или достоверность данных, размещенных на веб-сайтах сторонних производителей. Обратитесь к поставщику за дополнительной информацией.
Источник
Access iCloud Drive files from your iPhone and other devices
Use iCloud Drive to manage, view, edit and update file versions across all of your devices.
Use iCloud Drive on your iPhone, iPad, iPod touch, Mac, or PC
Set up iCloud Drive to keep your files up to date across your devices.
On your iPhone, iPad, and iPod touch with iOS 11 and later, you can access your files from the Files app when you have iCloud Drive set up. The Files app makes it easy to share your documents, collaborate in real time on your Pages, Numbers, and Keynote projects, and manage everything that you store in iCloud Drive.
If you don’t have the Files app on your device, update to iOS 11 or later. If you’re using iOS 9 or iOS 10, you can use the iCloud Drive app.
Automatically save Pages, Numbers, and Keynote files to iCloud Drive
You can update the settings on your iPhone, iPad, or iPod touch so that your documents automatically save to iCloud Drive, On My [device], or a third-party cloud service.
- Go to Settings.
- Choose to update the settings for Pages, Numbers, or Keynote.
- Tap Document Storage.
- Choose where you want to automatically save your documents.
If you choose iCloud Drive, changes you make to Pages, Numbers, and Keynote files on your Mac automatically save to iCloud Drive.
Add Desktop and Documents files to iCloud Drive
If you want to access files from your Mac on your other devices, you can add the Desktop and Documents folder to iCloud Drive.

Manage your iCloud Drive files while offline
If you’re offline and want to access, edit, and save documents in iCloud Drive, follow these steps first.
How to access files while you’re offline
To access your files offline, open the Files app on your iPhone, iPad, or iPod touch and follow these steps.
If you make changes to locally stored versions of your files while offline the changes won’t appear in iCloud Drive. Upload the updated versions of your files to iCloud Drive when you’re back online.
Upload files to iCloud Drive to save changes made offline
You can upload files to iCloud Drive from a Mac or PC by doing one of the following:
- Drag files from either your desktop or a folder window on your computer to the iCloud Drive window. You can also drag your files to a folder icon in the iCloud Drive window. If you drag to a folder icon, it’s highlighted to confirm that the item you’re dragging goes into the folder.
- Click the iCloud Drive upload button in the iCloud Drive toolbar. Select the files you want to upload, then click Choose.
If you don’t have enough space in iCloud for your upload, upgrade your iCloud storage or manage your iCloud storage to free up space.
When changes to your files upload to iCloud
The amount of time it takes for your changes to upload to iCloud depends on the app you’re using. Pages, Numbers, and Keynote regularly upload files to iCloud so you don’t lose any changes. Other apps upload your files to iCloud only after you save them to the iCloud Drive folder. To see your saved files on a Mac, go to Finder > iCloud Drive. On your iPhone, iPad, or iPod touch, go to the Files app. On a PC with iCloud for Windows, go to File Explorer > iCloud Drive.
If you still don’t see the latest changes or you see an «in-progress change» icon or the iCloud icon in the notification area (system tray), try to save a new document to the iCloud Drive folder. Then check the iCloud Drive folder to see if the changes appear.
Where to find missing files
When you turn on iCloud Drive, any documents that you already store in iCloud automatically move to iCloud Drive. You can see your files on iCloud.com, in the Files app on iOS 11 and later, in the Pages, Numbers, and Keynote apps, or in the iCloud Drive app on iOS 10 and iOS 9.
If you don’t see your files in any of those locations, set up iCloud Drive on all of your devices.
If you need to access a file that you deleted within the last 30 days, you can get it back from the Recently Deleted folder in the Files app, or on iCloud.com.
If your files don’t update to iCloud Drive
Check these things first:
- Make sure that you have enough iCloud storage. If you need more space in iCloud, you can buy more iCloud storage or free up space by deleting content.
- Sign in to iCloud on all of your devices and turn on iCloud Drive.
- Make sure that you have an active Internet connection on your Mac and on your iPhone, iPad, and iPod touch.
- Install the latest versions of Pages, Numbers, and Keynote. See which versions of Pages, Numbers, and Keynote you can use with iCloud Drive.
- Create a new document and save it to see if it uploads to iCloud. If it does, see if your other documents start uploading.
If you tried these steps and your files still don’t upload to iCloud, stay signed in to iCloud and save your updated files to a different folder on your Mac or PC. Then contact Apple Support for more help.
How to address a Resolve Conflict message
If you get a Resolve Conflict message when you open a file, choose the version of the document that you want to save. Then choose Keep to update the file in iCloud. This message means the file was updated on another device or from iCloud.com since the last time you signed in to iCloud.
Information about products not manufactured by Apple, or independent websites not controlled or tested by Apple, is provided without recommendation or endorsement. Apple assumes no responsibility with regard to the selection, performance, or use of third-party websites or products. Apple makes no representations regarding third-party website accuracy or reliability. Contact the vendor for additional information.
Источник
Резервное копирование и восстановление iPhone или iPad на Mac или в iCloud
Один из лучших способов защитить информацию на iPhone или iPad от повреждения или потери — создание резервных копий, или копирование файлов и настроек на Mac или в iCloud. Наличие резервной копии также полезна, если у Вас появилось новое устройство и Вы хотите перенести на него предыдущие настройки.
Выполнив резервное копирование устройства, можно при необходимости восстановить информацию на устройстве из резервной копии. Если на устройстве возникли неполадки, которые не устраняются при восстановлении из резервной копии, можно попробовать восстановить на устройстве заводские настройки, а затем восстановить недавнюю резервную копию
Резервное копирование данных на устройстве
Подключите устройство к компьютеру Mac.
Устройство можно подключить через кабель USB или USB-C либо через Wi-Fi. Синхронизация контента с Mac на iPhone или iPad по сети Wi-Fi.
В Finder  на Mac выберите устройство в боковом меню Finder.

Если устройство подключено к Mac посредством USB‑кабеля, но оно не отображается в боковом меню Finder, см. раздел Если устройство не отображается в боковом меню.
В панели кнопок нажмите «Основные».

Вы можете выбрать следующие варианты резервного копирования.

Выберите «Создавать резервные копии наиболее важных данных с [устройства] в iCloud», чтобы сохранять резервные копии в iCloud, а не на Mac.
Выберите «Создавать резервные копии всех данных с [устройства] на этом Mac», чтобы сохранять резервные копии на Mac.
Установите флажок «Зашифровать локальную копию», чтобы зашифровать данные резервной копии и защитить ее паролем. Чтобы впоследствии изменить пароль, нажмите «Изменить пароль».
Нажмите «Создать резервную копию сейчас».
Восстановление устройства с помощью резервной копии
Если на устройстве возникли неполадки, можно восстановить информацию на нем из недавней резервной копии.
Подключите устройство к компьютеру Mac.
Устройство можно подключить через кабель USB или USB-C либо через Wi-Fi. Синхронизация контента с Mac на iPhone или iPad по сети Wi-Fi.
В Finder на Mac выберите устройство в боковом меню Finder.
В панели кнопок нажмите «Основные».
Нажмите «Восстановить из копии».
Нажмите всплывающее меню «Резервная копия», выберите резервную копию для восстановления устройства, затем нажмите «Восстановить».
Если резервная копия зашифрована, перед восстановлением файлов и настроек необходимо ввести пароль.
Восстановление заводских настроек на устройстве
На устройстве можно заново установить стандартное программное обеспечение и восстановить заводские настройки. Это может быть необходимо, если на устройстве часто возникают проблемы (например, «зависания» и сбои) или Вы готовитесь продать или передать устройство другому пользователю.
Важно! При восстановлении заводских настроек с устройства удаляются все данные и настройки. Однако перед этим Mac создает резервную копию устройства. Из этой резервной копии можно восстановить данные и настройки на устройстве.
Примечание. Прежде чем восстанавливать устройство, необходимо отключить приложение «Локатор» в настройках iCloud.
Подключите устройство Mac через кабель USB или USB-C.
Устройство невозможно восстановить через подключение Wi-Fi.
В Finder на Mac выберите устройство в боковом меню Finder.
В панели кнопок нажмите «Основные».
Нажмите «Восстановить [устройство]», затем следуйте инструкциям на экране.
Источник


