- Урок 25. Navigation. Передача данных. Type-safe аргументы.
- Аргументы в графе
- Type-safe
- Отправитель
- action
- Получатель
- Safe Args — верный помощник Navigation Component
- Show me the code!
- В итоге
- Navigating with SafeArgs
- I don’t want to have an argument. But if I do, I’ll use SafeArgs.
- Introduction
- Time to Make the Donuts
- Using SafeArgs
- Summary
- For More Information
Урок 25. Navigation. Передача данных. Type-safe аргументы.
В этом уроке рассмотрим как передавать данные при навигации.
Полный список уроков курса:
Чтобы при вызове destination передать данные, необходимо использовать Bundle. Для него оставили местечко в методе navigate
Создаем Bundle, наполняем аргументами и передаем в метод navigate вместе с ID destination (или action).
В фрагменте fragment2 метод getArguments вернет следующий Bundle:
Соответственно получить данные можно стандартным путем:
А если вызывали не фрагмент, а Activity, то так:
Аргументы в графе
В графе мы можем для destination добавить аргументы и прописать им значения по умолчанию.
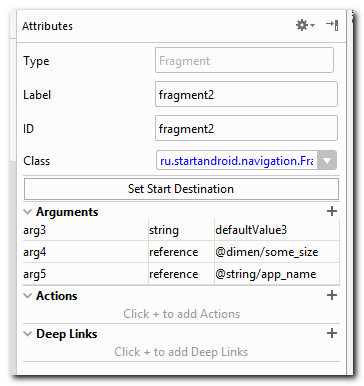
Секция Arguments. Указываем имя аргумента, тип и значение по умолчанию. Тип может быть string, integer и reference.
Если тип reference, то мы можем указать идентификатор какого-либо ресурса. В данном примере я указал dimen и string ресурсы. Они имеют следующие значения.
Давайте проверим, как работают эти значения по умолчанию. Снова вызовем fragment2 и при этом не будем задавать никаких значений для аргументов, которые только что создали.
В результате getArguments в фрагменте выглядит так:
Для аргументов arg3, arg4 и arg5 пришли дефолтные значения. Причем reference идентификаторы были конвертированы в соответствующие им значения. arg4 надо получать, как Int, а arg5 — как String.
Значения по умолчанию будут приходить, если мы в коде не поместили в Bundle какое-либо свое значение аргумента.
Если для аргумента нет значения по умолчанию в графе и в коде ничего не было задано в Bundle, то в destination этот аргумент просто не придет.
Type-safe
Студия может сгенерировать нам классы и методы для удобной передачи аргументов. Для этого нам понадобится safeargs плагин.
В build.gradle файл проекта в секцию buildscript > dependencies необходимо добавить classpath
А в build.gradle модуля добавляем плагин safeargs
Для полноценного использования плагина необходимо использовать action.
Добавим action, который будет вести из fragment1 к fragment2 и укажем >

Обратите внимание, что action подтянул аргументы из destination в который он ведет, т.е. из fragment2. И мы можем указать для них значения по умолчанию.
Итак, у нас в графе есть три компонента, которые участвуют в навигации:
— destination, которому принадлежит (из которого выходит) action (ID = fragment1)
— action (ID = actionToFrgament2)
— destination, в который ведет action (ID = fragment2)
Для каждого из них будет сгенерирован свой класс. Если классы не генерируются, нажмите Ctrl+F9.
Отправитель
Для fragment1 будет сгенерирован класс Fragment1Directions. Т.е. в качестве имени взято ID и добавлено слово Directions. В этом классе будет метод actionToFragment2(), который даст нам action ActionToFragment2.
action
ActionToFragment2 — сгенерированный класс для action actionToFragment2. У этого класса есть методы, соответствующие аргументам этого action (см. скриншот выше). Т.е. для аргументов arg3, arg4 и arg5 будут созданы методы:
и мы сможем их использовать, чтобы задавать значения аргументов. Под капотом там все также используется Bundle.
Код навигации будет выглядеть так:
Получаем ActionToFragment2 из Fragment1Directions, задаем значения аргументов и передаем этот action в метод navigate.
Получатель
Для получателя будет сгенерирован класс Fragment2Args. Т.е. для имени используется ID destination + суффикс Args.
У этого класса будут созданы методы для извлечения данных из bundle.
Статический метод, для создания Fragment2Args с передачей ему bundle.
И методы получения значения аргументов.
Код извлечения аргументов будет выглядеть так:
А если получатель — Activity, то код такой:
Эти сгенерированные классы очень просты, вы всегда можете открыть их и посмотреть код. В целом они являются оберткой над Bundle.
Присоединяйтесь к нам в Telegram:
— в канале StartAndroid публикуются ссылки на новые статьи с сайта startandroid.ru и интересные материалы с хабра, medium.com и т.п.
— в чатах решаем возникающие вопросы и проблемы по различным темам: Android, Kotlin, RxJava, Dagger, Тестирование
— ну и если просто хочется поговорить с коллегами по разработке, то есть чат Флудильня
— новый чат Performance для обсуждения проблем производительности и для ваших пожеланий по содержанию курса по этой теме
Источник
Safe Args — верный помощник Navigation Component
В этой статье вы узнаете, кто такой этот Safe Args, как он упрощает жизнь и что является продуктом его работы, в том числе и за кулисами.
Вы сейчас во второй части большого материала про Navigation Component в многомодульном проекте. Если вы впервые слышите про Navigation Component, то рекомендую сначала почитать, что вообще такое Navigation Component. Если уже знакомы с азами, то можно переходить к самому интересному:
Safe Args — это плагин, идущий отдельно от Navigation Component, но созданный специально для того, чтобы с библиотекой работалось легче. С ним нет необходимости указывать id destination-а и передавать параметры через Bundle — плагин генерирует для этого отдельные классы и имеет набор extension-ов для работы с ними. Давайте разбираться, как это всё работает.
Show me the code!
Здесь мы взяли: достаточно простой граф, где есть фрагмент, вложенный граф и переход от одного к другому. Единственная особенность — пресловутый , с помощью которого мы передаем в users details фрагмент параметр userId. Пересоберём проект и посмотрим, что получилось.
В generated-папке модуля, где лежит граф, находим вот такой класс — обертку, которая включает в себя все переходы, указанные в графе с уже включенными туда параметрами. В нашем случае это переход на экран деталей пользователя и передача туда аргумента userId.
Теперь вызов перехода будет выглядеть так:
А параметры в целевом destination-е можно получить через extension, который теперь у нас имеется.
Сам класс аргументов тоже генерируется в отдельный класс, который содержит методы упаковки и распаковки параметров в Bundle, но он уже не так интересен.
В итоге
Safe Args — приятное дополнение к Navigation Component, благодаря которому мы облегчили себе работу с id переходов и обработки получения/отправки их аргументов. Использовать его или нет — дело ваше, но дальнейшее повествование основано на использовании это плагина. Спойлер: он принесет немало проблем, но в конце все будут счастливы 🙂
Источник
Navigating with SafeArgs
I don’t want to have an argument. But if I do, I’ll use SafeArgs.

This is the third in a series of articles about the Navigation component API and tool. These articles are based on content that is also explained in video form, as part of the MAD Skills series, so feel free to consume this material in whichever way you prefer (though the code tends to be easier to copy from text than from a video, which is why we offer this version as well).
Here’s the video version:
This episode is on SafeArgs , the facility provided by Navigation component for easily passing data between destinations.
Introduction
When navigating to different destinations in your application, you may want to pass data. Passing data, as opposed to using references to global objects, allows for better encapsulation in your code so that different fragments or activities only need to share the pieces that directly concern them.
The Navigation component enables passing arguments with Bundles , which is the general mechanism used in Android for passing information between different activities.
And we could totally do that here, creating a Bundle for the arguments we want to pass and then pulling them out of the Bundle on the other side.
But Navigation has something even better: SafeArgs .
SafeArgs is a gradle plugin that allows you to enter information into the navigation graph about the arguments that you want to pass. It then generates code for you that handles the tedious bits of creating a Bundle for those arguments and pulling those arguments out of the Bundle on the other side.
You could totally use raw Bundle s directly… but we recommend using SafeArgs instead. It’s not only easier to write — with a lot less code for you to maintain — but it also enables type-safety for your arguments, making your code inherently more robust.
To show how SafeArgs works, I’ll keep working with the Donut Tracker app that I demo’d in the previous episode, Dialog Destinations. If you want to follow along at home, download the app and load it into Android Studio.
Time to Make the Donuts
Here’s our donut tracking app again:

Donut Tracker shows a list of donuts, each of which has name, description, and rating information that I added or in a dialog accessed by clicking on the floating action button:

It’s not good enough to be able to add information for new donuts; I also want to be able to change information about existing donuts. Maybe I got a picture of one in the wild, or I want to upgrade my rating for that donut — who knows.
A natural way to do this would be to click on one of the items in the list, which would take me to the same dialog destination as before, where I could update the information about that item. But how does the app know which item to present in the dialog? The code needs to pass information about the item that was clicked. In particular, it needs to pass the item’s underlying id from the list fragment to the dialog fragment, then the dialog can retrieve information from the database for the donut with that id and can then populate the form appropriately.
To pass that id, I’ll use SafeArgs .
Using SafeArgs
At this point, I should point out that I already wrote all of this code, and that’s what you will find in the sample on GitHub ; the finished code. So rather than take you through the steps as I do them, I will explain what I did, and you can see the results in the sample code.
First of all, I needed some library dependencies.
SafeArgs is not the same kind of library module as the other parts of navigation; it’s not an API per se, but rather a gradle plugin that will generate code. So I needed to pull it in as a gradle dependency and then apply the plugin to run at build time, to generate the necessary code.
I first added this to the dependencies block of the project’s build.gradle file:
I used version 2.3.0, but if you’re reading this much later, there’s probably a newer version which you can use instead. Just use whatever version you are using for the other parts of the Navigation component API.
I then added the following command to the app’s build.gradle file. This is the piece that causes the code to be generated for the SafeArgs calls.
At this point, gradle complained that it wanted to sync, so I clicked “Sync Now.”
Next, I went to the navigation graph, to create and pass the necessary data.
The destination that needed an argument is the dialog, donutEntryDialogFragment , which needed information about which item to display. Clicking on that destination showed the destination properties over to the right:
I clicked on the + sign in the Arguments section to add a new argument, which brought up the dialog below. I wanted to pass information about which donut item to display, so I chose Long as the type, to correspond with the type of the id in the database.

Note that the Nullable item was grayed out when I chose Long . This is because the base types allowed ( Integer , Boolean , Float , and Long ) are backed by primitive types ( int , bool , float , and long ) at the Java programming language layer, and these types cannot be null. So even though Kotlin’s Long type is nullable, the underlying primitive long type is not, so we are constrained to non-nullable types when using these base types.
Another thing to note is that the app now uses the dialog destination both for entering a new item (which I covered in the last episode) and for editing an existing item. There won’t always be an itemId to pass along; when the user creates a new item, the code should indicate that there is no existing item to display. That’s why I entered -1 for a Default Value in the dialog, to indicate that situation, since -1 is not a valid index. When the code navigates to this destination with no argument supplied, the default value of -1 will be sent and the receiving code will use that value to decide that a new donut is being created.
At this point, I ran a build, which caused gradle to generate the code for the information I had entered. This was important because otherwise Studio wouldn’t know about the generated functions that I wanted to call, and isn’t auto-complete just grand? (Note: This step is no longer needed in the latest version of Android Studio 4.2; I just tried it on canary 15 and it was able to auto-complete without having to build and generate the code first.)
You can see the results of the generated code by going to the “java (generated)” files in the project list. Inside one of the subfolders, you can see the new files that were generated to pass and retrieve the argument.
In DonutListDirections , you can see the companion object , which is the API I use to navigate to the dialog.
Instead of using an Action , which the navigate() call originally used, the code navigate() s using the NavDirections object, which encapsulates both the action (which takes us to the dialog destination) and the argument created earlier.
Note that the actionDonutListToDonutEntryDialogFragment() function above takes a Long parameter, which is the argument we created, and supplies it with a default value of -1. So if we call the function with no argument, it will return a NavDirections object with an itemId parameter of -1.
In the other generated file, DonutEntryDialogFragmentArgs , you can see the fromBundle() code generated that can be used to retrieve the argument on the other side, in the dialog destination:
Now I could use these generated functions to successfully pass and retrieve the data. First, I created the code in the DonutEntryDialogFragment class to get the itemId argument and decide whether the user is adding a new donut or editing an existing one:
That first line of code uses a property delegate supplied by the Navigation component library which makes retrieving the argument from a bundle easier. It allows us to refer directly to the name of the argument inside of the args variable.
If the user is editing an existing donut, the code retrieves that item’s information and populates the UI with it:
Note that this code queries the database for information, and we want that to happen off of the UI thread. Thus the code observes the LiveData object provided by the ViewModel and handles the request asynchronously, populating the views whenever that data comes in.
When the user clicks the Done button in the dialog, it’s time to save the information they entered. The code updates the database with the data in the dialog’s UI and then dismisses the dialog:
The code we just walked through handles the argument on the destination side; now let’s take a look at how the data gets sent to that destination.
There are two places, in DonutList , which navigate to the dialog. One handles the situation when the user clicks on the FloatingActionButton (FAB):
Note that the code creates the NavDirections object with no constructor argument, so the argument will get a default value of -1 (indicating a new donut) which is what we want from a click on the FAB.
The other way to navigate to the dialog happens when the user clicks on one of the existing items in the list. This action ends up in this lambda, which is passed into the creation of the DonutListAdapter code (as the parameter onEdit ) and called in the onClick handler for each item:
This code is similar to the code above called when the user clicks on the FAB, but in this case it uses the id of the item clicked on, to tell the dialog that it will be editing an existing item. And as we saw in the earlier code, that causes the dialog to be populated with the values from that existing item, and changes to that data will update that item in the database.
Summary
That’s it for SafeArgs . They are simple to use (much simpler than playing around with Bundle s!) because the library generates code for you to simplify passing data in a type-safe and easy manner between destinations. This allows you to take advantage of data encapsulation by passing only the data you need between destinations instead of exposing it more broadly.
Stay tuned for one more episode about Navigation component, where I will explore how to use Deep Links.
For More Information
For more details on Navigation component, check out the guide Get started with the Navigation component on developer.android.com.
To see the finished Donut Tracker app (which contains the code outlined above, but also the code covered in future episodes), check out the GitHub sample.
Finally, to see other content in the MAD Skills series, check out the video playlist in the Android Developers channel on YouTube.
Источник


