- Shooting Video with an iPhone
- Topic tags
- 1. Use a tripod
- 2. Don’t use the iPhone digital zoom
- 3. Light your video
- 4. Use the exposure lock
- 5. Get your microphone close to your subject
- 6. Slow-motion and time-lapse
- 7. Edit on your computer
- Use the camera you have
- Which is correct, «shot with an iPhone» or «shot on an iPhone»?
- 1 Answer 1
- Can You Shoot Professionally With Just an iPhone?
- A Few Tips
- Last Word
- How To : You Can Shoot Better-Looking Videos on Your iPhone if You Change This One Setting
- Method 1: Switch to 4K from the Camera App
- What if It’s Not Switching Between Resolutions?
- Method 2: Switch to 4K from the Settings App
- Your Frame Rate May Change in Dimly Lit Environments
Shooting Video with an iPhone
Topic tags
Apple has come a long way since introducing video recording with the iPhone 3Gs. The newest iPhones can shoot stunning 4K footage, but if you just pull your iPhone out of your pocket and hit record, you won’t take full advantage of everything this powerful camera can do.
The following are some quick tips for getting the most out of your iPhone’s camera.
1. Use a tripod
The newest iPhones have built-in optical image stabilization, which makes shooting decent handheld footage fairly easy. But no matter how steady your hands are, nothing beats using a good old-fashioned tripod.
Our favorite iPhone tripod adapter is the Joby GripTight, which is around $20. It’s barely big enough to hold the iPhone 7 Plus, but it does work.
If you are stuck shooting handheld, here are some tips to help you stabilize your shot:
- Keep the phone close to your body.
- Rest your elbows on a nearby object.
- Use your body to absorb bounces and shakes.
2. Don’t use the iPhone digital zoom
Unless you have the dual-lens iPhone 7 Plus, avoid the temptation to use the iPhone’s built-in camera zoom. Since the lens isn’t zooming optically, you’re just enlarging the picture digitally, which means you will quickly enter the world of unsightly pixelation.
If you want to get a closer-up shot of your subject, move the phone closer until you find the perfect shot!
3. Light your video
Your iPhone footage will look best when you shoot with lots of light. If you’re shooting indoors, adding supplemental lighting will go a long way.
The built-in camera flash on the new iPhone will never compare to using off-camera lights. You can use professional video lights in a bunch of different ways. The Westcott Ice Lights are some of our favorite versatile lights, but if you’re on a budget, you can also hack together a decent lighting kit from Home Depot for under $100.
If you can’t get your hands on any studio lights, but you’re still shooting indoors, position yourself facing a window and use the sun.
4. Use the exposure lock
The iPhone will automatically focus and expose your shot. This can be a great function for quick photos, but when you’re shooting a video of one person talking to the camera, it can really complicate things. The iPhone tends to keep adjusting and refocusing, which can lead to jittery-looking footage.
That’s why we recommend using the exposure focus lock. This will help to keep the focus and exposure constant throughout your shot.
5. Get your microphone close to your subject
A general rule for clear audio is to get your microphone as close to your subject as possible.
When you’re shooting video with an iPhone, it’s best to position a second iPhone directly above the subject’s head to record clean audio. Creating a simple voice memo will do the trick!
Another option is to use an external microphone. You can plug a powered mic, like the Sennheiser ME66, into an XLR microphone adapter, and it’ll send the audio from the microphone directly into your iPhone.
Pro Tip: Clap once at the beginning of each take to create a reference point for syncing the good sound from the voice memo with the bad sound from the video recording.
6. Slow-motion and time-lapse
You can get some amazing shots with the iPhone’s built-in slow-mo, but make sure the choice to slow down the action is motivated. A shot of someone skiing will probably be great in slowmo. A shot of someone typing on their computer, on the other hand, might not be so interesting.
In the camera settings, you can choose to shoot 120 frames-per-second at 1080p resolution or 240 frames-per-second at a reduced resolution of 720p.
Time-lapses are a cool way to showcase a bustling work environment or event. Here are some handy tips for capturing a seamless time-lapse video:
- Put your phone on a tripod.
- Lock the focus and exposure for smooth and natural lighting changes.
- Put your phone in airplane mode before you hit record.
7. Edit on your computer
There are some pretty cool editing apps available for the iPhone, but they still don’t beat editing on your computer. When you finish shooting, plug your phone in, offload your footage, and import your videos into your editor of choice.
If you’ve never edited a video before, there’s never been a better time to start. The iPhone’s camera combined with some minor editing can unlock some serious potential. Plus, free tools like iMovie have made editing easier for everyone.
Use the camera you have
If you thought you needed to go out and buy a DSLR to make a video, think again! Sometimes, the best camera is the one you have with you.
Источник
Which is correct, «shot with an iPhone» or «shot on an iPhone»?
I have used one of these variations (with/on) in a published video. Now one of the industry critics is saying that it should have been the other. So would highly appreciate if the correct preposition is established for the benefit of the entire English-speaking human race for centuries to come. Thank you! 🙂
1 Answer 1
This is clearly a correct use. The picture was shot. The iPhone was used to do this. There is a sense of with that relates this use of action to tool.
This is interestingly correct, in two different ways.
The pictures was shot. Historically, on was used to relate the act of taking pictures to the type of film stock used, but has a very long use referring to the type of equipment used more generally. While one might object that the relationship between act and medium originally suggested by on relates more to the film than the device, the use for referring to the camera too is well-established. And were it not well-established, we would have to coin it any way, to refer to the virtual medium that is used instead of film stock.
On is also used to refer to the relationship between a computer program and the computer that executes it. When you use an iPhone or any other such phone* to take a photograph, you use one or more camera applications on that device. (On referring both to the relationship of the software to the device, and to the relationship of the act of using the software to the device).
It’s amusing that the correctness of this stands up in the face of different attitudes to the device: If we consider it as comparable to all other cameras, then we would use on because we would with any other camera. If however we dismiss it as a camera, then we should forget about what terms are used with cameras and consider it as a small electronic computer, and use on.
Both are hence defensible.
In terms of attestation, both can be found frequently used, whether of phones, other digital cameras, or of film-based photography too.
Now. If you were writing in detail about the photographic process, there might be an advantage in distinguishing between the medium (whether digital or different types of film stock) and the device, and so say e.g. «shot on high-speed black and white film with a Nikon F3». In the context of such use we might favour with over on, though the distinction between medium and device is weaker with digital. In general, the nits just aren’t there to pick.
*This itself showing the way words from earlier technological stages carry through to later developments; it’s increasingly rare to carry a phone these days, as more and more of us carry small pocket-sized computers which have mobile telephony as just one of their many potential uses, but we tend to still call them «phones».
Источник
Can You Shoot Professionally With Just an iPhone?


There are dozens of articles pitting iPhones against typical pro-grade cameras. Dozens of iPhones shootouts. But, what happens when a professional photographer actually relies on an iPhone to shoot and deliver work to clients?
Jenn and Steve Van Elk are wedding photographers shooting out of Indianapolis. After experimenting with the new iPhone for a while, they matched up with a couple that was eager to experiment with them:
We saw a few shoots where people used iPhones to see if they would be a viable option. What we didn’t see was anyone actually shooting a full wedding with an iPhone 11.
The Van Elks covered their couple’s day with two shooters equipped with their normal cameras and a third sporting an iPhone.

According to the Van Elks, perhaps the biggest benefit of shooting with an iPhone is how unobtrusive it can be. Shooting with a phone is going to let you blend in. Big cameras and bigger lenses can attract attention and ruin otherwise candid moments. In particular, the Van Elks note that the iPhone allowed them to shoot candid emotional moments throughout the day where the guests just didn’t notice them as pro photographers.
No one paused and looked at the iPhone when we were shooting candids. People thought we were just another guest and treated us as such. Pick up a 5D Mark IV, and suddenly, that all changes.
 Second, the Van Elks gushed about how straightforward it was to cull images that were already on your device. As any wedding photographer knows, downloading, rendering, and culling a day’s worth of shooting can take hours or even days. Jenn Van Elk was able to cull and provide a mobile Lightroom edit to the wedding images on their drive home. In fact, their excited couple received a wedding gallery before the reception was finished.

The Van Elks feel that the iPhone lacked the creamy shallow depth of field that you can get from shooting details at f/2.8. This isn’t a deal-breaker, but it does set the iPhone images apart from their DSLR counterparts.
 The iPhone can force you to get too close during intimate moments. Shooting a first look from just a few feet away can be a bit intrusive in comparison to shooting with a 200mm lens.
The Van Elks also note that after shooting with DSLRs for years, using an iPhone throws off your whole shooting positioning.
On the subject of ergonomics, there isn’t a good button for taking photos. You’re either tapping the screen, which requires visual or audio confirmation that it was tapped, or you’re pushing the volume rocker, which is stiff and doesn’t feel good to push. Neither one of those things seems bothersome when you just take one or two photos at a time, but after 8 hours of constantly tapping the screen or pushing the volume rocker, you start to notice these things.
A Few Tips
Practically speaking, the Van Elks explain that you should turn off passcode entry to get on the iPhone. Wedding photographers need to be quick on the draw. You need to be able to pick up your phone and start shooting at the drop of a hat, particularly during the reception. Likewise, they suggest that you turn off facial recognition, as the program may slow down the iPhone’s response, leading to missed shots.

Last Word
What do you think? Would you ever shoot a professional gig with a mobile phone? Do you think that in a few more hardware and software generations we’ll see a big enough change that you’d be comfortable using a mobile as your primary pro camera?
The Van Elks’ decision:
Would we prefer to shoot with an iPhone 11 Pro? No. While we do enjoy looking more like guests, we’d rather have a device that produces consistent results. It’s bothersome in its current state. Also, we prefer the way the pistol grips and buttons feel with the DSLR/mirrorless cameras.
Источник
How To : You Can Shoot Better-Looking Videos on Your iPhone if You Change This One Setting
While most smartphones these days take great video, the iPhone is the camera to beat. Recent models like the iPhone 12 and 12 Pro shoot in 4K resolution from every camera, and even a budget device like the iPhone SE delivers an excellent 4K image from the rear shooter. That said, if you haven’t touched your camera settings since taking it out of the box, you’re likely missing out.
Every model since the iPhone 6 S is capable of shooting 4K video (2160p), but Apple insists on setting the default resolution to 1080p HD. That’s still high-definition, just not the maximum quality your iPhone is capable of shooting in. Unless you’re worried about storage space (4K video can take up a lot of room, and even more with HDR enabled), you should be focused on recording the best video possible.
Method 1: Switch to 4K from the Camera App
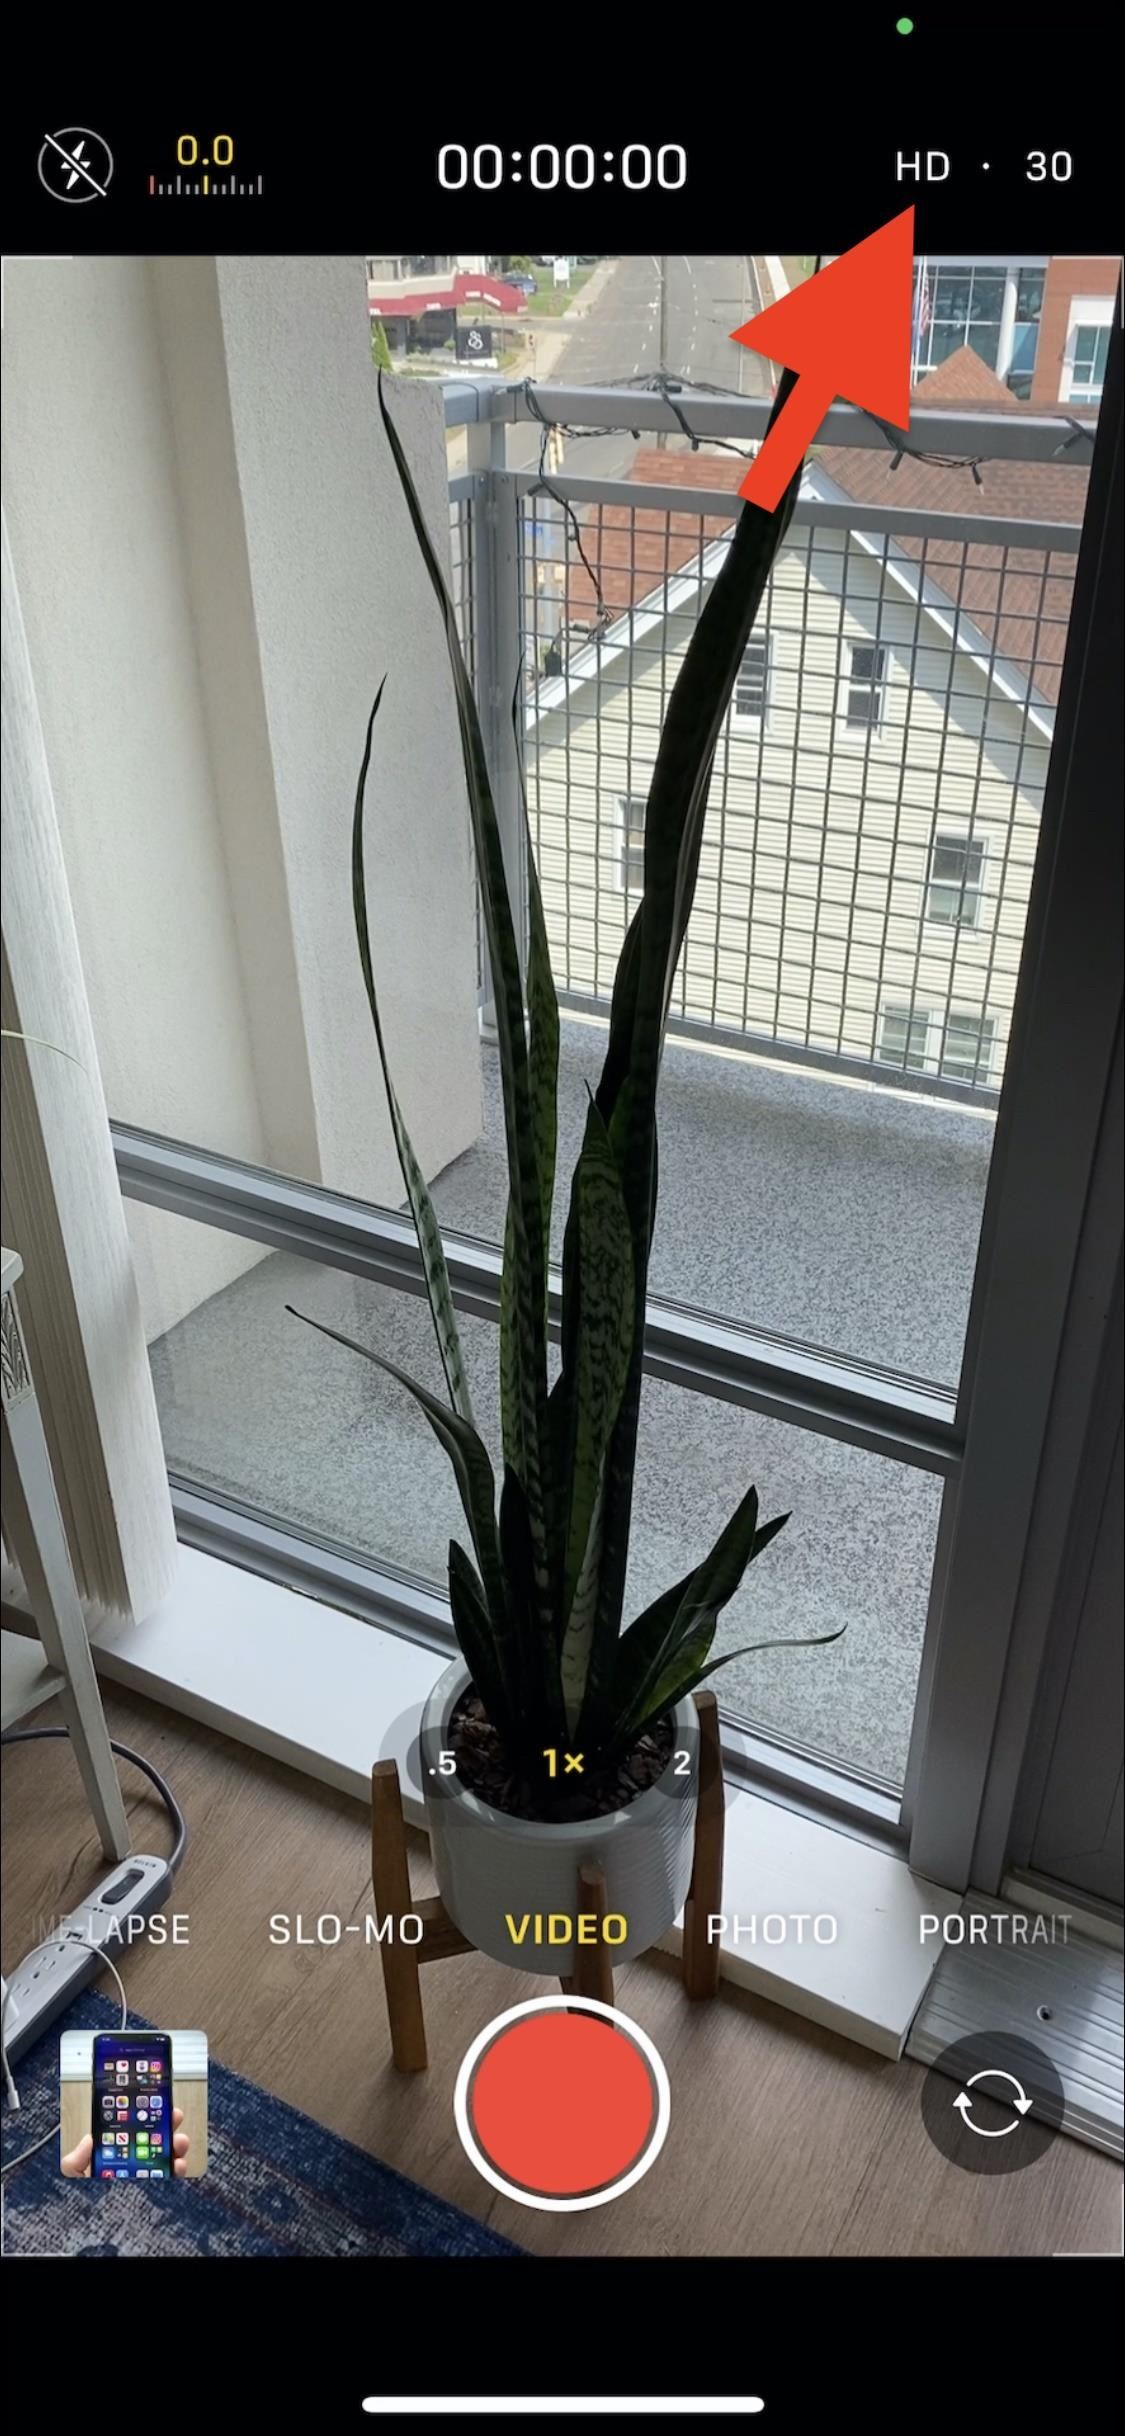
If you’re running iOS 14 on the iPhone 12, 12 mini, 12 Pro, or 12 Pro Max, or any iPhone model that supports the software, or iOS 13.2 or later on an iPhone 11, 11 Pro, 11 Pro Max, or SE (2nd generation), you can change your video resolution right in the Camera app.
Just tap on the «HD» that appears in the toolbar, which signifies 1080p mode. When you do, your iPhone should switch to 4K, without you needing to backtrack over to Settings. If you already see «4K,» that means your iPhone is already shooting at the highest quality possible. However, if you’re using the front camera instead of the rear, only the iPhone 11 series and iPhone 12 series models can choose 4K recordings.
At this point, you can also tap the «24,» «30,» or «60» that’s next to 4K to change the frame rate too. The 24 will make your video look choppier, like film; 30 will look like standard video; 60 will make captured motion look very smooth. The iPhone 8 and later can use any of those frame rates with the rear camera, while older devices are limited to «30» frames per second (fps). The iPhone 11 series and iPhone 12 series models can switch frame rates on the front camera too.
Just know that any changes you make directly in Camera will only affect that shooting session. If you close the app, Camera will return to the default resolution and frame rate (see Method 2 for info on that) when you open it back up. «Preserve Settings» does not lock it in place either.
What if It’s Not Switching Between Resolutions?
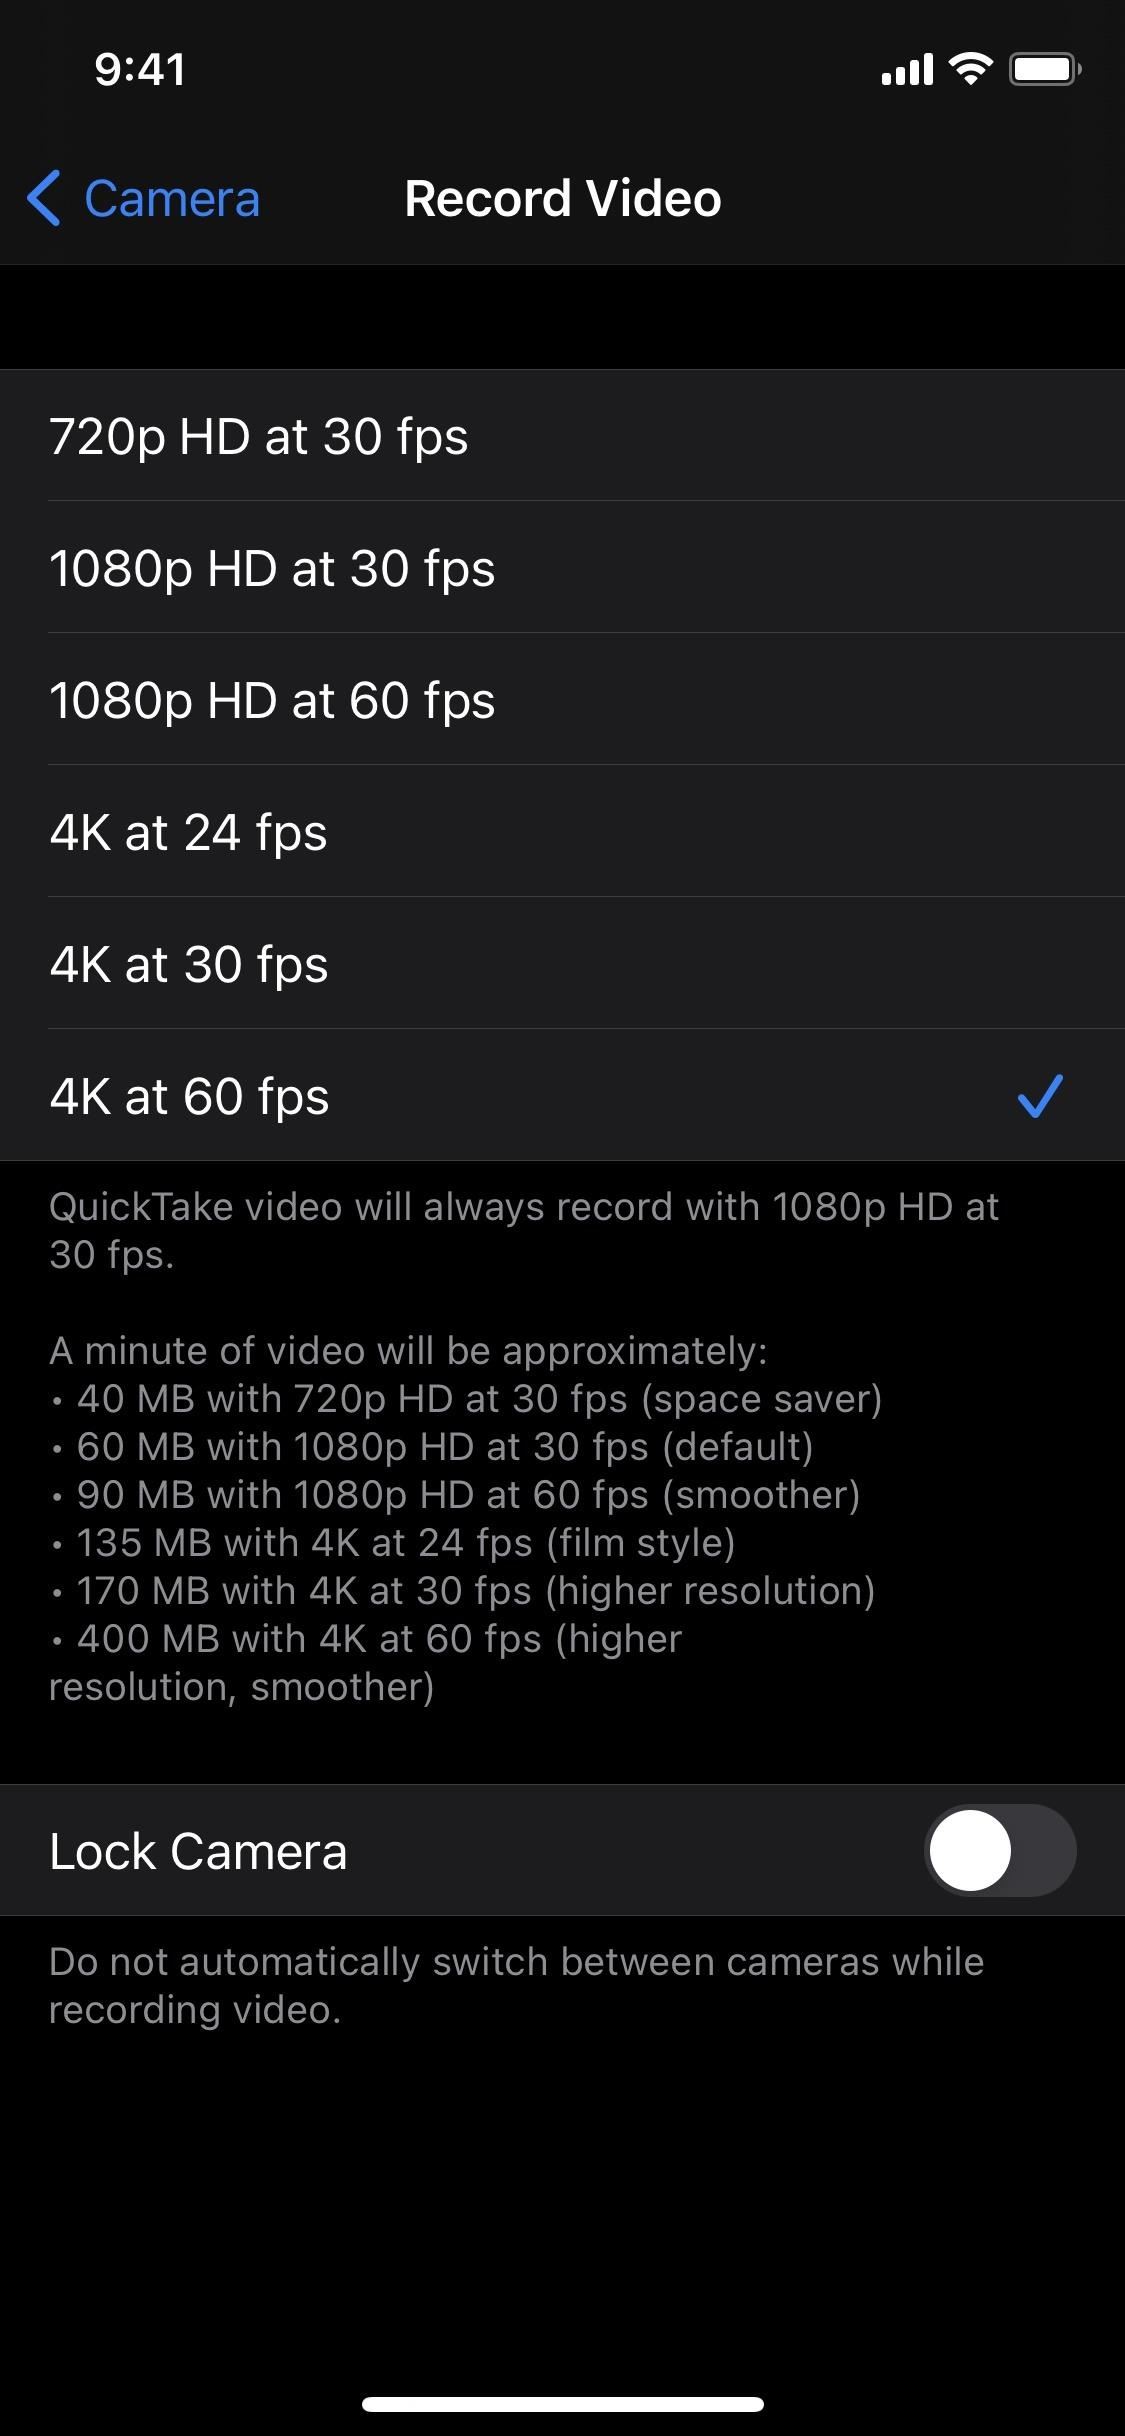
If nothing happens when you tap on «HD» in the toolbar, it may not be activated on your iPhone yet. So, you’ll need to head to Settings –> Camera –> Record Video, then toggle on the «Video Format Control» switch. Not every iPhone will have this setting, so if you don’t see it, it’s on by default, and you can’t turn it off.

Method 2: Switch to 4K from the Settings App
On any iPhone model or iOS version, open Settings, then head to «Camera.» From here, tap «Record Video,» then choose any of the 4K options. Changing it here will switch it in the Camera app immediately.
Just like in Method 1, which frame rate you choose is up to you. To reiterate, 24 fps will make your video look choppier, like film; 30 fps will look like standard video; 60 fps will make captured motion look very smooth. If it helps, the Apple default is 30 fps. Whichever option you choose will apply to the rear and front camera, though, if the front camera does not support your preferred resolution, it will use the next best one.
Whatever resolution settings you choose here will be your defaults going forward. So, let’s say you select 4K at 60 fps, but you change it to 4K at 24 fps using Method 1. When the Camera closes or times out, when you go back to record video, it’ll be back at 4K and 60 fps, your defaults.
Your Frame Rate May Change in Dimly Lit Environments
Now, there’s something to be said about shooting in dark areas. Whenever «Auto FPS» on the iPhone 12 series models is activated, in dimly lit environments, your iPhone will automatically switch from 60 fps or 30 fps to 24 fps since 24 fps keeps the shutter open longer, which lets in more light.
On older iPhone models, it does the same whenever «Auto Low Light FPS» is enabled, only it will switch to 24 fps when shooting at 30 fps, not both 30 fps and 60 fps. The indicator in the Camera app never changes when it does this, so you won’t know until you look at the footage.
Keep Your Connection Secure Without a Monthly Bill. Get a lifetime subscription to VPN Unlimited for all your devices with a one-time purchase from the new Gadget Hacks Shop, and watch Hulu or Netflix without regional restrictions, increase security when browsing on public networks, and more.
Источник


