- Текст на английском языке с переводом № 2.2
- A delicious apple pie!
- Вкусный яблочный пирог!
- Подсказки:
- Making Apple Pie — Transcript
- Let’s Bake an Apple Pie
- First Things First, Let’s Make Our Own Pie Crust
- For a perfect crust every time:
- Let’s Bake a Naturally Sweetened Apple Pie
- Subscribe For Free!
- Apple Pie Recipe
- Best Apples for Apple Pie
- How to Make Apple Pie
- Apple Pie Filling
- Apple Pie Crust
- How to Make a Lattice Pie Crust
- Make Ahead Instructions
Текст на английском языке с переводом № 2.2
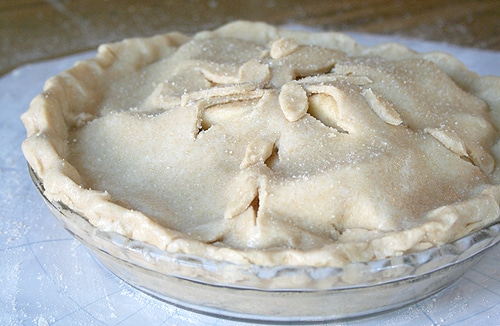
A delicious apple pie!
An apple pie is a simple but very tasty meal 1 . It is very easy to make. It’s made of two parts: a crust and a filling. An apple pie can be single-crusted (with only one piece of crust on top or bottom), or double-crusted (with crust on top and on bottom).
The top of an apple pie can be solid, or the stripes 2 of crust can form a lattice 3 top. If you have a pie with a lattice top, you can see the filling even before you cut the pie!
The filling is made with apples. Some people prefer finely 4 chopped apples, some add large slices 5 instead. With large slices you will get a hearty 6 pie, while the fine chop will make your pie very delicate.
An apple pie is a signature dish 7 of many nations. The first written recipe is found in the 14th century book The Forme of Cury ( The Method of Cooking in Middle English). That recipe also called for some pears, raisins and saffron.
An apple pie is also a signature American dish. Some people even call it an unofficial symbol of the United States.
The most basic (but still tasty!) apple pie needs 2 or 3 cups of flour, 2 eggs (1 beaten 8 egg), a stick of butter, some salt and a cup of water for a crust. For a filling you can take 1 kg of apples, a cup of sugar, 2 tablespoons 9 of flour. Make a simple pastry dough 10 and let it rest in your fridge. Combine everything you need for a filling and refrigerate it as well. Place your dough into a pie dish, add filling and the top layer of crust. Make sure to pinch 11 your crust so it’s sealed all around the pie. Brush 12 your pie with the beaten egg and bake in a preheated oven at 200 °C for about an hour until the crust is golden brown. The pie can be served with an ice cream or a cheese topping. Bon appétit!
Вкусный яблочный пирог!
Яблочный пирог – простое, но очень вкусное блюдо. Его очень легко приготовить. Оно состоит из двух частей: теста и начинки. Яблочный пирог может быть открытым (слой теста только сверху или только внизу) или закрытым (с тестом и сверху, и снизу).
Верх яблочного пирога может быть целым, либо же кусочки теста могут быть выложены в форме решётки. У пирога с решётчатым верхом начинку можно видеть ещё до разрезания!
Начинка делается из яблок. Некоторые люди предпочитают мелко нарезанные яблоки, некоторые вместо этого добавляют большие дольки. С большими дольками пирог получается очень сытным, а с мелкой нарезкой пирог будет очень нежным.
Яблочный пирог – национальное блюдо многих кухонь мира. Первый письменный рецепт был найден в книге XIV века «The Forme of Cury» («Методы приготовления еды» на среднеанглийском). Этот рецепт, кроме всего прочего, требует также груши, изюм и шафран.
Яблочный пирог, кроме того, является фирменным американским блюдом. Некоторые люди даже называют его неофициальным символом Соединённых Штатов.
Для самого простого (но по-прежнему вкусного!) яблочного пирога понадобится 2 или 3 стакана муки, 2 яйца (одно взбитое яйцо), пачка сливочного масла, немного соли и стакан воды – на тесто. Для начинки можно взять 1 кг яблок, стакан сахара, 2 столовые ложки муки. Сделайте простое тесто для выпечки и поставьте отдыхать в холодильник. Соедините всё, что вам нужно для начинки, и также поставьте охлаждаться. Поместите ваше тесто в форму для пирога, добавьте начинку и верхний слой теста. Убедитесь, что защипнули тесто по всему периметру пирога. Смажьте ваш пирог взбитым яйцом и выпекайте в разогретой до 200 °C духовке около часа или пока корочка не станет золотисто-коричневой. На готовый пирог при подаче можно положить мороженое или сыр. Приятного аппетита!
Подсказки:
- 1 meal – обед, кушанье, блюдо (как таковые);
- 2 stripes – полоски;
- 3 lattice – решётка;
- 4 finely (контекст.) – мелко (нарезанное, обработанное и т.п.);
- 5 slices – ломтики, дольки;
- 6 hearty (контекст.) – сытный, плотный;
- 7 dish (контекст.) – блюдо (в т.ч. рецепт);
- 8 beaten (контекст.) – взбитый;
- 9 tablespoons – столовые ложки.
- 10 pastry dough – тесто для выпечки;
- 11 to pinch – щипать, защипывать;
- 12 to brush – обработать при помощи щётки.
Finely в контексте данного текста – мелко, деликатно, а вовсе не хорошо.
Кулинарные традиции часто ссорят автора и переводчика. Так, в данном тексте очень сложно подобрать адекватный перевод слову crust: под «корочкой» здесь подразумевается весь наружный слой пирога, исключая начинку – в том числе и, возможно, не самые сухие его части. Аналогично, интуитивно абсолютно понятный кулинарный термин topping не имеет точного аналога в русском языке и со временем для удобства был полностью позаимствован (топпинг для пиццы, топпинг для мороженого).
Источник
Making Apple Pie — Transcript
Two friends talk about what they need to make apple pie.
| Your browser does not support playing embedded audio. If the audio player above doesn’t work, click here to download the audio file. Mike: We have to make dinner tonight. I hope you remembered! Cathy: Oops, I forgot actually. What do you want to make? Mike: Well, I thought we could make that apple pie we did last time. what do you think? Cathy: Yeah, ok, that’s a good idea. Do we have everything we need? Mike: Mm, let’s go and have a look in the kitchen. Cathy: right, first, of course, we need some apples. Do we have any? Mike: Yes, we have a lot of apples. I bought ten only yesterday. How many do we have to use? Cathy: I think six large apples will be fine. Now, is there any flour? We have to use two and a half cups of flour. How much do we have? Mike: I think we’ll have to buy some flour. We don’t have much. Maybe only 200 grams. I’ll start a shopping list. ok, flour. What about cinnamon and nutmeg? Cathy: Well, for this recipe, we only need a little cinnamon and nutmeg. How much do we have? Mike: Oh, these containers are both full, so we don’t need any more. Now, we need a little salt. Cathy: OK, we have a lot of salt. Mike: And quite a lot of sugar, hmmm. it says in the recipe about a cup. Cathy: Oh. we don’t have any sugar! We can’t make apple pie without sugar. Write sugar on the shopping list. Mike: OK, I’ve got it. We need a little butter too. Did you buy any butter yesterday at the store? Cathy: No, I didn’t get any. How much do we need for the recipe? Mike: Well, it says 100 grams. I think we have some butter in the fridge. Cathy: Yes, we don’t have much but there’s enough. Mike: OK, I will go down to the store and buy these things we need. And we can start when I return. Источник Let’s Bake an Apple PieT he temperatures are dropping and school has officially started. This is my first time as a parent with a child at school and I have to admit, the first couple of weeks I was heartbroken. I missed my little guy during the days and what made it worse, he was having a rough time being away as well. Now that he’s adjusted and quite happy to be in kindergarten, I’ve been on the upswing. I have found myself with more time on my hands and, in this season, there is nothing more relaxing than baking an apple pie.
With my 3 year old at home, we’ve been able to turn up the music, dance and bake. There’s so much freedom and peace in listening to good music and playing in the kitchen. What’s even more rewarding is that the older boys are happy to see what you’ve created after a long day of school and work. I’m starting to enjoy these school days and the season in which I have found myself. So, with fresh local apples at every farmers’ market (or your neighbor’s tree) let’s have some fun. Let’s bake an apple pie! First Things First, Let’s Make Our Own Pie Crust
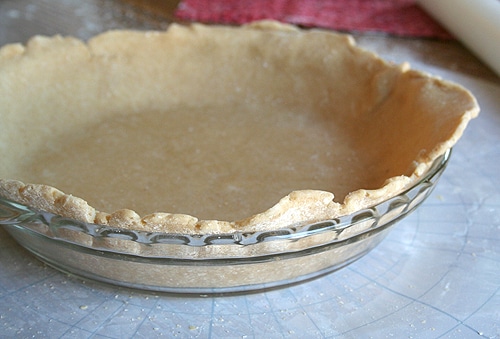
With only a few simple ingredients and a food processor, making a pie crust can be simple and quick to make. This is my go-to recipe for a buttery, rich, flaky crust. A traditional French Pâte Brisée. For a perfect crust every time:
For my pie crust, I grind my own whole wheat grain using soft white wheat berries. This is what you would find at the store called Whole Wheat Pastry Flour. In my opinion, store bought whole wheat flour does not compare to milling your own grain at home. It’s much heavier and in my opinion, gritty. If you do not grind your own grain, I would suggest using an unbleached all purpose white flour. **For a video tutorial for this pie crust, head over to A Little Bit of Spain in Iowa and join me in my kitchen as I mix it up!** Ingredients for a two crust pie:
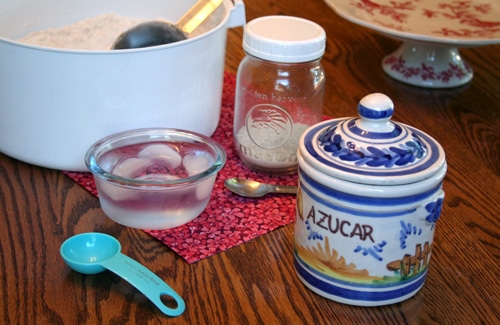
Method: 1. In a food processor combine the flour, salt and sugar. Blend to incorporate. 2. Cut the butter in small pieces, making sure to not handle it too much. Your hands will give off quite a bit of heat and it’s important to keep your butter as cold as possible. 3. Add the butter to the flour mixture and pulse 6-8 times or until the mixture resembles a coarse grain. Do not over process. 4. Add 1 tablespoon at a time of water and pulse. Continue to do this until the dough just begins to hold together without being wet or sticky. Again, do not over process. 5. The dough should not stick together in a ball-shaped form. It should just begin to hold. Once you’re at this stage, empty the dough “pieces” onto the counter and shape quickly into a rounded ball. Divide into two balls. 6. Quickly shape each piece into a disc and wrap in plastic. Do not overwork. 7. Place the dough in the refrigerator for at least 1 hour before using. The dough will keep in the refrigerator for 2 weeks or frozen for up to a month. Let’s Bake a Naturally Sweetened Apple Pie
Now that our pie crust has been made, putting together a filling for apple pie is a breeze. What’s great about this version is that it uses real maple syrup as the sweetener. Its sweet maple flavor lends itself beautifully to the apples and cinnamon; no one would ever guess that a granulated sugar wasn’t used. Ingredients:
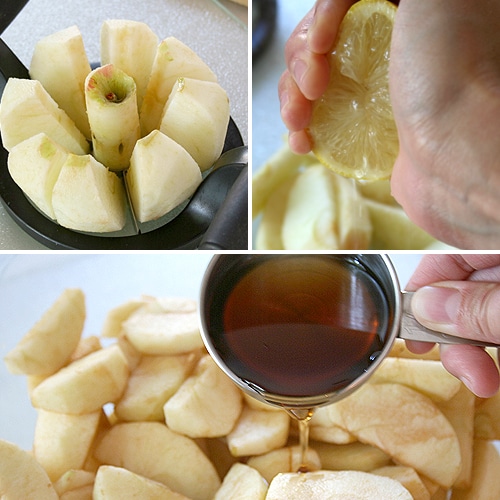
1. While peeling and slicing your apples, place in a large bowl and add the juice of 1/2 a lemon. Make sure to toss the apples in the lemon juice as you keep adding them to the bowl to prevent from discoloring. Once all the apples have been peeled and sliced, add the butter and maple syrup to the bowl. Mix well.
2. In a smaller bowl, combine the cinnamon, nutmeg and flour. Add to the apples and toss to incorporate.
3. Roll out one pie crust and line into a pie dish. Add the apple mixture into the pie crust, making sure to drizzle any remaining liquid on top.
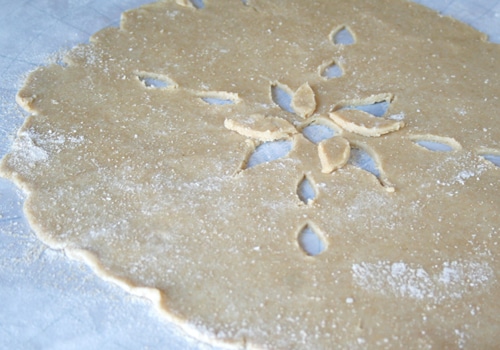
4. Roll out the top pie crust, cutting out any decorations into the crust.
5. Carefully, lift the top pie crust and cover the pie. Pinch the sides of the pie closed and sprinkle with organic sugar.
6. Bake at 450°F for 10 minutes. Lower the heat to 350°F and continue to bake for an additional 40-45 minutes. Allow to rest for at least 1 hour before you cut through. The liquids will thicken as it cools. What’s your favorite dish to make or treat to bake while jamming to your favorite tunes in the kitchen? As a first generation American, Diana shares her family’s traditional Spanish and Mexican recipes at her blog, A Little Bit of Spain in Iowa. As a mami and urban homesteader she also writes about her faith, family, organic gardening, raising backyard chickens and preserving the harvest. Subscribe For Free!Like reading this post? Источник Apple Pie RecipeThis apple pie recipe is easy to make from scratch! With a flaky, buttery pie crust and a sweet homemade apple pie filling, this apple pie is guaranteed to be a favorite. It’s perfect for the holidays or a weekend dessert.
Homemade apple pie is a classic dessert that’s especially perfect for fall. But really, who wouldn’t love a slice of apple pie any time of year? Making a pie from scratch can seem difficult, but it is actually really easy. If making pie dough from scratch intimidates you, don’t worry. I will walk you through the simple steps so that you can make your own scrumptious apple pie from scratch. As I was testing this apple pie recipe, my whole family kept raving that it’s the best apple pie they’ve ever eaten. You’ll have to tell me which you like more, because I just can’t decide: the juicy cinnamon-spiced apple pie filling or the buttery, flaky pie crust.
For Thanksgiving and the holidays, this delicious pumpkin pie recipe is my other favorite (and it’s really easy, too!). You’ll also love my blackberry pie and cherry pie recipes. For an easy-to-make apple dessert try my Apple Crisp recipe. Best Apples for Apple PieThe best apple pie starts with good baking apples. You want to use apples that are firm enough to hold up to the heat of baking, so that they don’t cook down into mush. I like to use a combination of sweet and tart apples in apple pie for the best flavor and texture. My favorite is a combination of Granny Smith and Honeycrisp apples. The Granny Smiths add tartness, and the Honeycrisps are on the sweeter side, so you get the perfect balance of sweet and tart flavors. Tart varieties of apples that are best for pie include Granny Smith, Northern Spy and Cripps Pink. Sweeter varieties of apples that are best for pie include Honeycrisp, Jonagold, Golden Delicious, Braeburn, Pink Lady, Crispin (Mutsu), Jazz and Fuji. Learn more about apple types. How to Make Apple PieApple Pie FillingThis easy apple pie recipe starts with my easy homemade apple pie filling. The first step is to peel and slice your apples. You want the apple slices to be about 1/4-inch thick. You will need about 8 cups of sliced apples (6-8 apples) to fill a deep dish pie dish. Place the sliced apples in a large bowl. To the bowl, add the rest of the apple pie filling ingredients:
Stir to combine the ingredients. Then you’ll let the filling sit at room temperature while you make the pie crust. As the filling rests, the sugar will start to bring out the juices from the apples. You’ll stir the filling again after it sits to make sure everything is well combined.
Apple Pie CrustFor the pie crust, we are using my easy pie crust recipe – you don’t have to chill the dough before rolling it out, and it rolls out like a dream. The trick to the best flaky pie crust is to use very cold butter and ice cold water, and to work quickly to keep the butter cold. But don’t stress! You really can’t mess up pie crust. I like to make pie dough in my food processor, because it is quick and easy. You can also make the pie crust by hand, using a pastry blender. The steps to making the pie crust are simple:
My recipe makes enough dough for a top and bottom pie crust. You’ll cut the dough in half and shape it into two disks. Refrigerate one disk for the top crust, and roll out the other for the bottom crust. Fit the bottom crust into your pie dish so it reaches all the way up the sides of the dish. Give the apple filling a stir and transfer it to the bottom crust in the pie dish. If it seems like your apples won’t fit, use your fingers to arrange them a bit and help them better fill the space. Roll out the second pie crust for the top of the pie. You can place it on the pie whole, you can make a lattice pie crust, or you can use a cookie cutter and arrange the dough shapes on top of the pie filling. If placing the dough round on the pie whole, be sure to cut a few slits in the top dough so that steam can escape as the pie bakes. I like to sprinkle some coarse turbinado sugar on the top crust because it makes the pie look pretty. It also adds a delicious sweet crunch to the top crust. Before sprinkling on the sugar, lightly brush the crust with milk to help the sugar stick. The milk also helps the crust to brown nicely. (I use milk instead of an egg wash, which is a combination of an egg and milk or water, because I find it easier and just as effective). While your oven preheats, chill the pie in your refrigerator to make sure the crust is cold. You’ll bake your apple pie for 20 minutes at 400° F and then another 40-50 minutes at 350° F. Check on the pie after it has baked for about 30-40 minutes total, and cover it loosely with foil to prevent the crust from browning too much. The pie is done when the filling is bubbly. How to Make a Lattice Pie CrustA lattice-top pie crust is the name for the woven crust that you see on the top of this apple pie. It’s fun and pretty to make a lattice top crust for your pie. To make a lattice pie crust, roll out the dough for the top of the pie into a 12-inch diameter circle. Use a sharp knife, pizza cutter or pastry wheel to cut the dough circle into ½-inch strips.
Using every other strip from the circle, arrange half of the dough strips going one direction across the pie. Leave a little bit of space in between each strip.
Weave the other half of the dough strips through the first set, over and under, pulling back the first set of strips as needed to weave. I find it easiest to start in the center of the pie when weaving, and pull back every other of the first set of dough strips.
Once you finish weaving in strips on one side of the pie, begin weaving the remaining strips of dough on the other side of the pie.
When you are finished weaving, trim off any excess dough from around the edges of the pie. Fold the edges under and crimp or flute as desired.
Make Ahead InstructionsIf you want to make this apple pie ahead for your Christmas or holiday meal, I recommend baking it the day before, letting it cool completely, and then storing it at room temperature, wrapped tightly with plastic wrap. To make two days ahead, cool completely, wrap tightly, and store in the refrigerator. Take the pie out of the refrigerator 1-2 hours before serving to let it come to room temperature. To store apple pie: You can store your apple pie at room temperature for one day. This apple pie can be stored in the refrigerator for 4-5 days. To freeze apple pie: Let the pie cool completely and then wrap it tightly. Freeze for up to 3 months. Thaw for 24 hours in the refrigerator before serving. Источник  Введение Технологии развиваются с невероятной скоростью  Введение: Apple является одной из самых известных и  Кастомизация гаджетов Apple – это процесс изменения |