- Image as map android
- Android MapView Tutorial
- Defining MapView in Layout
- Activity MapView
- Google Maps UI Controls
- Google Maps Gestures Setting
- Google Maps Camera Position
- Camera Position Update in Response to Events
- Google Maps Event Listeners
- OnCameraIdleListener
- OnCameraMoveListener
- OnCameraMoveStartedListener
- OnCircleClickListener
- OnInfoWindowClickListener
- OnInfoWindowCloseListener
- OnMarkerClickListener
- OnPoiClickListener
- OnPolygonClickListener
- Google Map Lite
- Lite mode xml attribute
- Enabling lite mode programmatically
- About
- Android Google Map Custom Marker Icon,Image,Color,Size,Title,Name
- Google Map Image
- Wait Before You Start
- Step 1. Default Activity
- Step 2. Adding API Key
- Step 3. Finishing the Changes
- Customizing Marker Title
- Customizing Marker Snippet or Text
- Customization of Marker Icon
- Changing Marker Color
- Other References On Map
- Maps SDK for Android
- Requirements
- Java compatibility
- Use with other Mapbox tools
- Static maps
- Mapbox Studio
- Conditions
- Attribution
Image as map android
Android MapView Tutorial
November 14, 2017
This tutorial is a continuation of Google maps in android apps tutorial and shows how to use MapView instead of SupportMapFragment to display Google maps in android applications. It also covers Google maps UI controls or settings, gestures, events and lite mode topics which were not covered in the previous tutorial Google maps android tutorial. You can find initial setup required to use Google maps android API in android projects at Google maps android tutorial.
If you want to learn android and its latest features with examples. Please visit android tutorials to learn android concepts, components and libraries with examples.
Defining MapView in Layout
To display maps in your android app, you need to first add MapView to activity layout.
Activity MapView
In the activity, get the MapView object and call getMapAsync on it passing OnMapReadyCallback handler. And also you need to make sure that you call onCreate, onSaveInstanceState, onResume, onStart, onStop, onPause, onDestroy and onLowMemory methods on MapView object in the corresponding activity lifecycle methods.
In the OnMapReadyCallback’s onMapReady method you can get GoogleMap object and apply required settings to customize the map.

Google Maps UI Controls
You can enable UI controls such as compass, zoom controls, indoor level picker, and map tool bar by setting related attributes in xml or programmatically. By default UI controls are not displayed.
Compass will be visible on rotating the map.
Map toolbar will be visible on touching a marker. Map tool bar contains actions which take you to directions screen, google map app etc.
Indoor level picker is applicable for building with floor plans, which allow you to see floor plan of selected level. First you need to enable indoor maps by calling setIndoorEnabled and setting it true on GoogleMap object.

Google Maps Gestures Setting
By default user can tilt, pinch to stretch, zoom, rotate and scroll map. If you don’t want to provide these options to user, you can disable any or all of the gestures. Below example shows how to disable gestures by calling setRotateGesturesEnabled, setScrollGesturesEnabled, setTiltGesturesEnabled and setZoomGesturesEnabled methods on UiSettings object.
Google Maps Camera Position
You can change the camera position programmatically or in xml. Some of the camera position attributes are target position, bearing, tilt and zoom. Bearing is the direction the camera is pointing, which is in degrees clock wise from north. Tilt is camera angle in degrees from the line when it is directly facing the earth.
Classes which are used to configure camera position are CameraPosition.Builder, CameraPosition, CameraUpdate and CameraUpdateFactory. Using CameraPosition.Builder, you can define camera position and then you can apply new camera position to GoogleMap using moveCamera method which takes CameraUpdate as parameter.
To get CameraUpdate object, you need to CameraUpdateFactory and its methods. If you use CameraPosition.Builder and create CameraPosition, you can get CameraUpdate object for that using newCameraPosition method of CameraUpdateFactory.
You can update camera position in response to events. Below example shows how to update camera position.
Camera Position Update in Response to Events
Camera position can be updated in response to events, below example shows zoom change in response to OnMapClick event using OnMapClickListener as shown below.
Google Maps Event Listeners
There are several event handlers which you can implement and add to GoogleMap to provide custom behavior in response to user interaction on Google maps.
OnCameraIdleListener
OnCameraIdleListener’s onCameraIdle method is called after camera moves. You can add the listener to GoogleMap object by calling setOnCameraIdleListener.
OnCameraMoveListener
OnCameraMoveListener’s onCameraMove method is called while camera moves. You can add the listener to GoogleMap object by calling setOnCameraMoveListener.
OnCameraMoveStartedListener
OnCameraMoveStartedListener’s onCameraMoveStarted method is called when camera motion starts. You can add the listener to GoogleMap object by calling setOnCameraMoveStartedListener. Based on the reason for camera motion, you can do something. Possible reasons for camera motion are GoogleMap.OnCameraMoveStartedListener.REASON_API_ANIMATION, GoogleMap.OnCameraMoveStartedListener.REASON_DEVELOPER_ANIMATION and GoogleMap.OnCameraMoveStartedListener.REASON_GESTURE
OnCircleClickListener
OnCircleClickListener’s onCircleClick method is called when a circle on the maps is clicked. You can add the listener to GoogleMap object by calling setOnCircleClickListener. In onCircleClick method, you can use Circle object, which is clicked, to change circle settings or other customizations on map.
OnInfoWindowClickListener
OnInfoWindowClickListener’s onInfoWindowClick method is called when marker’s info window is clicked. You can add the listener to GoogleMap object by calling setOnInfoWindowClickListener. Method onInfoWindowClick is passed the Marker object to which info window anchored. Using the Marker object, you can customize marker or info window in the handler method.
OnInfoWindowCloseListener
OnInfoWindowCloseListener’s onInfoWindowClose method is called when info window is closed. You can add the listener to GoogleMap object by calling setOnInfoWindowCloseListener.
OnMarkerClickListener
OnMarkerClickListener’s onMarkerClick method is called when a marker is clicked. You can add the listener to GoogleMap object by calling setOnMarkerClickListener. Return true to override the default behavior.
OnPoiClickListener
OnPoiClickListener’s onPoiClick method is called when any point of interest on the map is clicked. You can add the listener to GoogleMap object by calling setOnPoiClickListener method. PointOfInterest object which is passed to onPoiClick method can be used to get information about point of interest and do something like adding marker to POI and moving camera to POI as shown in the below example.
OnPolygonClickListener
OnPolygonClickListener’s onPolygonClick method is called when a polygon is clicked. You can add the listener to GoogleMap object by calling setOnPolygonClickListener, using polygon object passed to the handler method, you can customize the map.
Google Map Lite
You can display Google map in lite mode in android apps by setting lite mode attribute to true in xml or programmatically. You can set zoom, add marker, info window and shapes and select one of the supported map types to map, but lite mode doesn’t support camera tilt and bearing. User viewing the lite map can’t zoom or pan.
Lite mode xml attribute
To enable lite mode in xml layout, you need to set liteMode attribute to true.
Enabling lite mode programmatically
To enable lite mode in code, you need to instantiate MapView passing GoogleMapOptions object to constructor and then add the MapView object to layout. GoogleMapOptions contains lite mode attribute which you need to set to true.
About
Android app development tutorials and web app development tutorials with programming examples and code samples.
Источник
Android Google Map Custom Marker Icon,Image,Color,Size,Title,Name

This page is about Android Google Map Custom Marker Icon with Image,Color,Size,Title and Name programmatically.
Google map gives us many ways to customize the look and feel of the map. One of them is to customize the marker.
By default, google map shows the red icon marker but we can change this red icon marker with our custom image and icon.
You can also change the Title, Name, Snippet, Size etc. of the marker to make it more attractive.
We have to work with some methods and options provided by android’s in built library to accomplish our task.
In this tutorial, I will show you how to do this with one practical example in android studio.
Google Map Image
Final output for our example is as the below image
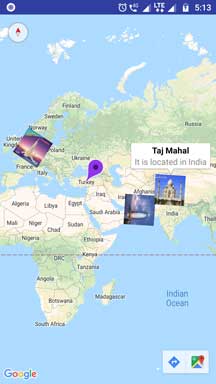 Output with Custom markers
Wait Before You Start
To integrate the google map in your android app, you need to have one Google API Key.
You need to create one app in the Google developer console to generate this API Key.
I have already written one separate article on this topic. Read it here : Android Integrate Google Map with API Key.
Just follow the “Work At Google Developer Console” part of this tutorial. After this, you will have one Google API Key which you need to write in your android studio project.
After getting Your Key, create new project in android studio.
Step 1. Default Activity
When you are creating new project in android studio, after giving project name, project directory and SDK level you need to select the activity type.
Activity type screen should look like the below picture
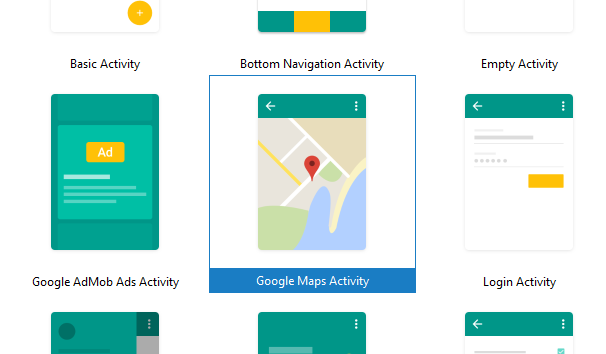 Select Google Map Activity
As you can see in the above image, there are many options like Basic Activity, Bottom Navigation Activity, Login Activity etc.
Among them select “Google Maps Activity” because it will load google map automatically to our default activity.
Thus, it will save our time and we do not need to write extra coding lines.
Step 2. Adding API Key
Now it is time to add the Google API Key, that you generated in the google developer console.
- There is a file named “google_maps_api.xml” in the res->values directory
- You need to write your key in this file.
Source Code for this file should look like below snippet
In the above code, last line have tags. You should write your Google API Key just between these two tags.
Step 3. Finishing the Changes
At last we just need to update the coding structure of MapsActivity.java file.
There should be some code lines already written by the compiler.
But replace all of them with the below lines including import statements.
Now let us read above code step by step.
Following code snippet is first one.
- Above lines will simply initiate the google map.
- When compiler is ready to create a google map, it will call onMapReady() method.
Following is the first few writings for onMapReady() method.
- First line will set the google map type. By default NORMAL MODE is selected.
- You can choose other options like : HYBRID, SATELLITE, TERRAIN etc.
- Then after camera options and position are specified. You need to give latitude and longitude in .target() option.
Now let us read how to customize markers.
I have created four markers like the above code snippet.
Customizing Marker Title
.title(“Taj Mahal”)
For customizing title of the marker, you just need to update the above line.
Customizing Marker Snippet or Text
.snippet(“It is located in India”)
Above line will help you to add some description about the marker.
Customization of Marker Icon
.icon(bitmapDescriptorFromVector(getApplicationContext(),R.drawable.taj)));
- Above line helps you to have custom image as a marker icon. All you need is to save your image into drawable folder.
- Here, I have used bitmapDescriptorFromVector() method to get the bitmap from the image.
Following is the source code for bitmapDescriptorFromVector() method
Changing Marker Color
.icon(BitmapDescriptorFactory.defaultMarker(BitmapDescriptorFactory.HUE_VIOLET)));
Above line will generate violet colored marker with the default shape.
Change various colors to make your marker more beautiful.
Other References On Map
Below are some useful examples for Google map in android.
Источник
Maps SDK for Android
Current version: v 10.1.0 View changelog
The Mapbox Maps SDK for Android is a library for embedding highly customized maps within Android applications.
Use custom map styles. Start with one of our Mapbox-designed styles that are optimized for various use cases or design your own custom style in Mapbox Studio. Enhance the experience with 3D terrain. You can even alter your map’s style at runtime.
Add your own custom data to the map. Whether you’re adding markers to a map to include a store locator right in your app or creating compelling data visualizations, the Maps SDK gives you control over how you display data on your map. You can style map features at runtime based on data properties, user interaction, or device settings.
Your browser doesn’t support HTML5 video. Open link to the video.
Requirements
The Mapbox Maps SDK for Android is compatible with applications that:
- Are built using the Android SDK 21 or higher.
- Use Java 8 for sourceCompatibility and targetCompatibility , as shown in the installation guide.
Java compatibility
The Mapbox Maps SDK for Android is built with Kotlin, the official language recommended by Google for Android development. Kotlin is 100% interoperable with Java.
Applications with a Java codebase can interact properly with the public APIs exposed by Mapbox SDKs for Android. If you experience any issues using the Mapbox Maps SDK for Android with Java, contact us.
Use with other Mapbox tools
Use the Mapbox Maps SDK for Android with other Mapbox products. Mix and match other tools and plugins to create a location-savvy application to your exact specifications.
Static maps
The Mapbox Maps SDK for Android includes methods to generate a static snapshot of an existing map within your application. Use the MapSnapshotter class to create a static raster image of a map, without having to make a request to another API.
The Java SDK is also available for applications that need direct access to the Mapbox Static Images API.
Mapbox Studio
The Mapbox Maps SDK is compatible with Mapbox Studio. Design a map that seamlessly matches your brand and application design, then infuse it with your own custom data all within the Mapbox Studio web interface.
Conditions
Attribution
You must include the Mapbox wordmark on any map that uses the Mapbox Maps SDK for Android. You must display attribution on maps unless the map’s data comes entirely from non-Mapbox sources.
You may adjust the position of the Mapbox wordmark and attribution notice, but they must stay visible on the map. You may also change the background and text color of the attribution notice to match your design aesthetics, but all information must be legible.
You may not otherwise alter the Mapbox wordmark or text attribution notice.
Источник


