- Image touch in android
- About
- Handling single and multi touch on Android — Tutorial
- 1. Android Touch
- 1.1. Android touch basics
- 1.2. Single touch
- 1.3. Multi touch
- 1.4. GestureDetectors
- 2. Prerequisites
- 3. Exercise: Custom view and touch events
- 3.1. Draw via touch
- 3.2. Allow to pick the line width
- 3.3. Tracking
- 4. Exercise: Multitouch
- 5. Exercise: Using ScaleGestureDetector
- Walkthrough — Using Touch in Android
- Touch Sample Activity
- Gesture Recognizer Activity
- Custom Gesture Activity
Image touch in android

TouchImageView for Android
TouchImageView extends ImageView and supports all of ImageView’s functionality. In addition, TouchImageView adds pinch zoom, dragging, fling, double tap zoom functionality and other animation polish. The intention is for TouchImageView to mirror as closely as possible the functionality of zoomable images in Gallery apps.
Please view the sample app which includes examples of the following functionality:
Basic use of a single TouchImageView. Includes usage of OnTouchImageViewListener , getScrollPosition() , getZoomedRect() , isZoomed() , and getCurrentZoom() .
TouchImageViews placed in a ViewPager like the Gallery app.
Mirror two TouchImageViews using onTouchImageViewListener and setZoom() .
Switch Image Example
Click on TouchImageView to cycle through images. Note that the zoom state is maintained though the images are switched.
Switch ScaleType Example
Click on TouchImageView to cycle through supported ScaleTypes.
Click on the arrow buttons to change the shape and size of the TouchImageView. See how the view looks when it shrinks with various «resize» settings. Read ChangeSizeExampleActivity.java’s comment for advice on how to set up a TouchImageView that’s going to be resized.
TouchImageView does not yet support pinch image rotation. Also, FIT_START and FIT_END scaleTypes are not yet supported.
Get the current zoom. This is the zoom relative to the initial scale, not the original resource.
Get the max zoom multiplier.
Get the min zoom multiplier.
Return the point at the center of the zoomable image. The PointF coordinates range in value between 0 and 1 and the focus point is denoted as a fraction from the left and top of the view. For example, the top left corner of the image would be (0, 0). And the bottom right corner would be (1, 1).
Return a RectF representing the zoomed image.
Returns false if image is in initial, unzoomed state. True , otherwise.
Reset zoom and translation to initial state.
Set the max zoom multiplier. Default value is 3.
Set the min zoom multiplier. Default value is 1. Set to TouchImageView.AUTOMATIC_MIN_ZOOM to make it possible to see the whole image.
Set the max zoom multiplier to stay at a fixed multiple of the min zoom multiplier.
Set the focus point of the zoomed image. The focus points are denoted as a fraction from the left and top of the view. The focus points can range in value between 0 and 1.
Set zoom to the specified scale. Image will be centered by default.
Set zoom to the specified scale. Image will be centered around the point (focusX, focusY). These floats range from 0 to 1 and denote the focus point as a fraction from the left and top of the view. For example, the top left corner of the image would be (0, 0). And the bottom right corner would be (1, 1).
Set zoom to the specified scale. Image will be centered around the point (focusX, focusY). These floats range from 0 to 1 and denote the focus point as a fraction from the left and top of the view. For example, the top left corner of the image would be (0, 0). And the bottom right corner would be (1, 1).
Set zoom parameters equal to another TouchImageView . Including scale, position, and ScaleType .
Set which part of the image should remain fixed if the TouchImageView is resized.
Set which part of the image should remain fixed if the screen is rotated.
TouchImageView is available under the MIT license. See the LICENSE file for more info.
About
Adds touch functionality to Android ImageView.
Источник
Handling single and multi touch on Android — Tutorial
Single and multi touch in Android. This tutorial describes how to use the touch API in Android applications.
1. Android Touch
1.1. Android touch basics
The Android standard View class support touch events. You can react to touch events in your custom views and your activities. Android supports multiple pointers, e.g. fingers which are interacting with the screen.
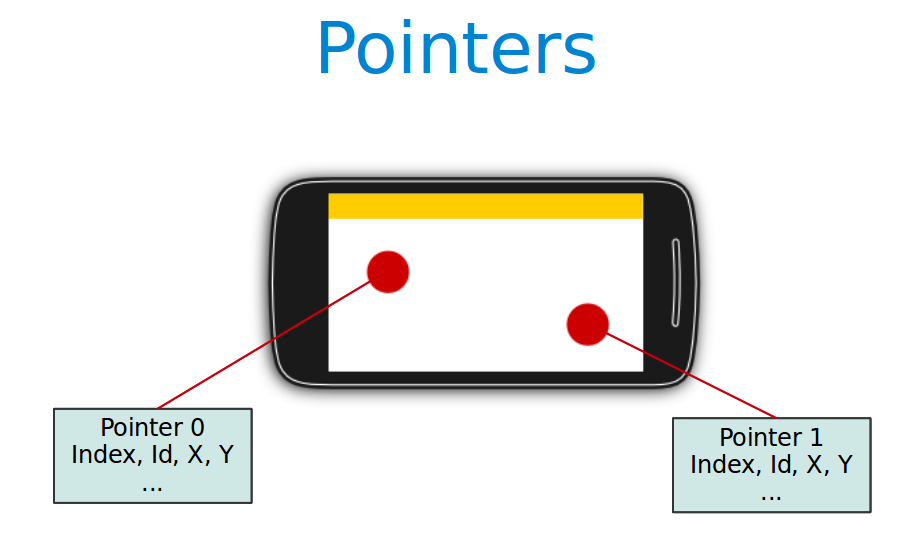
The base class for touch support is the MotionEvent class which is passed to Views via the onTouchEvent() method.
To react to touch events
you override the onTouchEvent() method.
The MotionEvent class contains the touch related information, e.g., the number of pointers, the X/Y coordinates and size and pressure of each pointer.
This method returns true if the touch event has been handled by the view. Android tries to find the deepest view which returns true to handles the touch event. If the view is part of another view (parent view), the parent can claim the event by returning true from the onInterceptTouchEvent() method. This would send an MotionEvent.ACTION_CANCEL event to the view which received previously the touch events.
To react to touch events in an activity, register an OnTouchListener for the relevant Views .
1.2. Single touch
If single input is used you can use the getX() and getY() methods to get the current position of the first finger.
Via the getAction() method you receive the action which was performed. The MotionEvent class provides the following constants to determine the action which was performed.
| Event | Description |
|---|---|
| Multitouch can not be tested on the emulator. You need a real Android device as input device. |
1.4. GestureDetectors
Android provide the GestureDetector class which allow to consume MotionEvents and to create higher level gesture events to listeners.
For example the ScaleGestureDetector class allows to determine the predefined gesture of increasing and decreasing the size of the object via two fingers.
2. Prerequisites
The following assumes that you have already basic knowledge in Android development.
3. Exercise: Custom view and touch events
3.1. Draw via touch
This exercise demonstrates the handling of (single) touch events within a custom view.
Create an Android project called com.vogella.android.touch.single with the activity called SingleTouchActivity. This activity uses a DialogFragment to set the color which is used for drawing.
Create the following layout called fragment_colorpicker.xml .
Create the following TouchEventView class which implements a View which supports single touch.
Adjust the activity_main.xml layout file to the following.
Add this view to your activity.
If you run your application you will be able to draw on the screen with your finger (or with the mouse in the emulator).
Change your coding so that you use a layout definition based on XML.
To use your own view in an XML layout definition you have to use the full-qualified class name (class including package information).
3.2. Allow to pick the line width
Add a menu to your application
3.3. Tracking
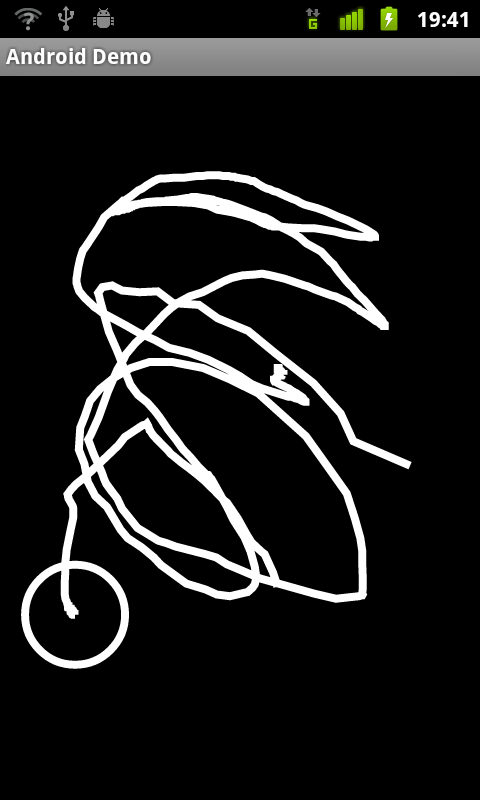
Add code to your drawing example so that the current position of a finger is marked via a circle. To draw a circle you can use the addCircle(x, y, 50, Path.Direction.CW) method call on a Path or use the canvas element directly.
Make sure that only the current position is highlighted with a circle. The circle should appears as soon as the finger goes down and vanish once the finger goes up.
The result should look like the following.
4. Exercise: Multitouch
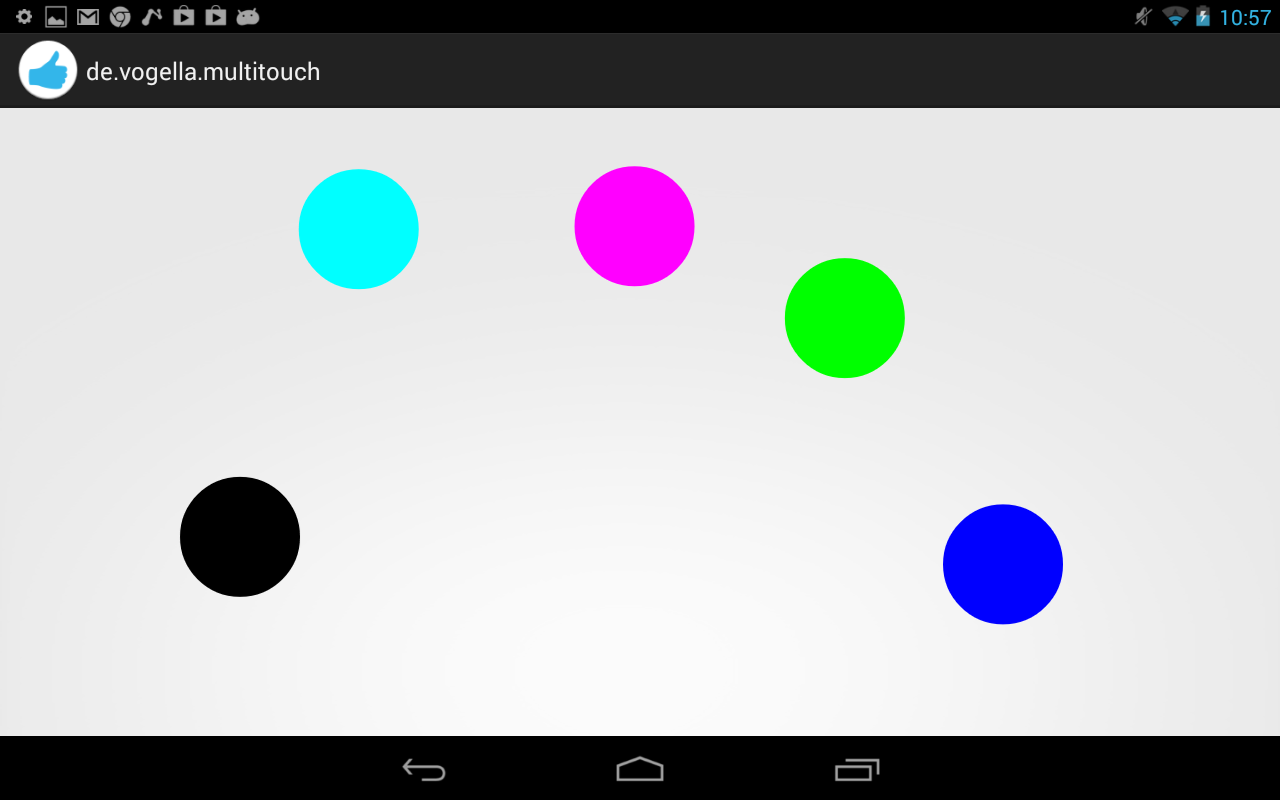
In this exercise you create a view which support multitouch and allows you to track several fingers on your device. On the Android emulator you can only simulate singletouch with the mouse.
Create an Android project called com.vogella.android.multitouch with an activity called MainActivity.
Create the following MultitouchView class.
Add this view to the layout of your activity.
Your generated activity can remain the same.
If you run your application you will be able to draw on the screen with your fingers. Every device has an upper limit how many pointers are supported, test out how many simultaneous pointers your device supports. This application should look similar to the following screenshot.
5. Exercise: Using ScaleGestureDetector
Create the Android project called de.vogella.android.touch.scaledetector with an activity called ScaleDetectorTestActivity.
Create the following class.
Add this view to your activity.
If you run your application you should be able to shrink and enlarge the image via a multi-touch gesture (pitch zoom).
Источник
Walkthrough — Using Touch in Android
Let us see how to use the concepts from the previous section in a working application. We will create an application with four activities. The first activity will be a menu or a switchboard that will launch the other activities to demonstrate the various APIs. The following screenshot shows the main activity:
The first Activity, Touch Sample, will show how to use event handlers for touching the Views. The Gesture Recognizer activity will demonstrate how to subclass Android.View.Views and handle events as well as show how to handle pinch gestures. The third and final activity, Custom Gesture, will show how use custom gestures. To make things easier to follow and absorb, we’ll break this walkthrough up into sections, with each section focusing on one of the Activities.
Touch Sample Activity
Open the project TouchWalkthrough_Start. The MainActivity is all set to go – it is up to us to implement the touch behaviour in the activity. If you run the application and click Touch Sample, the following activity should start up:
Now that we have confirmed that the Activity starts up, open the file TouchActivity.cs and add a handler for the Touch event of the ImageView :
Next, add the following method to TouchActivity.cs:
Notice in the code above that we treat the Move and Down action as the same. This is because even though the user may not lift their finger off the ImageView , it may move around or the pressure exerted by the user may change. These types of changes will generate a Move action.
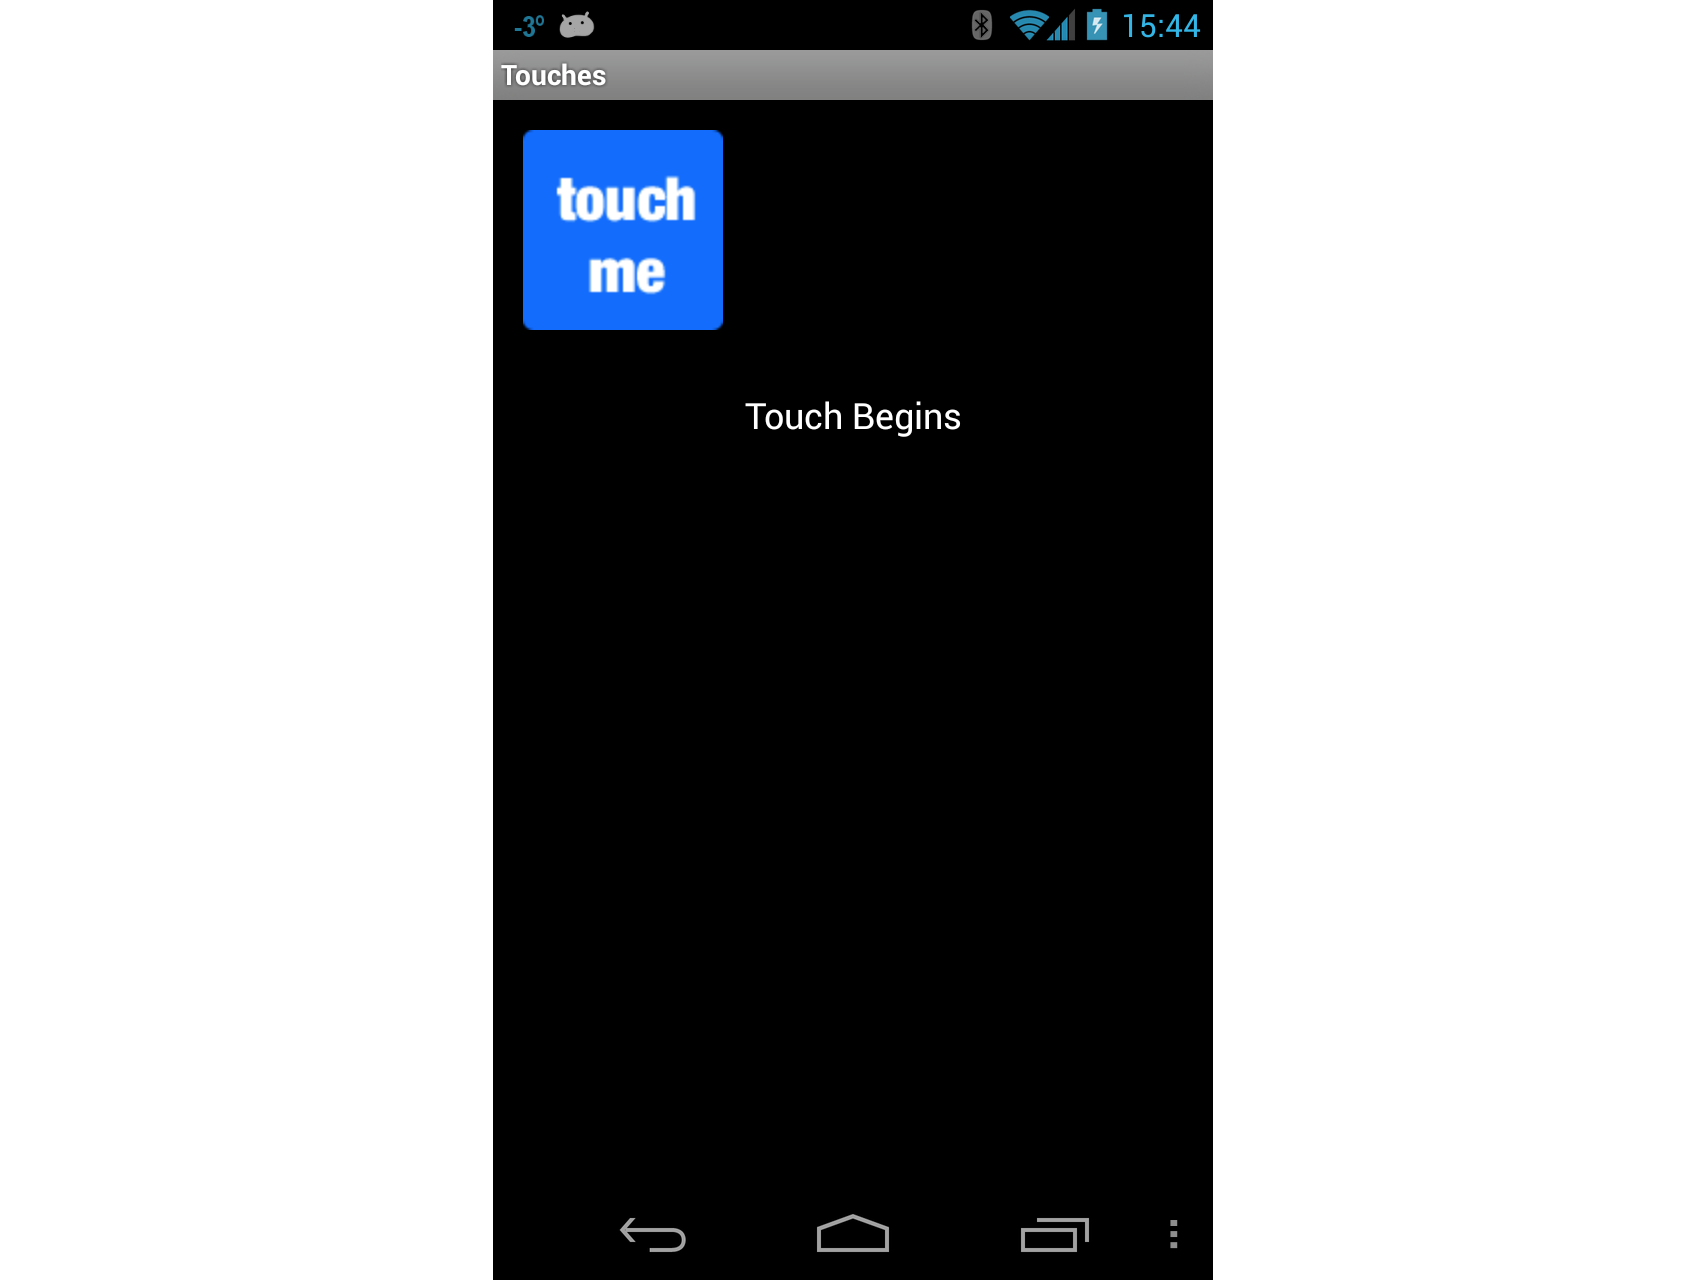
Each time the user touches the ImageView , the Touch event will be raised and our handler will display the message Touch Begins on the screen, as shown in the following screenshot:
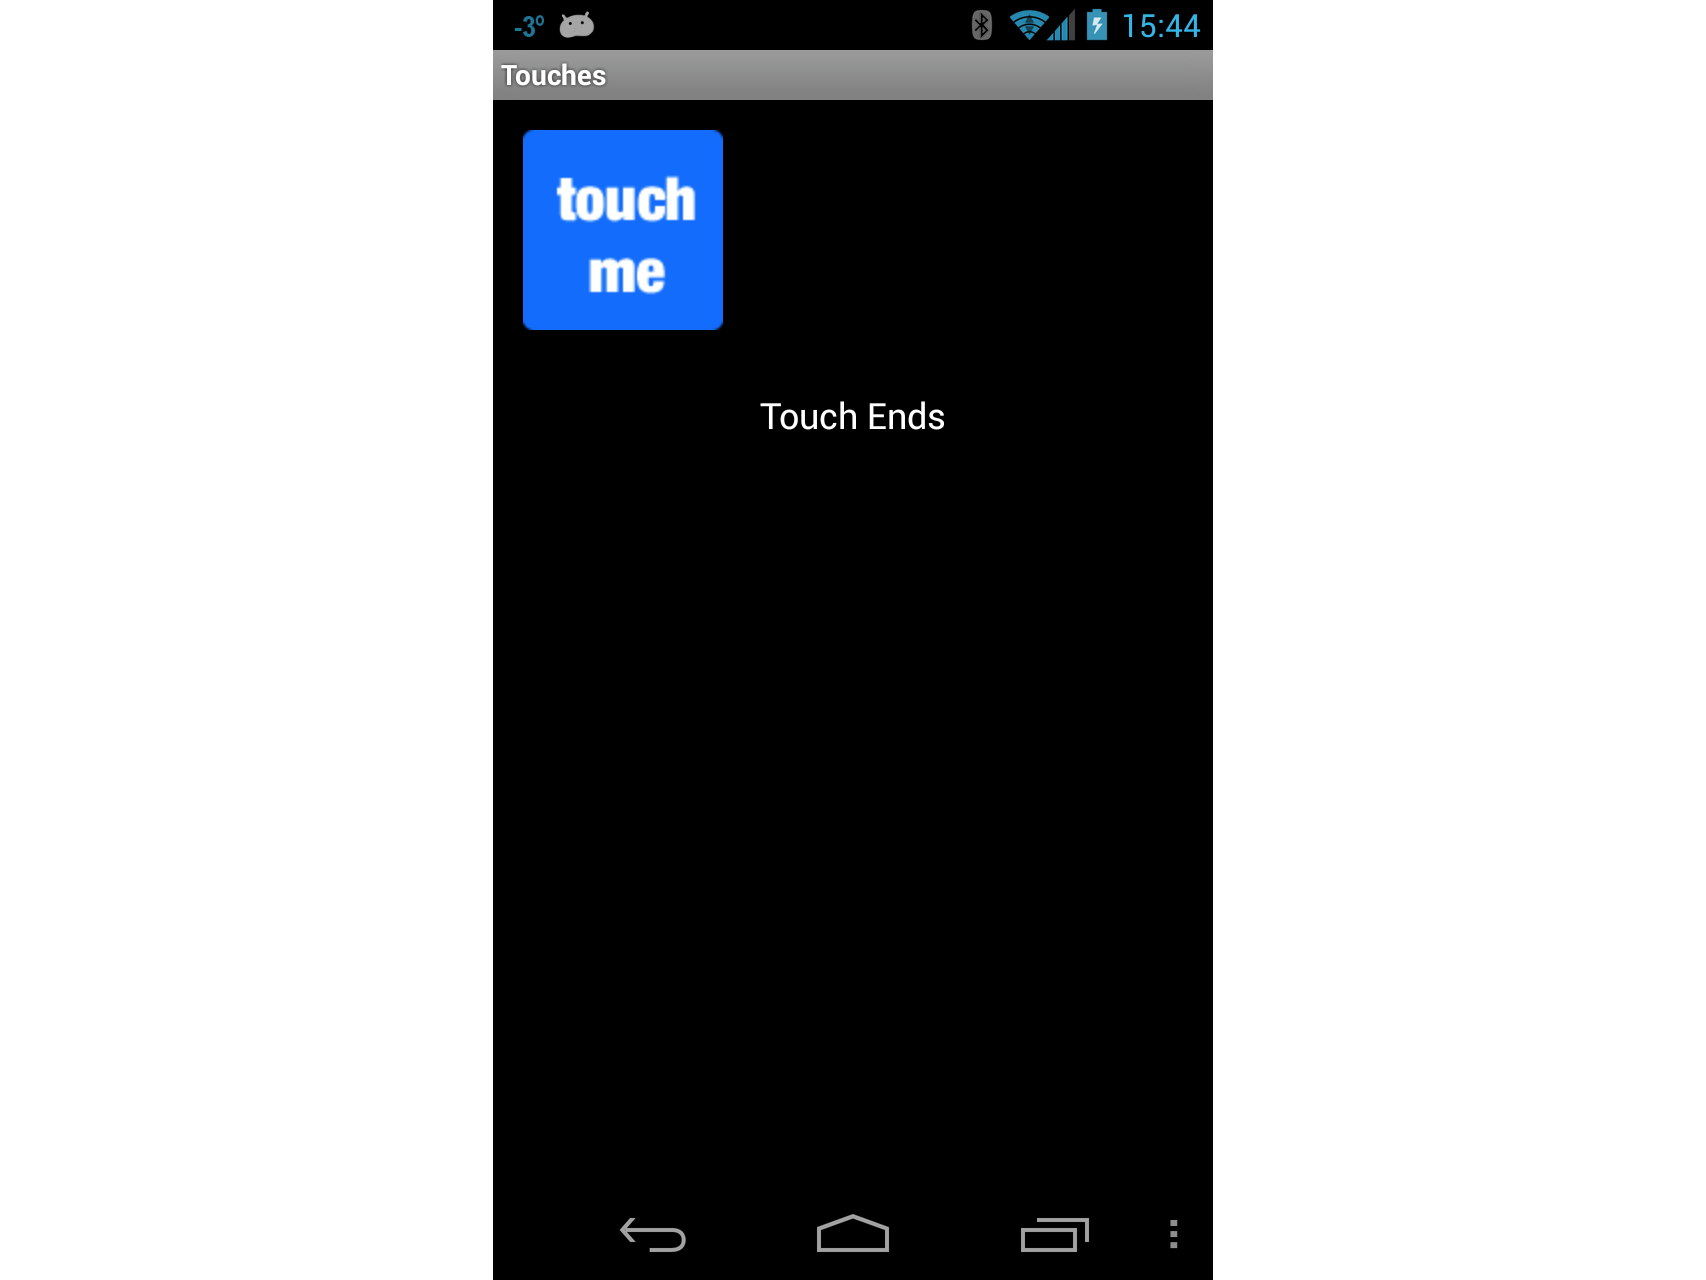
As long as the user is touching the ImageView , Touch Begins will be displayed in the TextView . When the user is no longer touching the ImageView , the message Touch Ends will be displayed in the TextView , as shown in the following screenshot:
Gesture Recognizer Activity
Now lets implement the Gesture Recognizer activity. This activity will demonstrate how to drag a view around the screen and illustrate one way to implement pinch-to-zoom.
Add a new Activity to the application called GestureRecognizer . Edit the code for this activity so that it resembles the following code:
Add a new Android view to the project, and name it GestureRecognizerView . Add the following variables to this class:
Add the following constructor to GestureRecognizerView . This constructor will add an ImageView to our activity. At this point the code still will not compile – we need to create the class MyScaleListener that will help with resizing the ImageView when the user pinches it:
To draw the image on our activity, we need to override the OnDraw method of the View class as shown in the following snippet. This code will move the ImageView to the position specified by _posX and _posY as well as resize the image according to the scaling factor:
Next we need to update the instance variable _scaleFactor as the user pinches the ImageView . We will add a class called MyScaleListener . This class will listen for the scale events that will be raised by Android when the user pinches the ImageView . Add the following inner class to GestureRecognizerView . This class is a ScaleGesture.SimpleOnScaleGestureListener . This class is a convenience class that listeners can subclass when you are interested in a subset of gestures:
The next method we need to override in GestureRecognizerView is OnTouchEvent . The following code lists the full implementation of this method. There is a lot of code here, so lets take a minute and look what is going on here. The first thing this method does is scale the icon if necessary – this is handled by calling _scaleDetector.OnTouchEvent . Next we try to figure out what action called this method:
If the user touched the screen with, we record the X and Y positions and the ID of the first pointer that touched the screen.
If the user moved their touch on the screen, then we figure out how far the user moved the pointer.
If the user has lifted his finger off the screen, then we will stop tracking the gestures.
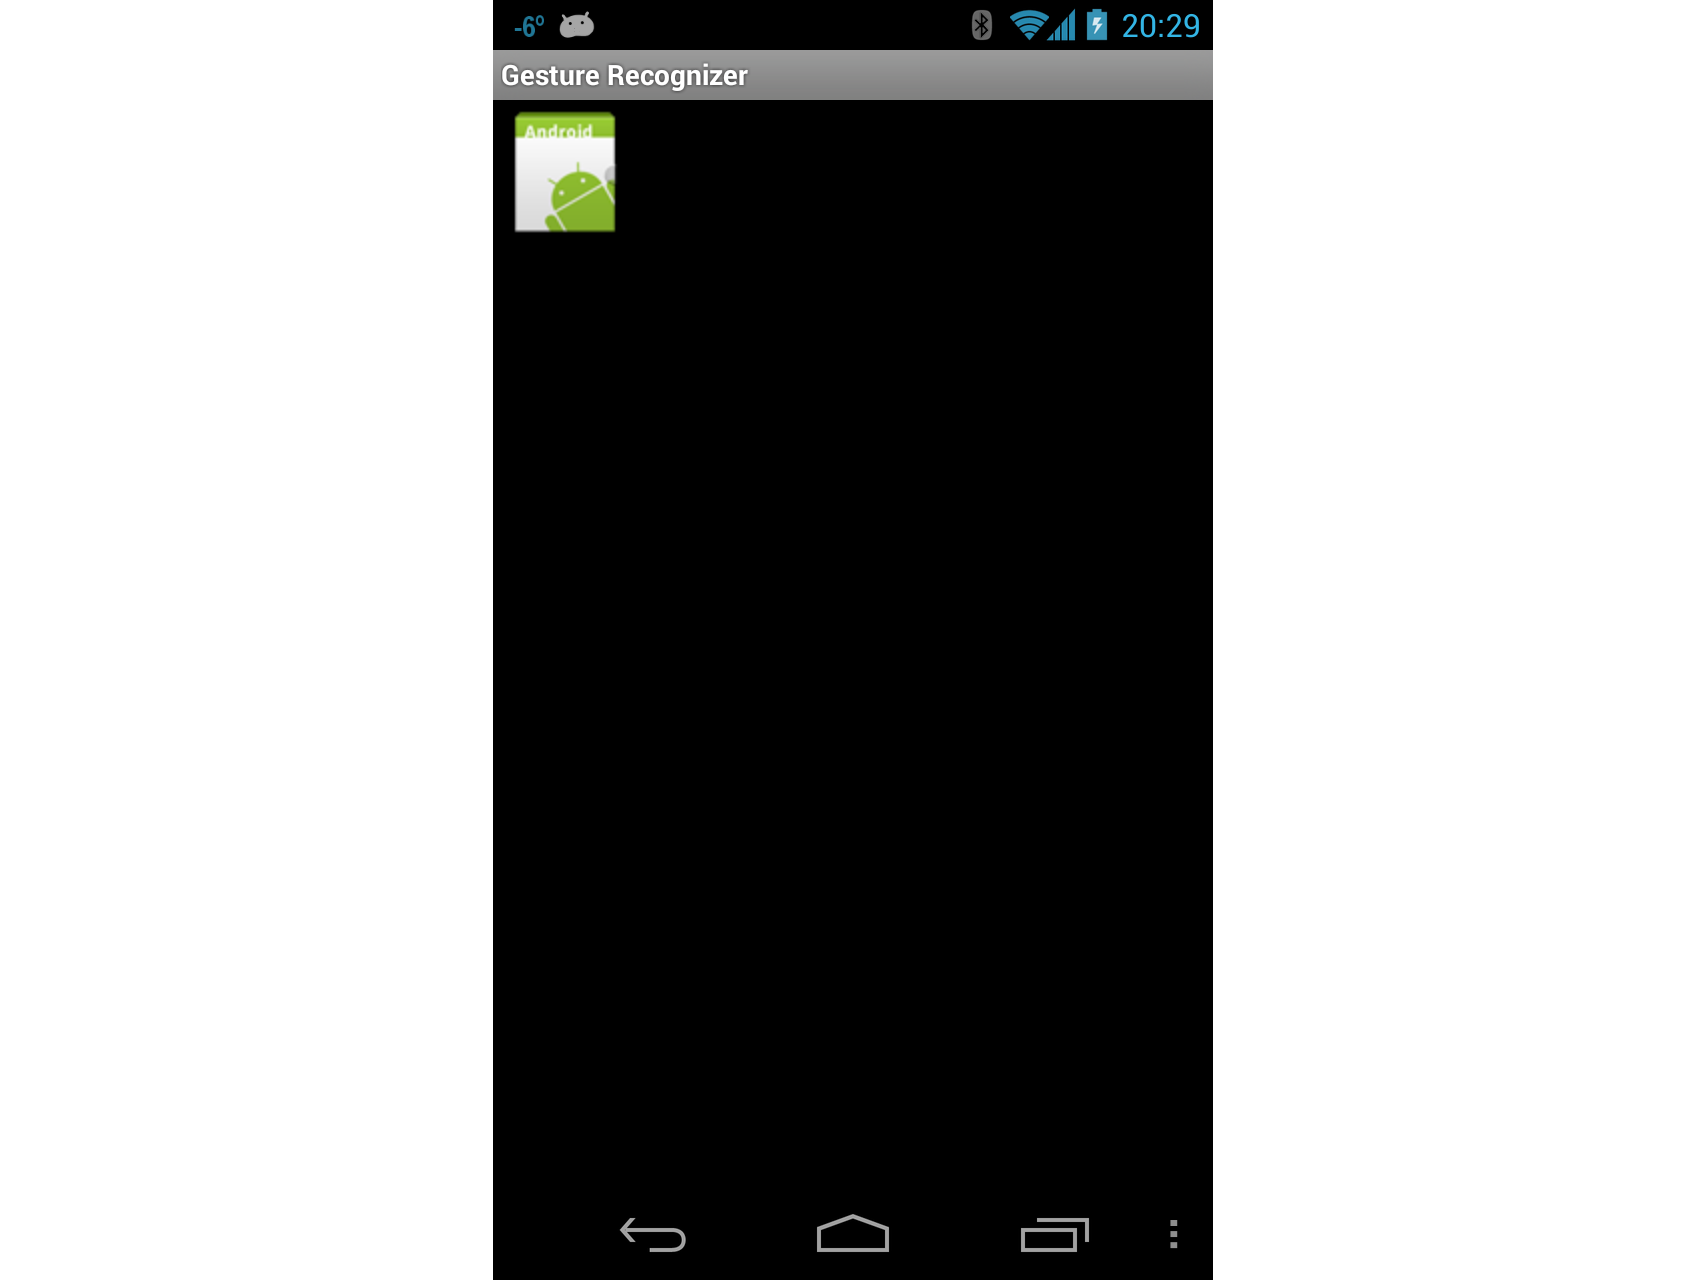
Now run the application, and start the Gesture Recognizer activity. When it starts the screen should look something like the screenshot below:
Now touch the icon, and drag it around the screen. Try the pinch-to-zoom gesture. At some point your screen may look something like the following screen shot:

At this point you should give yourself a pat on the back: you have just implemented pinch-to-zoom in an Android application! Take a quick break and lets move on to the third and final Activity in this walkthrough – using custom gestures.
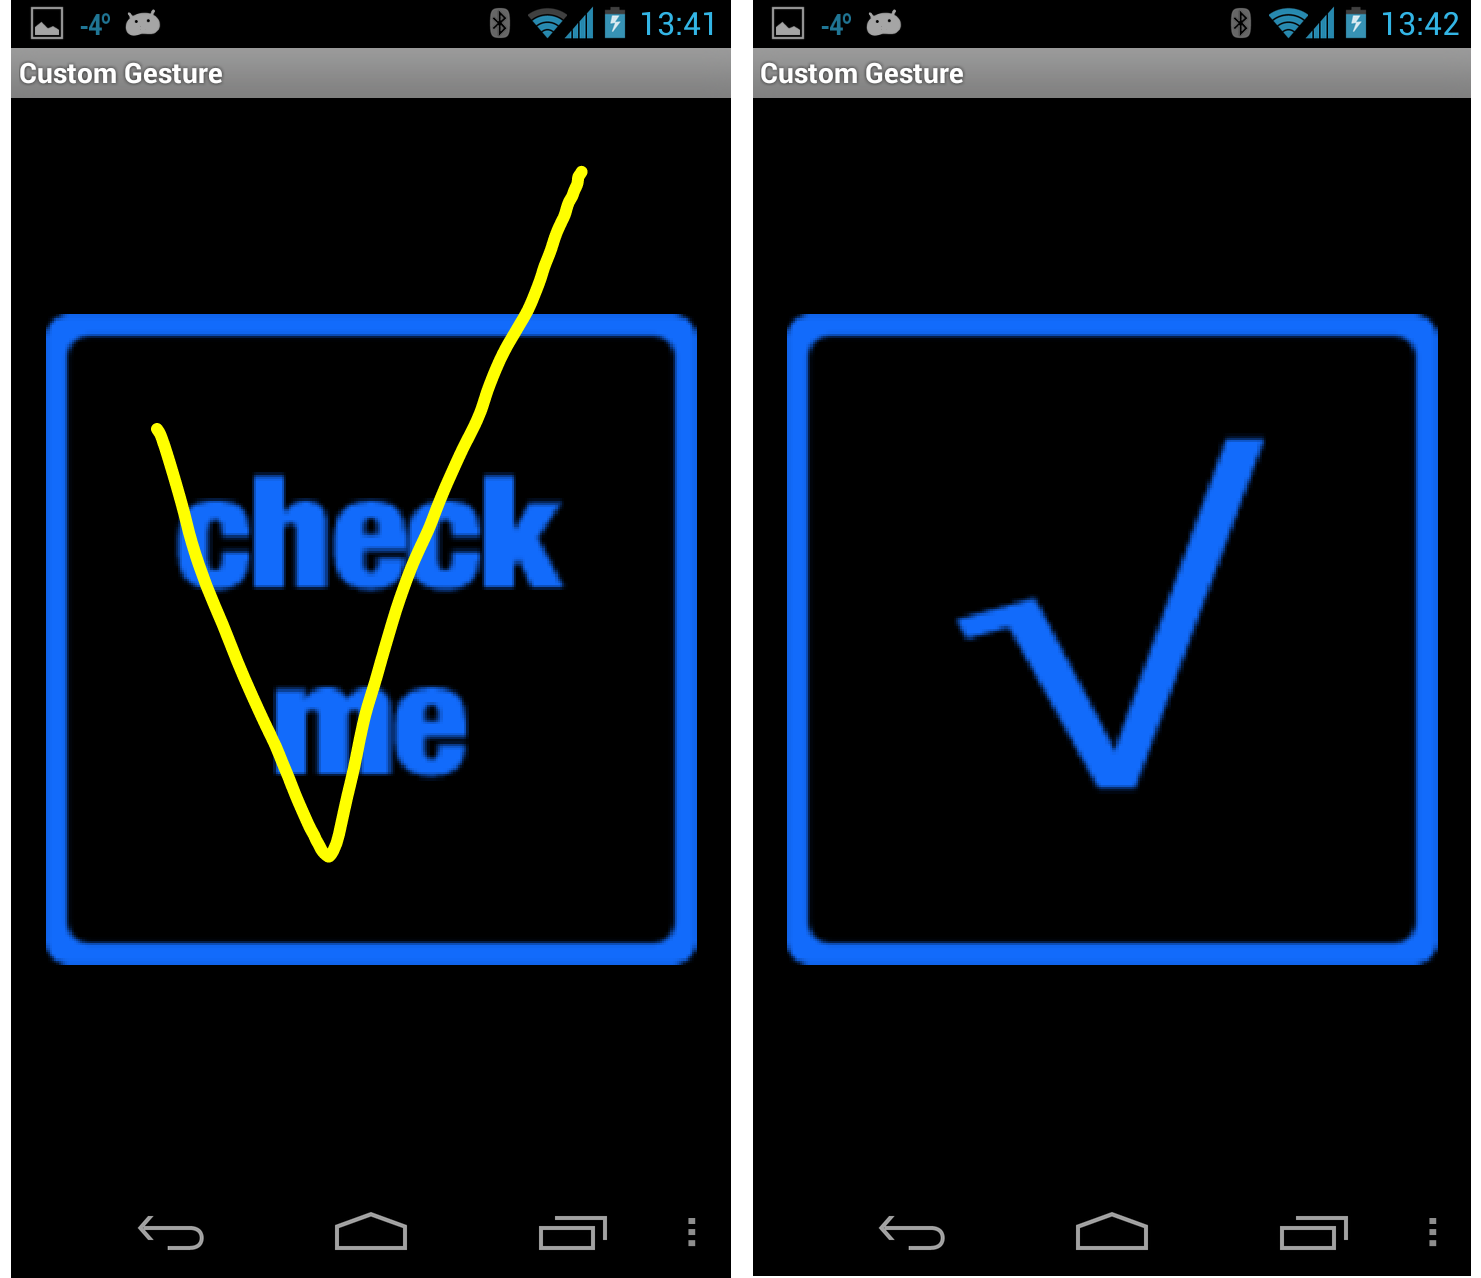
Custom Gesture Activity
The final screen in this walkthrough will use custom gestures.
For the purposes of this Walkthrough, the gestures library has already been created using Gesture Tool and added to the project in the file Resources/raw/gestures. With this bit of housekeeping out of the way, lets get on with the final Activity in the walkthrough.
Add a layout file named custom_gesture_layout.axml to the project with the following contents. The project already has all the images in the Resources folder:
Next add a new Activity to the project and name it CustomGestureRecognizerActivity.cs . Add two instance variables to the class, as showing in the following two lines of code:
Edit the OnCreate method of the this Activity so that it resembles the following code. Lets take a minute to explain what is going on in this code. The first thing we do is instantiate a GestureOverlayView and set that as the root view of the Activity. We also assign an event handler to the GesturePerformed event of GestureOverlayView . Next we inflate the layout file that was created earlier, and add that as a child view of the GestureOverlayView . The final step is to initialize the variable _gestureLibrary and load the gestures file from the application resources. If the gestures file cannot be loaded for some reason, there is not much this Activity can do, so it is shutdown:
The final thing we need to do implement the method GestureOverlayViewOnGesturePerformed as shown in the following code snippet. When the GestureOverlayView detects a gesture, it calls back to this method. The first thing we try to get an IList
Run the application and start up the Custom Gesture Recognizer activity. It should look something like the following screenshot:
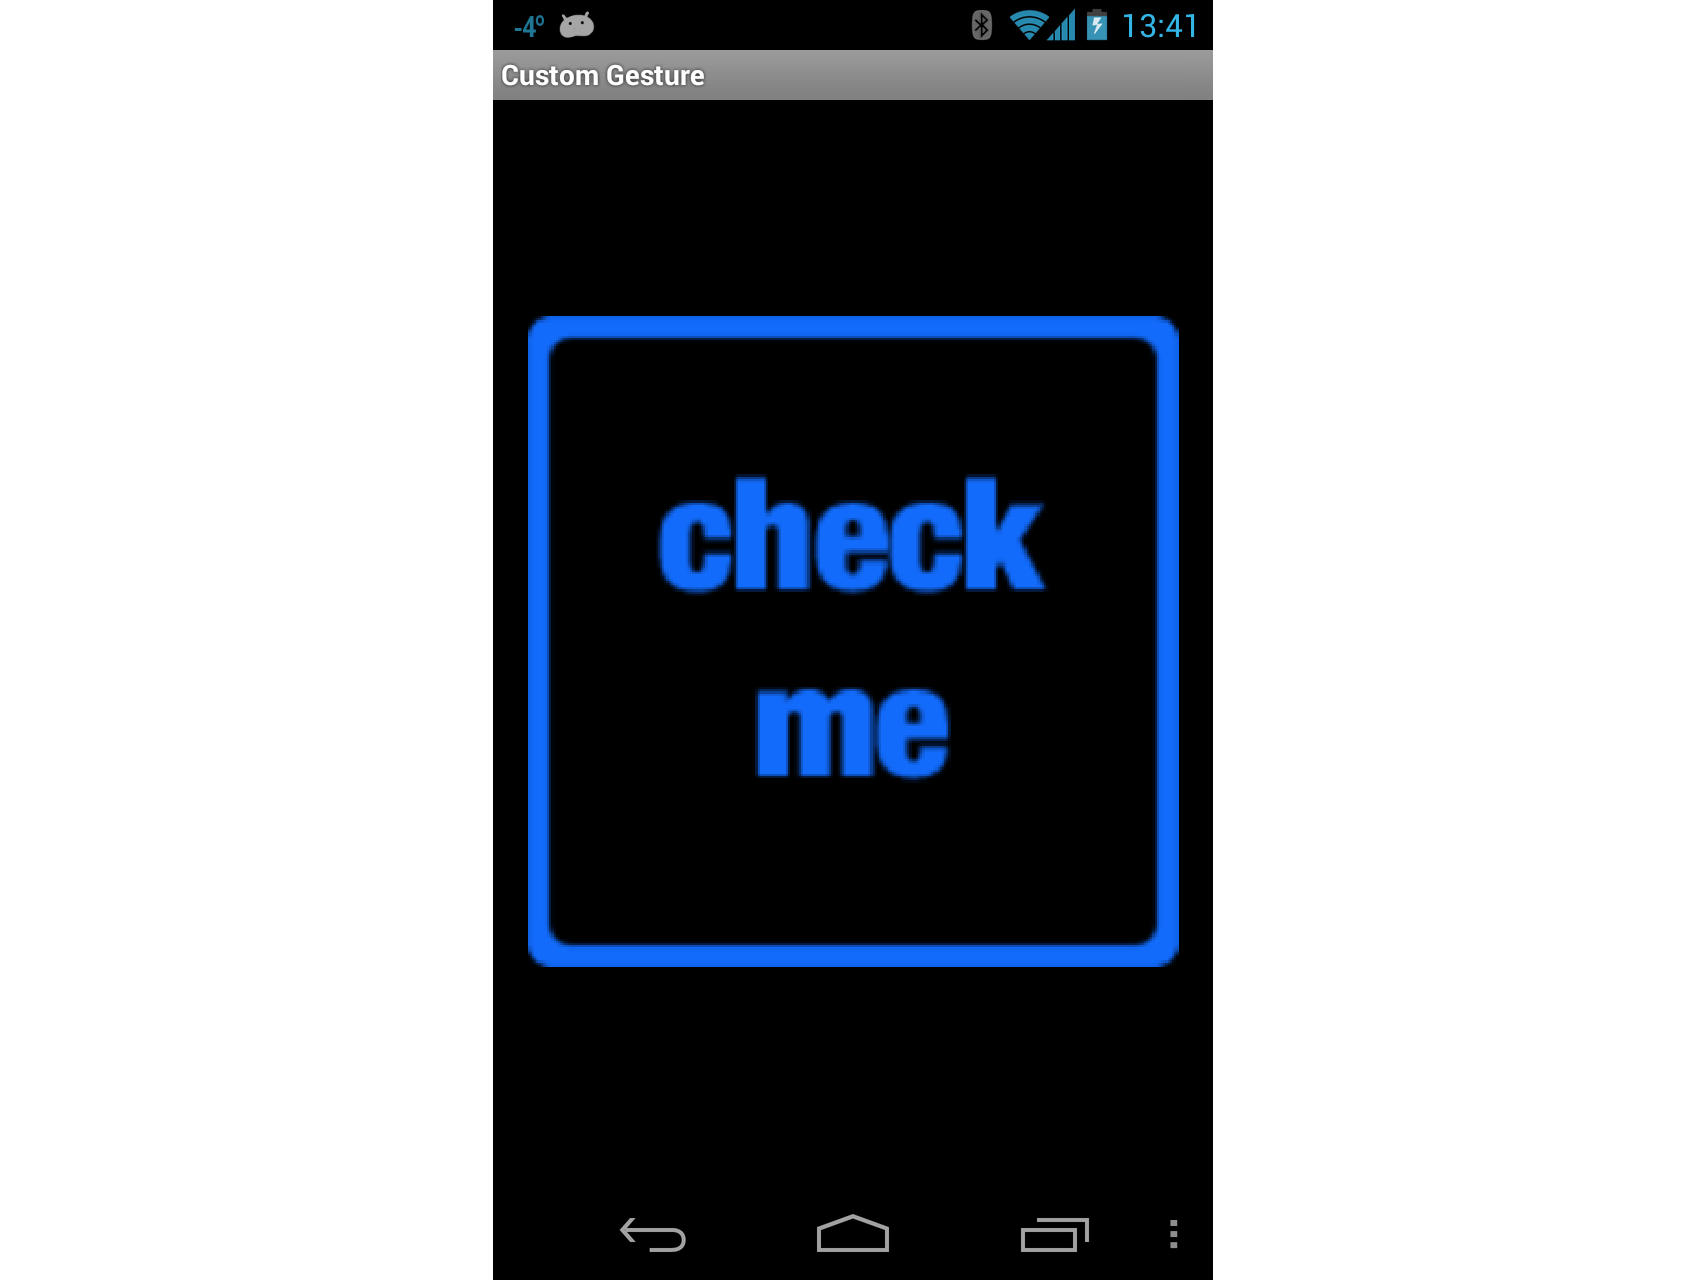
Now draw a checkmark on the screen, and the bitmap being displayed should look something like that shown in the next screenshots:
Finally, draw a scribble on the screen. The checkbox should change back to its original image as shown in these screenshots:
Источник


