- Use Messages on your Mac
- Send a message
- Add a Tapback or inline reply
- Find photos and other attachments from conversations
- Pin important conversations
- Pin attachments
- Mute conversations
- Start a FaceTime call from Messages
- Share your screen or location
- Customise your info or the group
- Set up text message forwarding
- Use Siri to send messages
- Delete a message or conversation
- Set up iPhone to get SMS messages on Mac
- Question: Q: iMessage not Syncing between iOS & Mac devices since installing iOS 11.01
- Helpful answers
- How to Sync Messages from iPhone to Mac
- How to sync iMessages across iPhone and Mac?
- How to sync Text Messages from iPhone to Mac?
- Wondershare TunesGo: The best iPhone Manager
Use Messages on your Mac
Use the Messages app to send unlimited messages to any Mac, iPhone, iPad or iPod touch using iMessage, Apple’s secure-messaging service. If you have an iPhone, you can also set up text message forwarding to send SMS and MMS messages.
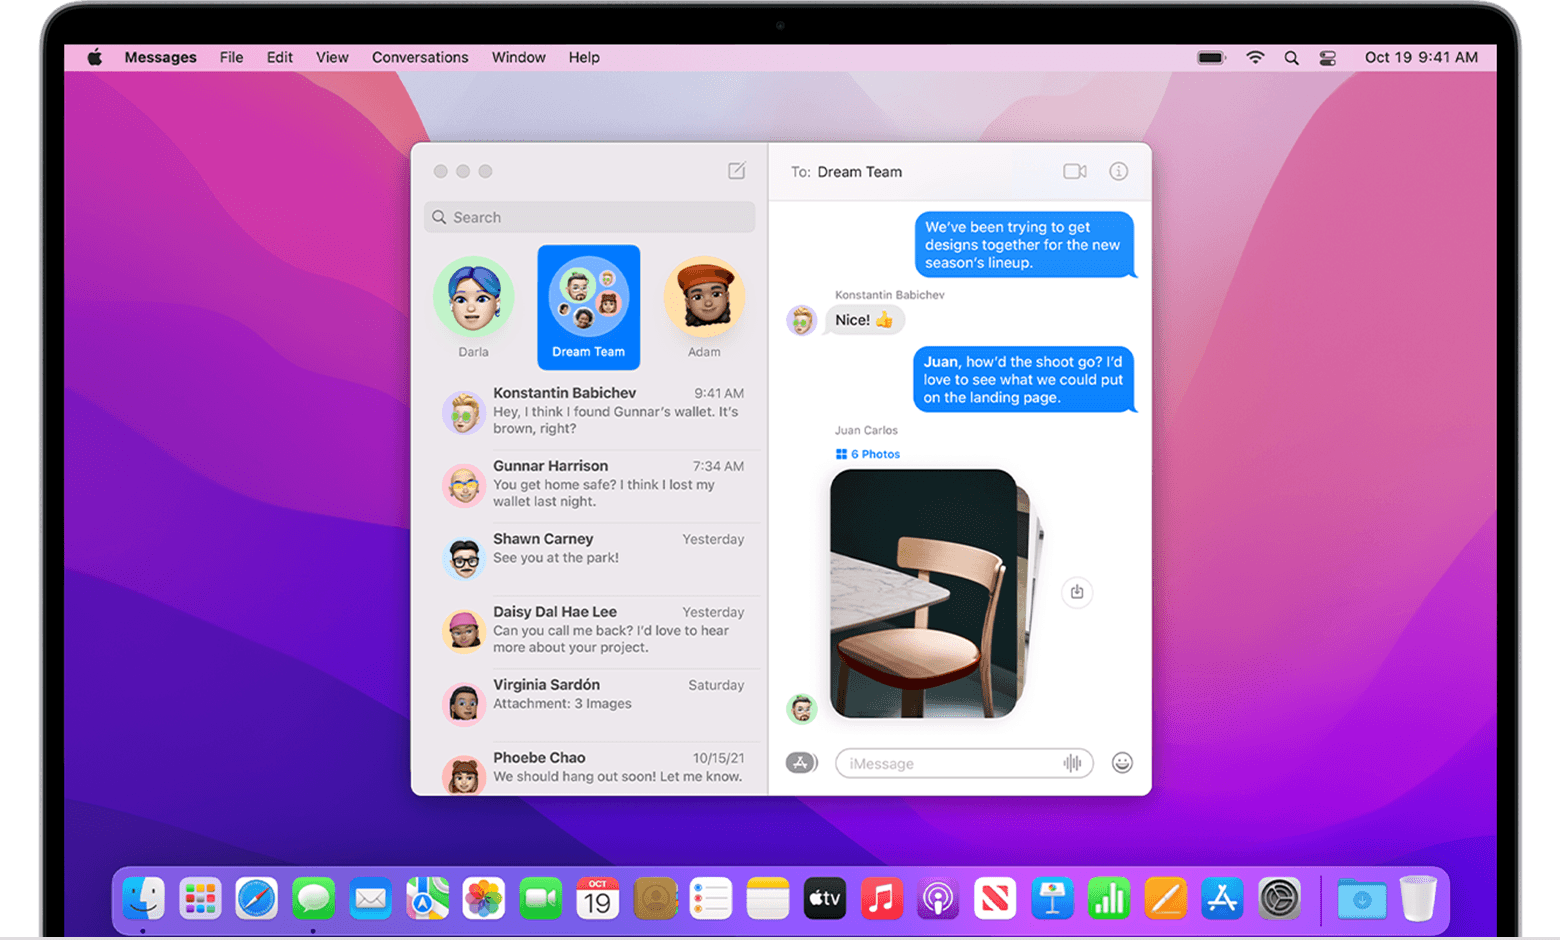
Send a message
- Open Messages. You may be asked to sign in with your Apple ID. Can’t sign in?
- Click the New Message button at the top of the Messages window.
- Type the name, email address or phone number of one or more recipients. Or click the Add button and choose from your contacts.
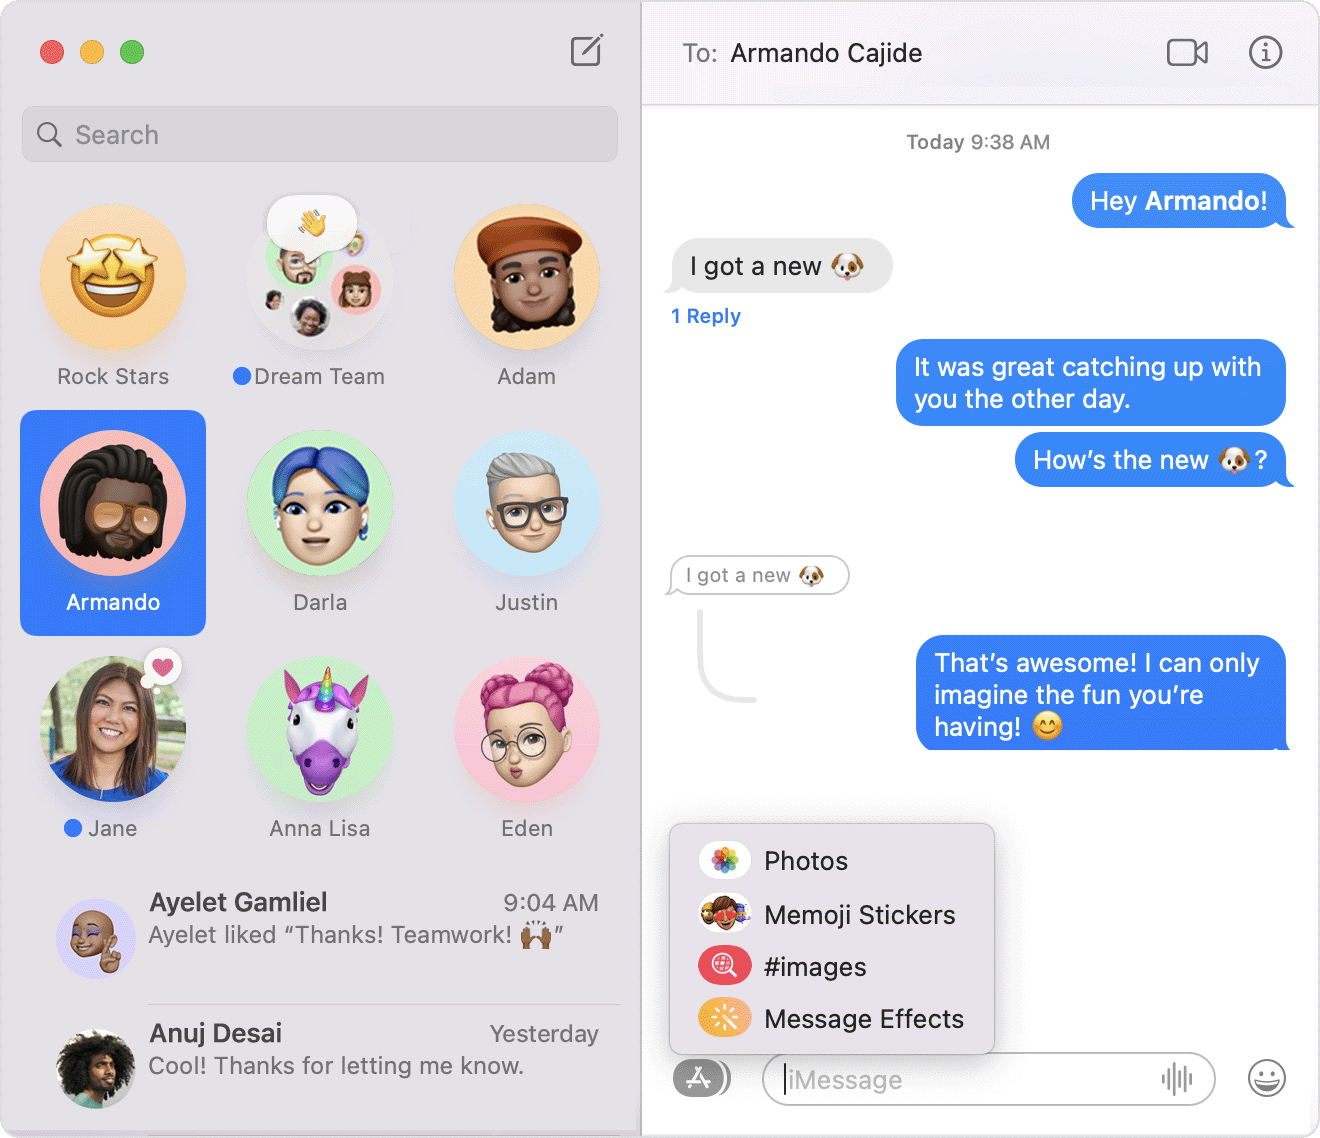
- Press Tab or click the message field at the bottom of the window, then type your message.
- To include emoji, click the Emoji Picker button .
- To include an image or other file, drag or paste it into the message field.
- To include an audio recording, click the Record Audio button and record your message.
- To include other items, such as Memoji stickers, GIFs and message effects, including balloons or confetti, click the Apps button . This feature is available in macOS Big Sur or later.
- To help bring your message to the attention of a recipient, include @ before their name, such as @John. Or click their name after you’ve typed it. Their name will then be highlighted in the message, and they’ll receive a notification letting them know that they’ve been mentioned. This feature is available in macOS Big Sur or later.
- Press Return to send the message.
Add a Tapback or inline reply
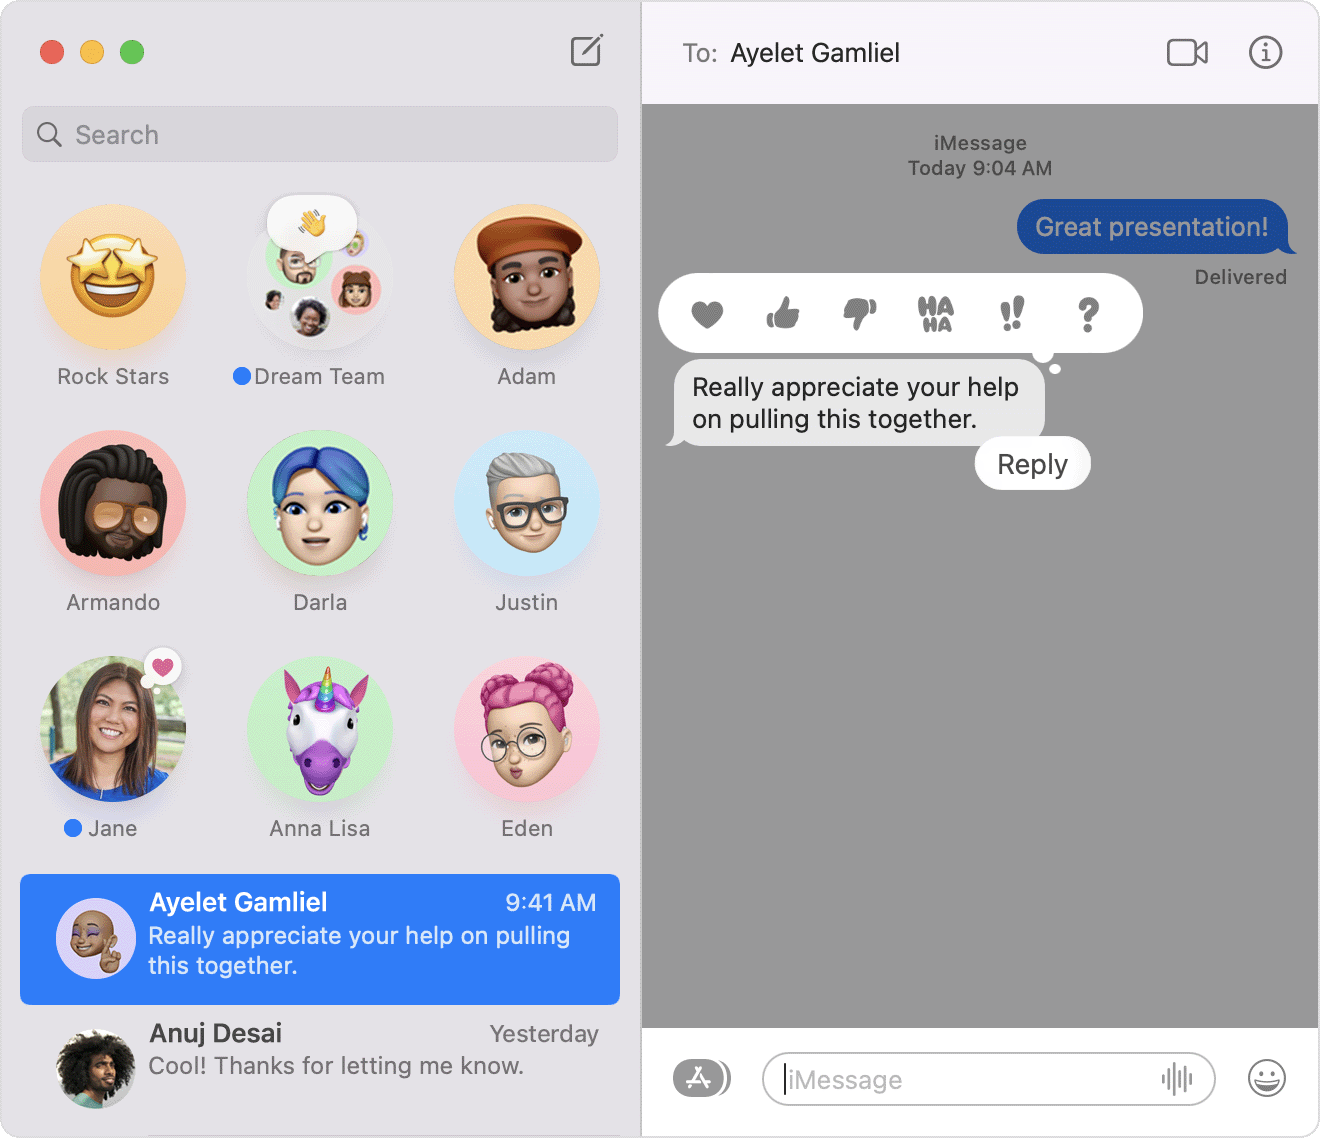
A Tapback is a quick response that expresses what you think about a message, such as whether you like it or think it’s funny. Your Tapback will be visible to everyone in the conversation who is using iMessage.
- Control-click a message bubble to open a shortcut menu, then choose a Tapback from the menu.
- Or click a message bubble and press Command-T.
In macOS Big Sur or later, you can create an inline reply to make it clear which specific message you’re replying to in a conversation.
- Control-click the message to open a shortcut menu, then choose Reply.
- Or click a message bubble to select it, then press Command-R.
Find photos and other attachments from conversations
To see all of the photos, links and other attachments that were exchanged in a conversation, select the conversation in the sidebar, then click the Details button in the top right-hand corner of the window, or press Command-I.
In macOS Monterey, you can also see these items in the Shared with You section of the corresponding app. For example, photos and videos you’ve received will appear automatically in the Shared with You section of the Photos app, and links to websites will appear in the Shared with You section of the Start Page in Safari.
Pin important conversations
In macOS Big Sur or later, you can pin a conversation to the top of the conversation list in the sidebar so you can get to it quickly.
- Control-click the conversation to open a shortcut menu, then choose Pin.
- Or drag the conversation to the top of the sidebar.
Pin attachments
In macOS Monterey, you can pin links and other content you’ve received, such as podcasts and TV programmes. Control-click the item, then choose Pin from the shortcut menu. The item will then be elevated in the Shared with You section of the corresponding app, in Messages search and in the Details view of the conversation.
Mute conversations
If you don’t want to be disturbed by notifications related to a conversation:
- Select the conversation in the sidebar.
- Click the Details button in the top right-hand corner of the window.
- Select Hide Alerts.
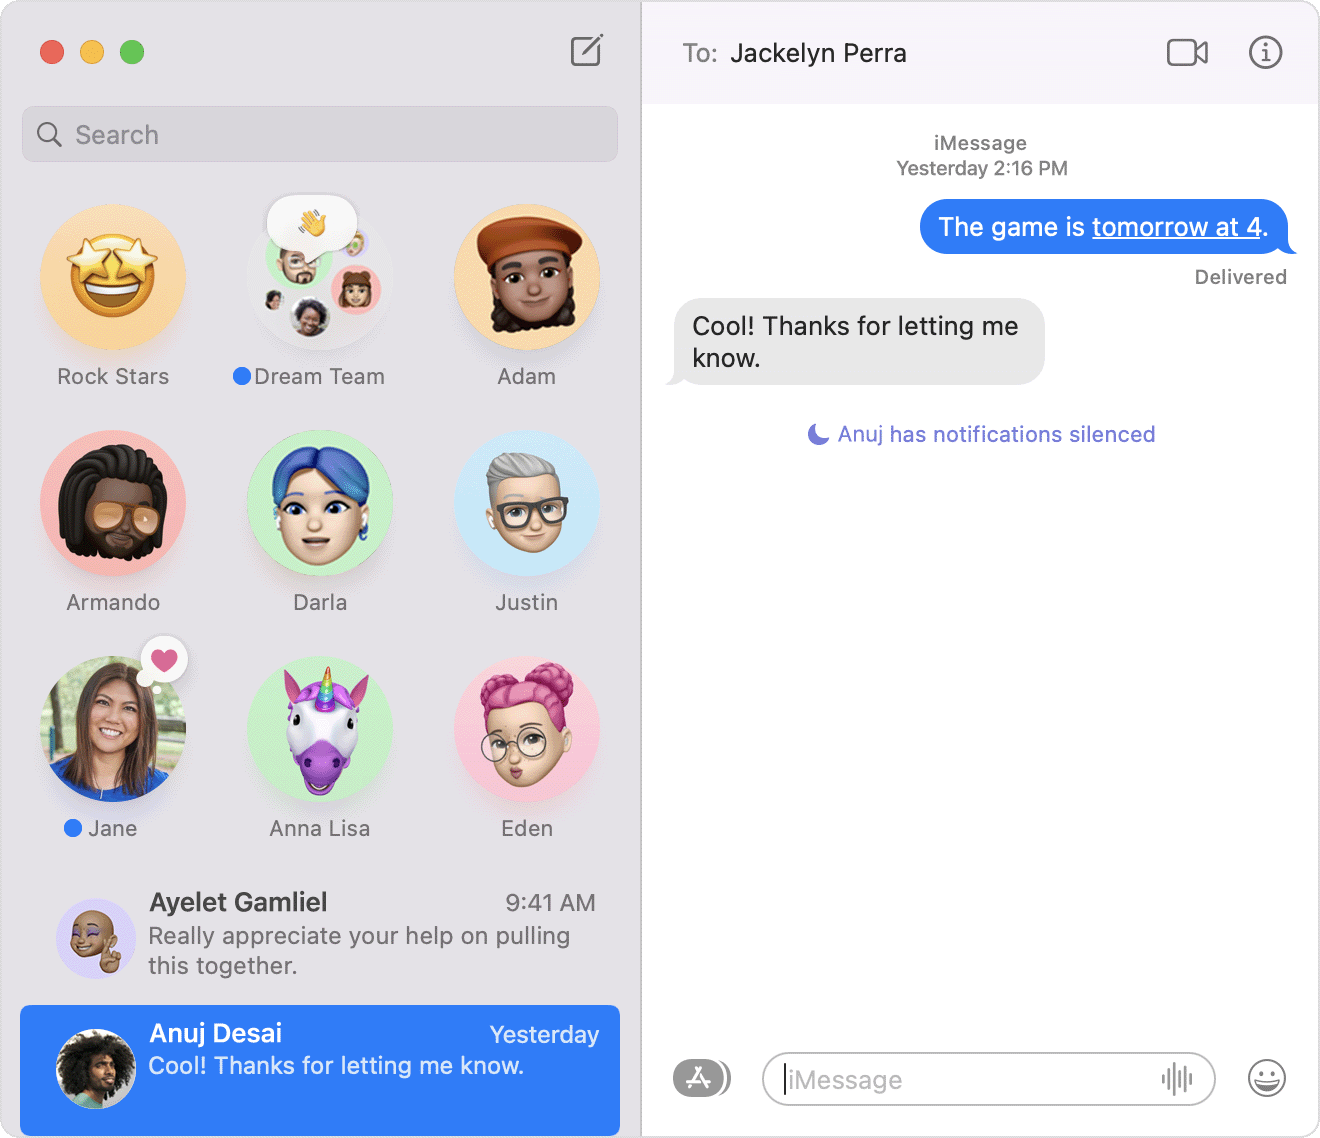
If a recipient is using Focus to silence notifications, their status will appear automatically in Messages, so others will know not to interrupt them. To set up Focus for yourself, choose Apple menu > System Preferences, click Notifications & Focus, then click the Focus tab. This feature is available in macOS Monterey.
Start a FaceTime call from Messages
During a conversation, you can start a FaceTime call with that person or group:
- In macOS Monterey, click the FaceTime button in the top right-hand corner of the window, then choose FaceTime Audio or FaceTime Video.
- Or click the Details button in the top right-hand corner of the window, then click the FaceTime audio or FaceTime video button.
Share your screen or location
Select the conversation in the sidebar, then click the Details button in the top right-hand corner of the window.
- Click the screen sharing button to share your screen.
- Click Share My Location to share your location temporarily or indefinitely. Or click Send My Current Location to send your current location at a given moment. You can also see the recipient’s location – if they’re sharing their location with you.
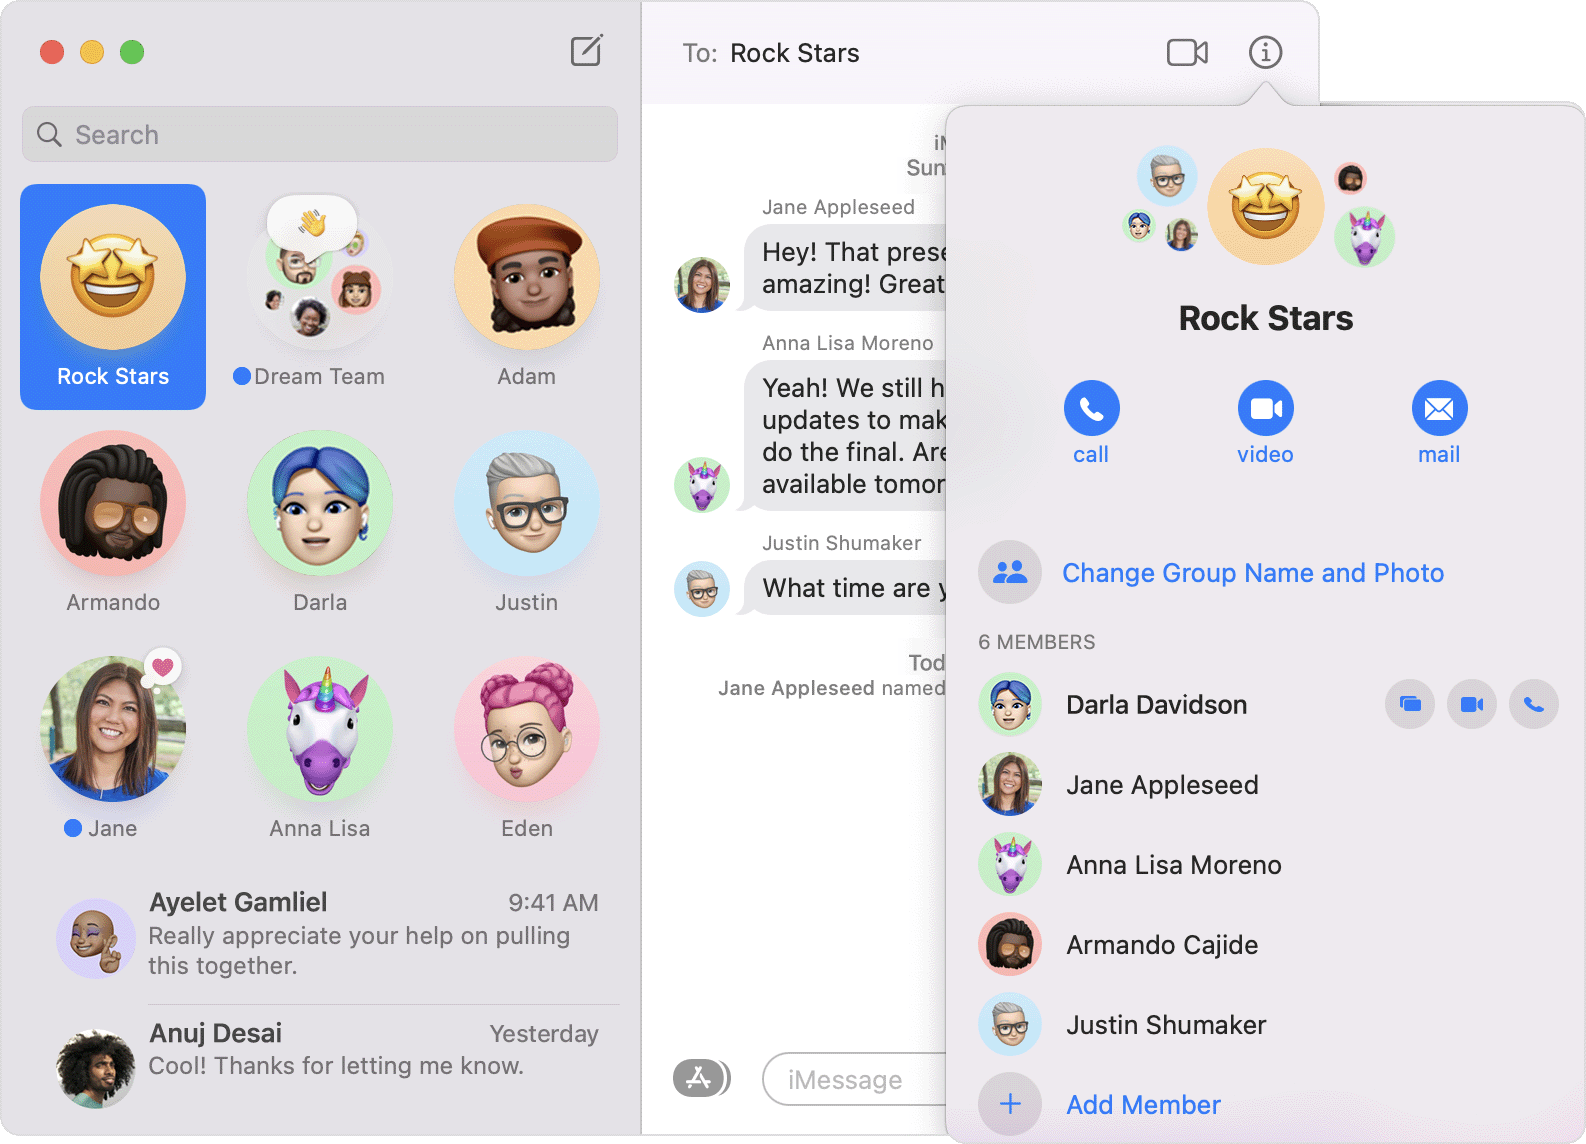
Customise your info or the group
Settings for changing your own name and photo are available by choosing Messages > Preferences from the menu bar. You can click your photo to edit it, and choose whether to share your name and photo with others.
To customise the group, select the group conversation in the sidebar, then click the Details button in the top right-hand corner of the window. You can then do the following:
- Click Change Group Name and Photo.
- Control-click a name, then choose Remove from Conversation. This is available for groups of four or more members.
- Click Leave this Conversation to remove yourself from the group conversation.
- Click Add Member to add a new person to the conversation.
Set up text message forwarding
If you have an iPhone, you can set up text message forwarding to send and receive SMS and MMS messages on your Mac. Find out how to forward SMS/MMS text messages from your iPhone to your Mac.
Use Siri to send messages
You can use Siri to send, read and reply to Messages. Examples:
- “Send a message to Susan and Johnny saying I’ll be late» or “Tell Johnny Appleseed the show is about to start” or “Text a message to 408 555 1212”.
- ”Read the last message from Brian Park” or ”Read my new messages”.
- ”Reply that’s great news” or ”Tell him I’ll be there in 10 minutes”.
Delete a message or conversation
When you delete a message or conversation, it’s a permanent action and you can’t get it back.
- To delete a message, Control-click the message bubble, then choose Delete from the shortcut menu. Or select the message and choose Edit > Delete from the menu bar.
- To delete a conversation, Control-click the conversation in the sidebar, then choose Delete Conversation from the shortcut menu. Click Delete to confirm.
FaceTime is not available in all countries or regions.
Источник
Set up iPhone to get SMS messages on Mac
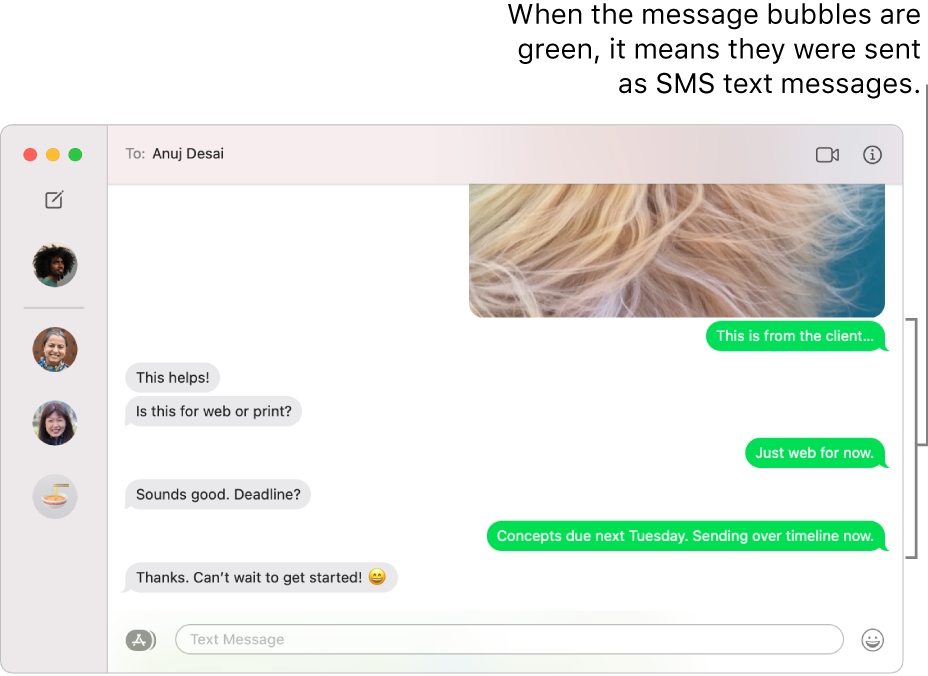
You can set up your iPhone so that you can receive and send SMS messages (short text messages) and MMS messages (text messages with graphics, audio, video, and other media) on your Mac. After you set up your iPhone, when you receive an SMS message, it appears on both your iPhone and your Mac. When you send a message to someone who uses a phone other than an iPhone, your message is sent as an SMS message.
Important: To receive and send SMS and MMS messages on your Mac, your iPhone must have iOS 8.1 or later, and your iPhone and Mac must be signed in to iMessage using the same Apple ID. See the Apple Support article Use Continuity to connect your Mac, iPhone, iPad, iPod touch, and Apple Watch.
On your iPhone, go to Settings > Messages.
Tap Text Message Forwarding.
Note: If you don’t see Text Message Forwarding, make sure you’re signed in to iMessage using the same Apple ID on both your iPhone and your Mac.
Turn on your Mac in the list of devices.
If you’re not using two-factor authentication, a six-digit activation code appears on your Mac; enter this code on your iPhone, then tap Allow.
For more information, see the Messages chapter of the user guide for iPhone, iPad, or iPod touch. For a device that doesn’t use the latest version of iOS or iPadOS, get the user guide from the Apple Support Manuals website.
Источник
Question: Q: iMessage not Syncing between iOS & Mac devices since installing iOS 11.01
I installed iOS 11.01 on my iPhone 6 and iPad Air 2 yesterday and since then I can’t get iMessage to sync between them and my 2016 MacBook pro. I tried turning iMessage on and off on all devices and resetting all devices. I also checked the settings to be sure that the send and receive had all possible options selected. I can’t seem to find any solution to this issue. Any assistance would be greatly appreciated.
iPhone 6, iOS 11.0.1
Posted on Sep 28, 2017 6:39 PM
Helpful answers
Welcome to the Apple Support Communities!
I understand your iMessages and text messages aren’t in sync between your Mac and your iOS devices since updating to iOS 11.0.1 yesterday. In addition to the troubleshooting steps you’ve already taken, I would suggest revisiting the settings for your Apple ID and checking that all requirements for Continuity are still in place.
I. Update your Apple ID Settings:
- From your Mac, go to the Apple ID website and sign in with your Apple ID and password.
- In the «Reachable At» section, confirm that your Apple ID (which is an email address) is listed, and confirm that the telephone number for your iPhone is listed. If not, click the Edit button and add that information. Click Done and sign out of your Apple ID account.
II. On your iPhone and iPad:
- Open the Settings app
- Tap Messages
- Scroll down and tap Send & Receive
- Make sure your Apple ID appears at the top of the iMessage screen
- Make sure your Apple ID email address and your iPhone cell number are listed in the «You can be reached by Message at» section.
- On your iPhone, start new messages from your cell number. On the iPad, start new messages from your Apple ID (email.)
III. On your Mac, review the instructions again for Continuity Settings
Use Continuity to connect your Mac, iPhone, iPad, iPod touch, and Apple Watch
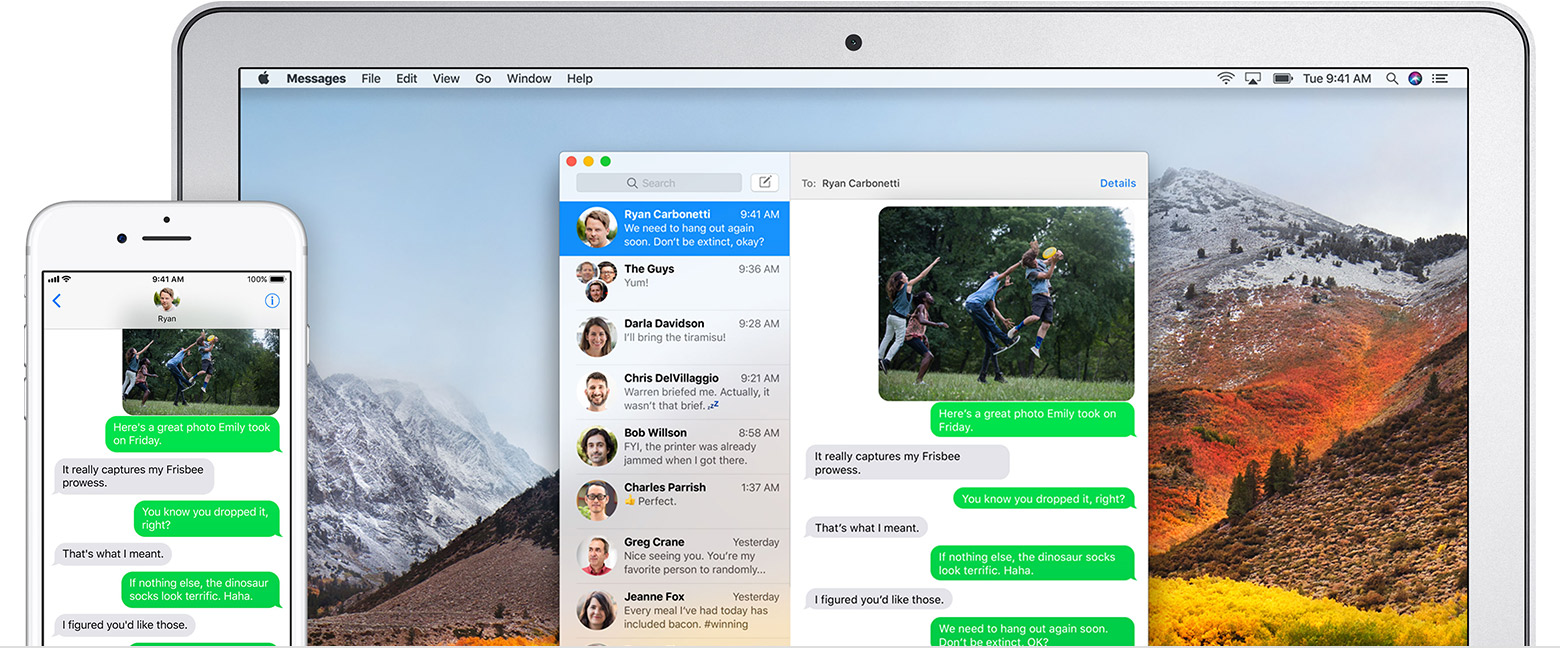
If you have an iPhone, the text messages that you send and receive on your iPhone can appear on your Mac, iPad, and iPod touch as well. You can then continue the conversation from whichever device is closest to you.
Set up SMS and MMS messaging
Use this feature with any Mac, iPhone, iPad, or iPod touch that meets the Continuity system requirements. Make sure that your devices are set up as follows:
- Each device is signed in to iCloud with the same Apple ID.
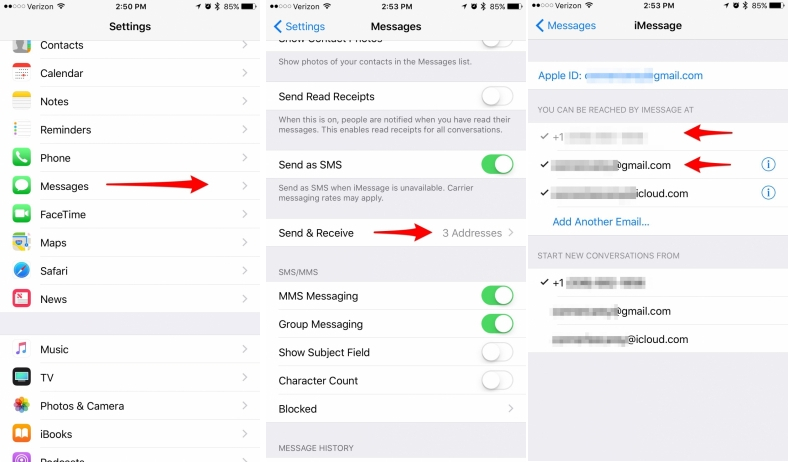
- On iPhone, go to Settings > Messages > Send & Receive. Make sure that the Apple ID at the top of the screen is the same Apple ID that you’re using for iMessage on your other devices. Add a check to your phone number and email address, so that you can be reached by iMessage at both. Do the same on your iPad or iPod touch.
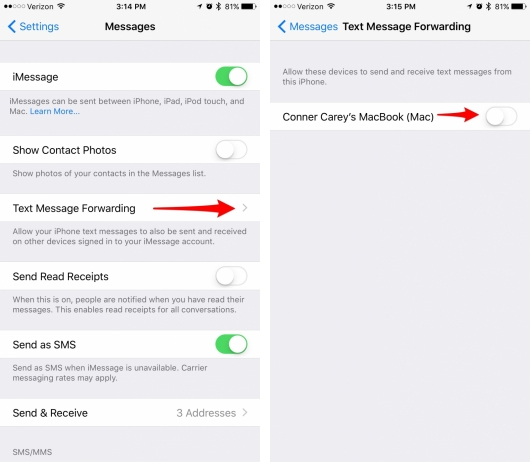
- On iPhone, go to Settings > Messages > Text Message Forwarding, then choose which devices to allow to send and receive text messages from this iPhone. If you’re not using two-factor authentication for your Apple ID, a verification code appears on each of your other devices: enter that code on your iPhone.
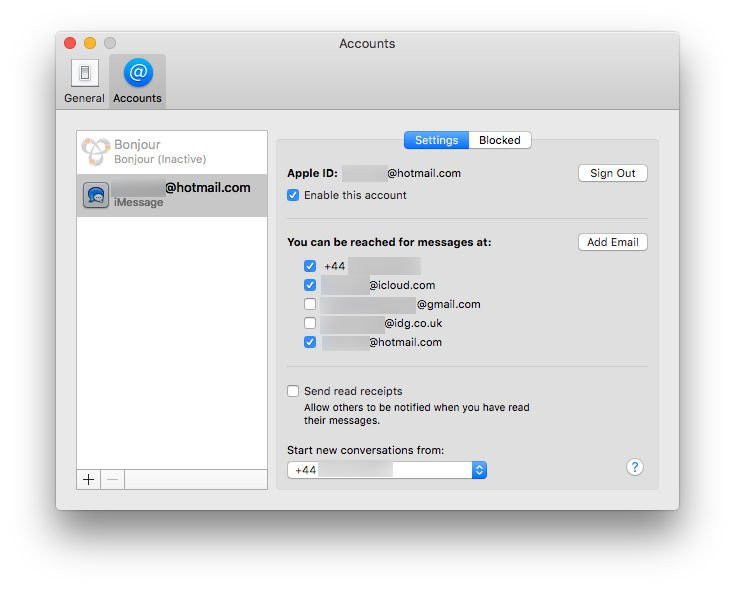
- On Mac, open Messages, then choose Messages > Preferences. Click Accounts, then select your iMessage account. Make sure that the Apple ID shown here is the same Apple ID that you’re using on your other devices. Add a check to your phone number and email address.
Use SMS and MMS messaging
To use this feature, just start conversations as normal in the Messages app on any of your devices. You can also start a conversation by clicking a phone number in Safari, Contacts, Calendar, or other apps that detect phone numbers. All of your incoming and outgoing messages appear on all of your devices.

IV. Turn off your Mac and your iOS devices.
V. Unplug the power cable to your modem and/or router. Wait a minute, and plug it back in. This will reinitialize your connection to the internet and your Wi-Fi.
VI. Turn on your Mac, turn on your iOS devices
VII. Create a new message to test.
R22183, if your issue persists after trying all of these steps, reply back to this thread with any additional information you can (including any error messages you may encounter) and we’ll investigate this further with you.
Take care.
Источник
How to Sync Messages from iPhone to Mac
I Recently grabbed an iPhone 7, and I’m looking to sync those messages with my MacBook Air. Unfortunately, I have had difficulty with this. According to countless community boards one key step in syncing messages between mac and iPhone is to select «Text Message Forwarding» from the iPhone under settings>messages. But it appears as if this option does not exist (at least not in the same place) on iOS 10.
Today we are going to discuss about the problems related to Apple messaging service and also the best possible ways to solve this error. So How to sync Messages from iPhone to Mac?
Recently, Apple has taken a joint approach to Mac OS/iOS (Apple calls it Continuity). One of the good things about this approach is that you are able to start a task on a mobile device and then continue it on desktop when you arrive at work. One of the neatest ways it works is through the messaging service. The matching Messages apps installed on iOS and Mac will allow you to easily and conveniently carry on iMessage conversations across the two platforms, without any error.
How to sync iMessages across iPhone and Mac?
Sometimes the synchronization between Mac and iPad or iPhone isn’t quite right: some people have found that iMessages sent from the iPhone don’t appear in the conversation in Messages on the Mac, and vice versa.
So, in this part we will learn about how to sync Messaging apps on iPhone and Mac
Follow the steps given below to sync your iMessages on iPhone and Mac
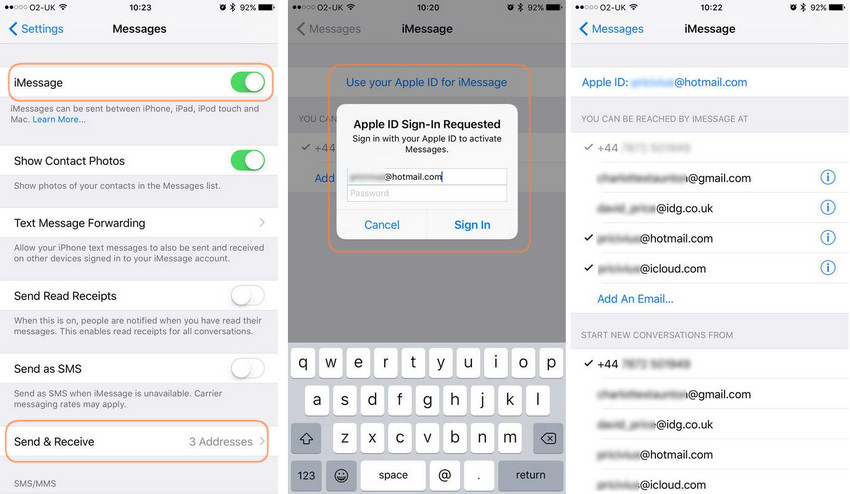
Step 1 Get your iPhone and launch the Settings app on the device. Swipe down to the fifth group of options (the one starting with Mail) and tap on iMessages option. The fifth option down is labeled as Send & Receive, which has a phone number or email address, or something like «3 Addresses», tap on this option.
Step 2 Now, you will be able to see all the phone numbers and email addresses on which you can be contacted via iMessage option. Tick any numbers or addresses that you want to use but which aren’t currently selected.
When you look at this, incidentally, you will see only the iPhone’s number, so you have to tap ‘Use your Apple ID for iMessage‘. This will unlock the long list of email addresses registered to your Apple ID. Then, you can tick the addresses as appropriate. (If you want to remove an address from the list entirely, tap the ibutton and tap Remove This Email.)
Step 3 Now get your Mac and open the Messages app on that device. Click Messages in the top menu bar, and then select the Preferences option. (You can jump straight to the settings from Messages, or like most other Mac apps, by hitting Cmd-comma.) Click on Accounts.
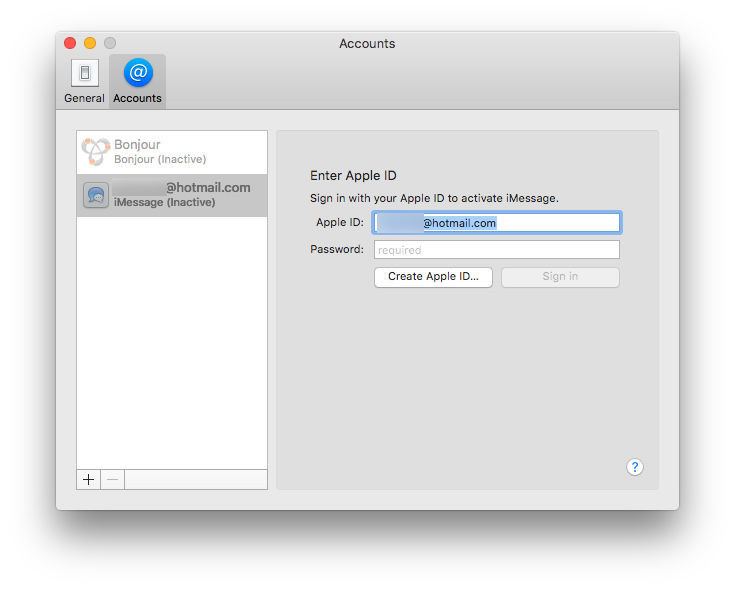
Step 4 As on the iPhone, you need to tick all the email addresses that you want to be associated with iMessage on this machine as well. If your Apple ID account says Inactive, the click on it and enter the required details to log in, then tick or uptick the numbers/addresses you want to use.
Step 5 And that should be all the requirements you need to sync iMessages on iPhone and Mac. Restart Messages on each device and see if everything is now working the way it should.
How to sync Text Messages from iPhone to Mac?
Many people think that Syncing messages from iPhone to Mac is a tough job, but actually it is a very simple process that can be completed by following few steps. So, follow the steps given below to Sync messages from iPhone to Mac.
NOTE: — Please follow the all the steps to the exact detail in order to get the best results. Make sure that your Mac is running on OS X Yosemite (10.10 or higher) and your iPhone is running iOS 8.0 or higher, or else this option won’t be available to you.
Step 1 When you are ready to go, click on the Messages app on your Mac to open it. Now we need to make sure you’re logged into, specifically, Messages on Mac. To do this, open the Messages app, tap Messages at the very top of the screen, and select Preferences. Choose Accounts. Tap the one that says iMessage. Log in using the same Apple ID as you did on iPhone. If already logged in, great! Under You can be reached for messages at, make sure you check both your Apple ID email and phone number.
Step 2 Now, get your iPhone and tap Settings > Messages. Select Send & Receive. Under You Can Be Reached By iMessage At, make sure both your phone number and Apple ID email address are checked. If not, tap to check them.
Step 3 Go back to Messages. Now go to Text Message Forwarding option. You’ll be able to see a complete list of all your devices linked to your personal Apple ID. Choose the one that you want to send and receive messages and select the вЂOn’ option. Toggle on your Mac.
Step 4 You’ll see a six-digit code pop up in Messages on your Mac. An alert window will finally appear and marked Text Message Forwarding will show up on the iPhone.
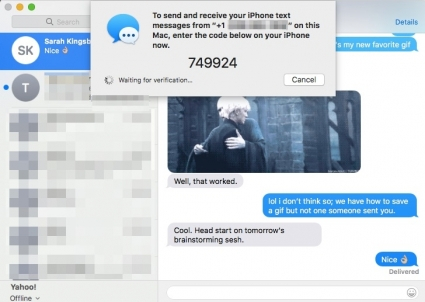
Step 5 Enter the six-digit code that will be displayed in Messages on the Mac into the alert window on the iPhone and tap Allow as a confirmation.
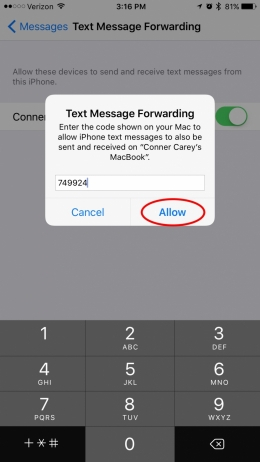
Congratulations! You’re completely ready. When someone sends you a text message on your iPhone, it will automatically appear inside Messages in Yosemite. That’s how to sync text messages from iPhone to Mac.
Wondershare TunesGo: The best iPhone Manager
Many mobile users believe that syncing processes must be lengthy and especially, if it involves Apple, must be too complicated as well, however that’s not at all true. The toolkit that we will discuss in this section called the TunesGo has advanced file explorer that collects contacts, messages, photos, songs, videos and apps, and instantly syncs them with your computer by a simple of a button. The TunesGo toolkit from Wondershare, supports most of the OS including Android and iOS. It is faster than most of the other toolkits and gives 100% data security by using special encryption. The integrated file manager of TunesGo helps in keeping your data in a very organized manner as well. This toolkit has been around for a long time and is trusted by millions of users worldwide. TunesGo has repeatedly received the highest ratings and the most number of positive customer reviews.
Источник


