- Урок 5. Kotlin. Добавление второго экрана в android-приложение. Передача данных через Intent
- Вы узнаете
- Создаем новое активити
- Изучите файл манифеста
- Создаем макет для нового активити
- Добавьте TextView для заголовка
- Android Intents with Kotlin
- There are two types of Intents.
- Implicit Intent in Android example – Kotlin
- In Android, there are 2 types of Intent.
- Here is Some actions can do with
- Let’s Build an App for Implicit intent in kotlin :
- Output screenshot Implicit Intent kotlin example in Android :
- Video Output
- Download source code Implicit Intent kotlin example
- Android Intent Handling Between Activities Using Kotlin
- Android Tutorial
- Kotlin Tutorial
- Android Intents
- Intent Flags
- Passing Data Through Intents
- Using Parcelable and Serializable Data
- Sending Parcelable Data
- Sending Serializable Data
- Project Structure
- Layout Code
- Activity Code
Урок 5. Kotlin. Добавление второго экрана в android-приложение. Передача данных через Intent
Продолжаем курс по обучению основам разработки мобильных приложений в Android Studio на языке Kotlin.
В этом уроке создадим второй экран в приложении, и настроим взаимодействие между экранами с передачей данных.
Предыдущий урок, в котором мы обрабатывали нажатия кнопок, здесь
Продолжаем разработку приложения на языке Kotlin, которое мы делали на прошлом уроке. Исходный код можно скачать на странице прошлого урока.
Пока что наше приложение имеет только один экран. В этом уроке мы добавим второе активити, которое будет отображать экран с данными, полученными на основе данных с первого экрана. При нажатии кнопки Random будет отображаться окно со случайным числом от нуля до текущего значения счетчика.
Вы узнаете
- Как запустить новое активити с помощью интента
- Как передать данные во второе активити через интент
- Как получить данные, переданные через интент во втором активити
Создаем новое активити

- Раскройте пакет с именем com.example.android.myfirstapp по пути apps >java >com.example.android.myfirstapp.
- Правым кликом выберите команду File >New >Activity >Empty Activity.
- В окне настроек нового активити установите для него имя SecondActivity. Убедитесь, что в поле Source Language установлен Kotlin.
Также проверьте им пакета, оно должно соответствовать вашему приложению. Если вы не выделили имя пакета в меню при вызове команды добавления нового активити, установите в это поле android.example.com.myfirstapp.
4. Нажмите Finish. Android Studio создаст файл на языке Kotlin и файл макета на языке XML для нового активити.
5. Дождитесь синхронизации gradle в Android Studio.Gradle это система сборки, которая используется в Android Studio для компиляции и постройки приложения. Вы будете видеть сообщения от gradle о прогрессе сборки приложения внизу экрана.
Изучите файл манифеста

Каждое активити должно быть определено в файле манифеста. Вы можете добавить новое активити в приложение не через меню добавления активити, но тогда вам нужно будет вручную прописать его в манифесте.
Изучите файл Kotlin нового активити
- Откройте файл SecondActivity.kt.
- Обратите внимание на метод onCreate(). Постмотрите на вызов setContentView(). Этот метод указывает файл макета activity_second.xml как разметку нового активити.
В этом активити мы добавим метод отображения случайного числа. Но сначала нам нужно определить поле в макете для его отображения.
Создаем макет для нового активити
Экран нового активити будет отображать заголовок и случайный номер. На вкладке дизайн редактора макетов можно увидеть, как будет выглядеть экран:

Добавьте TextView для заголовка

- Откройте файл activity_second.xml. Вы увидите пустой ConstraintLayout. Это макет по умолчанию для шаблона Empty Activity.
- Добавьте TextView из палитры компонентов. Этот TextView будет использовано для отображения заголовка вверху экрана.
- Ограничение верхнего края TextView установим по верхней границе окна, левый край по левой стороне, а правый край по правой стороне экрана. Нижний край не ограничиваем.
- Установите значение ширину match_parent, а высоту wrap_content, поэтому высота изменится в соответствии с высотой содержимого.
- Установите идентификатор @+id/textview_label.
- Установите верхний, левый и правый отступ 24dp. Левый и правый отступы могут также иметь значение «start» и «end» для поддержки локализации языков с написанием справа налево.
- Установите значение параметра цвета текста @color/colorPrimaryDark и размер текста 24sp.
- Поместите текст в TextView «Это случайное число между 0 и %1d.» Спецификатор %1dбудет заменен числом в процессе работы приложения.
- Поместите текст в ресурсы с именем random_heading.

Это код XML для TextView, которое отображает заголовок:
Источник
Android Intents with Kotlin
We all have come across intents in different apps. Whether it is being able to share an image, start another activity or open a browser. Well, before an app can perform an action, it needs to know what that actions purpose is, or intent, in order to carry out that action properly. So what exactly is an intent?
An intent is a messaging object you can use to request an action from another app component.
If you are an android Dev you might have used intents to launch an activity from an existing activity or to launch an app . There are number of tasks on apps that depend on the use of intents. In this blog we are going to cover implicit android intents using Kotlin.
There are two types of Intents.
Implicit Intents – Allows you to have a separate app that performs an action such as “Send an email”
Explicit Intents – These are intents used to navigate between activities in your own app. This can be by launching another activity on the click of a button
With Intents in your app you can perform some actions such as, Call📞, sending an email✉️, Browse, capture images 📷 or view the gallery. The idea of using intents is not having to build an individual activity or another app to perform an action, you can pass the intent and let another app perform the assigned action. If you call the Implicit Intent, the android system searches for components that can be used to start the activity. This is done by comparing the contents of the intent with content present in the intent-filters declared in the AndroidManifist.xml.
Intent Filters are expressions that are used to specify the type of components or actions that can be received by the application.
In this tutorial we shall build a simple Bio App where you shall be able to call, send an email and view the location with the use of implicit Intents.
Unlike in Explicit intents where we declare the class name of the components to start, with implicit intents, we declare an action to be performed. Depending on the intent you want to create, the data might be an Uri(Uniform Resource Identifier).the intent might also not need data at all.
Step 1. Crete a new Android Studio Project
Step 2. Open the activity _main.xml and add the following code.
From the above xml code, I created an imageView and a button. I used a Circle image view and constraint layout. Well, it all depends on your preference when it comes to it.
My drawable/roundbutton.xml
Intent filters declared in the AndroidManifest.xml
Step 3. Create another activity.
Step 4. Editing the activity_dets.xml
From the above code, we have created three buttons. One to allow a call to be made, another to send an email and another to view the location.
First Lets add functionality to the button in the main activity to open our second activity. We shall use an explicit intents .
Step 4. Adding functionality to the button in the main activity
On button click, we shall start our Dets activity.
Step 5. Add functionality to the three buttons in DetsActivity.
From the above code we have three intents, callme, emailme and locateme.
«callme» will initiate a phone call using the Uri data to specify the telephone number (“:+254712345678”). When your app invokes this intent by calling startActivity(), the Phone app initiates a call to the given phone number. The same applies to «locateme» whereas «emailme» does not require the use of an Uri.
locateme also requires the use an Uri
Other Intents you can try adding to your app;
To open a browser
btn_browser.setOnClickListener(View.OnClickListener <
val intent = Intent(Intent.ACTION_VIEW)
intent.data = Uri.parse(«https://github.com/user/myportfolio»)
startActivity(intent)
>)
To capture an image
btn_camera.setOnClickListener(View.OnClickListener <
val intent = Intent(MediaStore.ACTION_IMAGE_CAPTURE)
startActivity(intent)
>)
PS: If you invoke an intent and there is no app on the device to handle it, your app will crush.
To verify there is an activity available that can respond to the intent, call queryIntentActivities() to get a list of activities capable of handling your Intent. If the returned List is not empty, you can safely use the intent.
Consider the one we used to verify if the app to handle the intent exists.
`
// Verify it resolves
val activities: List = packageManager.queryIntentActivities(mapIntent, 0)
val isIntentSafe: Boolean = activities.isNotEmpty()
// Start an activity if it’s safe
if (isIntentSafe) <
startActivity(mapIntent)
>
`
Get the full code from here
The internet is resourceful. It does not come to an end from that. There is so much to learn about intents. From receiving and responding to intents from other apps, Verifying if there is an app to receive the intent and so much more.
Источник
Implicit Intent in Android example – Kotlin
Implicit Intent is not known which app or android component is a target. You have to specifics action in intent, that can invoke any android app on the device able to perform the action. Why Implicit Intent is required? Sometimes your app can’t perform particular actions. At that time you can use implicit intent with action and other apps that can able to this action will show to the user by the android system. If there are multiple apps that can able to do, then the pick-up option will show. This example we will write in Kotlin.

In Android, there are 2 types of Intent.
- Implicit Intent
- Explicit Intent
On this tutorial, you can read about all basic of about Android Intent and Types of Intent.
Note: If your app supports some action like open images then you have to implement Intent Filter in your app component.
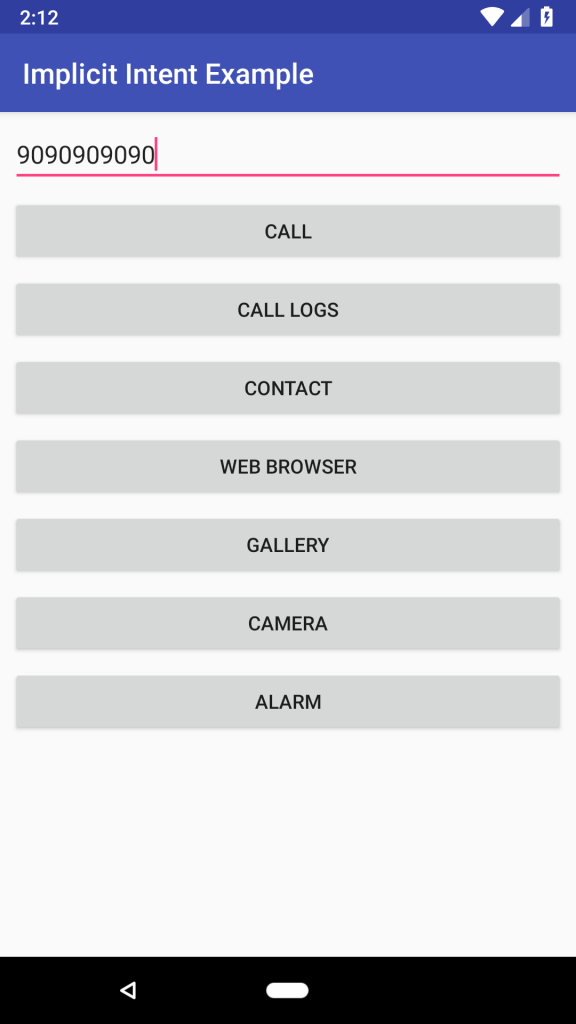
Here is Some actions can do with
- Call
- Call Log
- Contact
- Browser
- Gallery
- Camera
- Show alarm
And so many more actions can do with Implicit Intent, you don’t need to write all app ability to do things. Some awesome specifics app already in the device to handle those actions. Like call app, there is so many call apps, and Android also his own. So you don’t need to build your on calling app component, just pass the intent and let handle to another app.
Let’s Build an App for Implicit intent in kotlin :
In this example, we are sharing some example of Implicit intent with kotlin language.
Step 1. Create a new project “ Build Your First Android App in Kotlin “
Step 2. Add the string in res/values/strings.xml
Step 3. Open an “activity_main.xml” resource file
add buttons or add the following code
Step 4. Open an “ActivityMain.kt” class file
and add the following code
*App permission is required for some actions.
Step 5. Add Call permission in “AndroidManifest.xml“
Step 6. Run the application, in an emulator or On your Android device
Output screenshot Implicit Intent kotlin example in Android :
Video Output
Download source code Implicit Intent kotlin example
Note: This example (Project) is developed in Android Studio 3.1.3. Tested on Android 9 ( Android-P), compile SDK version API 26: Android 8.0 (Oreo)

Degree in Computer Science and Engineer: App Developer and has multiple Programming languages experience. Enthusiasm for technology & like learning technical.
Источник
Android Intent Handling Between Activities Using Kotlin
Android Tutorial
Kotlin Tutorial
In this tutorial, we’ll be discussing Android Intents and implement them using Kotlin in our application.
- What are Intents?
- Types Of Intents?
- Using Intents Between Activities
- Sending Data Using Android Intents
- Using Parcelable and Serializable to pass objects
- Creating shorthand intents
Android Intents
As the name says Intent is something that’s used to perform some action with respect to the flow of the android application. Intents can be used to:
- Starting a new activity and passing some data.
- Starting Fragments/Communicating between fragments.
- Start/End service.
- Launch activities from a broadcast receiver
In this tutorial, we’ll be looking mainly at intents to handle activities.
An intent definition mainly consists of an instance of the current activity. We set the component name which can be:
The fully qualified class name of the activity to be called. This type of Intent is an explicit intent.
An action such as URL, phone number, location. It’ll display all the available applications of those types.
This falls under the implicit intent category.
In Kotlin, following is the way to create an activity.
startActivity would add OtherActivity on the activity stack and launch it.
How does our Application, realise which activity is the first to be invoked?
In the AndroidManifest.xml we set the intent filter with the action android.intent.action.MAIN and category android.intent.category.LAUNCHER on the first activity to be launched when our application opens.
finish() is used to destroy an activity and remove it from the stack.
Intent Flags
Flags are like options that can be set on intents to customise the launch process.
If you start the same activity everytime, a new instance would be created and added onto the activity stack
To prevent this, you can use the flags:
FLAG_ACTIVITY_SINGLE_TOP – If set, the activity will not be launched if it is already running at the top of the activity stack.
Similarly using a flag FLAT_ACTIVITY_CLEAR_TOP would not launch another instance of the activity if it already exists. This flag would clear all the activities above the activity that’s called and set it on the top of the stack.
Passing Data Through Intents
To pass data onto the new activities we use key value pairs inside the function putExtra , putStringArrayListExtra etc.
putExtra generally passes the basic types such as Int, Float, Char, Double, Boolean, String along with  IntArray…. etc.
These Extras fields are under the hood wrapped into the Bundle object which ultimately holds all the data to be passed.
To retrieve the data in the other activity, we need to use the extras property over the bundles .
Retrieving Data in the new Activity
intent , extras are equivalent to getIntent() , getExtras() in Java.
We’ve used a nullable type Bundle? to prevent NullPointerExceptions when not data exists. Similarly, for the data that’s fetched using the keys, we’ve used the nullable types to prevent NPE that can occur when the key is incorrect.
Using Parcelable and Serializable Data
Sometimes we need to pass a complete object from one activity to another. It’s not possible to do so unless we implement the Parcelable or Serializable interface.
Difference between Parcelable and Serializable
- Parcelable interface is a part of the Android SDK. Serializable is a standard interface of Java.
- In Parcelable you need to set all of the data you need to pass in a Parcel object and also override the writeToParcel() methods etc. In serializable implementing the interface is sufficient to pass the data.
- Parcelable is faster than Serializable.
Sending Parcelable Data
Kotlin comes up with some handy annotations to save us from overriding the writeToParcel() method to set the data on the Parcelable. Instead, we can use @Parcelize annotation as shown below:
Note: Currently in your build.gradle you must add the following code for the @Parcelize annotation to work:
In your Activity you do:
Sending Serializable Data
Let’s use over above knowledge in our Android Studio Project.
Project Structure

Layout Code
The code for the activity_main.xml layout is given below:
The code for the activity_other.xml layout is given below:
Activity Code
The code for the MainActivity.kt class is given below:
In the above code, we’ve used Buttons for each type of Intent.
We’ve used Kotlin’s with expression to prevent setting data over the intent object every time.
Besides, we’ve created three different intents apart from the ones already discussed above.
A browser intent is used to launch the url present in the intent in the browser app.
It uses Intent(Intent.ACTION_VIEW, uri) .
A location intent is used to launch the lat,lng location in the maps application.
Both of these are implicit intents.
Lastly, we’ve used a generic intent in which we use the Kotlin’s extension functions and lambda expressions to create a shorthand function to launch an intent.
For this we use the following functions:
startActivity is an exension function which looks for a higher order function as it’s parameter.
Thanks to this, we can now launch intents in as few lines as:
start
The code for the OtherActivity.kt class is given below.
We’ve used let and apply to handle nullable types and prevent doing bundle.field in every line.
The output of the above application in action is given below: 
This brings an end to this tutorial on Android intents in Kotlin. You can download the project from the link below.
Источник


