- Настройка Android Studio
- Отображение номера строки
- Разделители методов
- Выделение изменённых файлов звёздочкой
- Использование стиля «Верблюжьи горбы»
- Импортирование на лету, «imports on the fly»
- Цветовая гамма
- Настройка цветовой гаммы редактора Java
- Настройка цветовой гаммы окна консоли
- Кодировка
- Именование полей, методы get/set
- Установка Android Studio и настройка среды
- Установка Java JDK
- Android Studio for beginners, Part 1: Installation and setup
- Install Android Studio and start your first Android project. Updated January 2020
- What’s new in Android Studio 3.x
- Get started with Android Studio
- Download Android Studio
- Windows requirements
- Mac OS requirements
- Linux OS requirements
- Android SDK command-line tools
- Installing Android Studio on 64-bit Windows 10
- Running Android Studio
- Your first Android Studio mobile app
- Starting a new project
- Reconfigured buttons
- Accessing AVD Manager and SDK Manager
- The Project and editor windows
- Branch names and directory/file names
- Conclusion to Part 1
Настройка Android Studio
В Android Studio имеется возможность определить собственный стиль представления информации в редакторе, сохранить все настройки в отдельный файл, который в дальнейшем можно импортировать в новую версию IDE. Здесь на странице описываются некоторые возможности настройки интерфейса среды разработки. Это даёт Вам возможность понять где искать и как определить тот или иной стиль представления информации.
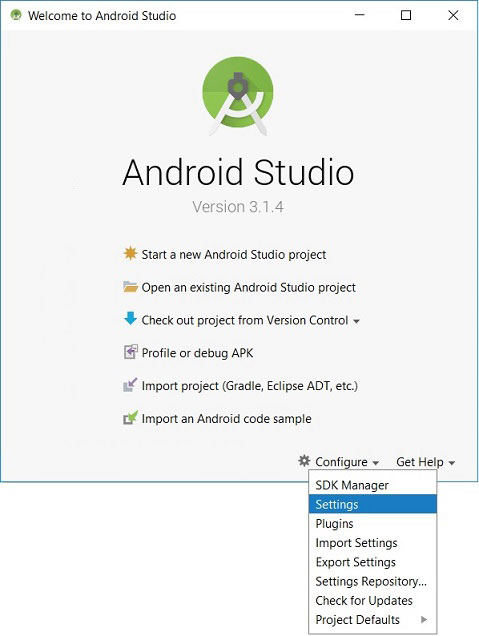
Чтобы открыть окно настроек в окне приветствия нажмите «Configure» в нижней части формы и во всплывающем меню выберите пункт «Settings». как это представлено на следующем скриншоте :
Всплывающее меню раздела конфигурации включает пункты импорта и экспорта настроек (Import Settings, Export Settings), о чем было сказано выше.
Отображение номера строки
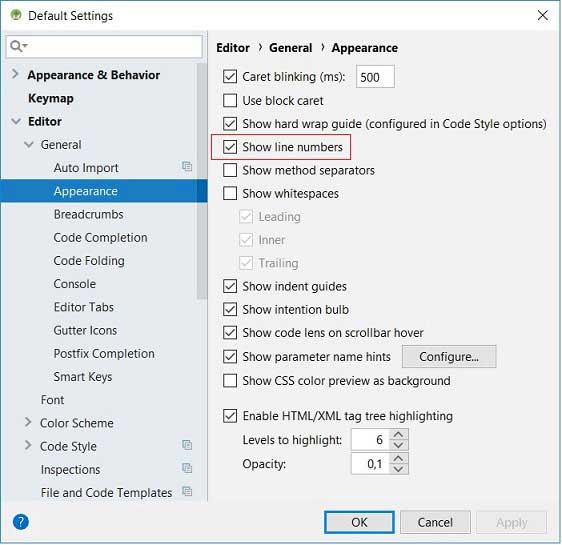
Чтобы отображать номера строк кода в среде разработки необходимо в левой части окна настроек среды разработки IDE выбрать пункт меню Editor/General/Appearance и в правой части установить (не снимать) галочку в чекбоксе «Show line numbers».
Разделители методов
Между методами класса можно установить разделительную черту. Это очень удобно для наглядного отделения одного метода от другого. Чтобы не делать это вручную, можно процесс автоматизировать установкой флага в чекбоксе «Show method separators» (см. скриншот выше).
Выделение изменённых файлов звёздочкой
Часто в различных редакторах изменённые, но не сохранённые файлы на вкладках помечаются звёздочкой. Так работает в Eclipse, Notepad++ и многих других редакторах. Чтобы данную функцию включить в Android Studio необходимо выделить пункт меню Editor/General/Editor Tabs и в панели установить флажок в чекбоксе «Mark modified tabs with asterisk».
Использование стиля «Верблюжьи горбы»
Стиль редактирования «Верблюжьи горбы» определяет навигацию курсора при использовании клавиш ‘Ctrl+ стрелки влево/вправо’. Ниже представлены анимационные изображения, демонстрирующие использование стиля «Верблюжьи горбы».
 |
| Навигация по словам |
 |
| Навигация с помощью «Верблюжьих горбов» |
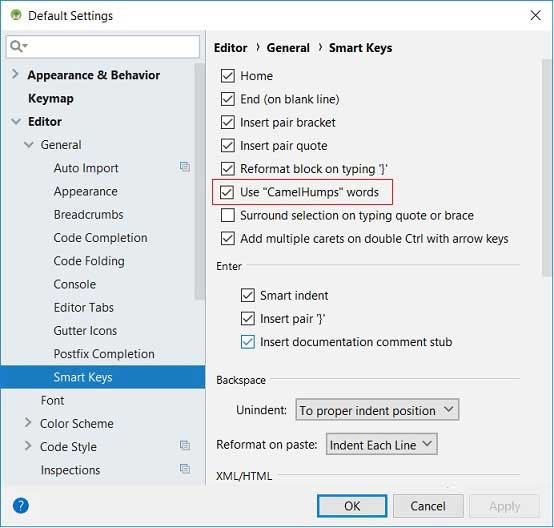
Для использования в среде разработки стиля навигации «Верблюжьи горбы» выберите в окне настроек пункт меню Editor/General/Smart Keys и в правой части установите галочку в чекбоксе «Use «CamelHumps» words».
Импортирование на лету, «imports on the fly»
В Android Studio имеется функция автоматического импорта («imports on the fly») и очистки неиспользуемых импортов в Java коде. Ниже представлены анимационные изображения, демонстрирующие использование функции «imports on the fly».
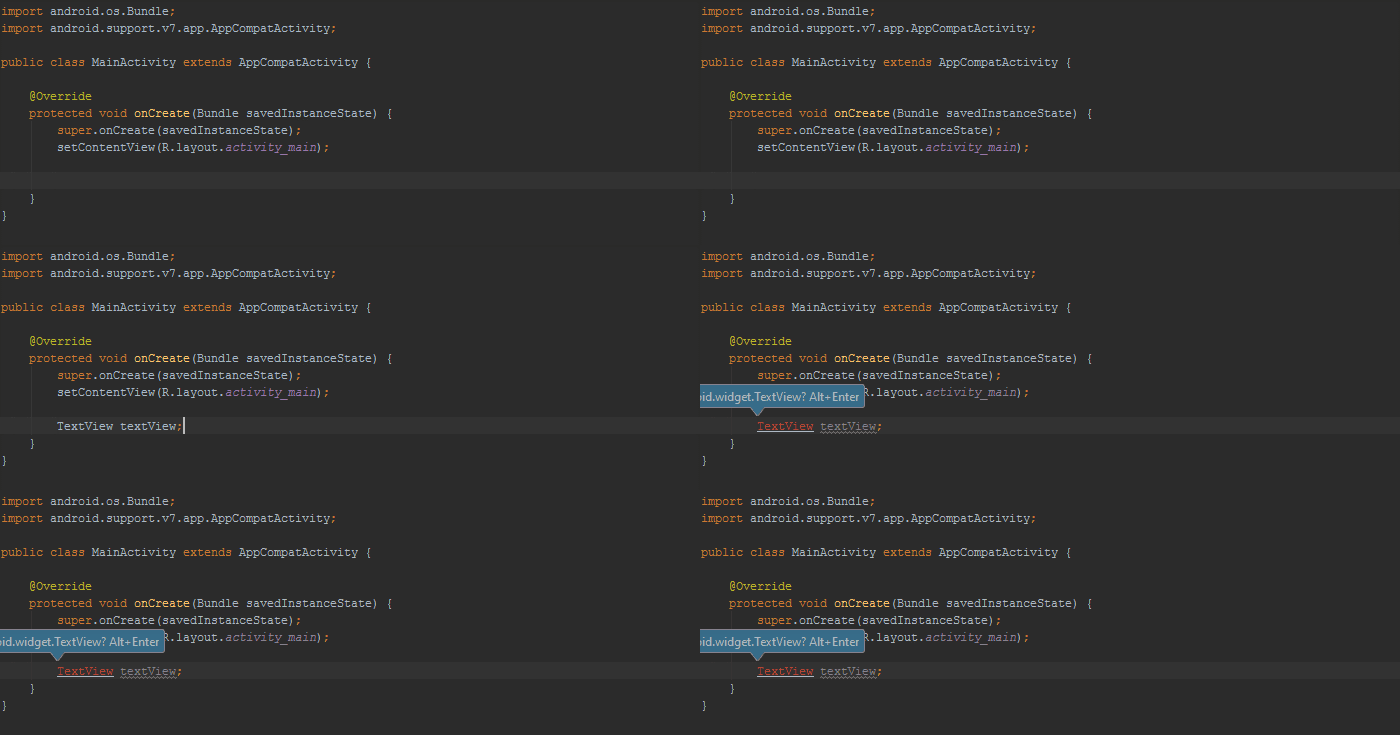 |
| Без функции «импорт на лету» |
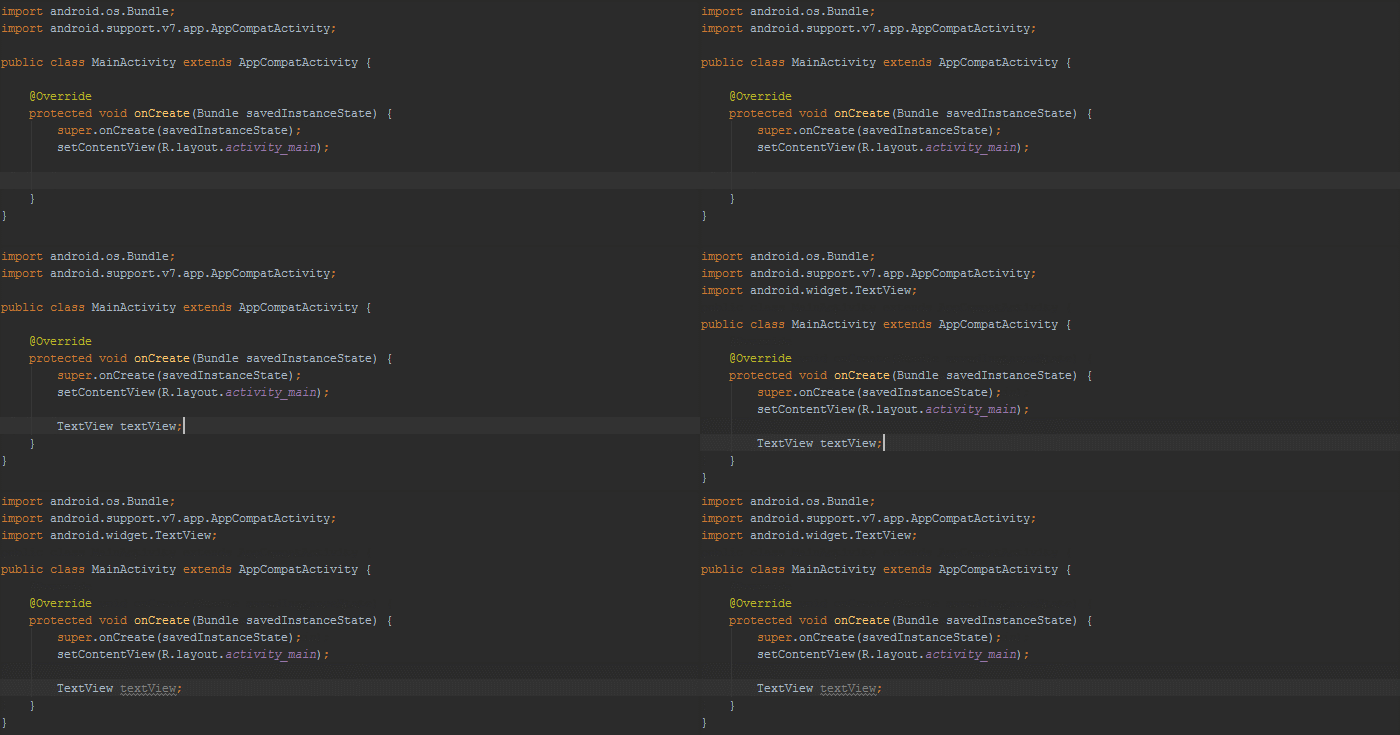 |
| С функцией «импорт на лету» |
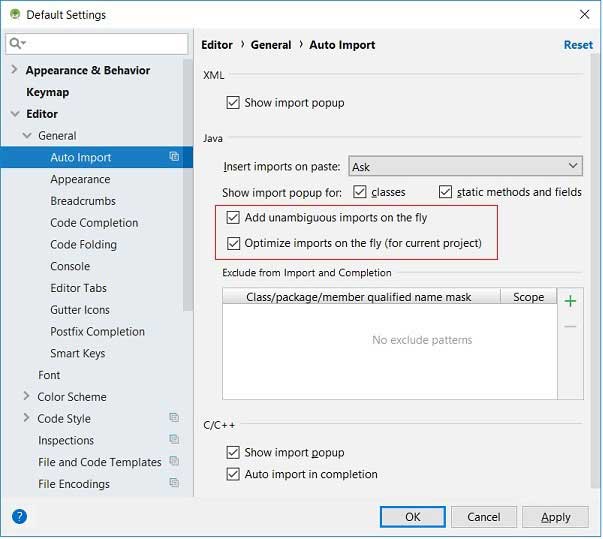
Для установки в среде разработки функции «импорт на лету» выберите в окне настроек пункт меню Editor/General/Auto Import и в правой части установите галочку в чекбоксах «Add unambiguous imports on the fly» и «Optimize imports on the fly», как это представлено на следующем скриншоте.
Цветовая гамма
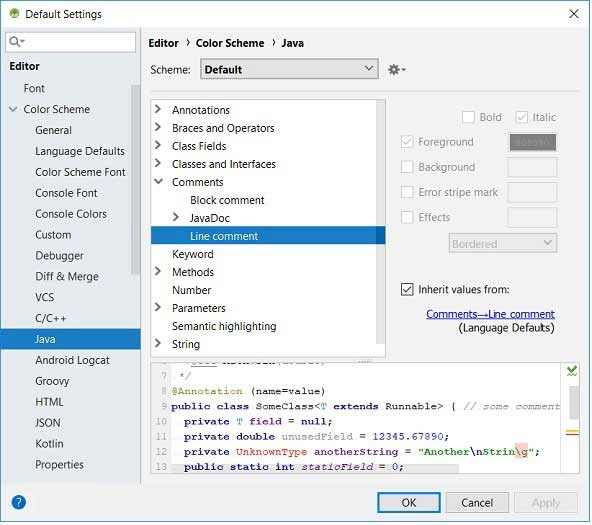
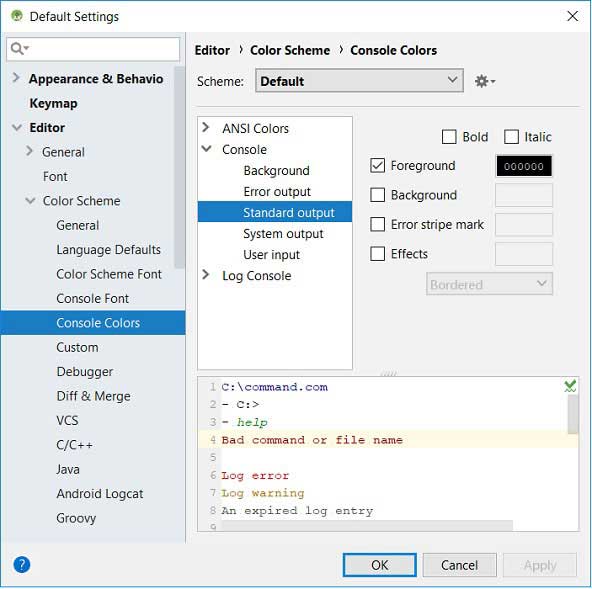
Android Studio позволяет настроить шрифты и цветовую гамму окон редактирования, отладки, консоли для различных языков программирования (Java, C/C++, Groovy) и форматов представления информации (HTML, JSON). На следующих двух скриншотах представлены панели настроек Java и консоли.
Настройка цветовой гаммы редактора Java
Настройка цветовой гаммы окна консоли
Студия версии 3.1.4 поставляется с двумя предустановленными темами: Default (IntelliJ), Darcula. По умолчанию, используется тема Default со светлым фоном (выпадающий список Scheme). Интерес для программистов IntelliJ представляет тема с чёрным фоном Darcula; здесь обыгрывается слово «dark». Чтобы переключиться на «тёмную тему», поменяйте её в выпадающем списке Scheme.
Кодировка
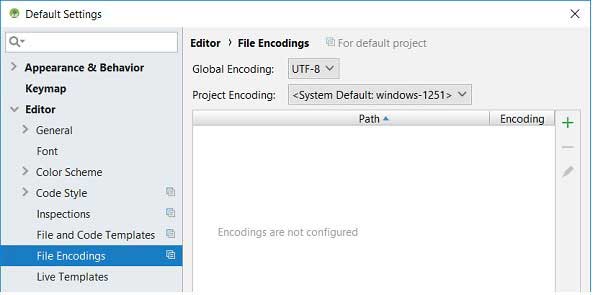
Для изменения кодировки новых проектов и текущего необходимо выделить пункт меню в окне конфигурации File/Settings/Editor/File Encodings и определить значения «Global Encoding» и «Project Encoding». В Android Studio по умолчанию используется в качестве глобальной кодировки UTF-8, а для кодировки проектов используется «системная по умолчанию». У многих разработчиков в качестве системной используется win-1251, с которой могут быть связаны проблемы при выводе строковых сообщений.
Именование полей, методы get/set
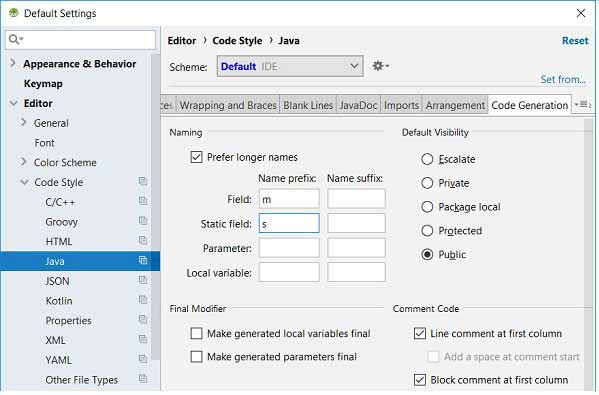
Android Studio умеет самостоятельно генерировать так называемые методы get/set класса на основе его полей. Чтобы использовать правильный стиль кодирования согласно ковенции ‘Android Code Style Guidelines for Contributors’, необходимо сначала определить настройки распознавания префиксов ‘m’ (member) и ‘s’ (static) в названии переменных. Для этого следует открыть панель настроек Editor/Code Style/Java и перейти на вкладку ‘Code Generation’. В разделе Naming в поле Naming Prefix строки Field введите префикс ‘m’. После добавьте префикс ‘s’ для статических полей в строке ‘Static field’.
Подобная настройка подскажет IDE о необходимости генерирации методов для поля без соответствующего префикса в его наименовании. Например, для поля mCatName будет создан метод setCatName() вместо setMCatName().
Для генерации в файле класса с полями методов get/set щёлкните правой кнопкой мыши после конструктора и в раскрывшемся меню выберите команду ‘Generate…| Getter And Setter’, определите в открывшемся окне поля класса и щёлкните на кнопке OK, чтобы IDE сгенерировала get/set методы для каждого выделенного поля класса.
Источник
Установка Android Studio и настройка среды
Всем салют друзья!
Продолжаем изучение программирования на Android.
- Введение в программирование под Android
- Архитектура Android
- Установка Android Studio и настройка среды
- Пример Hello World — создание первого приложения для Android
- Базовый обзор приложения для Android
- Жизненный цикл деятельности
- Макеты
- LinearLayout
- Кнопка
- Кнопка переключения
- Пользовательский тост
- Снэк-бар
- Вид сетки
- WebView
- Выбор даты
- RatingBar
- Пример PopupWindow
- Проверьте подключение к Интернету
- SharedPreferences
- Управление сеансом с использованием SharedPreferences
- База данных SQLite
- База данных Realm
- Учебник по залпу
- Учебник Пикассо
- Библиотека изображений Glide
- Войти и зарегистрироваться с помощью Restful Web Services (Java + MySQL)
- Загрузить изображение на сервер с помощью Volley
- Push-уведомление с использованием Firebase Cloud Messaging (FCM)
- Преобразование изображения в строку Base64 или строку Base64 в изображение
- Приложение для чата в реальном времени с использованием Firebase
- 4 способа узнать текущую дату в Android
- Руководство по AdMob
- Потяните или проведите вниз, чтобы обновить, используя SwipeRefreshLayout
- Воспроизведение видео с URL-адреса с помощью VideoView
- Пример клиента SOAP с использованием ksoap2
- Как передавать данные из одного действия в другое
- Разбор XML с использованием XMLPullParser
- Как получить текущее местоположение с помощью диспетчера местоположения
- Учебное пособие по Google Maps API — Начало работы
- Разбор JSON из URL
- Загрузить изображение в хранилище Firebase
- Руководство по интеграции Google Analytics
- Учебник по фреске
- Панель навигации
Вступайте в группу — vk.com/mrsisadm — там больше интересного.
Сегодня вы узнаете об установке студии Android и настройке среды.
Android Studio — официальная IDE для разработки приложений Android. Для запуска Android Studio у вас должно быть минимум 2 ГБ ОЗУ, но рекомендуется 4 ГБ ОЗУ. Как я уже говорил в предыдущем руководстве, приложения для Android разрабатываются на языке Java, поэтому также требуется JDK. Ниже я объяснил каждый шаг и подкинул скриншоты туда где это необходимо.
Примечание: описанная ниже процедура предназначена для ОС Windows, поэтому для других операционных систем она будет немного отличаться.
Установка Java JDK
2. Теперь нажмите кнопку «Загрузить», это перенаправит вас на страницу загрузки JDK.
Источник
Android Studio for beginners, Part 1: Installation and setup
Install Android Studio and start your first Android project. Updated January 2020
Updated: January 2020.
For some years now it’s been clear that Android is a force to be reckoned with in the mobile OS landscape. This Java-based technology has sparked a new gold rush, with programmers competing to make money from their mobile apps. Android jobs are also plentiful, as shown by a quick job search using Indeed.com.
To be successful, Android developers need a good grasp of the Java language (or Kotlin), Android APIs, and Android application architecture. It’s also important to use an appropriate and effective development environment. For many years, Eclipse IDE with the ADT plugin was the preferred platform for Android development. Today, it’s Android Studio.
What’s new in Android Studio 3.x
Find out what to look for in the latest version of Android Studio, including support for Kotlin, Java 8, and a wealth of new tools and plugins.
If you’re new to Android Studio, this tutorial series will get you started. I’ll briefly introduce the Android development platform, then show you how to download, install, and run the software. After that, we’ll spend most of our time actually using Android Studio to develop an animated mobile app:
- In Part 1, you’ll start up your first Android project and get to know Android Studio’s main window.
- In Part 2, you’ll code the app, learning how to use Android Studio to enter source code and resources into the project.
- In Part 3, we’ll build and run the app, using both an emulated hardware device and a Kindle Fire tablet.
- In Part 4, I’ll show you how to use use built-in tools and plugins to debug Android and improve your coding productivity.
Examples in this series are from the most stable version of Android at the time of this writing, Android 3.2.1.
Get started with Android Studio
Android Studio is Google’s officially supported IDE for developing Android apps. This IDE is based on IntelliJ IDEA, which offers a powerful code editor and developer tools. Android Studio 3.2.1 includes the following features:
- A flexible Gradle-based build system
- A fast and feature-rich emulator
- A unified environment where you can develop for all Android devices
- Instant Run to push changes to your running app without building a new APK
- Code templates and GitHub integration to help you build common app features and import sample code
- Extensive testing tools and frameworks
- Lint tools to help you catch performance, usability, version compatibility, and other problems
- C++ and NDK support
- Built-in support for Google Cloud Platform, making it easy to integrate Google Cloud Messaging and Google App Engine
- Plugin architecture for extending Android Studio via plugins
Download Android Studio
Google provides Android Studio for the Windows, Mac OS X, and Linux platforms. You can download Android Studio from the Android Studio homepage, where you’ll also find the traditional SDKs with Android Studio’s command-line tools. Before downloading Android Studio, make sure your platform meets the following requirements:
Windows requirements
- Microsoft Windows 7/8/10 (32-bit or 64-bit)
- 3 GB RAM minimum, 8 GB RAM recommended (plus 1 GB for the Android Emulator)
- 2 GB of available disk space minimum, 4 GB recommended (500 MB for IDE plus 1.5 GB for Android SDK and emulator system image)
- 1280 x 800 minimum screen resolution
Mac OS requirements
- Mac OS X 10.10 (Yosemite) or higher, up to 10.13 (High Sierra)
- 3 GB RAM minimum, 8 GB RAM recommended (plus 1 GB for the Android Emulator)
- 2 GB of available disk space minimum, 4 GB recommended (500 MB for IDE plus 1.5 GB for Android SDK and emulator system image)
- 1280 x 800 minimum screen resolution
Linux OS requirements
- GNOME or KDE desktop. Tested on Ubuntu 14.04 LTS, Trusty Tahr (64-bit distribution capable of running 32-bit applications)
- 64-bit distribution capable of running 32-bit applications
- GNU C Library (glibc) 2.19 or later
- 3 GB RAM minimum, 8 GB RAM recommended (plus 1 GB for the Android Emulator)
- 2 GB of available disk space minimum, 4 GB recommended (500 MB for IDE plus 1.5 GB for Android SDK and emulator system image)
- 1280 x 800 minimum screen resolution
Once you’ve ensured that your operating system is compatible with Android Studio 3.2.1 or higher, download the appropriate Android Studio distribution file. The Android Studio download page auto-detected that I’m running a 64-bit Windows operating system and selected android-studio-ide-181.5056338-windows.exe (927 MB) for me to download.
Android SDK command-line tools
android-studio-ide-181.5056338-windows.exe includes an installer and the Android SDK command-line tools. If you don’t need or want to use Android Studio, you can download only the Android SDK command-line tools.
Installing Android Studio on 64-bit Windows 10
I launched android-studio-ide-181.5056338-windows.exe to start the installation process. The installer responded by presenting the Android Studio Setup dialog box shown in Figure 1.
Figure 1. Set up Android Studio
Clicking Next took me to the following panel, which provides the option to decline installing an Android Virtual Device (AVD).
Figure 2. Install an Android AVD?
I chose to keep the default settings. After clicking Next, I was taken to the Configuration Settings panel, where I was asked to choose where to install Android Studio.
Figure 3. The installation location must have at least 500 MB free space
I kept the default installation location and clicked Next, and was greeted with the Choose Start Menu Folder panel.
Figure 4. Select the folder in which to store Android Studio shortcuts
I kept the default setting and clicked Install. The following Installing panel appeared:
Figure 5. This panel shows the progress of the installation
Clicking Show details causes the names of files being installed and other activities to be displayed. When installation finished, the Installation Complete panel appeared.
Figure 6. The Next button is enabled when installation completes
After clicking Next, the installer presented the Completing Android Studio Setup panel.
Figure 7. Leave the Start Android Studio checkbox checked to run this software
To complete the installation, I left the Start Android Studio box checked and clicked Finish.
Running Android Studio
The first time Android Studio runs, it presents a Complete Installation dialog box that offers the option of importing settings from a previous installation.
Figure 8. A previous installation’s settings can be imported
I chose not to import settings (the default selection) and clicked OK, and was rewarded with the following splash screen:
Figure 9. Android Studio’s splash screen
I also observed the following Finding Available SDK Components message box.
Figure 10. Android Studio downloads any SDK components that are needed (and available)
At this point, Android Studio presented the following Android Studio Setup Wizard dialog box:
Figure 11. The wizard provides setup and app-porting capabilities
I clicked Next, and the wizard invited me to select an installation type. I kept the default standard setting.
Figure 12. Choose an installation type
I was then given the opportunity to choose a user interface theme.
Figure 13. Put the bite on Android Studio by choosing the Darcula theme
I kept the default IntelliJ setting and clicked Next. Android Studio next provided the opportunity to verify settings.
Figure 14. Android Studio identifies additional SDK components that will be downloaded (click to enlarge)
I clicked Finish and Android Studio began the process of downloading SDK components.
Figure 15. The wizard downloads and unzips SDK components
It can take several minutes for this part of the setup to finish. Clicking Show Details might relieve some boredom by revealing the various files being downloaded and unzipped.
Figure 16. The wizard identifies the various archives being downloaded
For my AMD-based computer, an unpleasant surprise awaited after the components had completely downloaded and unzipped:
Figure 17. Intel-based hardware acceleration is unavailable
My options are to either put up with the slow emulator or use an Android device to speed up development. In Part 3 I’ll show you how I resolved this issue.
Finally, I clicked Finish to complete the wizard. The Welcome to Android Studio dialog box appeared.
Figure 18. Welcome to Android Studio
This dialog box is used to start up a new Android Studio project, work with an existing project, and more. It can be accessed by selecting Android Studio from the Windows Start menu, or the equivalent on another platform.
Your first Android Studio mobile app
The quickest way to get to know Android Studio is to use it to develop an app. We’ll start with a variation on the «Hello, World» application: a little mobile app that displays a «Welcome to Android» message.
In the steps that follow, you’ll start a new Android Studio project and get to know the main window, including the editor window that you’ll use to code the app in Part 2.
Starting a new project
From our setup so far, you should still have Android Studio running with the Welcome to Android Studio dialog box. From here, click Start a new Android Studio project. Android Studio will respond with the Create New Project dialog box shown in Figure 19.
Figure 19. Create a new Android project
Enter W2A (Welcome to Android) as the application name and javajeff.ca as the company domain name. On my desktop, I observed C:\Users\JEFF\AndroidStudioProjects\W2A as the project location. Click Next to select your target devices.
Figure 20. Select your target device categories
Android Studio lets you select form factors, or categories of target devices, for every app you create. I kept the default setting.
Click Next, and you will be given the opportunity to choose a template for your app’s main activity. For now we’ll stick with Empty Activity. Select this template (if necessary) and click Next.
Figure 21. Specify an activity template
Next you’ll customize the activity:
Figure 22. Customize your activity
Enter W2A as the activity name and main as the layout name, and click Next to complete this step.
Reconfigured buttons
The next time you create an app for the chosen target device category, you’ll probably discover that Next is disabled and Finish is enabled.
The first time you use Android Studio, you’ll discover that it has to download some files related to its constraint layout, which is used to build responsive user interfaces:
Figure 23. Constraint layout is the default layout used by Android Studio for new app projects
Android Studio enables Finish after downloading the constraint layout files. Click this button and Android Studio takes you to the main window.
Figure 24. Android Studio’s main window reveals that it has built a skeletal W2A app
The main window is divided into a menu bar and several other areas, which are identified in Figures 25 and 26. (Note that Figures 25 and 26 are courtesy of Google.)
Figure 25. The different areas that comprise the main window
Figure 26. The main window presenting a toolbar, editor window(s), and other features
Check out the Meet Android Studio page to learn more about Android Studio’s user interface.
Accessing AVD Manager and SDK Manager
To access the traditional AVD Manager or SDK Manager, select AVD Manager or SDK Manager from Android Studio’s Tools menu.
The Project and editor windows
When you enter the main window (see Figure 24), you observe the Project window showing only app and Gradle Scripts. You’ll have to expand the app branch of the project tree to observe more details.
Figure 27. The Project window and an editor window show the skeletal W2A activity source code
The Project window is organized into a tree whose main branches are app and Gradle Scripts. The app branch is further organized into manifests, java, generatedJava, and res subbranches:
- manifests stores AndroidManifest.xml , which is an XML file that describes the structure of an Android app. This file also records permission settings (where applicable) and other details about the app.
- java stores an app’s Java source files according to a package hierarchy, which is ca.javajeff.w2a in this example. It also organizes files for testing purposes.
- res stores an app’s resource files, which are organized into drawable, layout, mipmap, and values subbranches:
- drawable is a mostly empty location in which to store an app’s artwork; initially, the XML files for the launcher foreground and background adaptive icons are stored here.
- layout is a location containing an app’s layout files; main.xml (the main activity’s layout file) is initially stored here.
- mipmap is a location containing various ic_launcher.png files, which store launcher screen icons of different resolutions.
- values is a location containing colors.xml , strings.xml , and styles.xml .
The Gradle Scripts branch identifies various .gradle (such as build.gradle ) and .properties (such as local.properties ) files that are used by Android Studio’s Gradle-based build system.
Branch names and directory/file names
Each branch/subbranch corresponds to a directory name or to a file name. For example, res corresponds to the res directory and strings.xml corresponds to the strings.xml file.
Conclusion to Part 1
You’ve installed and configured Android Studio and created a project for your first Android Studio mobile app; now you’re ready to build your Android application. In Android Studio, this means populating your new project with Java source code and resource files. Turn to Part 2 when you’re ready to code your first Android animated mobile app.
This story, «Android Studio for beginners, Part 1: Installation and setup» was originally published by JavaWorld .
Источник
