- 4 Ways to Transfer Photos from Android to Android
- Part 1: How to transfer photos from Android to Android using MobileTrans?
- MobileTrans — Phone Transfer
- Part 2: How to transfer photos from Android to Android using Bluetooth?
- Part 3: How to transfer photos from Android to Android using Android Beam
- Part 4: How to transfer photos from Android to Android using dr.fone — Phone Manager (Android)?
- dr.fone — Phone Manager (Android)
- Работа с изображениями
- Ресурсы изображений
- Add images to your Android Project
4 Ways to Transfer Photos from Android to Android


“Is there an easy solution to help me? I change to a new android phone and need to transfer all photos from old to new phone.”
You want to share the pictures taken during trips with your friends or family members or you just got a brand new Android device and want to move all your loved photos from the old Android to the new Android device?
If you want to transfer photos from Android to Android, but you don’t know much about Android photo transfer then this is just the article for you. Keep on reading this to know everything related to how to transfer pictures from Android to Android.
Part 1: How to transfer photos from Android to Android using MobileTrans?
MobileTrans is a very handy data transfer software that can meet most of your Android needs. With MobileTrans — Phone Transfer, you will be able to transfer photos from Android to Android easily and efficiently.
Besides, you can easily do the data transfer between Android and iOS devices in one click when you need to upgrade to a new device.
Let’s check how to transfer photos from Android to Android with MobileTrans — Phone Transfer.
MobileTrans — Phone Transfer
1-Click Phone to Phone Transfer
- • Easy, fast and safe.
- • Transfer photos, text messages, contacts, notes, and many other file types.
- • Move data between devices with different operating systems, i.e iOS to Android.
- • Supports iOS devices that run the latest iOS 14

- • Supports over 8000+ Android devices. Works for all models of iPhone, iPad, and iPod.

- Download and install MobileTrans on your computer. Select the «Phone Transfer» module.
![]()
Then connect both your Android phones to the computer. Select Photos from the supported file type list and click on the «Start» button.
![]()
There you go! You have successfully transferred photos from one Android to another Android Device.
![]()
Here is the video tutorial for you:
Part 2: How to transfer photos from Android to Android using Bluetooth?
Another simple way for Android photo transfer is via Bluetooth, and probably this is the only way that works on almost every device presently in usage in this world. You just have to follow the two simple steps to know how to transfer pictures from Android to Android.
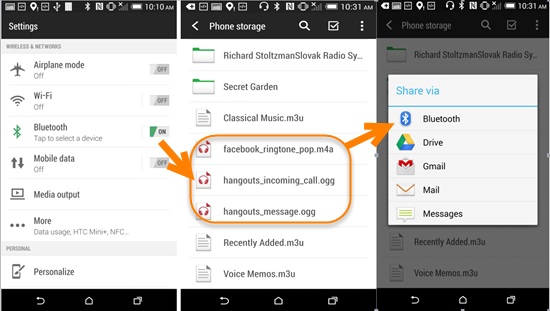
- Turn on the Bluetooth on both android devices and pair Bluetooth with those two devices. Select Bluetooth option that will be available in the settings then turn it вЂon’ on both android devices for file sharing. After that, establish a connection between the two phones to pair them successfully and exchange files.
- Now, share photos between those two android devices.
- When the two smartphones have been successfully paired and connected, open the “File Manager” option on the phone desktop, then select the music that you want to transfer and press it for 2 seconds to share to the destination phone via Bluetooth.
Part 3: How to transfer photos from Android to Android using Android Beam
Android Beam is a software that allows you to send content between devices just by pressing them back-to-back. Android Beam is very ideal for sharing content – web pages, maps, videos, photos, and more – with other people’s Android phones and tablets. Many latest Android phones have integrated NFC hardware under their panel and support Android Beam on them.
Here are the tips on how to transfer photos from Android to Android using Android Beam.
Step 1: Check for NFC Support
- Before you try to transfer photos between two Android devices using Android Beam, you will need to ensure that both your Android devices support NFC. Some Android smartphones support NFC, however, some don’t come with NFC support, so it is necessary to check before you launch this process.
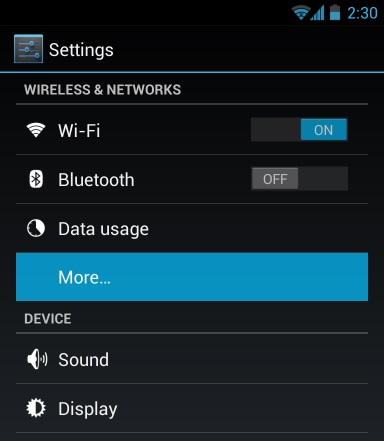
- To check for NFC support, open your device’s Settings screen and tap on “More…” that will be located under Wireless & networks.

Step 2: Open the Content that You Want to Share
Once your device confirms that you have NFC support and you can use Android Beam, you need to navigate to the content that you want to share. For example, here’s how you would share various types of content using this toolkit:
- Web Page: Open it in Chrome (it is always advisable to use chrome for this purpose).
- YouTube Video: Open it in the default YouTube app, pre-download the app on both devices).
- Map Directions or a Location: Open the Google Maps app and pull up the directions or the location that you want to share.
- Contact Information: Open the contact card in the People app on the sender device.
- An App: Open its download page on Google Play Store.
- Photos: Open a photo in the gallery. You can also send multiple photos by opening the default gallery app, you just have to long-press a photo’s thumbnail, and then tap all the other photos you want to send to select them. With the photos selected, you can finally start the beaming process.
Step 3: Beam the Content
- Now, before you can send your content between two devices with Android Beam, they must both be powered on and completely unlocked. If either device screen is off, or if either device is at its lock screen (or is password-encrypted), Android Beam won’t work, and you can’t transfer photos.
- With both devices on and unlocked, press them back-to-back to transfer your music from one Android to Another.
Part 4: How to transfer photos from Android to Android using dr.fone — Phone Manager (Android)?
dr.fone — Phone Manager (Android)
Transfer Photos from Android to Android flexibly and easily.
- • Transfer files between Android and computer, including contacts, photos, music, SMS, and more.
- • Manage, export/import your music, photos, videos, contacts, SMS, Apps, etc.
- • Transfer iTunes to Android (vice versa). • Manage your Android device on the computer.
- • Fully compatible with Android 10.
- Download and install dr.fone — Phone Manager on your computer. Select the «Phone Manager» from all the models.

Connect both your Android phones to the computer. dr.fone will recognize them and display them like below. Select the Android phone which you would like to transfer photos from.
![]()
Go to the Photos tab on the top. It will display all the photos on your source Android phone. Select the photos you would like to transfer and click Export > Export to Device to transfer the selected photos to the target Android phone.
![]()
So, in this article, we discussed how to transfer photos from Android to Android. I would recommend everyone to use the Wondershare toolkit for this process as it is the safest, secure, and easy to use toolkit for Android photo transfer process. They are the best toolkit makers all over the globe. Lastly, I hope that you enjoyed reading this article on how to transfer pictures from Android to Android.
Источник
Работа с изображениями
Ресурсы изображений
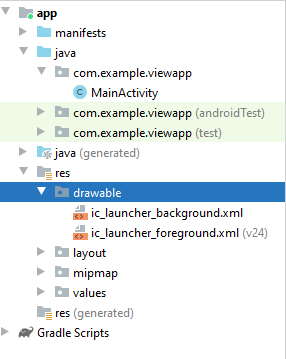
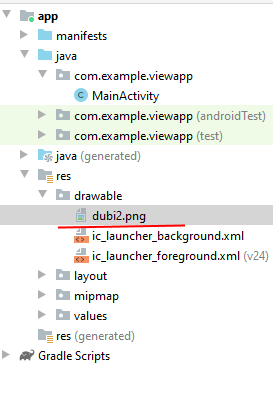
Одним из наиболее распространенных источников ресурсов являются файлы изображений. Android поддерживает следующие форматы файлов: .png (предпочтителен), .jpg (приемлем), .gif (нежелателен). Для графических файлов в проекте уже по умолчанию создана папка res/drawable . По умолчанию она уже содержит ряд файлов — пару файлов иконок:
При добавлении графических файлов в эту папку для каждого из них Android создает ресурс Drawable . После этого мы можем обратиться к ресурсу следующим образом в коде Java:
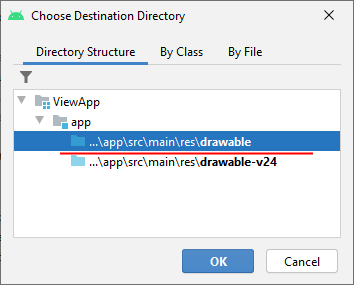
Например, добавим в проект в папку res/drawable какой-нибудь файл изображения. Для этого скопируем на жестком диске какой-нибудь файл с расширением png или jpg и вставим его в папку res/drawable (для копирования в проект используется простой Copy-Paste)
Далее нам будет предложено выбрать папку — drawable или drawable-24 . Для добавления обычных файлов изображений выберем drawable :
Здесь сразу стоит учесть, что файл изображения будет добавляться в приложение, тем самым увеличивая его размер. Кроме того, большие изображения отрицательно влияют на производительность. Поэтому лучше использовать небольшие и оптимизрованные (сжатые) графические файлы. Хотя, также стоит отметить, что все файлы изображений, которые добавляются в эту папку, могут автоматически оптимизироваться с помощью утилиты aapt во время построения проекта. Это позволяет уменьшить размер файла без потери качества.
При копировании файла нам будет предложено установить для него новое имя.
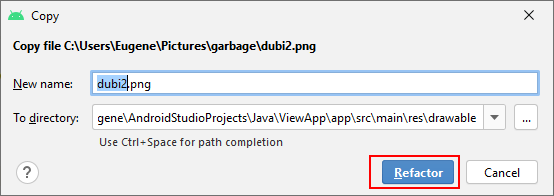
Можно изменить название файла, а можно оставить так как есть. В моем случае файл называется dubi2.png . И затем нажмем на кнопку Refactor. И после этого в папку drawable будет добавлен выбранный нами файл изображения.
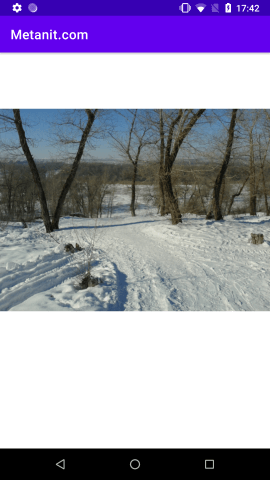
Для работы с изображениями в Android можно использовать различные элементы, но непосредственно для вывода изображений предназначен ImageView . Поэтому изменим файл activity_main.xml следующим образом:
В данном случае для отображения файла в ImageView у элемента устанавливается атрибут android:src . В его значении указывается имя графического ресурса, которое совпадает с именем файла без расширения. И после этого уже в Preview или в режиме дизайнере в Android Studio можно будет увидеть применение изображения, либо при запуске приложения:
Если бы мы создавали ImageView в коде java и из кода применяли бы ресурс, то activity могла бы выглядеть так:
В данном случае ресурс drawable напрямую передается в метод imageView.setImageResource() , и таким образом устанавливается изображение. В результате мы получим тот же результат.
Однако может возникнуть необходимость как-то обработать ресурс перед использованием или использовать его в других сценариях. В этом случае мы можем сначала получить его как объект Drawable и затем использовать для наших задач:
Для получения ресурса применяется метод ResourcesCompat.getDrawable() , в который передается объект Resources, идентификатор ресурса и тема. В данном случае тема нам не важна, поэтому для нее передаем значение null. Возвращается ресурс в виде объекта Drawable :
Затем, например, можно также передать ресурс объекту ImageView через его метод setImageDrawable()
Источник
Add images to your Android Project
We’re now going to add a picture to Android Studio. This picture will be used in an Image View.
First, download this picture: (Right click and select Save Image As.)
Save it to your own computer and remember where you saved it to.
We need to import this picture into the res > drawable folder. Open up your Project Explorer again by clicking its tab:

Now expand the res item and locate the drawable folder:

Right click the drawable folder, and select Show in Explorer from the menu:
This will open a window showing a list of folders. The image below is from Windows 10:
All of these folders are from your res directory. (The mipmap ones are used mainly for icons. You can create them in different sizes. We’ll do this much later in the course.)
What you need to do is to copy and paste your image from where you saved it on your computer into the drawable folder (we’re assuming you know how to copy and paste files from one folder to another):
Now go back to Android Studio and you should see it there:
We can now use this image in our app.
Go back to your blueprint. Locate the Image View control in the Palette, which is under Images in earlier versions of Android Studio:
In later versions of Android Studio, you can find the Image View control under the Common category of the Palette (and under Widgets):
Drag an Image View to just below your Text View. As soon as you do, you should the following dialogue box appear:
Expand the Project item of Drawable and select the bridge image and click OK. Your blueprint will then look like this:
As you can see, the Image View has ended up in the top left. We don’t want it there.
With the Image View selected, click anywhere inside of it with your left mouse button. Keep the left mouse button held down and drag it below the Text View:
(You won’t be able to see the image itself in Blueprint View.)
Now we’ll add a Constraint. We want to connect the top middle circle of the Image View to the bottom middle circle of the Text View. Hold your mouse over the top middle circle of the Image View. It will turn green. Now hold your left mouse button down. Keep it held down and drag to the bottom middle circle of the Text View:
You should see a blue arrow connecting the two:
Now add a constraint from the left of the Image View to the left edge of the screen, just like you did for the Text View. Likewise, connect the right edge of the Image View to the right edge of the screen. Your blueprint will then look like this:
It can be a little bit fiddly, so don’t forget you can undo with CTRL + Z.
If you have a look at the properties area again, you may be wondering what all those lines are for:
The straight lines indicate which sides of your view are constrained, and to where. They also tell you the size of the margins, 8 in the image above. Hold your mouse over one of the lines and you’ll see a dropdown list. You can change your margins from here:
The other lines to be aware of are the ones inside the square, pointy arrows in the image above. There are three different settings here:
Wrap Contents
Fixed
Match constraints
Click the arrows to see what they do. Watch what happens to the Image View when you click a set of arrows. In the image below, we’ve set the arrows to Fixed:
The arrows have turned into straight lines. Notice that layout_width value has changed to 200dp. It has changed to 200 because that was the width of the image we used. Notice that the Image View hasn’t changed its size. But move the horizontal slider from 50 to something else. Watch what happens to your Image View in the blueprint.
Click the straight lines inside the square to see the third of the settings, Match Constraints:
Notice that image has now stretched to the margins of the screen. Notice, too, that the layout_width has been reset to zero. Click again, though, to go back to Wrap Contents.
In the next lesson, you’ll learn about a different type of layout — LinearLayout.
Источник


