- How to Add a Library Project to Android Studio?
- Different Ways To Add Library Project to Android Studio
- Method 1
- Method 2
- Method 3
- Method 4
- Import an external module to Android Project in Android Studio
- Import library via IDE (Android Studio)
- Configure gradle from import project
- импорт библиотек jar в android-studio
- 13 ответов
- обновленный ответ для Android Studio 2
- New -> Module
- выберите Import .JAR/.AAR пакета
- выбрать .СОСУД./AAR файл и поставить имя модуля
- добавить модуль как зависимость
- вы можете следить за скриншоты ниже:
How to Add a Library Project to Android Studio?
Adding an external library in Android Studio is a very common thing but still, most beginners or freshers find it difficult to do. Some of you must have gone through this. Whenever you want to add some external library and you try to do that with maven(File > Project Structure > Dependencies) and try to add your dependencies there but when you hit Gradle sync, it fails. So now, without fixing this, you want to go for building your app then you will get the error: Error: A problem occurred configuring project ‘:app’. There are many external libraries available that make many specific tasks simple and easy with the APIs and Classes they provide. So including all those libraries in our project is really going to help you a lot. Many developers are often confused about how to add these libraries to their projects. This article is helpful for all such people.
In this article, we will see different ways to add library projects to our project. But before jumping to that let’s have a quick look at this: We can use Gradle, to add library projects with a single line code. Android Studio Project has a modular structure and we have a main module called “app”. There may be multiple modules in a Project. We can connect them together through Gradle, this connection is known as Dependency. Now Let’s get back to our main agenda.
Different Ways To Add Library Project to Android Studio
Method 1
Almost every well-known Android library is available in a Maven repository and its installation takes only one line of code in the app/build.gradle file:
Let’s add the external library to our project:
Step 1: Create a new project using Android Studio and name it anything you want (GFG in this example) and hit the finish button.
Step 2: The original project structure created by Android Studio looks like this:
Step 3: In the root directory (GFG/), create a new folder: /libs in which we’ll place our external libraries (this step is not required – only for keeping a cleaner project structure).

Step 4: Paste your library in the newly created /libs folder. For this example, we are using the PagerSlidingTabStrip library (you just need to download ZIP from GitHub, rename the library directory to “PagerSlidingTabStrip” and copy it). The new structure of our project should look like this:

Step 5: Edit settings.gradle by adding your library to include. If you use a custom path like I did, you have also to define the project directory for our library. A whole settings.gradle should look like below:
project(‘:PagerSlidingTabStrip’).projectDir = new File(‘libs/PagerSlidingTabStrip’)
Step 5.1: If you face “Default Configuration” error, then try this instead of step 5,
Step 6: In app/build.gradle add our library project as a dependency:
compile fileTree(dir: ‘libs’, include: [‘*.jar’])
Step 6.1: If you followed step 5.1, then follow this instead of 6,
compile fileTree(dir: ‘libs’, include: [‘*.jar’])
Step 7: If your library project doesn’t have build.gradle file you have to create manually.
Step 8: That’s all. Just click‚ synch the project with Gradle. Your library should be available for your project.
Method 2
Step 1: Follow to File > New Module
Click on “Import Existing Project“.
Step 2: Select the desired library and the desired module. Then click finish. Android Studio will import the library into your project and will sync Gradle files.
Step 3: In the next step you need to add the imported module to your project’s dependencies. Right-click on the app folder > Open Module settings
Step 4: Navigate to the dependencies tab > Click on the ‘+’ button -> click on Module Dependency. The library module will be then added to the project’s dependencies.
Method 3
Step 1: Navigate to File > Project Structure

Step 2: Then click on Modules.
To import the library using Gradle, you can have to add it to the dependencies section of your build.gradle (the module’s one).
Method 4
Just go to Project Structure > under Modules (see below images) just click the plus button and select Import Existing Project and import. Then sync your Gradle files. There are chances to face the error
Error: The SDK Build Tools revision (xx.x.x) is too low. Minimum required is yy.y.y
Then just open the build.gradle file in your library project directory and update the buildToolsVersion to the suggested one.
then try importing the module by clicking on File > Project Structure
Module > Import Module
After importing the library module, select your project module and add the dependency and then select the imported module.
Источник
Import an external module to Android Project in Android Studio
Today I want to talk about an importing external module to Android project in Android Studio.
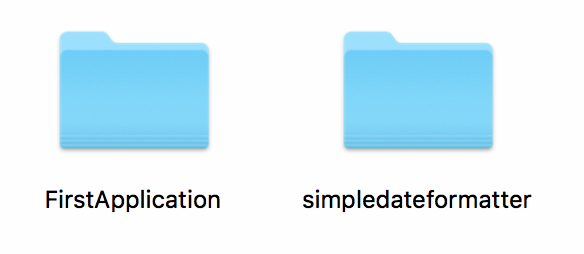
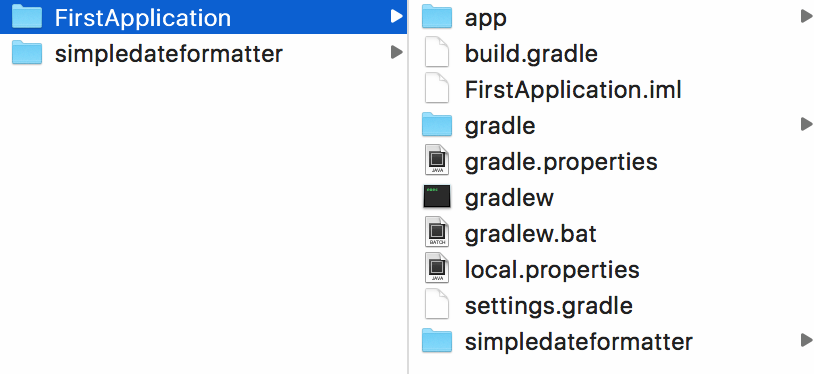
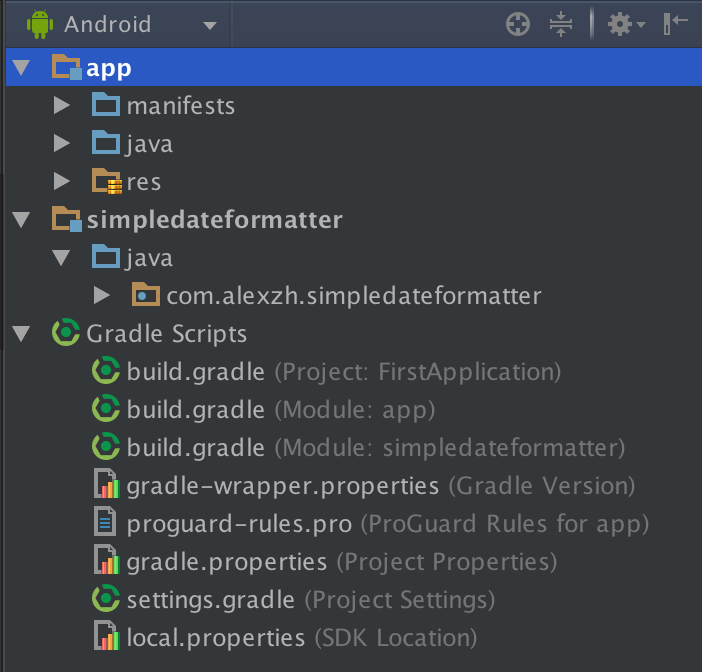
Let’s imagine, you have a «Projects» folder with two subfolders (FirstApplication and simpledateformatter). In this case a simpledateformatter it’s just a module which you want to use in the FirstApplication.
Import library via IDE (Android Studio)
First and the simplest way it’s import your additional module via IDE. (File -> New -> Import module OR File -> Project Structure -> «+»). Unfortunately it’s not the best way to do it because you can find copy of your additional module into main project folder.
Of course, it’s working correctly and you can use and modify your library, but in this case you will update just module into subfolder of you main project. It’s not the best ways for your module, because probably you want to use you additional module not just for one project. In this case, the best way it’s configure gradle files for using additional folder without copy whole module to you project.
Configure gradle from import project
You can configure gradle files in your project(s) and your applications can use one folder with you additional project without creating subfolders into project folder. It’s better way for support you additional module, because if you add some changes to your additional library all your project will use this module with all changes.
We need to open settings.grade file in «Main project» and we need to add few lines:
After it, we need to add a dependency to build.gradle file in the project, we need to add to this files next line:
After these changes, you will use additional module from default folder of additional module.
You need to adapt path to your additional module to your situation. In situation where you have your «Main project» and «additional module» in the same folder everything works correctly.
Full source code of settings.gradle file:
Full source code of build.gradle file:
Note: You have other ways for use last version of you library:
- repositories (maven , jcentral, etc)
- aar, jar files
Источник
импорт библиотек jar в android-studio
Я пытаюсь добавить банку jtwitter в свой проект.
сначала я попытался сделать следующее:

при импорте файла jar я получаю следующую ошибку:
Я исследовал и обнаружил, что android-studio имеет некоторые проблемы, и что вы должны отредактировать build.gradle файл самостоятельно.
поэтому я попытался добавить это в свою сборку.Gradle в файл:

и получил сообщение об ошибке: cannot resolve symbol dependencies
другой вопрос, где будет папка libs. Означает ли это External Libraries ?
любая помощь будет наиболее полезна,
13 ответов
обновленный ответ для Android Studio 2
простой и правильный способ импортировать jar/aar в ваш проект-импортировать его как модуль.
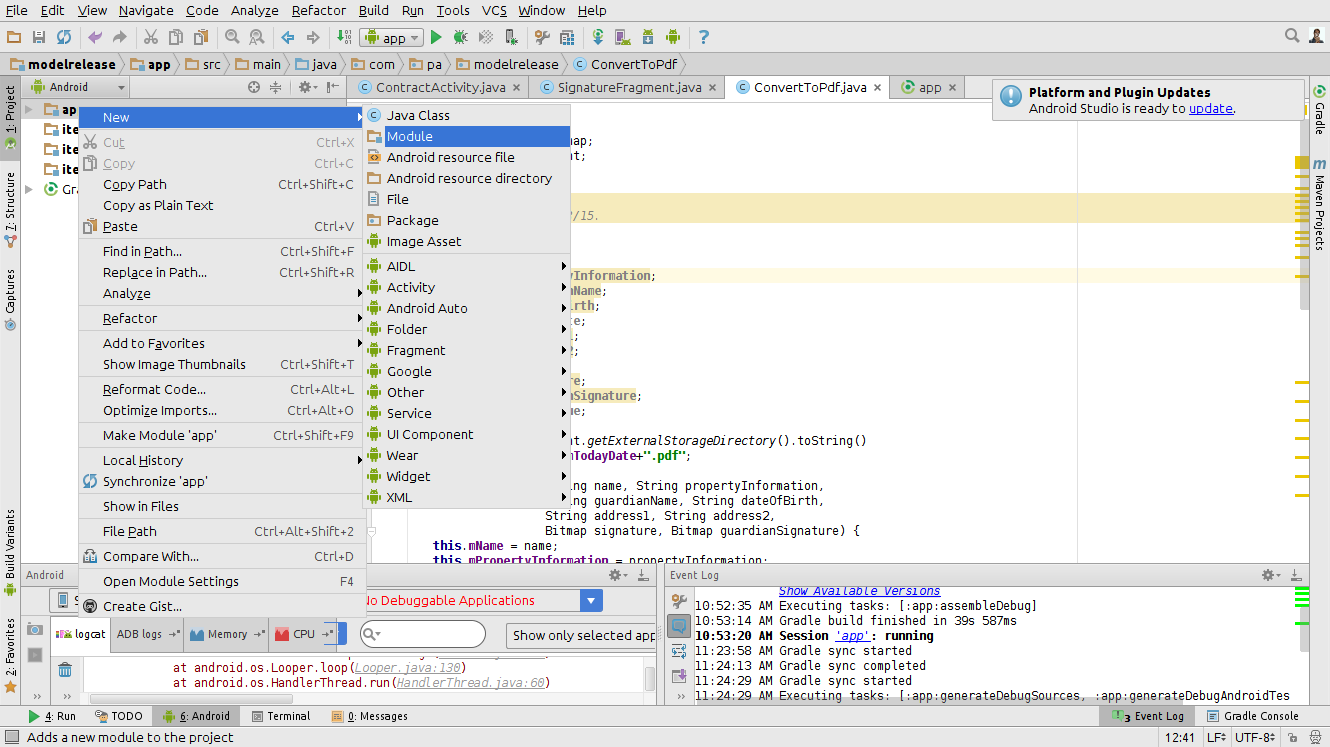
New -> Module
выберите Import .JAR/.AAR пакета

выбрать .СОСУД./AAR файл и поставить имя модуля

добавить модуль как зависимость

- создать папку libs в папке приложения.
- добавить .файлы jar в папку libs.
- затем добавить .файлы jar для сборки приложения.зависимость от gradle.
- наконец-то синхронизировать проект с Gradle файлы.
1.Создать папки libs:

2.Добавлять.jar в папку libs:

3.Редактировать приложения строить.зависимость gradle:
- открыть приложение/сборка.Gradle в

4.Синхронизировать проект с Gradle файлы:
- наконец-то добавить .файлы jar для вашего приложения.

обновление:
здесь я собираюсь импортировать org.затмение.ПАОЗ.клиент.mqttv3.файл jar в наш модуль приложения.
- скопировать файл jar и вставьте его в каталог библиотеки.

- нажмите Ctrl + Alt + Shift + s или просто щелкните значок структуры проекта на панели инструментов.

- затем выберите модуль для импорта .jar-файл, а затем выберите вкладку зависимости.

- нажмите значок плюс, затем выберите Файл зависимость

- выбрать .путь к файлу jar, нажмите OK, чтобы построить gradle.
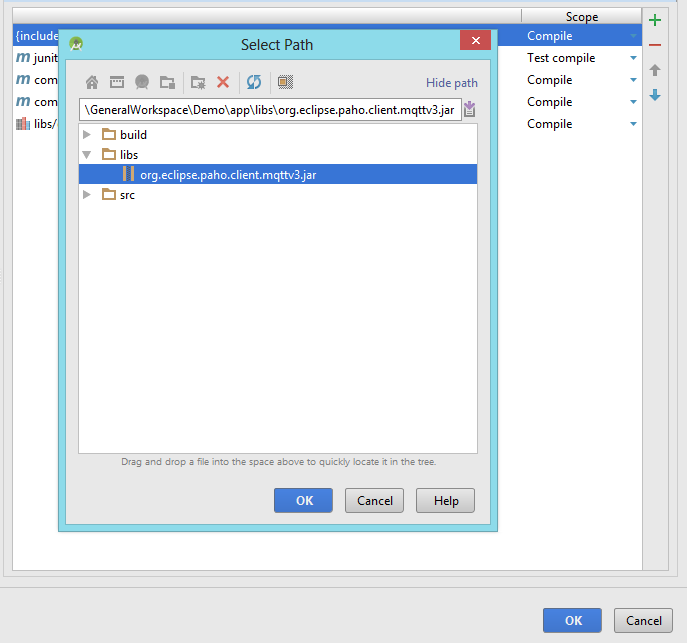
- — наконец-то мы импортировали .файл jar в наш модуль.

удачи в кодировании.
Запуск Android Studio 0.4.0 Решена проблема импорта jar по
для тех, кто любит ручное редактирование Откройте приложение/сборка.Gradle в
Android Studio 1.0.1 не делает его более ясным, но это делает его как-то проще. Вот что сработало для меня:
1) Используя explorer, создайте’external_libs‘ (любое другое имя в порядке) внутри проект/приложение / src папку, где «проект» — это имя вашего проекта
2) скопируйте файл jar в эту папку «external_libs»
3) в Android Studio перейдите в файл — > проект Структура — > зависимости — > добавить — > зависимость файла и перейдите к файлу jar, который должен быть под’src / external_libs‘
3) Выберите файл jar, и нажмите кнопку ‘Ok’
теперь проверьте свою сборку.gradle (Module.app) скрипт, где вы увидите банку, уже добавленную в разделе «зависимости»
в проекте щелкните правой кнопкой мыши
вы можете следить за скриншоты ниже:


вот как вы добавляете файлы jar из внешних папок
1) Нажмите на файл и там вы нажмете на новый и новый модуль
2) появляется новое окно, в котором вы должны выбрать импорт .СОСУД./Пакет AAR .
3) Нажмите на опцию path в правом верхнем углу окна . И дайте весь путь файла JAR .
4) Нажмите кнопку Готово.
теперь вы добавили файл Jar, и вам нужно добавить его в зависимость для вашего проект приложения
1)Щелкните правой кнопкой мыши на папке app и там вы должны выбрать параметры модуля или F4
2)нажать на зависимость в правом верхнем углу текущего окна .
3)Нажмите на символ » + «и выберите » зависимость модуля», и он покажет вам существующие файлы JAR, которые вы включили в свой проект .
выберите тот, который вы хотите, и нажмите «OK / Finish»
Android Studio 1.0 упрощает добавление .библиотека файлов jar для проекта. Перейдите в файл>структура проекта, а затем нажмите на зависимости. Там вы можете добавить .JAR-файлы с Вашего компьютера в проект. Вы также можете искать библиотеки из maven.
Это то, как я только что сделал на Android Studio версии 1.0.2
- Я создал папку libs на [ваш проект dir]\app\src
- Я скопировал jtwitter.Джар (или yambaclientlib.Джар) в [ваш проект dir]\app\src\libs каталог
- следующий путь по меню: Файл — > Структура Проекта — > Зависимости — > Добавить — > Зависимость От Файла, Android Studio открывает диалоговое окно, в котором вы можете drag & drop на jar библиотека. Затем я нажал OK.
в этот момент ш перестроит проект, импортирующий библиотеку и разрешающий зависимости.
здесь три стандартных подхода для импорта файла JAR в Android studio. Первый —традиционным способом, второй —стандартным способом, и удаленный библиотека. Я объяснил эти подходы шаг за шагом со скриншотами по ссылке:
надеюсь, это поможет.
Если код для вашей библиотеки jar находится на GitHub, то импорт в Android Studio легко с JitPack.
вам просто нужно будет добавить репозиторий для сборки.Gradle в:
а затем репозиторий GitHub библиотеки как зависимость:
JitPack действует как репозиторий maven и может использоваться как Maven Central. Хорошо, что вам не нужно загружать банку вручную. За кулисами JitPack проверит исходный код из GitHub и скомпилировать его. Поэтому он работает только в том случае, если в репо есть файл сборки (build.Gradle в).
появилась руководство о том, как подготовить проект Android.
Я вижу так много сложных ответов.
все это смутило меня, когда я добавлял свой файл Aquery jar в новую версию Android Studio.
вот что я сделал :
копировать вставил файл jar в папку libs, которая отображается в представлении проекта.
и в построении.файл gradle только что добавил эту строку: compile files(‘libs/android-query.jar’)
PS: после загрузки файла jar, пожалуйста, измените его имя. Я изменил имя на android-query.Джар
избежать избыточности. Если у вас есть jars под /libs в сборке приложения.gradle по умолчанию у вас будет
этого достаточно, чтобы добавить все банки, которые у вас есть под /libs
Я также столкнулся с тем же препятствием, но не смог найти решение из заданных ответов. Может быть это происходит из-за пути проекта, который имеет специальные символы и пространства и т. д. Поэтому, пожалуйста, попробуйте добавить эту строку в ваш build.gradle .
«..» (Double dot) найдет корневой каталог вашего проекта.
Источник


