- Android — Text To Speech
- Example
- Текст с разметкой в android.widget.TextView
- Задачи
- Создание приложения
- Подготовка ресурсов
- Как всё работает
- Вызов Activity
- Использованные материалы
- Архив с исходниками проекта
- 5 Ways to Transfer SMS from Android to Android
- Part 1: How to transfer SMS from Android to Android in 1 click
- MobileTrans — Phone Transfer
- Part 2: How to selectively transfer SMS from Android to Android
- Dr.Fone — Phone Manager (Android)
- Part 3: How to transfer SMS from Android to Android using Android SMS Transfer
- Part 4: How to transfer messages from Android to Android using Bluetooth
- Part 5: How to transfer messages from Android to Android using SMS Backup & Restore
Android — Text To Speech
Android allows you convert your text into voice. Not only you can convert it but it also allows you to speak text in variety of different languages.
Android provides TextToSpeech class for this purpose. In order to use this class, you need to instantiate an object of this class and also specify the initListener. Its syntax is given below −
In this listener, you have to specify the properties for TextToSpeech object , such as its language ,pitch e.t.c. Language can be set by calling setLanguage() method. Its syntax is given below −
The method setLanguage takes an Locale object as parameter. The list of some of the locales available are given below −
| Sr.No | Locale |
|---|---|
| 1 | US |
| 2 | CANADA_FRENCH |
| 3 | GERMANY |
| 4 | ITALY |
| 5 | JAPAN |
| 6 | CHINA |
Once you have set the language, you can call speak method of the class to speak the text. Its syntax is given below −
Apart from the speak method, there are some other methods available in the TextToSpeech class. They are listed below −
| Sr.No | Method & description | |||||||||
|---|---|---|---|---|---|---|---|---|---|---|
| 1 |
| Steps | Description |
|---|---|
| 1 | You will use Android studio to create an Android application under a package com.example.sairamkrishna.myapplication. |
| 2 | Modify src/MainActivity.java file to add TextToSpeech code. |
| 3 | Modify layout XML file res/layout/activity_main.xml add any GUI component if required. |
| 4 | Run the application and choose a running android device and install the application on it and verify the results. |
Here is the content of src/MainActivity.java.
Here is the content of activity_main.xml
In the following code abcindicates the logo of tutorialspoint.com
Here is the content of Strings.xml.
Here is the content of AndroidManifest.xml
Let’s try to run your application. I assume you have connected your actual Android Mobile device with your computer. To run the app from Android studio, open one of your project’s activity files and click Run  icon from the toolbar. Before starting your application, android studio will display following window to select an option where you want to run your Android application.

Select your mobile device as an option and then check your mobile device which will display following screen.
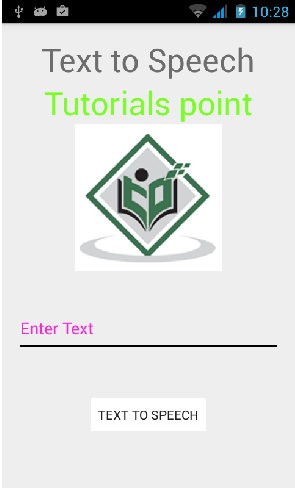
Now just type some text in the field and click on the text to speech button below. A notification would appear and text will be spoken. It is shown in the image below −
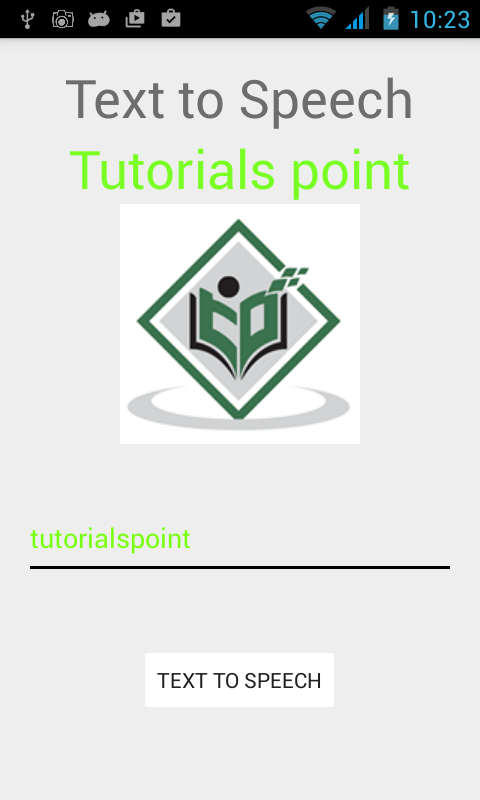
Now type something else and repeat the step again with different locale. You will again hear sound. This is shown below −
Источник
Текст с разметкой в android.widget.TextView
Недавно мне понадобилось сделать довольно хитроумный чат в приложении под Android. Помимо собственно информации требовалось передавать пользователям дополнительную функциональность в контексте определенного сообщения: имя автора сообщения по нажатию на него должно вставляться в текстовое поле ответа, а если это сообщение о только что созданном игровом сеансе, пользователи должны иметь возможность присоединиться к игре по клику и так далее. Одним из главных требований была возможность создавать сообщение, содержащее несколько ссылок, что и задало направление исследований.
WebView, обладая нужной функциональностью, был отвергнут по причине тяжести решения: я даже не стал создавать 100 или сколько-нибудь там экземпляров в тестовых целях, по одному на каждое сообщение, поскольку сразу было понятно, что это расточительство нормально работать не будет.
К счастью, самый обычный TextView обладает неожиданно потрясающей функциональностью по разметке текста и может использоваться как в качестве отдельного элемента, так и служить целой страницей, будучи несравненно легковеснее, чем WebView.
Я реализовал весь, необходимый мне функционал и выяснил ещё несколько довольно интересных вещей, столкнувшись с некоторым количеством подводных камней (впрочем, не очень острых). Можно сказать, всё нижеописанное — руководство по созданию достаточно мощной справочной системы в своём приложении практически даром.
Задачи
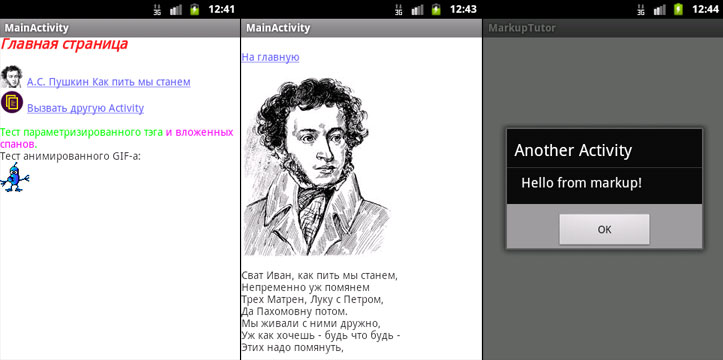
В данном примере мы создадим приложение с двумя Activity, одна из которых содержит TextView, исполняющий роль браузера, из которого, в частности, можно вызвать вторую Activity, демонстрирующую работу с параметрами вызова. Мы выясним, каким образом можно создавать страницы текста с разметкой и изображениями и связывать их ссылками.
Содержимое страниц берётся из строк в ресурсах приложения, а изображения являются drawable-ресурсами. Небольшие изменения в коде позволят использовать другие расположения.
Создание приложения
Любым удобным нам способом создаём обычное приложение:
Немного пояснений к манифесту. Если с первой Activity всё понятно, вторая (AnotherActivity) содержит некие дополнительные описатели.
android:exported=«false» необходимо для того, чтобы компилятор не выдавал предупреждения о том, что мы забыли что-то прописать в экспортируемом компоненте. На мой взгляд, чисто декоративный момент, но чем меньше жёлтых треугольничков — тем спокойнее.
Раздел intent-filter содержит описатели того, каким образом и при каких обстоятельствах будет происходить запуск Activity.
означает, что можно запустить Activity ссылкой вида activity-run://AnotherActivityHost?params.
Значения action и category необходимы системе для того чтобы обнаружить и запустить Activity.
Подготовка ресурсов
Строки, содержащие разметку, должны иметь аттрибут formatted со значением false, а содержимое должно передаваться в блоке CDATA, чтобы у компилятора не было претензий к разметке и специальным символам. В данном примере признаком статьи будет префикс article_ в названии строки.
Также замечен странный глюк, проявляющийся в том, что если текст начинается с тега, то заканчивается он этим же тегом. Если у вас в начале статьи ссылка, советую ставить перед ней либо пробел, либо
.
Изображения могут быть формата jpg, png или gif без анимации. Анимированный gif отображается статичной картинкой. Расположение стандартное для ресурсов, для дисплеев разной плотности можно подготовить свой вариант картинки. В данном примере все изображения находятся в drawable-nodpi

Как всё работает
Рассмотрим некоторые части кода подробно.
TextView используемый нами в качестве браузера, требует особой инициализации:
tvContent.setLinksClickable(true); указывает на то, что ссылки в данном элементе реагируют на нажатие.
tvContent.setMovementMethod(new LinkMovementMethod()); назначает способ навигации по элементу. Использованный нами LinkMovementMethod интересен сам по себе и, возможно, заслуживает отдельной статьи. Я лишь скажу, что при необходимости более полного контроля можно создать его наследника, переопределенные методы которого позволят отслеживать все действия со ссылками в элементе.
В данном методе происходит получение строки по идентификатору из строковых ресурсов, её преобразование из HTML в специальный объект Spanned, затем ещё одно преобразование в Spannable и установка в TextView в качестве содержимого. Всё это кажется довольно громоздким, но тому есть причины.
В TextView, на мой взгляд, странный порядок обработки спанов — с конца списка. При естественном расположении спанов после преобразования строки из HTML, изменения внешнего вида вложенных спанов перекрываются свойствами спанов, их содержащих. Для нормального отображения приходится буквально выворачивать маркировку наизнанку с помощью метода revertSpanned:
Определение обработчика ссылок на изображения минималистично и призвано загружать только картинки из ресурсов. Поскольку мы рассматриваем вариант справочной системы, я посчитал, что этого будет достаточно. С вашего позволения, я не буду цитировать его. Если вы хотите большего, можно обратиться, например, к данной статье.
Более интересен нам будет Html.TagHadler:
Здесь у нас происходит несколько интересных вещей.
При преобразовании из HTML в Spanned методом Html.fromHtml, обрабатываются тэги br , p , div , em , b , strong , cite , dfn , i , big , small , font , blockquote , tt , a , u , sup , sub , h1. h6 и img . В случае, если тэг не опознан, вызывается Html.TagHandler (если, конечно, он передан в вызов).
Мы проверяем, не является ли переданный тэг «нашим» и если это так, создаём соответствующий Span — элемент разметки, а затем накладываем его на текст. Я создал несколько собственных Span-ов, они будут рассмотрены далее. Как правило, Span-ы наследуются от android.text.style.CharacterStyle.
К сожалению, у меня не получилось малой кровью добиться центрования отдельных строк или абзацев, а встроенной возможности для этого не существует. Также, нельзя прочесть атрибуты тэга из xmlReader, поскольку он реализован не полностью. По этой причине пришлось изобретать свой способ передачи параметров: значение является частью тега. В нашем примере таким образом передаётся значение цвета в тэге color, преобразовываемом в ParameterizedSpan. Получается что-то вроде красный . Это достаточно ограниченный и не очень удобный способ, но иногда лучше такой, чем никакого.
Этот код делает следующее: В случае, если передан открывающий Span, он добавляется к концу строки в текущем её виде. В случае, если Span закрывающий, мы находим в строке его открывающий аналог, запоминаем его положение, затем удаляем и добавляем новый, но уже с информацией о начальном положении и длине.
Мы завершили рассмотрение класса Activity, являющегося основным модулем нашего приложения. Теперь рассмотрим вспомогательные классы.
Это Span общего назначения и с его помощью можно задать большинство параметров стиля текста. Его можно использовать как базу для создания стилей текста из собственных тэгов.
Этот класс описывает элемент, который по нажатию на него обеспечивает переход к статье, чей идентификатор является его параметром. Здесь я применил производное от способа, описанного мной ранее: сам тэг является собственным параметром, а его класс определяется префиксом article_. Поднимемся выше, к описанию Html.TagHandler:
Обработчик тэгов, увидев тэг, начинающийся на article_, создаёт ArticleSpan, задавая ему в качестве параметра название тэга. Элемент, при нажатии на него, вызывает метод MainActivity.setArticle, после чего в TextView устанавливается новый текст.
Здесь реализован элемент, получающий параметр явно и отдельно от своего имени. Претензия на своего рода стандарт именования тэгов, раз уж нельзя передавать атрибуты.
Конечно, всё описанное является вариациями одного принципа, каждый выберёт то, что ему удобнее.
Вызов Activity
В HTML мы видим следующее:
При нажатии на ссылку, происходит вызов AnotherActivity с передачей параметров в Intent. Эти параметры можно получить и использовать:
Использованные материалы
Следующие материалы очень ускорили создание данной статьи, да и, чего уж там, сделали его вообще возможным:
Я очень рад, что существует на свете StackOverflow.com.
Архив с исходниками проекта
Архив с исходными текстами и ресурсами проекта можно взять здесь.
Источник
5 Ways to Transfer SMS from Android to Android


Whenever we move from one Android device to another, we mostly focus on transferring our photos, videos, contacts, and other data files. Too often, we forget to transfer messages from Android to Android, which might backfire in the long run.
From personal chats to important information, our SMS messages may contain crucial details at times. Therefore, when you transfer from old Android to new Android, make sure that you also migrate your messages. In this guide, you will learn 5 different ways to transfer SMS from Android to Android.
Part 1: How to transfer SMS from Android to Android in 1 click
If you are looking for a hassle-free and quick solution to transfer text messages from Android to Android, give MobileTrans — Phone Transfer a try. With this tool, you can directly move all the important data like SMS from one Android to another. Compatible with all the major Android and iOS devices, it allows you to transfer text messages not only between Android and Android but also between Android and iOS.
MobileTrans — Phone Transfer
Transfer Messages from Android to Android in 1 Click
- Easily transfer every type of data from Android to Android, including messages, music, videos, photos, contacts, call logs, etc.
- Transfer messages between two devices even of different operating systems (iOS 14 and Android 10 included).
- Work perfectly with Apple, Samsung, HTC, LG, Sony, Google, HUAWEI, Motorola, ZTE, and more smartphones and tablets.
- Fully compatible with major providers like AT&T, Verizon, Sprint, and T-Mobile.
- The Latest Windows 10 and Mac 10.15 supported.
To learn how to transfer text messages from Android to Android in one click, follow these simple steps.
- Launch MobileTrans on your computer and select the “Phone Transfer” module from its welcome screen.
![]()
![]()
![]()
In this way, you can transfer messages from Android to Android with a single click. The process is not only easy but also extremely time-saving.
If you’re tired of reading text guide, you can learn the video tutorial below:
Part 2: How to selectively transfer SMS from Android to Android
Sometimes you may not want to transfer all Android messages in one click but would like to select only important texts to transfer to a new Android phone. For this requirement, one-click for all SMS transfer may fail to meet your expectations.
In this situation, you’d better opt for Dr.Fone — Phone Manager (Android), which is developed to complement Android SMS transfer by meeting selective-transfer needs.
Dr.Fone — Phone Manager (Android)
Selectively transfer SMS messages from Android to Android
- Select and transfer desired messages, contacts, call logs from Android to Android.
- Export/import your music, photos, videos, contacts, SMS, apps, etc. to computer/Android.
- Parse and transfer iTunes messages to Android (vice versa).
- Manage your Android device on a computer.
- Fully compatible with Android 10.0.


This Android SMS transfer tool is designed to meet custom transfer requirements. Just transfer only wanted messages to new Android, and leave unwanted ones on old Android. Many users take it as an ideal solution to minimize SMS storage consumption in new Android.
Follow the below instructions to selectively transfer SMS from Android to Android:
- Install and launch Dr.Fone, and select the «Phone Manager» option from the main screen.

Connect the two Android devices to your computer using the USB ports. Click the upper left corner and you can see the names of both Android devices. Click on the name to specify it as the source Android for SMS transfer.
![]()
![]()
That’s all the process of selectively transferring Android messages to a new device. Pretty easy, isn’t it?
Part 3: How to transfer SMS from Android to Android using Android SMS Transfer
There are also a few readily available apps that you can use to transfer text messages from Android to Android. For instance, the Android SMS Transfer is one of the time-honored apps that can help you.
The app will first take a backup of your Android messages and can later restore them to the target Android device. The messages will be exported to an Android SD card, which will later be used for SMS restore. While the SMS transfer process is not as fast and direct as MobileTrans — Phone Transfer, it can meet your basic SMS transfer requirements.
Here’s how you can transfer SMS from Android to Android using this Android SMS Transfer app.
- First of all, download the Android SMS Transfer app on the source Android and launch it. From its welcome page, click on the «Backup SMS» option.
![]()
You will be asked to name the backup file of your Android messages. Just enter any file name and proceed.
![]()
The app will show that the SMS backup has been taken and stored on the Android SD card.
![]()
In this way, you can transfer messages from Android to Android by using an SD card. Though, it will only transfer the text messages and will not include any other media data.
Part 4: How to transfer messages from Android to Android using Bluetooth
While the technique is not widely recommended, you can use the native Android Bluetooth feature as well to transfer text messages from one Android to another. Since Bluetooth SMS transfer is gradually getting obsolete, the feature might not be supported on all Android devices. Also, it would take a lot of time to send your Android messages via Bluetooth.
The method is also not recommended from a security perspective. If the source Android phone has malware, then it can be transferred to your target phone as well. Therefore, you should only consider this as your last resort for Android SMS transfer.
You can follow these steps for Android SMS transfer via Bluetooth.
- To start with, bring the source and the target Android devices in close vicinity.
- Turn on the Bluetooth feature on both Android devices and pair them by confirming the passcode.
- Now, go to the Messaging app on the source device and select the messages that you wish to transfer.
- Go to its Settings and choose to «Send» or «Share» the selected SMS threads. After that, you need to send SMS via Bluetooth.
- A list of all the available Android devices will be displayed. Simply tap on the target device to receive SMS messages.
- On the target Android, you will receive a prompt for the incoming SMS data. Touch «Agree» and start the SMS transfer process.
![]()
As you can see, it can be tedious to learn how to transfer messages from Android to Android via Bluetooth. Not only is this SMS transfer method time-consuming, but it would also be complicated to implement as well.
Part 5: How to transfer messages from Android to Android using SMS Backup & Restore
Another smart and easy way to transfer SMS from Android to Android is by using the SMS Backup & Restore app. Besides taking a backup of your Android messages and restoring them afterward, it can also perform a wireless SMS transfer. Unlike Bluetooth, this message transfer takes place via WiFi direct, which makes it a lot faster and reliable.
The app is available for free and can be downloaded from Google Play Store. Therefore, before you begin, make sure that you have downloaded the SMS transfer app on both Android devices.
Later, you can follow these steps to transfer messages from Android to Android directly.
- Launch the Android SMS transfer app on both the devices and choose to «Transfer» your messages. You can find «Transfer» on the home page of the app or under its Settings tab.
![]()
Now, you need to specify the source and the target Android device. On the source phone, tap on the “Send from this phone” option, while on the target device, tap on the “Receive on this phone” button.
![]()
The target Android will wait for the SMS transfer. On the other hand, you can view a list of all the available devices on the source Android. Simply tap on the target Android device from here.
![]()
On the target Android, you will get an invitation to connect. Tap on the “Accept” button to proceed.
![]()
Great! You are almost there. On the source Android, the app will provide an option to send a previous backup file or all the text messages and calls. Choose the relevant option and touch on the “OK” button.
![]()
Just wait for a while for the Android messages to transfer to the target device. Once the process is complete, you can view the newly transferred messages on the target Android phone.
Источник


