- Transfer photos and videos from your iPhone, iPad, or iPod touch
- Use iCloud Photos
- Import to your Mac
- Import to your Windows PC
- Import photos using Apple camera adapters
- Import photos and videos
- If you don’t see the import option
- If you can’t import some content
- Supported SD cards and image-transfer protocols
- Sync photos between your Mac and iPhone or iPad
- Sync photos to your device
- Remove automatically synced photos from your device
- How to transfer photos from computer to iPhone
- How to transfer photos from laptop to iPhone
- using iTunes
- How to transfer photos from PC to iPhone without iTunes
- using specialized third-party software
- Why people choose CopyTrans Photo:
- Here is how to get photos from PC to iPhone:
- Transfer photos from PC to iPhone
- YouTube guide
- Upload photos to iCloud
- using CopyTrans Cloudly
- Some advantages of using CopyTrans Cloudly:
- Upload photos to iCloud
- using iCloud.com
- How to get photos from PC to iPhone
- via Google Drive
- Transfer photos from PC to iPhone without iTunes
- Dropbox
- Import photos to iPhone
- with OneDrive
- Conclusion
- CopyTrans 7 Pack
Transfer photos and videos from your iPhone, iPad, or iPod touch
Learn how to transfer photos and videos from your iPhone, iPad, or iPod touch to your Mac or PC. You can also make your photos available on all your devices with iCloud Photos.
Use iCloud Photos
iCloud Photos keeps your photos and videos safe, up to date, and available automatically on all of your Apple devices, on iCloud.com, and even your PC. When you use iCloud Photos, you don’t need to import photos from one iCloud device to another. iCloud Photos always uploads and stores your original, full-resolution photos. You can keep full-resolution originals on each of your devices, or save space with device-optimized versions instead. Either way, you can download your originals whenever you need them. Any organizational changes or edits you make are always kept up to date across all your Apple devices. Learn how to set up and use iCloud Photos.
The photos and videos that you keep in iCloud Photos use your iCloud storage. Before you turn on iCloud Photos, make sure that you have enough space in iCloud to store your entire collection. You can see how much space you need and then upgrade your storage plan if necessary.
Import to your Mac
You can use the Photos app to import photos from your iPhone, iPad, or iPod touch to your Mac.
- Connect your iPhone, iPad, or iPod touch to your Mac with a USB cable.
- Open the Photos app on your computer.
- The Photos app shows an Import screen with all the photos and videos that are on your connected device. If the Import screen doesn’t automatically appear, click the device’s name in the Photos sidebar.
- If asked, unlock your iOS or iPadOS device using your passcode. If you see a prompt on your iOS or iPadOS device asking you to Trust This Computer, tap Trust to continue.
- Choose where you want to import your photos. Next to «Import to,» you can choose an existing album or create a new one.
- Select the photos you want to import and click Import Selected, or click Import All New Photos.

- Wait for the process to finish, then disconnect your device from your Mac.
Import to your Windows PC
You can import photos to your PC by connecting your device to your computer and using the Windows Photos app:
- Make sure that you have the latest version of iTunes on your PC. Importing photos to your PC requires iTunes 12.5.1 or later.
- Connect your iPhone, iPad, or iPod touch to your PC with a USB cable.
- If asked, unlock your iOS or iPadOS device using your passcode.
- If you see a prompt on your iOS or iPadOS device asking you to Trust This Computer, tap Trust or Allow to continue.
If you have iCloud Photos turned on, you need to download the original, full resolution versions of your photos to your iPhone before you import to your PC. Find out how.
When you import videos from your iOS or iPadOS device to your PC, some might be rotated incorrectly in the Windows Photos app. You can add these videos to iTunes to play them in the correct orientation.
If you’re having trouble importing photos from your iOS or iPadOS device to Windows 10, try these steps:
- On your iOS or iPadOS device, open the Settings app. Tap Camera, then tap Formats.
- Tap Most Compatible. From now on, your camera will create photos and videos in JPEG and H.264 formats.
Источник
Import photos using Apple camera adapters
Learn how to import photos and videos from a digital camera or SD Card to your iPhone, iPad, or iPod touch using Apple camera adapters.
You can import photos and videos from an SD card, digital camera, or other supported accessory to your iOS device using one of these:
- Lightning to SD Card Camera Reader
- Lightning to USB 3 Camera Adapter
- Lightning to USB Camera Adapter
- Apple USB-C to SD Card Reader
If you have an iPhone 5 or later, it needs iOS 9.2 or later. If you have an iPod touch or iPhone 4s, it needs iOS 9.3. If you’re using a Lightning to USB 3 Camera Adapter, you need an iPad with iOS 9.3.

Import photos and videos
To import from your SD card or digital camera, follow these steps:
- Connect the adapter to your iOS device.
- Connect your digital camera to the adapter by USB or insert an SD card.
- Photos should automatically open to the Import tab. If it doesn’t, open Photos and tap Import.
- Tap Import All to import your content, or tap specific items, then tap Import.
- When the import is complete, you might be asked to Keep or Delete the media on the camera or SD card.
You can import content only to your iPhone, iPad, or iPod touch. You can’t export content to an SD card or digital camera.
If you don’t see the import option
If you don’t see the Import tab, follow these steps:
- Make sure that your digital camera is on and in the correct mode to export images.
- Disconnect the adapter, wait 30 seconds, then reconnect it.
- Unplug the digital camera or SD card, wait 30 seconds, then reconnect.
- Restart your iOS device and turn your camera off and back on.
- If one is available, test with a different digital camera or SD card. If you can import media with a different digital camera or SD card, there might be an issue with the data on the camera or SD card. Try to import the data to another device or computer, then use your digital camera to format—or reset—the SD card. Reformatting will erase all the images on the SD card. Check the manual for your digital camera for more help.
If you can’t import some content
Apple camera adapters can import multiple types of media files from your digital camera or SD card. If the format isn’t compatible with iOS, you won’t be able to view them on your device, but can import them to your computer later.
Apple camera adapters can import only content that was captured by digital cameras. You might not be able to import content that was renamed, edited, or copied to the digital camera or SD card.
Supported SD cards and image-transfer protocols
- Picture Transfer Protocol (PTP)
- Mass Storage Device protocol
- SDSC
- SDHC
- miniSD
- microSD
- MMC
- SDXC
Flash or USB thumb drives aren’t supported for image importing.
If you’re using a Lightning to USB 3 Camera Adapter, these iPad models transfer data at USB 3 speeds:
- iPad Pro 12.9-inch (2nd generation)
- iPad Pro 10.5-inch
- iPad Pro 12.9-inch
All other adapters and iOS devices use USB 2 speeds.
Источник
Sync photos between your Mac and iPhone or iPad
You can sync photos on your Mac to your device. You can sync all or a selection of photos from your Photos library on your Mac. For example, you can sync a selection of favourite albums or photos of people.
You can also sync photos from your Pictures folder or another folder that you organise to hold photos. For example, you can import photos from a camera into a folder in the Finder. You can organise your photos in multiple folders within a folder and sync the folders to a device.
Synced photos appear in the Photos app on your device.
Important: If you already use iCloud Photos on your Mac and devices, your photos are updated automatically. You can’t use the syncing method described here unless you turn off iCloud Photos in Photos preferences. See Use iCloud Photos to store photos in iCloud and What is iCloud?
Sync photos to your device
Connect your device to your Mac.
You can connect your device using a USB or USB-C cable or using a Wi-Fi connection. See Sync content between your Mac and iPhone or iPad over Wi-Fi.
In the Finder  on your Mac, select the device in the Finder sidebar.

If you connect your device to your Mac using a USB cable and can’t see the device in the Finder sidebar, see If your device doesn’t appear in the sidebar.
Click Photos in the button bar.

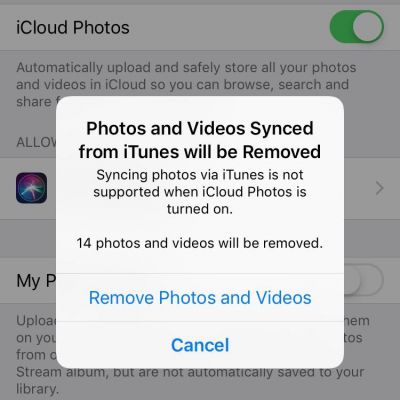
Note: When iCloud Photos is turned on, no photo syncing options appear when you click Photos in the button bar.
Select “Sync Photos to your device from” tickbox, then choose Photos, Pictures or a folder from the pop-up menu.
Do one of the following:
When syncing photos from the Photos app: Click “All photos and albums” or “Selected albums”. If you click the “Selected albums” button, select the tickboxes of the albums you want to sync in the Albums list.

Click Photos or People to see your photos organised by that category.
When syncing photos from a folder: Click “All folders” or “Selected folders”. If you clicked “Selected folders”, select the tickboxes of the folders you want to sync in the Folders list.
Select syncing options:
Select the “Include videos” tickbox to include videos when syncing from a folder or Photos library.
When syncing from the Photos app, select the “Only favourites” tickbox to sync only photos specified as favourites.
When syncing from the Photos app, select the “Automatically include photos from” tickbox and choose a time period from the pop-up menu to sync only photos taken within that period.
When you’re ready to sync, click Apply.
You can choose to sync your Mac and your device automatically whenever you connect them. See Turn automatic syncing on or off on Mac.
Before disconnecting your device from your Mac, click the Eject button  in the Finder sidebar.
Remove automatically synced photos from your device
To remove an unwanted folder of photos from your Mac and device, delete photos from the Photos app or delete the folder from your Mac and sync your device.
To remove an album or folder of photos from just your device while keeping it on your Mac, follow these steps:
Connect your device to your Mac.
You can connect your device using a USB or USB-C cable or using a Wi-Fi connection. See Sync content between your Mac and iPhone or iPad over Wi-Fi.
In the Finder on your Mac, select your device in the sidebar, then click Photos in the button bar.
In the folders list, deselect the tickbox of the albums or folders you want removed.
Sync your Mac with the device.
WARNING: If you delete an automatically synced item from your Mac, the deleted item is removed from your device the next time you sync.
Before disconnecting your device from your Mac, click the Eject button in the Finder sidebar.
Источник
How to transfer photos from computer to iPhone
You might be wondering how to transfer photos from computer to iPhone? And we are here to help!
In case you are looking for a way to transfer photos from iPhone to PC we have an excellent comprehensive guide:
There are many ways to import photos to iPhone, starting with iTunes and ending with different cloud solutions. In this article, you will find a comprehensive overview of all the ways to copy pictures from PC to iPhone. Keep on reading for detailed info or choose one of the ways below:
How to transfer photos from laptop to iPhone
using iTunes
The first app that comes to mind when you think about transferring photos to iPhone is, of course, iTunes. Apple-based solution, it will allow you to transfer files to your iPhone quickly. However, as with so many Apple products, the whole process is tainted by some weird-flavoured magic, leaving behind a bitter taste and a silent question of whether it was really worth it.
We would not recommend using this method because of the following disadvantages:
😣 You will only be able to sync one folder at any time. If you change the folder later, your previous images will be erased.
😲 The operation will erase all the images previously stored in Photo Library (your Camera Roll photos will stay intact).
😤 Images in the Photo Library can only be changed/deleted from the PC, and iTunes won’t let you delete the images separately – only do a full resync. To be able to create and edit the content of albums inside Photo Library, you can use CopyTrans Photo.
🙄 The sync will not be automatic anyway. You will need to relaunch it every time you need to introduce changes.
Keep on reading for detailed info on the best methods to transfer photos from PC to iPhone without iTunes below.

How to transfer photos from PC to iPhone without iTunes
using specialized third-party software
If you are looking for a quick way to copy pictures from PC to iPhone, we have a solution just for you: CopyTrans Photo. The app has an intuitive interface, gets things done quickly and you can see thumbnails of all the files you’re operating at any moment.
Why people choose CopyTrans Photo:
✔ Introduces a convenient way to manage photos and videos on your iPhone from PC;
✔ Transfers photos in HEIC, bmp, gif, jpeg, jpg, dng, tiff, tif, tga, png, pcx, dng (ProRAW).
✔ Transfers photos and videos between iPhone and PC preserving the original quality and EXIF data;
✔ Copies photo albums back and forth, preserving the album structure;
✔ Compatible with the latest iOS, iTunes, and Windows versions.
The process of transfer is intuitive, but you can always see our instructions below!
Here is how to get photos from PC to iPhone:
If you haven’t done so already, download and install CopyTrans Photo:
Launch CopyTrans Photo. Connect your iPhone to PC with a USB cable. If prompted to trust PC, press “Trust”.
You will see your iPhone photos on the left and your PC pictures on the right:
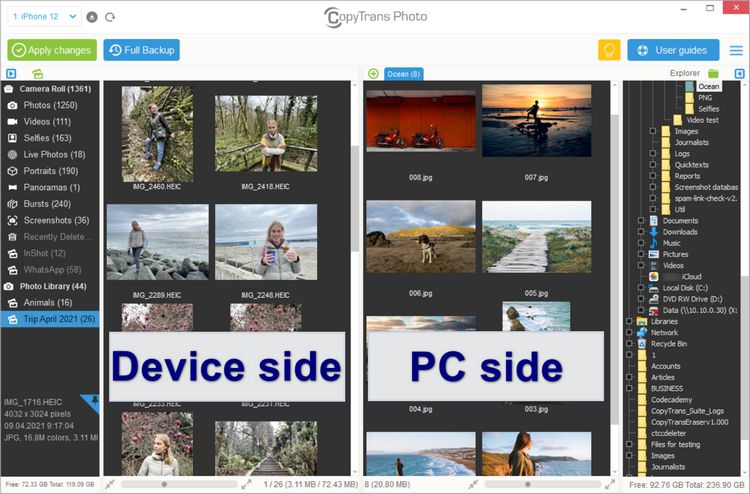
Create a new album on the left iPhone side. If you click on this album, the working area will display the contents (no files there for now).
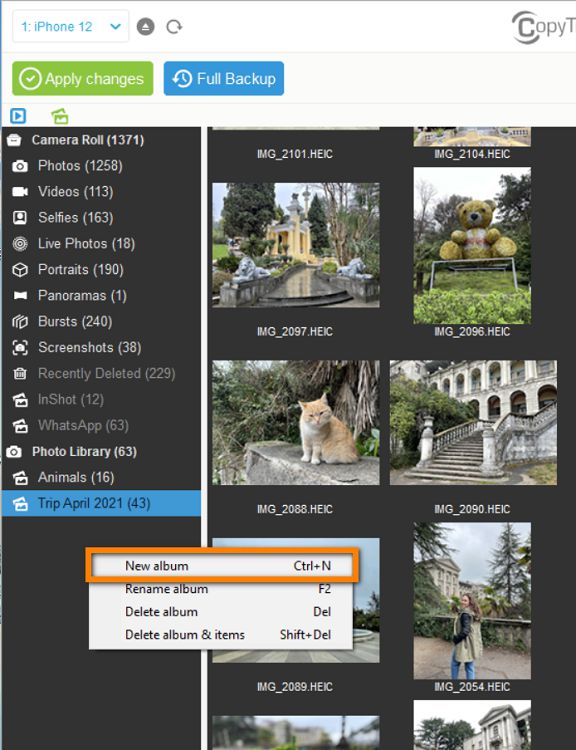
Using the folder tree on the right PC side, navigate to the PC folder with the photos you want to transfer.
Select the pictures and Drag and Drop them from the right PC area to the left iPhone area.
![]()
Click on “Apply Changes” and wait for the syncing process to complete.
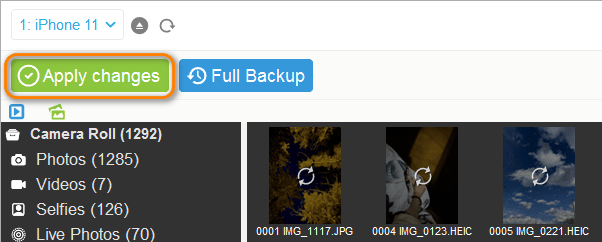
All done! Your photos are now waiting for you in the folder “From my Mac” folder on your iPhone.
The same method perfectly works in case you need to transfer photos from PC to iPad. Check out our YouTube guide below!
Transfer photos from PC to iPhone
YouTube guide
Upload photos to iCloud
using CopyTrans Cloudly
This option can help you sync PC photos to all your iOS devices at once, provided that you have iCloud Photos enabled. Once you upload photos to iCloud, they will automatically appear on all your devices that share the same Apple ID.
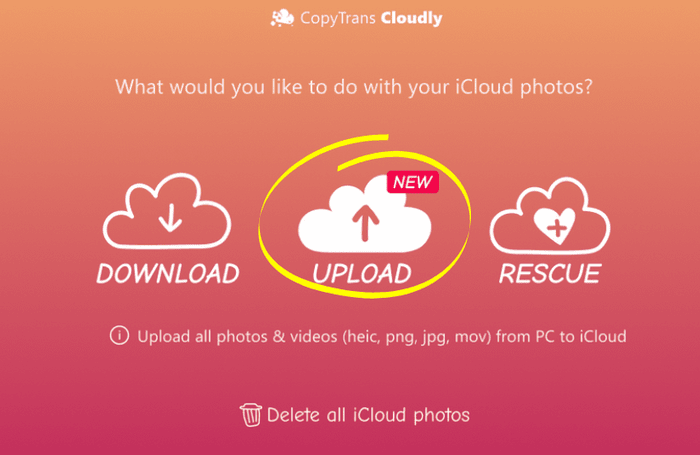
The following steps explain how to upload photos to iCloud via CopyTrans Cloudly:
Download and install CopyTrans Cloudly:
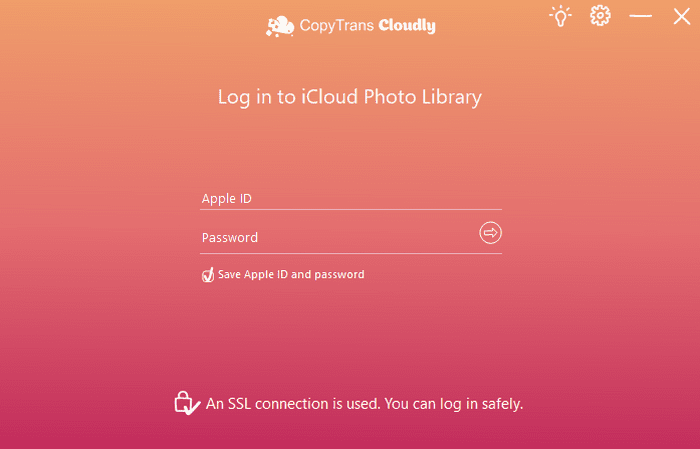
Launch CopyTrans Cloudly and log in with your iCloud credentials. SSL connection guarantees the safety of your personal data.
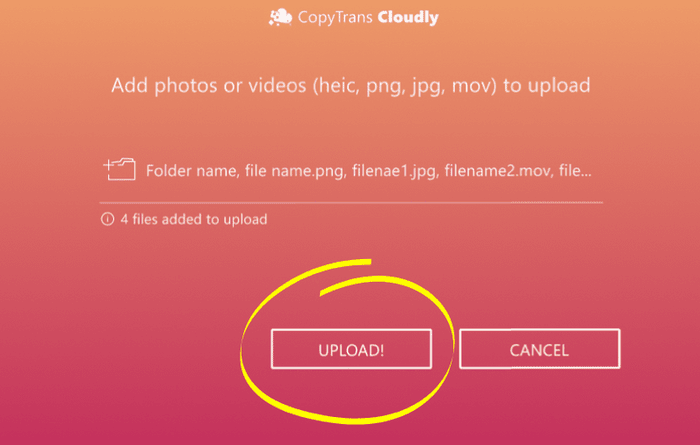
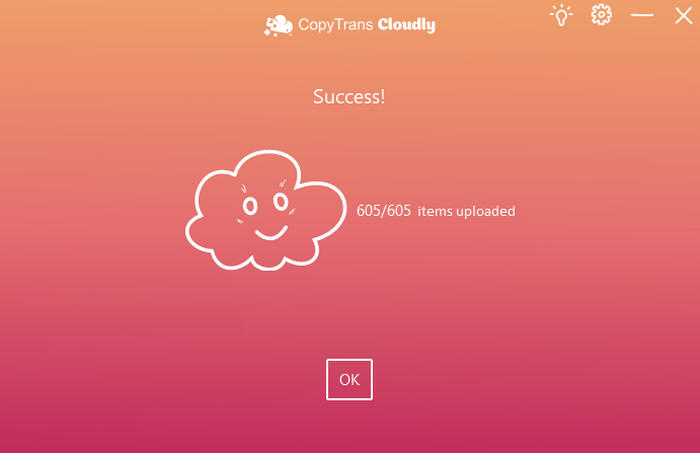
Wait while CopyTrans Cloudly is doing the job.

Now you know how to upload photos and videos to iCloud from PC using CopyTans Cloudly. And once the photos are in iCloud, they should appear on your device!
Some advantages of using CopyTrans Cloudly:
✔ CopyTrans Cloudly can upload files with native iPhone extension, .HEIC.
✔ You can upload your whole library in one iteration.
✔ Uploads videos as well as photos.
✔ Easy-to-use interface.
Upload photos to iCloud
using iCloud.com
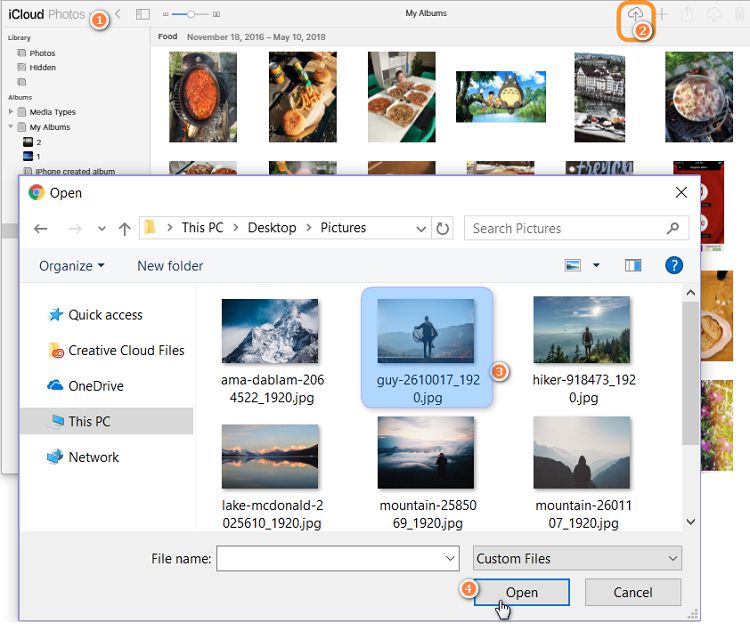
Another option is to use the web interface Apple provides to upload photos to iCloud. For that, open icloud.com in your web browser of choice.
You log in, select the Photos section in the main menu and immediately see your iCloud Photo Library on your computer screen. To put photos on iCloud, click on the “Upload photos” button at the top-right corner and select the photos you want to import.
The photos should immediately appear on your iPhone and any other device having the same iCloud account signed in. If that does not happen, check if iCloud Photo Library is enabled on your iPhone or iPad: Settings> Your Name> iCloud> Photos> iCloud Photos.

Disadvantages:
- Everything that you store in iCloud makes it to the Apple servers as well. If you want to delete some images forever, they will disappear from your account but not from the Apple servers. We even conducted an investigation and created a tool that can recover deleted photos from iCloud.
- On icloud.com, you can manually sort the uploaded images by album. But within an album, the photos are sorted by the transfer date and you cannot change this order online.
- Another major drawback is that if you disable iCloud Photo Library and turn it back on after some time, any pictures you previously added to iPhone with iTunes (or any other third-party app like CopyTrans Photo) will get deleted. That’s why you should be extra careful with this setting and regularly backup your cloud photos to a computer.

How to get photos from PC to iPhone
via Google Drive
If you have a Google account, you are automatically eligible for 15Gb of free storage on Google Drive (originally SkyDrive). However, Google Drive shares this storage space with other apps, like Gmail and Google Photos.
In order to use this option, you will need to download the official Google Drive app on your computer and your iOS device. Once you run Google Drive on your PC, create a new folder and copy photos to iPhone. The folder will appear with the photos on iPhone in the Google Drive app.
![]()
You can create additional folders to transfer multiple photos to iPhone and move them between folders. There is also a possibility to sort photos within one folder by date or by name.
- The uploaded photos will not be saved in the native Photos app on iPhone but in the Google Drive app.
- You cannot edit the photos within the app without first copying them into the native folder – double work.

Transfer photos from PC to iPhone without iTunes
Dropbox
Dropbox offers only 2GB of free storage to their users. On the other hand, you do not have to install the program on the PC. In order to transfer photos from a computer to iPhone, save your data online on dropbox.com directly: log in, create a folder and upload the photos from the computer. After that, go to the Dropbox app on your iPhone to see your imported pictures.
![]()
Disadvantages:
- Unfortunately, you can only upload individual photos, since Dropbox does not allow importing a folder.
- Images will possibly lose in quality.
- Although you can import HEIC photos, there will be no possibility to open them.
Import photos to iPhone
with OneDrive
With Microsoft’s OneDrive you get 5Gb of storage space for free. Just like Google Drive, it requires you to install the official OneDrive app on both your computer and iDevice to transfer photos to iPhone. Drag the desired files or entire albums to the program window and after a few seconds, you will see the images the iPhone in the OneDrive app.
![]()
The photos are transferred in the original quality including the date created. You can also choose to sort the photos automatically by tags.
- The photos will not make it to the Photos app; instead, they will be placed to OneDrive app, which should be installed on the iPhone beforehand.
- OneDrive app does not provide built-in image editing, nor support for HEIC photos: if you place HEIC images in OneDrive, you won’t be able to view them or copy to the Photos app.
💡 Pro-Tip: After you’ve transferred your photos to your iPhone, use a photo editing tool like Instasize to improve how your photos look before uploading them to your feed! Choose any image on your iPhone to improve color settings, size, aspect ratio, or even make a colourful collage. Check it out yourself!
Conclusion
If you don’t trust cloud solutions, find iTunes hard to use and want to keep your photos in the native Photo app, CopyTrans Photo is the best solution for you to transfer photos from PC to iPhone. The program allows managing iPhone photos and videos on PC and has several unbeatable advantages such as managing Live Photos, viewing pictures in HEIC format, keeping excellent quality, order and EXIF files, and much more. Give it a go today!
CopyTrans 7 Pack
If you want to manage iOS device, CopyTrans offers you many options:
✔ Save your iPhone music on PC or iTunes with CopyTrans
✔ Manage iTunes library with CopyTrans Swift
Источник


