- Move from Android to iPhone, iPad, or iPod touch
- Before you begin
- Tap Move Data from Android
- Open the Move to iOS app
- Wait for a code
- Use the code
- Connect to a temporary Wi-Fi network
- Choose your content and wait
- Set up your iOS device
- Finish up
- If you need help with the transfer
- If you need help after the transfer
- How to Transfer Data from iPhone to iPhone (iPhone 13 Included)
- iPhone to iPhone Transfer Tips
- AnyTrans – Transfer Data to New iPhone 13
- Transfer Data from One iPhone to Another via Quick Start
- TransferВ Data from iPhone to iPhoneВ without Quick Start
- # 1. AnyTrans –В iPhone to iPhone Data Mover
- FAX from iPhone — send fax 4+
- Send fax from iPhone or iPad
- Municorn
- Designed for iPad
- Screenshots
- Description
- What’s New
- Ratings and Reviews
- Worth every penny.
- Subscription Service? Seriously??
Move from Android to iPhone, iPad, or iPod touch
Ready to transfer to iOS? Download the Move to iOS app to get help switching from your Android device to your new iPhone, iPad, or iPod touch.
If you can’t use the Google Play Store, learn how to download Move to iOS.
Before you begin
- On your Android device, make sure that Wi-Fi is turned on.
- Plug your new iOS device and your Android device into power.
- Make sure that the content you’re moving, including what’s on your external Micro SD card, will fit on your new iOS device
- If you want to transfer your Chrome bookmarks, update to the latest version of Chrome on your Android device.

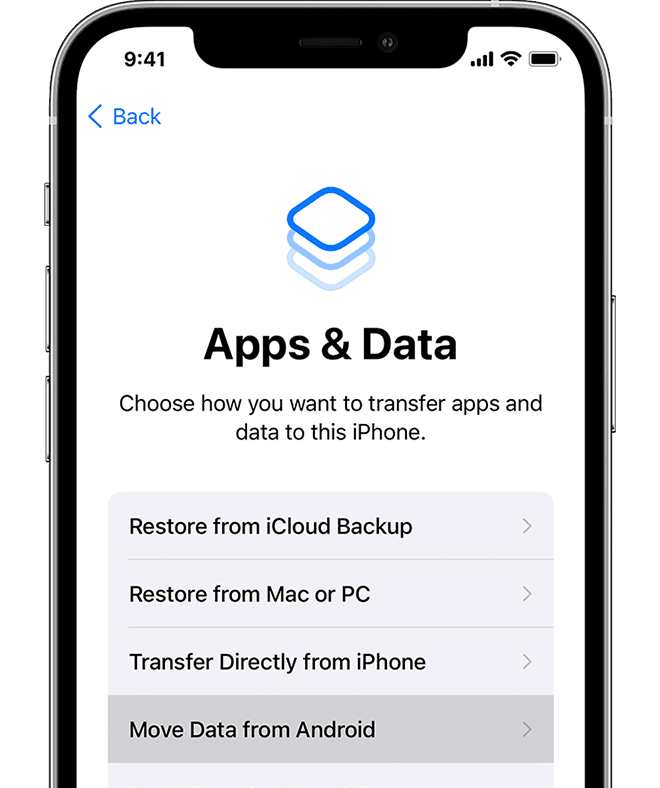
Tap Move Data from Android
While you set up your new iOS device, look for the Apps & Data screen. Then tap Move Data from Android. (If you already finished setup, you need to erase your iOS device and start over. If you don’t want to erase, just transfer your content manually.)
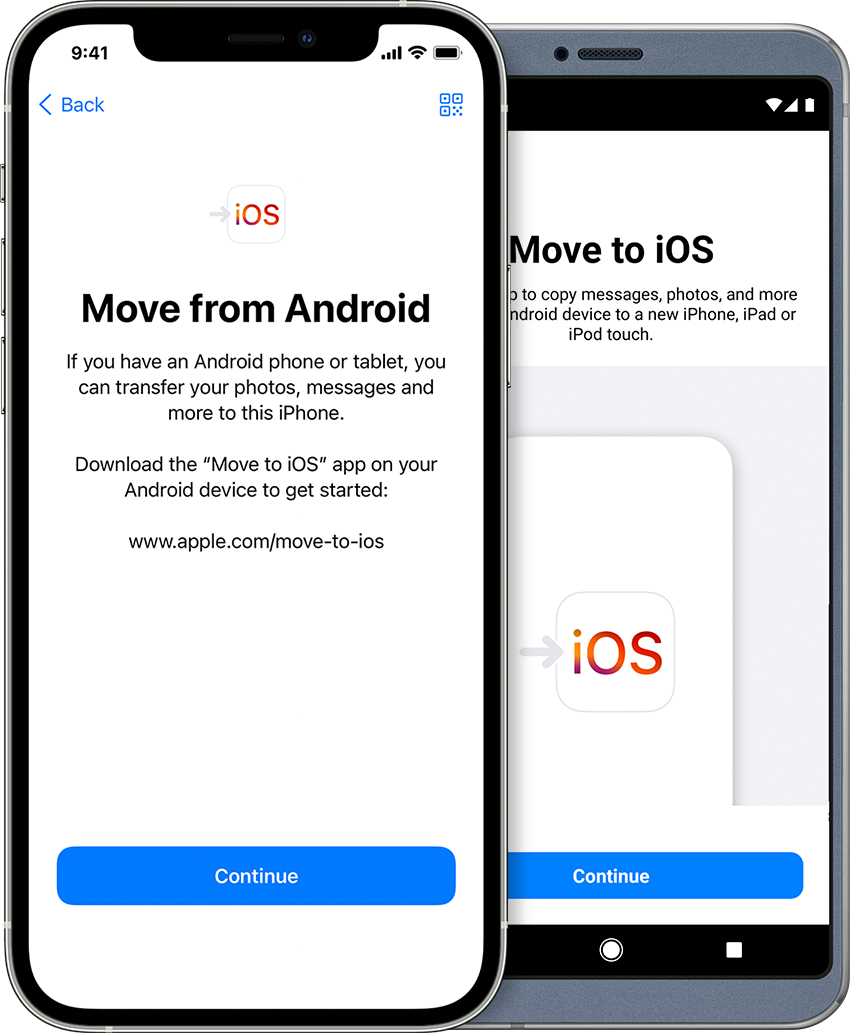
Open the Move to iOS app
On your Android device, open the Move to iOS app. If you don’t have the Move to iOS app, you can tap the QR code button on your new iOS device and scan the QR code using the camera on your Android device to open the Google Play Store. Tap Continue, and read the terms and conditions that appear. To continue, tap Agree.
Wait for a code
On your iOS device, tap Continue when you see the Move from Android screen. Then wait for a ten-digit or six-digit code to appear. If your Android device shows an alert that you have a weak internet connection, you can ignore the alert.
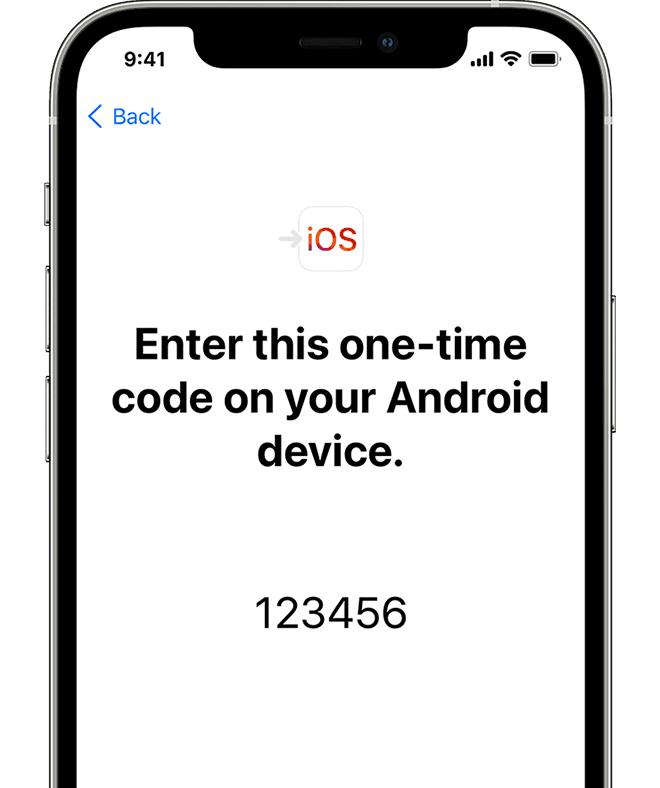
Use the code
Enter the code on your Android device.
Connect to a temporary Wi-Fi network
Your iOS device will create a temporary Wi-Fi network. When asked, tap Connect to join that network on your Android device. Then wait for the Transfer Data screen to appear.
Choose your content and wait
On your Android device, select the content that you want to transfer and tap Continue. Then—even if your Android device shows that the process is complete—leave both devices alone until the loading bar that appears on your iOS device finishes. The whole transfer can take a while, depending on how much content you’re moving.
Here’s what gets transferred: contacts, message history, camera photos and videos, photo albums, files and folders, accessibility settings, display settings, web bookmarks, mail accounts, and calendars. If they’re available on both Google Play and the App Store, some of your free apps will also transfer. After the transfer completes, you can download any free apps that were matched from the App Store.
Set up your iOS device
After the loading bar finishes on your iOS device, tap Done on your Android device. Then tap Continue on your iOS device and follow the onscreen steps to finish setup for your iOS device.
Finish up
Make sure that all of your content transferred. Music, books, and PDFs need to be moved over manually.
Need to get the apps that were on your Android device? Go to the App Store on your iOS device to download them.
If you need help with the transfer
- Make sure that you leave both devices alone until the transfer finishes. For example, on your Android device, the Move to iOS app should stay onscreen the whole time. If you use another app or get a phone call on your Android before the transfer finishes, your content won’t transfer.
- On your Android device, turn off apps or settings that might affect your Wi-Fi connection, like the Sprint Connections Optimizer or the Smart Network Switch. Then find Wi-Fi in Settings, touch and hold each known network, and forget the network. Then try the transfer again.
- Restart both of your devices and try again.
- On your Android device, turn off your cellular data connection. Then try the transfer again.
If you need help after the transfer
- Get help if Messages doesn’t work as expected after you transfer your content.
- If you don’t see apps from your Android device on your new iOS device, find and download them in the App Store on your new device.
- You might find that only some content transferred and your iOS device ran out of space, or your iOS device might appear full even though the transfer didn’t finish. If so, erase your iOS device and start the transfer again. Make sure that your Android content doesn’t exceed the available space on your iOS device.
Information about products not manufactured by Apple, or independent websites not controlled or tested by Apple, is provided without recommendation or endorsement. Apple assumes no responsibility with regard to the selection, performance, or use of third-party websites or products. Apple makes no representations regarding third-party website accuracy or reliability. Contact the vendor for additional information.
Источник
How to Transfer Data from iPhone to iPhone (iPhone 13 Included)
Don’t know how to transfer data when switching from old iPhone to the new one? Check this post now and easily grab 5 simple methods on how to transfer iPhone to iPhone (iPhone 13 supported), with or without iCloud/iTunes.
iPhone to iPhone Transfer Tips
Transfer/Sync iPhone
Transfer Media Data
Transfer Personal Info
AnyTrans – Transfer Data to New iPhone 13
Free download AnyTrans to start moving data from your old iPhone to your new iPhone 13, including contacts, messages, photos, apps, etc.
Speaking of mobile phones, Apple is definitely the industry giant. Every time a new series of iPhone isВ released, many people will place orders in the first place. And iPhone 13 seriesВ has been released this year. Most iPhone users already used an iPhone, so transferring content fromВ the old iPhone to iPhone 13, like transferring contacts to the new iPhone, is quite necessary.
![]()
Transfer Data from iPhone to New iPhone
To solve this problem, Apple itself came up with many solutions, for example, iTunes (Finder), iCloud, Quick Start, and iPhone migration after iOS 12.4. All of these methods are meant to make it easier for users to set up a brand new iPhone, however, they still have their own pros and cons. Here in this article, we will introduce all the possible ways for you to move content and data from the previous iPhone to your new iPhone (iPhone 13 included).
Transfer Data from One iPhone to Another via Quick Start
Since most of the iPhones are running iOS 11 or later now, we suggest you use Quick Start to set up your new iPhone and transfer the files from your old iPhone to it.В Quick Start is an iPhone-to-iPhone data transferring tool developed by Apple.
With this tool, you can set up a new iOS device quickly using information from your current device. Check the steps of transferring iPhone data with Quick Start:
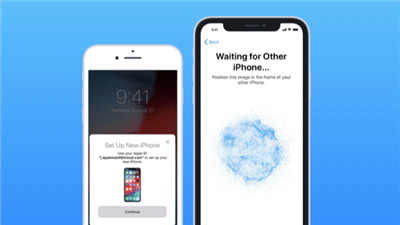
Step 1. Activate Quick Start on Your New iPhone
Turn on your new iPhone and bring it near your old device. The Quick Start screen will offer the option of using your Apple ID to set up your new iOS device.
Step 2. Pair Your Old and New iPhone
Tap Continue, wait for an animation to appear on your new device. Hold your old device over the new device, then center the animation in the viewfinder. Wait for a message that says Finish on New [Device Name], and then enter your old device’s passcode on your new device.
Step 3. Set Up Face/Touch ID on iPhone
Set up your Face ID or Touch ID onВ the new iPhone, then enter your Apple ID password on your new device. If you have multiple iDevices, you need to enter all their passcodes.
Step 4. Restore from iCloud Backup
The new device will give you the choice of restoring apps, data, and settings from your most recent iCloud backup or updating your current device’s backup and then restoring. Just select one backup that contains the data you want to use to set up your new iPhone. You can also choose whether to transfer iPhone settings.
iPhone Quick Start
TransferВ Data from iPhone to iPhoneВ without Quick Start
Well, one guaranteedВ secure software to transfer data from iPhone to iPhone would cover all scenarios you could meet while switching the iPhone. In this part, 2 highly recommended utilities are listing. Keep on reading and figure out how to transfer data from iPhone to iPhone without Quick Start.
# 1. AnyTrans –В iPhone to iPhone Data Mover
Is there aВ method to transferВ everything from iPhone to iPhone? В AsВ a comprehensive and easy-to-use iPhone data manager,В AnyTransВ can easily get data transferred to your new iPhone in clicks (iPhone 13 mini, iPhone 13, iPhone 13 Pro, iPhone 13 Pro Max). Check its main features and have a try on it:
- Transfer all your important data – with AnyTrans, you can transfer contacts, photos, messages, videos, music, ringtones, and other iPhone data from your old iPhone to your new iPhone 13.
- Transfer Apps to new iPhone in 1-click – AnyTrans moves apps from the old iPhoneВ directlyВ to the new iPhone seamlessly, so you don’t need to download apps one by one from the App Store.
- No data erase on your iPhone –В Unlike restoring from iTunes or iCloud backup, the transfer will not overwrite any existing data on your iPhone.
- Freely transfer all or selected data –В AnyTrans lets you freely choose what you really wantВ to transfer, so you can selectively transfer data to your new iPhone.
- Move data from Android to iPhone easily – Also, if you are an Android user, AnyTransВ is able to switch Android to the new iPhone.
Now,В Free Download AnyTransВ and install it on your computer firstly,В and then follow the steps below to transferВ everything from iPhone toВ iPhone wholly or selectively.
Источник
FAX from iPhone — send fax 4+
Send fax from iPhone or iPad
Municorn
Designed for iPad
-
- #85 in Business
-
- 4.8 • 205.2K Ratings
-
- Free
- Offers In-App Purchases
Screenshots
![]()
![]()
![]()
![]()
![]()
Description
Send fax from iPhone or iPad on the go. Fast and easy! No Fax Machine Required! Send any document everywhere. NO need to use old school fax machine or go to a fax office.
Powerful fax app:
— Fax from iPhone in 90+ international countries;
— Advanced document scanner & image processing;
— Best possible quality achieved no matter what types of documents you use;
— Combine multiple documents into a single fax;
— Preview any document before sending;
Upload any types of documents:
— Send just about any file type as a fax (PDF, DOC, JPG, PNG & TIFF, HTML);
— Create new documents with images as you go (Photo Gallery, Camera);
— Import any types of documents (Dropbox, iCloud, Google Drive, Box or any other source).
Try powerful tracking:
— Track sent documents status via fax app.
Subscription plans — Unlimited:
• 1-week subscription — US$ 9.99
• 1-month subscription — US$ 24.99
• 12-month subscription — US$ 99.99
Note: price may vary depending on location.
Information about the auto-renewal of subscription:
— Payment will be charged to iTunes Account at confirmation of purchase;
— Subscription automatically renews unless auto-renew is turned off at least 24-hours before the end of the current period;
— The account will be charged for renewal within 24-hours before the end of the current period. The cost depends on the selected plan;
— Subscriptions may be managed by the user and auto-renewal may be turned off by going to the user’s Account Settings after purchase;
Privacy Policy: https://faxapp.biz/info/privacy.html
Terms of Use: https://faxapp.biz/info/terms_of_use.pdf
For any questions or inquiries, please get in touch: support@faxapp.biz
* iPhone and iPad are trademarks of Apple Inc.
What’s New
— Bug fixes & improvements.
*** Have any problems/ideas? Get in touch with us in the app or support@faxapp.biz ***
Ratings and Reviews
Worth every penny.
Emails are not HIPPA compliant. Medical information has to be faxed. The App has saved me hours of time running to a Staples or business store to fax sensitive documents. You get exactly what you pay for. I paid for the year and have used it more times than I can count. I recently refinanced and faxed all my tax documents, mortgage documents, and payroll documents just by scanning them with this App on my iPhone and faxing them with this App. Don’t write negative reviews because you want something for nothing or you don’t know how to use the App. It’s very straightforward and user friendly. Put in the Fax number. Create a cover page if you want with one click on the page. Attach scans, photos, or documents from you iPhone. Then send. Done.
I just wish they offered receiving faxes. Developers- Please consider making the App to be able to receive faxes also.
Subscription Service? Seriously??
So, once upon a time this app used to be a “pay as you go” app. You bought credits and sent faxes as needed. When I went to reload credits this time, I only had 1 option. The dreaded hook-digging “subscription service.” I send maybe 1-2 faxes every 2 years (if that), so a monthly fee for faxing nothing is absolutely ludicrous.
I completely understand that every single software driven model these days has turned into a revolving door of subscriber services. Having a healthy ARR/MRR is great for raising private equity capital (this company isn’t traded publicly). But for faxes? Come on! Apps like these should still continue to offer folks one-time fax credits, because people rarely need fax machines these days, and the app would provide value to a customer’s experience when this type of app is needed.
To the developers/owners of this app, please consider rolling out a graduated pricing scale for “pay as you go” customers. Set a minimum credit purchase, charge a bit more per page, offer break points (discounts) if you purchase more credits up front, and still hold onto the subscription based service for heavy users. You could have the best of both worlds, and an additional revenue stream to boot. Imagine that!
Источник


