- Android system init process startup and init.rc full analysis
- Service startup mechanism
- init.rc Introduction
- init.rc grammatical structure analysis
- Actions
- Triggers (Triggers)
- Services
- init.rc file detailed
- init.c full analysis
- Как в ядро Андроид добавить поддержку init.d
- Что необходимо чтобы добавить поддержку init.d в Android?
- Инструкция как в ядро Android добавить поддержку init.d
- Способ 1. ОС Windows
- Способ 2. ОС Ubuntu
- Работа с ядром
- Как проверить поддерживает ли ядро init.d?
- Где должна быть создана папка init.d в Android для добавления скриптов?
Android system init process startup and init.rc full analysis
This is a blog written with heart, and I hope everyone can read it carefully and help find the improvement of the article, thank you;
Service startup mechanism
- parse_config_file (init.rc) in the main function of the system/core/init/init.c file reads and parses the contents of the init.rc file. Place the service information in the service_list of system/core/init/init_parser.cpp
- The main function of the system/core/init/init.c file continues to execute restart_servie_if_needed(. ) -> service_start(. ) -> Execve(. ) to establish the service process;
In order to let everyone see more clearly, the last picture first «Overall Startup Framework»: 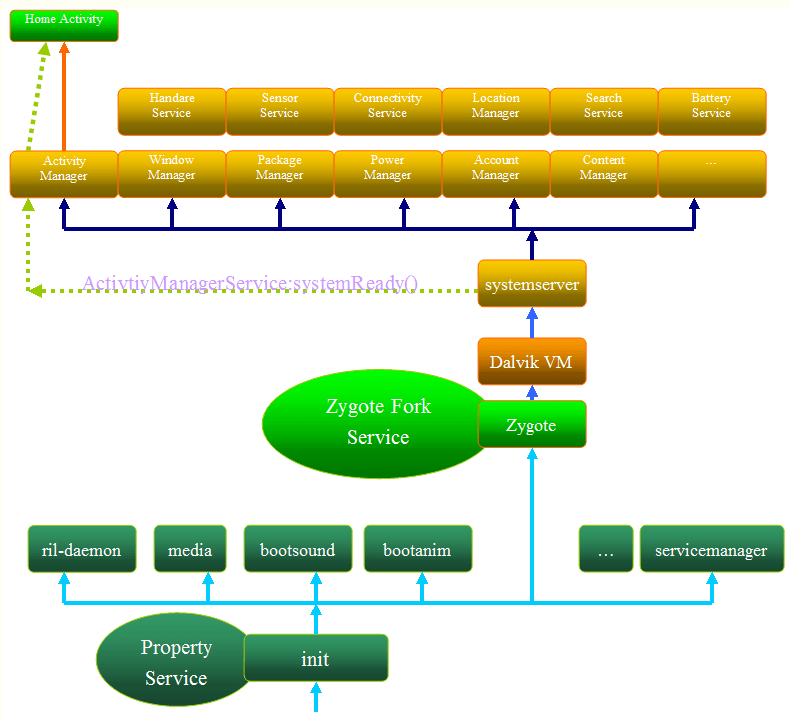
init.rc Introduction
At present, Linux has many communication mechanisms that can interact between user space and kernel space, such as device driver files (located in the /dev directory), memory files (/proc, /sys directories, etc.). Students who know Linux should know that one of the important features of Linux is that everything exists in the form of files. For example, a device usually corresponds to one or more device files. These files that interact with the kernel space are in the user space, so after loading in the Linux kernel, you need to first create the directory where these files are located. The program to complete these tasks is the init described in this article. Init is a command line program. One of its main tasks is to create a directory where these files that interact with the kernel space are located. When the Linux kernel is loaded, the first thing to do is to call the init program, that is, init is the first program executed in user space.
Although the work done by init is not much, the code is still very complicated. Init program is not composed of one source code file, but is formed by linking a set of object files of source code files. These files are located in the following directories.
It should be understood that these init.rc are just grammar files, not programs. The real entry point is the system/core/init/init.c mentioned above.
Because the init.c file is relatively large, in the second part of the article I will briefly analyze the init startup process through the main function;
There are two init.rc, located in:
./system/core/rootdir/init.rc
./bootable/recovery/etc/init.rc
It can be guessed from the catalog that the two init.rc usage scenarios are different. One is used for flashing, that is, to enter the recorvery mode, and the other is used for normal startup; our focus here is the above one, which is also init The one associated with .c;
init.rc grammatical structure analysis
To understand how init.rc is parsed, we need to look at the documentation first. The documentation is there. Of course, you can also look at the Chinese version ;
init.rc is located in /bootable/recovery/etc/init.rc
The Android initialization language contains four types of declarations:
Actions (behavior), Commands (command), Services (service) and Options (options)
All of these are in units of lines, and various signs are separated by spaces.
C-style backslashes can be used to insert spaces between tokens.
Double quotes can also be used to prevent a string from being split into multiple tokens by spaces.
The backslash at the end of the line is used to wrap the line, and the comment line starts with a pound sign (#) (a space is allowed).
It should be noted that this is only a grammar file, just like an xml file, without execution order, the parser obtains the desired data by reading this file, including service, action, etc.
Actions and Services declare a new grouping Section. All commands or options belong to the most recently declared group. Commands or options before the first group will be ignored.
Actions and Services have unique names. If there is a duplicate name, the second statement will be ignored as an error.
Actions
Actions are the start of a series of commands
Actions represent some Actions. Actions represent a set of commands (Commands), and Actions have a trigger (trigger) that determines when to execute this Action, that is, under what circumstances can the defined command in the Action be executed. When some conditions meet the conditions of the trigger, the command defined in the Action will be added to the end of the command queue to be executed (if this group of commands is already in the queue, it will not be added again).
Each action in the queue is extracted in turn, and each command in this action is executed in turn when an Action is removed from the queue.
The format of Action is as follows:
Exit fullscreen mode
On is followed by a trigger. When the trigger is triggered, command1, command2, and command3 will be executed in sequence until the next Action or the next Service.
To put it simply, Actions is a startup script defined by Android at startup. When the conditions are met, the script will be executed. There are some commands in the script, and different scripts are distinguished by on.
Triggers (Triggers)
Trigger is the trigger we mentioned above, which is essentially a string that can match a certain event containing the string.
Triggers are subdivided into event triggers and property triggers.
Triggers (triggers) is a string used to match specific event types to make Actions happen.
Event triggers can be triggered by the «trigger» command or via QueueEventTrigger() during the initialization process, usually some simple strings defined in advance, such as: boot, late-init
Property trigger is triggered when the variable value of the specified property becomes the specified value, and its format is property:=*
An Action can have multiple attribute triggers, but there is at most one event trigger. Let’s look at two examples below:
Exit fullscreen mode
This Action will only be triggered when the boot event occurs and the attributes a and b are equal.
Exit fullscreen mode
The Action will be triggered in the following three situations:
-At startup, if the value of attribute a is equal to b and the value of attribute c is equal to d
-When the value of attribute c is already d, the value of attribute a is updated to b
-When the value of attribute a is already b, the value of attribute c is updated to d
The following event triggers are commonly used in AIL:
Exit fullscreen mode
The trigger of Init is determined by the function action_for_each_trigger in init.c (called in the main function).
Services
A service is a program that starts with service and is started by the init process. Generally, it runs in another child process of init. Therefore, it is necessary to determine whether the corresponding executable file exists before starting the service. The sub-processes generated by init are defined in the rc file, and each service in it will generate sub-processes through the fork method at startup. The form of Services is as follows:
Exit fullscreen mode
-name: service name
-pathname: the program location corresponding to the current service
-option: the option set by the current service
-argument optional parameter
init.rc file detailed
In order to facilitate understanding, I put the whole init.rc analysis aside, so that everyone can understand the whole process; if you want to understand the init syntax analysis under recovery, refer to this article «Init.rc syntax analysis under recovery»
The amount of code is relatively large, if you think it looks laborious, you can pick the green part to see;
Exit fullscreen mode
init.c full analysis
Next, we analyze the execution process of the following main function in detail; it may be relatively long, so please take a look:
Источник
Как в ядро Андроид добавить поддержку init.d
вкл. 02 Июнь 2016 . Опубликовано в Android — Общее

Как в ядро Андроид добавить поддержку init.d. В Android возможно встроить различные скрипты и твики которые начнут работать еще в процессе загрузки системы, для это нужна поддержка ядром init.d, но как ее добавить? Очень просто!
Более детально про init.d можете прочитать в wiki , если коротко, то с помощью данной системы инициализации, можно улучшить с помощью скриптов скорость работы 3G интернета, продлить время работы устройства от одного заряда аккумулятора, влиять на работу процессора и многое другое. Скрипты можно найти в интернет…
Что необходимо чтобы добавить поддержку init.d в Android?
Способ 1. ОС Windows
- Компьютер на ОС Windows (7/8/10)
- Ядро boot.img от вашего смартфона или планшета Android
- Скачать и распаковать архив с утилитой Android Image Kitchen
- Скачать и установить Notepad ++
Способ 2. ОС UBUNTU (Linux)
- Компьютер с ОС UBUNTU
- Ядро boot.img от вашего смартфона или планшета Android
Инструкция как в ядро Android добавить поддержку init.d
Способ 1. ОС Windows
1. Ядро boot.img поместить рядом в папку Android Image Kitchen

2. Перетянуть ядро на BAT-скрипт unpackimg.bat, после чего ядро будет разобрано
3. Открыть папку ramdisk и найти файл init.rc, после чего открыть его через Notepad ++

Добавить после service bootanim /system/bin/bootanimation …. следующие стороки:

5. Сохранить документ, закрыть Notepad ++, вернуться в папку Android Image Kitchen
6. Запустить Bat-скрипт repackimg.bat после чего будет созданно новое ядро image-new.img

7. Готовое ядро прошить через Fastboot
Способ 2. ОС Ubuntu
Подготовка
Установим пакет встраивающий открытие терминала в файловом менеджере
1. Открываем терминал и вводим следующую команду (с версии Ubuntu 15.10 терминал уже встроен в файловый менеджер Nautilus)
Для 32х разрядных систем:
Для 64х разрядных систем:
2. После чего выполнить команду перезапуска файлового менеджера
3. Установить пакет необходимый для работы с ядром Android
В текстовом редакторе Gedit снять галочку с параметра «создание резервной копии»

Работа с ядром
1. Создайте в папке home (Домашняя папка) папку с любым удобным именем и переместите туда ядро Android — boot.img. ( В примере будет указана папка kernel)

2. Перейдите в папку kernel, в любом пустом месте нажмите правую кнопку мыши и выбрать «Открыть в терминале»
3. В открывшемся терминале введите команду:

После чего в папке kernel вы увидите что появились новые файлы (ядро распаковано)

4. Создадим новую папку (назовем ее rw) внутри папки kernel, в терминале пишем
и далее пишем команду для перехода в нее

5. Пишем команду в терминале для дальнейшей распаковки раздела initrd.img

6. После чего в папке rw вы обнаружите множество файлов

7. Найдите и откройте файл init.rc

8. В конце файла добавьте следующие строки
и сохраните файл и выйдете с него

9. В терминале выполняем сборку файла initrd.img, пишем команду
10. Возвращаемся обратно в папку kernel, для этого в терминале пишем
11. Собираем ядро Android с внесенными изменениями
и после еще одну команду
Если получаете ошибку что ядро стало большим:
boot.img: updated is too big for the Boot Image
тогда собираем с такой командой
Ядро Android с поддержкой init.d собрано! Далее вам необходимо прошить!
Как проверить поддерживает ли ядро init.d?
1. Установите Busybox
2. Через любой терминал (с помощью ПК или приложение) введите команду:
3. Если появиться ответ со строкой:
Значит все работает как надо, ядро поддерживает init.d
Где должна быть создана папка init.d в Android для добавления скриптов?
1. Скачайте приложение Root Browser
2. Установите Busybox
3. В приложение Root Browser перейдите в раздел /system/etc
4. Создайте папку init.d
5. Задайте права доступа для папки (Permissions) — rwxr-xr-x или 07555 или буквой «П»
Источник


