- How to create a bootable installer for macOS
- What you need to create a bootable installer
- Download macOS
- Use the ‘createinstallmedia’ command in Terminal
- Set up and use iCloud for Windows
- Before you begin
- Set up iCloud for Windows
- Download and share your photos
- Share your photos
- See your files and folders with iCloud Drive
- Keep your apps up to date
- Save your passwords across devices
- iTunes 12.10.11 for Windows (Windows 64 bit)
- If you can’t install or update iTunes for Windows
- Make sure that you’re logged in to your computer as an administrator
- Install the latest Microsoft Windows updates
- Download the latest supported version of iTunes for your PC
- Repair iTunes
- Remove components left from a previous installation
- Disable conflicting software
- Restart your computer
- Get more help
- Download iCloud for Windows
- Here’s what you need
- Make the most of iCloud for Windows
How to create a bootable installer for macOS
You can use an external drive or secondary volume as a startup disk from which to install the Mac operating system.
These advanced steps are primarily for system administrators and others who are familiar with the command line. You don’t need a bootable installer to upgrade macOS or reinstall macOS, but it can be useful when you want to install on multiple computers without downloading the installer each time.
What you need to create a bootable installer
- A USB flash drive or other secondary volume formatted as Mac OS Extended, with at least 14GB of available storage
- A downloaded installer for macOS Monterey, Big Sur, Catalina, Mojave, High Sierra, or El Capitan
Download macOS
- Download: macOS Monterey, macOS Big Sur, macOS Catalina, macOS Mojave, or macOS High Sierra
These download to your Applications folder as an app named Install macOS [ version name ]. If the installer opens after downloading, quit it without continuing installation. To get the correct installer, download from a Mac that is using macOS Sierra 10.12.5 or later, or El Capitan 10.11.6. Enterprise administrators, please download from Apple, not a locally hosted software-update server. - Download: OS X El Capitan
This downloads as a disk image named InstallMacOSX.dmg. On a Mac that is compatible with El Capitan, open the disk image and run the installer within, named InstallMacOSX.pkg. It installs an app named Install OS X El Capitan into your Applications folder. You will create the bootable installer from this app, not from the disk image or .pkg installer.
Use the ‘createinstallmedia’ command in Terminal
- Connect the USB flash drive or other volume that you’re using for the bootable installer.
- Open Terminal, which is in the Utilities folder of your Applications folder.
- Type or paste one of the following commands in Terminal. These assume that the installer is in your Applications folder, and MyVolume is the name of the USB flash drive or other volume you’re using. If it has a different name, replace MyVolume in these commands with the name of your volume.
Monterey:*
Big Sur:*
Catalina:*
Mojave:*
High Sierra:*
El Capitan:
* If your Mac is using macOS Sierra or earlier, include the —applicationpath argument and installer path, similar to the way this is done in the command for El Capitan.
After typing the command:
- Press Return to enter the command.
- When prompted, type your administrator password and press Return again. Terminal doesn’t show any characters as you type your password.
- When prompted, type Y to confirm that you want to erase the volume, then press Return. Terminal shows the progress as the volume is erased.
- After the volume is erased, you may see an alert that Terminal would like to access files on a removable volume. Click OK to allow the copy to proceed.
- When Terminal says that it’s done, the volume will have the same name as the installer you downloaded, such as Install macOS Monterey. You can now quit Terminal and eject the volume.


Источник
Set up and use iCloud for Windows
With iCloud for Windows, the photos, documents, and bookmarks on your PC are updated automatically on your Apple devices.
Before you begin
Make sure that you set up iCloud on your iPhone, iPad, or iPod touch or Mac and that you’re signed in with your Apple ID. Then follow the steps below to download and set up iCloud for Windows.
Want to access iCloud’s latest features? See the recommended system requirements. iCloud requires an Internet connection. iCloud might not be available in all areas and features vary. If you use a Managed Apple ID, iCloud for Windows isn’t supported.
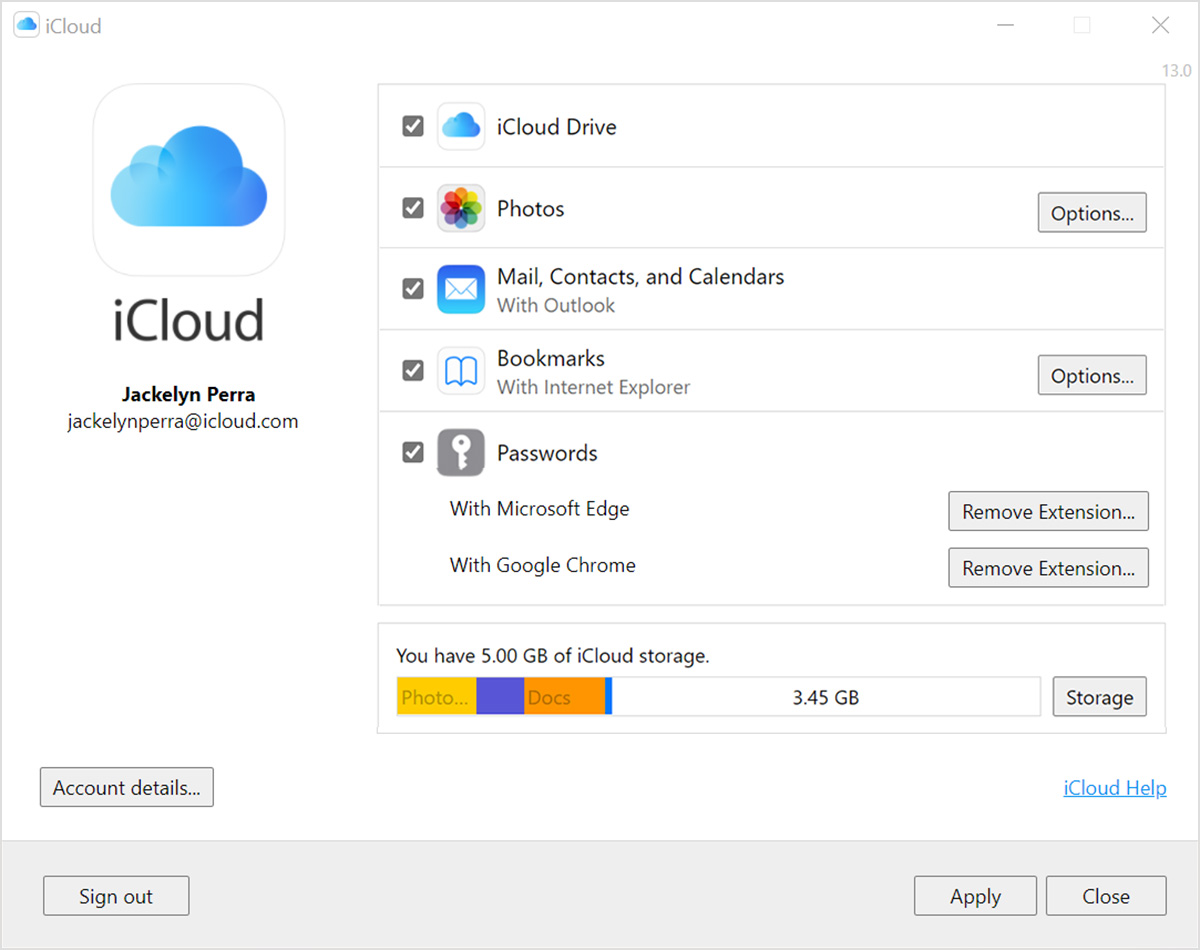
Set up iCloud for Windows
- Download iCloud for Windows on your PC.
- Windows 10 or later: Go to the Microsoft Store to download iCloud for Windows.
- Earlier versions of Windows*: Download iCloud for Windows from apple.com.
- If it doesn’t install automatically, go to File Explorer and open iCloud Setup.
- Restart your computer.
- Make sure iCloud for Windows is open. If it doesn’t open automatically, go to Start, open Apps or Programs, and open iCloud for Windows.
- Enter your Apple ID to sign in to iCloud.
- Choose the features and content that you want to keep up to date across your devices.
- Click Apply.

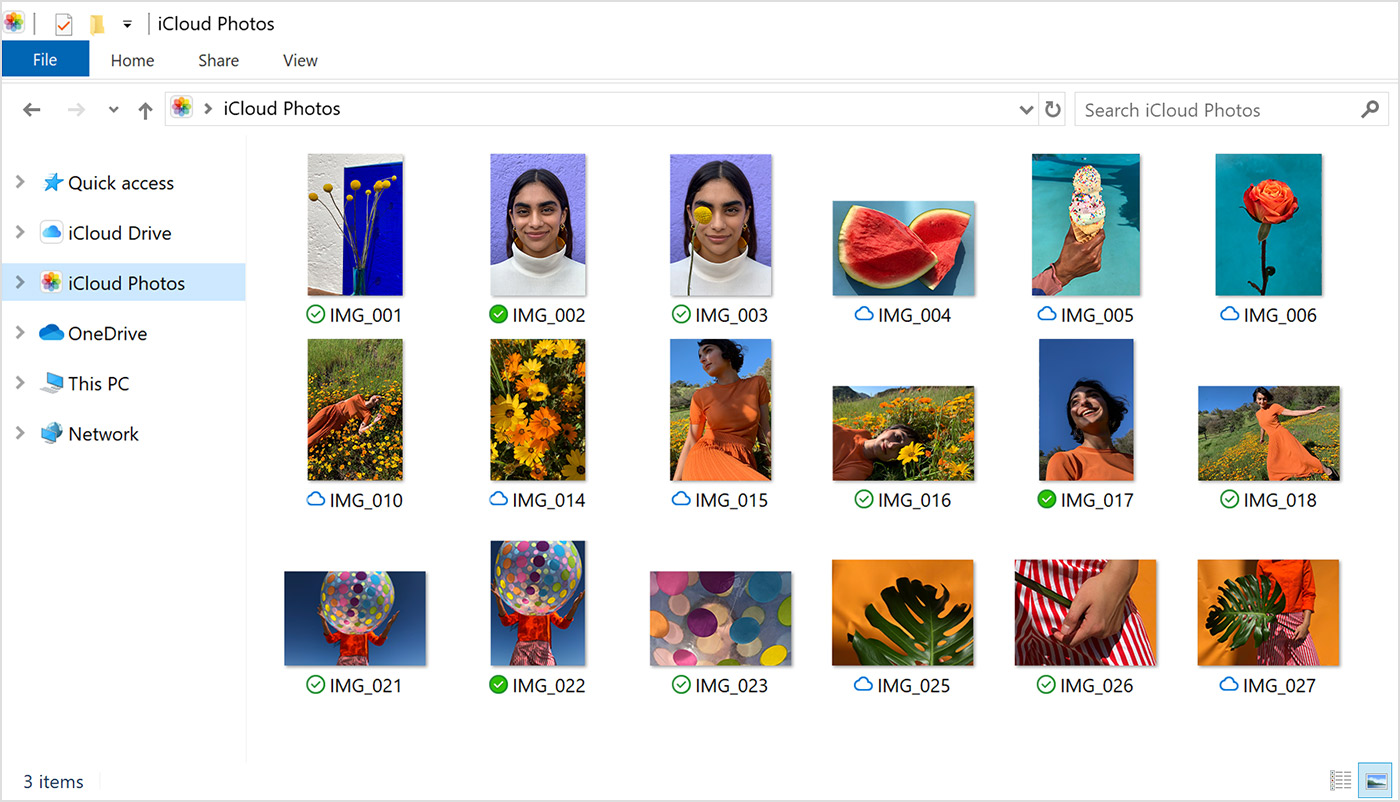
Download and share your photos
When you turn on Photos, iCloud for Windows creates a Photos folder in File Explorer called iCloud Photos. iCloud Photos uploads new photos and videos that you add to the iCloud Photos folder on your PC so you can see them in the Photos app on your iPhone, iPad, iPod touch, and Mac, and on iCloud.com. New photos and videos you take automatically download from iCloud Photos.
Share your photos
You can also share your photos. Shared Albums lets you view, share, and comment on the photos and videos you share with other people. And if you use the latest version of iCloud for Windows, you can pin photos to keep them local to your device. When you unpin them, they upload to iCloud instead.
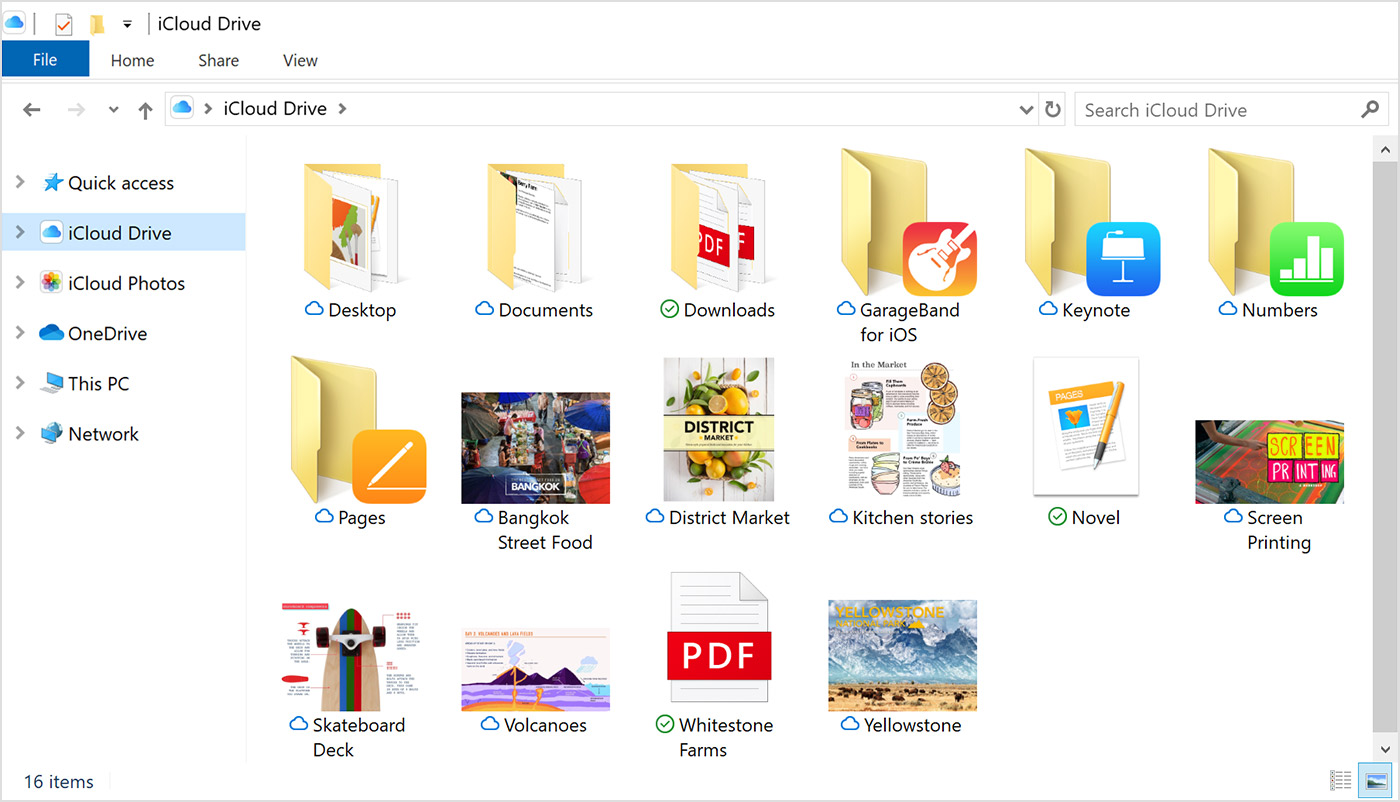
See your files and folders with iCloud Drive
When you turn on iCloud Drive, iCloud for Windows creates an iCloud Drive folder in File Explorer. You can find documents that you’ve stored in iCloud in this folder. When you create a file on your PC and save it to the iCloud Drive folder, it also appears on your other devices.
If you want to work on files with friends or colleagues, you can share individual files or create a shared folder to share a group of files. You can also pin files and folders so you can use them offline, and easily check the status of a download or shared file.
In iCloud for Windows 12 or later, you can find and recover files deleted from iCloud Drive in the past 30 days in Recently Deleted in iOS, iPadOS, or iCloud.com, in Trash in macOS, and in Recycle Bin in Windows. If you use Delete or Delete All in Recently Deleted or empty the Trash in macOS, files aren’t recoverable. If you don’t see the files you wish to restore, you can recover files deleted within the last 30 days at iCloud.com.
You can also access your iCloud Drive files and folders at iCloud.com.
If you receive an error when you try to move a file from iCloud for Windows, you might need to download the file to your Windows PC. After you download the file, try moving it again.
Keep your apps up to date
When you use iCloud on all of your devices, you can keep your Mail, Contacts, and Calendars updated no matter which device you’re using. Learn how to use Mail, Contacts, and Calendars with iCloud on all of your devices.
If you sign in to iCloud using a third-party Mail app outside of iCloud for Windows, learn how to create an app-specific password to keep information up to date on your devices.
Save your passwords across devices
If you use two-factor authentication with your Apple ID and own a device running iOS 14 or later, you can save important web passwords and keep them up to date in Safari on your iPhone, iPad, or iPod touch and in Google Chrome or Microsoft Edge on your PC. Just download the iCloud Passwords extension for your web browser, and then use the iCloud Passwords app to create, access, and manage your passwords.
Источник
iTunes 12.10.11 for Windows (Windows 64 bit)
About iTunes
iTunes is the easiest way to enjoy your favorite music, movies, TV shows, and more on your PC. iTunes includes the iTunes Store, where you can purchase everything you need to be entertained. Your purchases are stored in iCloud and are available on your devices at no additional cost.
What’s new in iTunes
This update allows you to sync your iPhone, iPad, or iPod touch on Windows 7 and Windows 8 PCs.
Дата отправки: Dec 7, 2020
Размер файла: 201 MB
Hardware:
- PC with a 1GHz Intel or AMD processor with support for SSE2 and 512MB of RAM
- To play standard-definition video from the iTunes Store, an Intel Pentium D or faster processor, 512MB of RAM, and a DirectX 9.0–compatible video card is required
- To play 720p HD video, an iTunes LP, or iTunes Extras, a 2.0GHz Intel Core 2 Duo or faster processor, 1GB of RAM, and an Intel GMA X3000, ATI Radeon X1300, or NVIDIA GeForce 6150 or better is required
- To play 1080p HD video, a 2.4GHz Intel Core 2 Duo or faster processor, 2GB of RAM, and an Intel GMA X4500HD, ATI Radeon HD 2400, or NVIDIA GeForce 8300 GS or better is required
- Screen resolution of 1024×768 or greater; 1280×800 or greater is required to play an iTunes LP or iTunes Extras
- 16-bit sound card and speakers Internet connection to use Apple Music, the iTunes Store, and iTunes Extras
- iTunes-compatible CD or DVD recorder to create audio CDs, MP3 CDs, or backup CDs or DVDs. Songs from the Apple Music catalog cannot be burned to a CD.
Software:
- Windows 7 or later
- 64-bit editions of Windows require the iTunes 64-bit installer
- 400MB of available disk space
- Some third-party visualizers may no longer be compatible with this version of iTunes. Please contact the developer for an updated visualizer that is compatible with iTunes 12.1 or later. Apple Music, iTunes Store, and iTunes Match availability may vary by country Apple Music trial requires sign-up and is available for new subscribers only. Plan automatically renews after trial.
Источник
If you can’t install or update iTunes for Windows
Learn what to do if you can’t install or update iTunes on your Windows PC.
If you downloaded a version of iTunes from Apple’s website, use the steps in this article.
If you have Windows 10, you can also get iTunes from the Microsoft Store. If you have trouble installing iTunes from Apple’s website, download iTunes from the Microsoft Store. If you can’t download or update iTunes from the Microsoft Store, contact Microsoft for help.
If you can’t install iTunes on your Windows PC from Apple’s website, or if you see «error 2» or «Apple Application Support was not found» after you install the software, follow the steps below in order.
Make sure that you’re logged in to your computer as an administrator
If you’re not sure if you have an administrator account, learn how to log on as an administrator.
You can also refer to your computer’s help system, contact your IT department, or visit support.microsoft.com for more help.
Install the latest Microsoft Windows updates
To download the latest updates, visit the Microsoft Windows Update website.
iTunes for Windows requires Windows 7 or later, with the latest Service Pack installed. If you can’t install the updates, refer to your computer’s help system, contact your IT department, or visit support.microsoft.com for more help.
Download the latest supported version of iTunes for your PC
Download iTunes from Apple’s website, then click Download to download the iTunes installer. When prompted, click Save (instead of Run).
If you have Windows 10, you can get the latest version of iTunes from the Microsoft Store. If you get iTunes from the Microsoft Store, you shouldn’t need to follow the rest of the steps in this article. If you downloaded iTunes from Apple’s website, continue below.
Repair iTunes
Right-click the installer that you downloaded in step 3—it will be labeled iTunesSetup or iTunes6464Setup—and choose «Run as administrator.»
If you’ve previously installed iTunes, the installer will prompt you to repair the software.
After the repair is complete, restart your computer and try launching iTunes.
Remove components left from a previous installation
If iTunes fails to install or repair, it might be necessary to remove components left from a previous installation of iTunes and then reinstall.
Songs that you bought from the iTunes Store or imported from CDs are saved in your My Music folder by default. Deleting iTunes won’t delete your music.
Disable conflicting software
Some background processes can cause issues that prevent applications like iTunes from installing.
If you installed security software and are having issues installing iTunes for Windows, you might need to disable or uninstall security software to resolve the issues.
Restart your computer
After the restart, try to install iTunes again.
Get more help
If the steps in these articles don’t help you fix the issue, you might be able to find a solution through a search of the Microsoft support website.
Information about products not manufactured by Apple, or independent websites not controlled or tested by Apple, is provided without recommendation or endorsement. Apple assumes no responsibility with regard to the selection, performance, or use of third-party websites or products. Apple makes no representations regarding third-party website accuracy or reliability. Contact the vendor for additional information.
Источник
Download iCloud for Windows
With iCloud for Windows, you’ll have your photos, videos, mail, calendar, files, and other important information on the go and on your Windows PC.
Here’s what you need
- Make sure that your PC or Microsoft Surface is updated to the latest version of Windows 10 or later.*
- Have your Apple ID and password ready. If you don’t have an Apple ID, you can create one.
Make the most of iCloud for Windows
When you download and set up iCloud on your Windows PC, your photos, videos, mail, files, and bookmarks are accessible on all of your devices.
![]()
If you need help, you can find solutions to common issues or learn more about iCloud for Windows.![]()
Want to access iCloud’s latest features? See the system requirements for iCloud. You can also learn about the security content of this update. If you use a Managed Apple ID, iCloud for Windows isn’t supported.
Information about products not manufactured by Apple, or independent websites not controlled or tested by Apple, is provided without recommendation or endorsement. Apple assumes no responsibility with regard to the selection, performance, or use of third-party websites or products. Apple makes no representations regarding third-party website accuracy or reliability. Contact the vendor for additional information.
Источник


