- Install application adb android
- How to Install APK Using ADB Commands
- Preparations
- Install APK Using ADB Commands
- How to Install APK Using ADB Commands
- How to Install APK Using ADB Commands
- What is ADB?
- How does it work?
- What are the various Pre-requisites for using ADB?
- How to Download and Install ADB on Windows?
- How to Use ADB to install APK on your device?
- Other Important ADB Commands
- Elon Decker
Install application adb android
Platform-tools: r31.0.3
ADB: 1.0.41 (31.0.3-7562133)
Fastboot: 31.0.3-7562133
Make_f2fs: 1.14.0 (2020-08-24)
Mke2fs: 1.46.2 (28-Feb-2021)
Последнее обновление утилит в шапке: 01.08.2021
ADB (Android Debug Bridge — Отладочный мост Android) — инструмент, который устанавливается вместе с Android-SDK и позволяет управлять устройством на базе ОС Android.
Работает на всех Android-устройствах, где данный функционал не был намеренно заблокирован производителем.
Здесь и далее: PC — ПК, компьютер к которому подключено устройство.
ADB — консольное приложение для PC, с помощью которого производится отладка Android устройств, в том числе и эмуляторов.
Работает по принципу клиент-сервер. При первом запуске ADB с любой командой создается сервер в виде системной службы (демона), которая будет прослушивать все команды, посылаемые на порт 5037.
Официальная страница
ADB позволяет:
- Посмотреть какие устройства подключены и могут работать с ADB.
- Просматривать логи.
- Копировать файлы с/на аппарат.
- Устанавливать/Удалять приложения.
- Удалять (очищать) раздел data.
- Прошивать (перезаписывать) раздел data.
- Осуществлять различные скрипты управления.
- Управлять некоторыми сетевыми параметрами.
Поставляется ADB в составе инструментария разработчика Андроид (Android SDK), который, в свою очередь входит в состав Android Studio.
Если что-то неправильно, то в списке подключенных устройств (List of devices attached) будет пусто.
Скрытые команды ADB
adb -d Команда посылается только на устройство подключенное через USB.
Внимание: Выдаст ошибку, если подключено больше одного устройства.
adb -e Команда посылается на устройство в эмуляторе.
Внимание: Выдаст ошибку, если подключено больше одного эмулятора.
adb -s Команда посылается на устройство с указанным серийным номером:
adb -p Команда посылается на устройство с указанным именем:
Если ключ -p не указан, используется значение переменной ANDROID_PRODUCT_OUT.
adb devices Список всех подсоединенных устройств.
adb connect [: ] Подсоединиться к андроид хосту по протококу TCP/IP через порт 5555 (по умолчанию, если не задан).
adb disconnect [ [: ]] Отсоединиться от андроид подключенного через TCP/IP порт 5555 (по умолчанию, если не задан).
Если не задан ни один параметр, отключиться от всех активных соединений.
adb push Копировать файл/папку PC->девайс.
adb pull [ ] Копировать файл/папку девайс->PC.
adb sync [ ] Копировать PC->девайс только новые файлы.
Ключи:
-l Не копировать, только создать список.
adb shell Запуск упрощенного unix shell.
Примеры использования
adb emu Послать команду в консоль эмулятора
adb install [-l] [-r] [-s] Послать приложение на устройство и установить его.
Пример: adb install c:/adb/app/autostarts.apk Установить файл autostarts.apk лежащий в папке /adb/app/ на диске с:
Ключи:
-l Блокировка приложения
-r Переустановить приложение, с сохранением данных
-s Установить приложение на карту памяти
Установка split apk
adb uninstall [-k] Удаление приложения с устройства.
Ключи:
-k Не удалять сохраненные данные приложения и пользователя.
adb wait-for-device Ждать подключения устройства.
adb start-server Запустить службу/демон.
adb kill-server Остановить службу/демон.
adb get-state Получить статус:
offline Выключен.
bootloader В режиме начальной загрузки.
device В режиме работы.
adb get-serialno Получить серийный номер.
adb status-window Непрерывный опрос состояния.
adb remount Перемонтировать для записи. Требуется для работы скриптов, которые изменяют данные на.
adb reboot bootloader Перезагрузка в режим bootloader.
adb reboot recovery Перезагрузка в режим recovery.
adb root Перезапуск демона с правами root
adb usb Перезапуск демона, прослушивающего USB.
adb tcpip Перезапуск демона, прослушивающего порт TCP.
adb ppp [параметры] Запуск службы через USB.
Note: you should not automatically start a PPP connection. refers to the tty for PPP stream. Eg. dev:/dev/omap_csmi_tty1
Параметры:
defaultroute debug dump local notty usepeerdns
FastBoot — консольное приложение для PC. Используется для действий над разделами
fastboot devices Список присоединенных устройств в режиме fastboot.
fastboot flash Прошивает файл .img в раздел устройства.
fastboot erase Стереть раздел.
Разделы: boot, recovery, system, userdata, radio
Пример: fastboot erase userdata Стирание пользовательских данных.
fastboot update Прошивка из файла имя_файла.zip
fastboot flashall Прошивка boot + recovery + system.
fastboot getvar Показать переменные bootloader.
Пример: fastboot getvar version-bootloader Получить версию bootloader.
fastboot boot [ ] Скачать и загрузить kernel.
fastboot flash:raw boot [ ] Создать bootimage и прошить его.
fastboot devices Показать список подключенных устройств.
fastboot continue Продолжить с автозагрузкой.
fastboot reboot Перезагрузить аппарат.
f astboot reboot-bootloader Перезагрузить девайсв режим bootloader.
Перед командами fastboot можно использовать ключи:
-w стереть данные пользователя и кэш
-s Указать серийный номер устройства.
-p
Указать название устройства.
-c Переопределить kernel commandline.
-i Указать вручную USB vendor id.
-b Указать в ручную базовый адрес kernel.
-n
Указать размер страниц nand. по умолчанию 2048.
Команду logcat можно использовать с машины разработки
$ adb logcat
или из удаленного shell
# logcat Каждое сообщение лога в Android имеет тэг и приоритет
Тэг – это строка указывающая компонент системы, от которого принято сообщение (например: View для системы view)
Приоритет – имеет одно из нижеследующих значений (в порядке от меньшего к большему):
V — Verbose (Низший приоритет).
D — Debug
I — Info
W — Warning
E — Error
F — Fatal
S — Silent (Наивысший приоритет, при котором ничего не выводится).
Получить список тэгов, используемых в системе, вместе с их приоритетами можно запустив logcat. В первых двух столбцах каждого из выведенных сообщений будут указаны / .
Пример выводимого logcat сообщения:
I/ActivityManager( 585): Starting activity: Intent
Для уменьшения вывода лога до приемлемого уровня нужно использовать выражения фильтра. Выражения фильтра позволяют указать системе нужные комбинации и , остальные сообщения система не выводит.
Выражения фильтра имеют следующий формат : . где указывает нужный тэг, указывает минимальный уровень приоритета для выбранного тэга. Сообщения с выбранным тэгом и приоритетом на уровне или выше указанного записываются в лог. Можно использовать любое количество пар : в одном выражении фильтра. Для разделения пар : используется пробел.
Пример ниже выводит в лог все сообщения с тэгом «ActivityManager» с приоритетом «Info» или выше, и сообщения с тэгом «MyApp» и приоритетом «Debug» или выше:
adb logcat ActivityManager:I MyApp:D *:S
Последний элемент в выражении фильтра *:S устанавливает приоритет «silent» для всех остальных тэгов, тем самым обеспечивая вывод сообщений только для «View» и «MyApp». Использование *:S – это отличный способ для вывода в лог только явно указанных фильтров (т.е. в выражении фильтра указывается «белый список» сообщений, а *:S отправляет все остальное в «черный список»).
При помощи следующего выражения фильтра отображаются все сообщения с приоритетом «warning» или выше для всех тэгов:
adb logcat *:W
Если logcat запускается на машине разработчика (не через удаленный adb shell), можно также установить значение выражения фильтра по умолчанию задав переменную окружения ANDROID_LOG_TAGS:
export ANDROID_LOG_TAGS=»ActivityManager:I MyApp:D *:S»
Следует обратить внимание что задав переменную окружения ANDROID_LOG_TAGS она не будет работать в эмуляторе/устройстве, если вы будете использовать logcat в удаленном shell или используя adb shell logcat.
Вышеописанная команда export работает в ОС *nix и не работает в Windows.
Контроль формата вывода лога
Сообщения лога в дополнение к тэгу и приоритету содержат несколько полей метаданных. Можно изменять формат вывода сообщений показывая только конкретные поля метаданных. Для этого используется параметр -v и указывается один из ниже перечисленных форматов вывода.
brief Показывать приоритет/тэг и PID процесса (формат по умолчанию).
process Показывать только PID.
tag Показывать только приоритет/тэг.
thread Показывать только процесс:поток и приоритет/тэг.
raw Показать необработанное сообщение, без полей метаданных.
time Показывать дату, время вызова, приоритет/тэг и PID процесса.
long Показывать все поля метаданных и отдельно сообщения с пустыми строками.
При запуске logcat можно указать формат вывода используя параметр -v:
adb logcat [-v
Источник
How to Install APK Using ADB Commands
Besides sideloading APK on Android devices, you can also install APK using ADB commands. In this tutorial, we’ll see how we can sideload APK via ADB easily. Read on to learn more.
Hello folks, how do you install an app on your Android-powered device? Most of my pals answered this question with the most common answers like installing from the Google Play Store app on their Android devices or installing apps by logging into their Play Store on the PC and installing Standalone apps from the SD card by enabling the Unknown Sources option in the device settings. Most of the Android users fall into one of these categories because that’s the simple way to install apps. But what if the UI of your device collapsed and you can’t access any apps on your device?
When you’re playing with some random app, your device may sometime collapse due to that app interfering with your device UI. This most possible scenario is that the device’s launcher is hung and cannot be accessed. As you know without the launcher app, you cannot access anything on your device. Thus, if you need to install any third-party launcher app to get into your device, you have to download the launcher app APK on your PC. If the Google Play Services has collapsed (this usually happens when you try to mod your device), you cannot install the app from Play Store at all.
In that case, the ADB comes to your rescue. ADB is the acronym for Android Device Bridge which acts a bridge between your PC and Android device. You can install apps through this ADB tool, but it is not limited to it, the scope of ADB tool is far higher and even if you know little about Android development you will understand its importance. But for the sake of the topic, we will show you how to install android apps from ADB. So let’s get on with the guide.
Preparations
- Proper Device drivers installed on your PC for your device.
- Either setup ADB and Fastboot on your computer, or download the ADB and Fastboot SDK Platform-Tools.
- Enable USB Debugging on your device. If you don’t know how to do it, follow the instructions given here.
Install APK Using ADB Commands
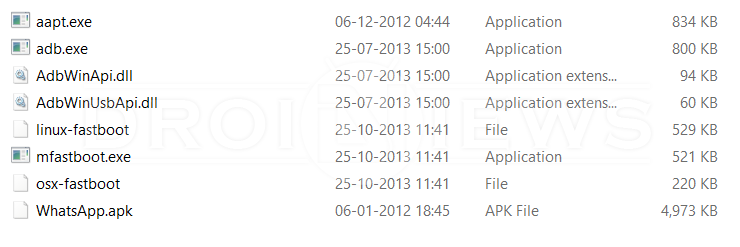
- Let’s make the ingredients ready, extract the ADB files to a folder on your PC and place the APK file you want to install (We are installing Whatsapp) You should have the similar files:

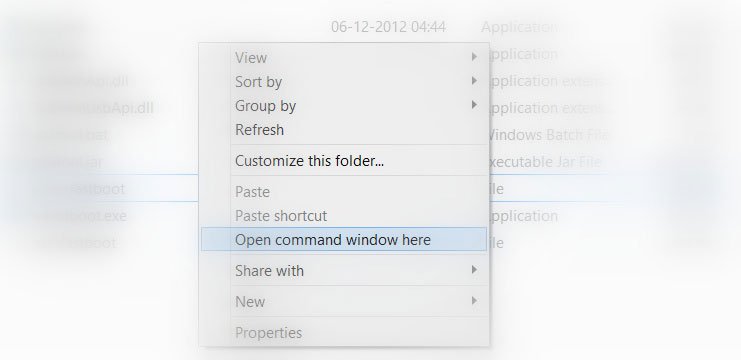
- Now open a command prompt in the ADB folder by holding the Shift key and Right Click in the empty space in the folder.
- Connect your device to the PC and type the following command to verify whether your device is detected by the PC. Install APK via ADB Commands on Android Devices
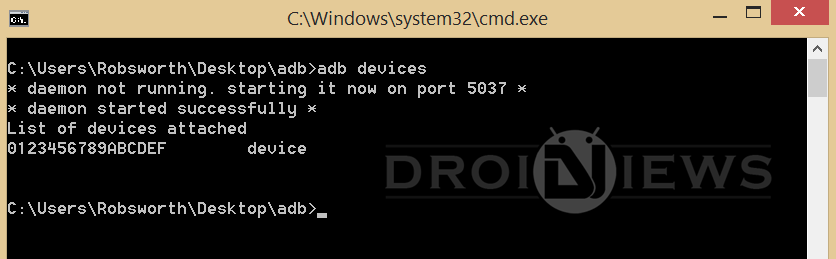 Install APK via ADB Commands on Android Devices
If detected you will see the output similar to below:
 Install APK via ADB Commands on Android Devices
 Where apk name is the exact name of the app you’re installing. Check this screenshot for example:
That’s it, try this little trick on your device.
Let us know the outcome in the comments section below.
Источник
How to Install APK Using ADB Commands
When you consider installing an app on your Android smartphone, what is the first thing that comes to your mind? Google Play Store, right? Downloading and installing an app from the Play Store is the simplest and easiest method to do so. However, it most certainly isn’t the only method. Well, for starters, you always have the option to install apps from their APK files. These files are like setup files for software that can be downloaded using a web browser like chrome and then installed as and when required. The only requirement is that you enable the Unknown Sources permission for your browser.
Now, the described method requires you to have direct access to your device but consider a situation where accidentally some system file gets damaged. This causes your UI to crash and leaving you with no way to access your phone. The only way to resolve the issue is to install a third-party UI app so that the device starts working again. This is where ADB comes in. It allows you to control your device using a computer. It is the only way in which you can install apps on your device in a situation like this.
Well, this is just one of many scenarios where ADB could be a lifesaver. Therefore, it would only do you good if you knew more about ADB and learned how to use it and that’s exactly what we are going to do. We are going to discuss what is ADB and how it works. We will also take you through the various steps involved in the process of setting up and then using ADB to install apps on your device.

How to Install APK Using ADB Commands
What is ADB?
ADB stands for Android Debug Bridge. It is a command-line tool that is a part of the Android SDK (Software Development Kit). It allows you to control your Android smartphone using a PC provided that your device is connected to the computer via a USB cable. You can use it to install or uninstall apps, transfer files, get information about network or Wi-Fi connection, check battery status, take screenshots or screen recording and so much more. It has a set of codes that allow you to perform various operations on your device. As a matter of fact, ADB is a very powerful tool that is capable of performing advanced operations that a good amount of practice and training to master. The more you explore the world of coding, the more useful ADB will become for you. However, for the sake of keeping things simple, we are just going to cover some basics and mainly teach you how to install an APK using ADB.
How does it work?
ADB uses USB debugging to take control of your device. When connected to a computer using a USB cable, ADB client is able to detect the connected device. It uses a command line or command prompt as the medium to relay the commands and information between the computer and the Android device. There are special codes or commands which allow you to control the processes and operations on your Android device.
What are the various Pre-requisites for using ADB?
Now, before you can install APK using ADB commands, you need to make sure the following pre-requisites are met.
1. The first thing that you need is to make sure that the device’s driver is installed on your PC. Every Android smartphone comes with its own device driver that automatically gets installed when you connect your phone to your PC. If your device does not have one then you need to download the driver separately. For Google devices like Nexus, you can find just install Google USB Driver which is a part of SDK (we will discuss this later). Other companies like Samsung, HTC, Motorola, etc. provide drivers on their respective sites.
2. The next thing that you need is to enable USB debugging on your Android smartphone. The option to do so can be found under Developer options. First, enable the Developer Options from the Settings menu.

After that, you need to enable USB debugging from the Developer options.
a. Open Settings and click on the System option.

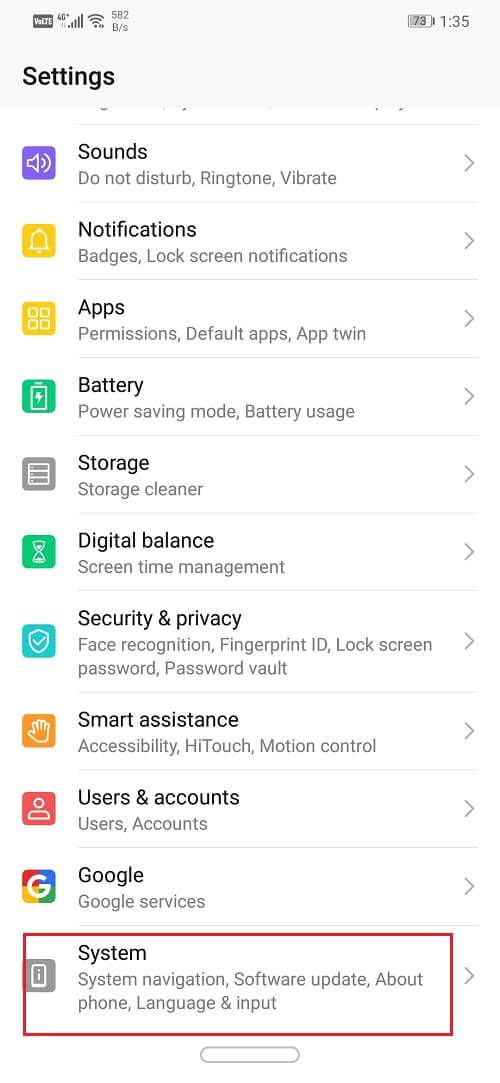
b. Now, tap on Developer options.

c. Scroll down and under the Debugging section, you will find the setting for USB debugging. Simply toggle on the switch and you are good to go.

3. Last but not least, you need to download and install ADB on your computer. We will discuss this in the next section and guide you through the entire installation process.
How to Download and Install ADB on Windows?
As mentioned earlier, ADB is a part of the Android SDK and thus, you need to download the entire setup package for the tool kit. Follow the steps given below to download and install ADB on Windows 10:
1. Click here to go to the downloads page for Android SDK platform tools.
2. Now, click on the “Download SDK Platform-Tools for Windows” button. You can select the other options as well depending upon the operating system that you are using.
3. Agree to the Terms and Conditions and click on the Download button.
4. Once the zip file is downloaded, extract it at a location where you want to save the tool kit files.

You will be able to see the ‘ADB’ present in the folder along with other tools. The installation process is now complete. We will now be moving to the next step that is using ADB to install APK on your device.
How to Use ADB to install APK on your device?
Before you proceed to install APK using ADB commands, you need to make sure that ADB is set up properly and the device connected is being detected properly.
1. To do this, connect your Android device to the computer and then open the folder containing the SDK platform tools.
2. In this folder, hold down Shift and then right-click. From the menu select the “Open Command window here” option. If the option to open the command window is not available, then click on the “Open PowerShell window here”.

3. Now, in the Command Prompt window/PowerShell window type the following code: “.\adb devices” and press Enter.

4. This will display the name of your device in the command window.
5. If it does not, then there is a problem with the device’s driver.
6. There is a simple solution to this problem. Go to the search bar on your computer and open Device Manager.
7. Your Android device will be listed there. Right-click on it and simply tap on the update driver option.

8. Next, click on the option to look for Drivers online. If there are any new drivers available then they will automatically get downloaded and installed on your computer.

9. Now, go back to command prompt/PowerShell window and type the same command provided above and press Enter. You will now be able to see the name of the device displayed on the screen.
This confirms that ADB has been successfully set up and your device is connected properly. You can now perform any operations on your phone using the ADB commands. These commands need to be entered in the Command Prompt or PowerShell window. In order to install an APK on your device via ADB, you need to have the APK file stored on your computer. Let us assume that we are installing the APK file for the VLC media player.
Follow the steps given below to install the app on your device:
1. The first thing that you need to do is move the APK file to the folder containing the SDK platform tools. This will make it easier as you would not have to type the entire path for the location of the APK file separately.
2. Next, open the command prompt window or PowerShell window and type in the following command: “adb install ” where the app name is the name of the APK file. In our case, it will be “VLC.apk”
3. Once the installation is complete, you will be able to see the message “Success” displayed on your screen.
Recommended:
Thus, you have now successfully learned how to install APK using ADB commands. However, as mentioned above ADB is a powerful tool and can be used to perform various other operations. All that you need to know is the correct code and syntax and you will be able to do so much more. In the next section, we have a little bonus for you. We will be listing down certain selected important commands that you can try and have fun experimenting with.
Other Important ADB Commands
4. “adb logcat” – This command allows you to view the device’s log files.
5. “adb shell” – This command allows you to open an interactive Linux command-line shell on your Android device.
6. “adb push /sdcard/ ” – This command allows you to transfer some file on your computer to the SD card of your Android device. Here “file location path” stands for the pathway of the file on your computer and “folder name” is the directory where the file will get transferred on your Android device.
7. “adb pull /sdcard/ ” – This command can be considered to be the reverse of push command. It allows you to transfer a file from your Android device to your computer. You need to type in the name of the file on your SD card in place of “filename”. Specify the location on your computer where you want to save the file in place of “file location path”.
8. “adb reboot” – This command allows you to restart your device. You can also select to boot your device in bootloader by adding -bootloader after reboot. Some devices also allow you to directly boot into Recovery mode by typing “reboot recovery” instead of simply reboot.

Elon Decker
Elon is a tech writer at TechCult. He’s been writing how-to guides for about 6 years now and has covered many topics. He loves to cover topics related to Windows, Android, and the latest tricks and tips.
Источник


