- Install a trusted CA in Android N
- Generate
- Convert the private key
- Convert the public key
- Copy the cert to the phone
- Import the cert into BurpSuite
- Share on
- Leave a Comment
- You May Also Enjoy
- How a double-free bug in WhatsApp turns to RCE
- DoS Wechat with an emoji
- RB App Checker
- Handy Android code snippets
- How to Download and Install a PKCS#12 onto Your Android Device
- How to Download a Certificate onto Your Android Device
- Step 1 — Open Certificate Pick Up Email on Android Device
- Step 2 — Enter Certificate Pick-Up Password
- Step 3 — Create a PKCS#12 Passphrase
- Step 4 — Download the Certificate onto Your Device
- Step 5 – Name Your Certificate
- How to Add a Certificate to Your Android ‘Device Credentials’
- Step 6 — Navigate to Settings > Security
- Step 7 — Locate Your Downloaded Certificate File
- Step 8 — Enter Your PKCS#12 Passphrase
- Step 9 — Adjust Certificate Settings
- Установка собственного корневого сертификата в Android и запуск Citrix XenApp Web Interface
- Немножко предыстории:
- Что же за проблемы могли возникнуть?
- Так что же все-таки надо, чтобы запустить через Citrix Receiver приложения опубликованные на Citrix XanApp вашего предприятия?
- От требований (если они все выполнены) переходим к действию.
Install a trusted CA in Android N
It’s very trivial to install a user-trusted certificate on Android. Under Settings -> Security you can install new trusted certificates. However, this creates a permanent “Your network could be monitored” warning in your task tray and forces you to have a lock-screen. In addition to this, apps that target API Level 24 and above no longer trust user or admin-added CAs for secure connections, by default.
This guide shows how to install a system-trusted CA certificate. Most of the steps are referenced from Using a custom root CA with Burp for inspecting Android N traffic, excep that this guide is adapted to generate only 730-day certificates to deal with error NET::ERR_CERT_VALIDITY_TOO_LONG in Chrome
Generate
Convert the private key
Convert the public key
Copy the cert to the phone
In the adb shell
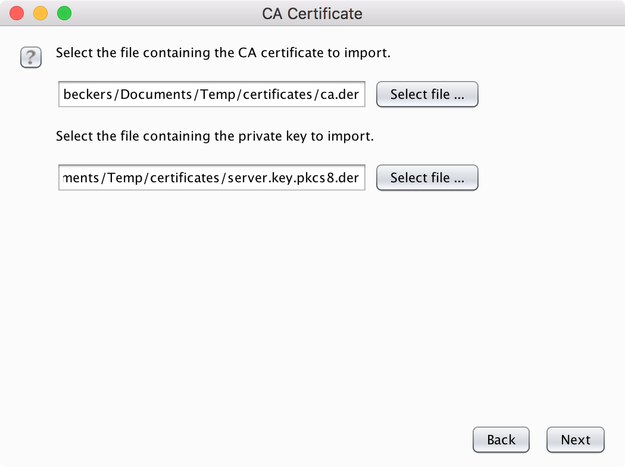
Import the cert into BurpSuite
Go to the proxy settings page and choose “Import / Export CA Certificate” -> “Import” -> “Certificate and priate key in DER format”
Updated: June 01, 2018
Share on
Leave a Comment
You May Also Enjoy
How a double-free bug in WhatsApp turns to RCE
October 02, 2019 12 minute read
In this blog post, I’m going to share about a double-free vulnerability that I discovered in WhatsApp for Android, and how I turned it into an RCE. I informe.
DoS Wechat with an emoji
May 14, 2019 1 minute read
This DoS bug was reported to Tencent, but they decided not to fix because it’s not critical. The Common Vulnerabilities and Exposures (CVE) Program has assig.
RB App Checker
June 06, 2018 less than 1 minute read
This tiny yet powerful app lets us check the iOS application for the certificates, requirements and entitlements, embedded provisioning profiles, auxiliary e.
Handy Android code snippets
May 18, 2018 less than 1 minute read
This blog post is a memo of handy Android code snippets that I found particularly useful in programming and hacking.
Источник
How to Download and Install a PKCS#12 onto Your Android Device

One of the questions we’re most often asked is, «how do I download and install my Digital Certificate to my phone?» If you want to encrypt emails or authenticate to corporate networks using your mobile device, installing the certificate can be a bit of a barrier. Fortunately, Digital Certificates are compatible with most of the leading mobile operating systems, so it’s easy to implement and enforce the same security policies, even on mobile devices.
You can view the full ‘how-to’ video here or continue reading for the in-depth guide.
Note: This post is about how to install certificates onto devices. If you’re looking for information about what mobile certificates can be used for, please visit our mobile page.
The method involved in installing Digital Certificates onto your mobile device will vary by operating system. To help you support mobile devices in your workplace, we’ve put together a user guide that walks through how to install a Digital Certificate or PKCS#12 file onto an Android phone. The overall process is really simple; let’s take a look now:
A couple things before we get started.
- This example will show you how to install a PKCS#12 (as opposed to other file types) onto an Android device, which is our recommended option as the file type is easily accepted and provides the simplest installation experience for the end user.
- I’m running through this using a GlobalSign Digital Certificate and GlobalSign’s certificate issuance process, but the general steps should be the same regardless of the supplier and issuing Certificate Authority.
There are two main parts to downloading and installing a certificate on an Android device — downloading the PKCS#12 or .pfx file onto the Android and adding it to the device’s «credential store». We will take you through the steps involved in each part now. Let’s get rolling!
How to Download a Certificate onto Your Android Device
Step 1 — Open Certificate Pick Up Email on Android Device
Certificate delivery is completed using an over-the-air enrollment method, where the certificate enrollment is delivered directly to your Android device, via email using the email address you specified during the registration process.
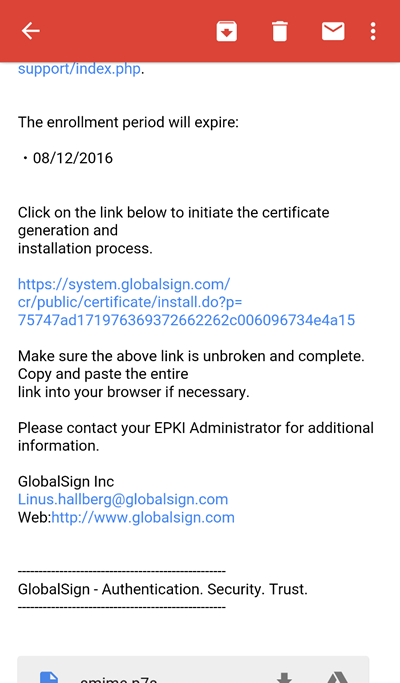
Click the link in your certificate pick up email.
Step 2 — Enter Certificate Pick-Up Password
Click on the enrollment link in the email. Next, you will be prompted to enter the one-time certificate password you created (or an administrator created for you), during the certificate ordering process.
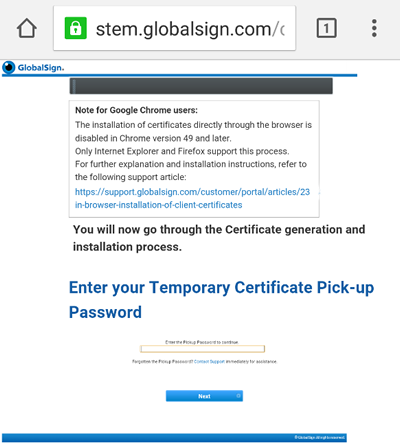
Enter your certificate pick up password when prompted.
Step 3 — Create a PKCS#12 Passphrase
Next, create the password you will use when you install the certificate onto your device (covered in the next section). Our system asks that your password is no less than 12 characters and is only alpha-numeric. That means no special characters. Make sure you read our subscriber agreement and click ‘I agree’ to proceed.
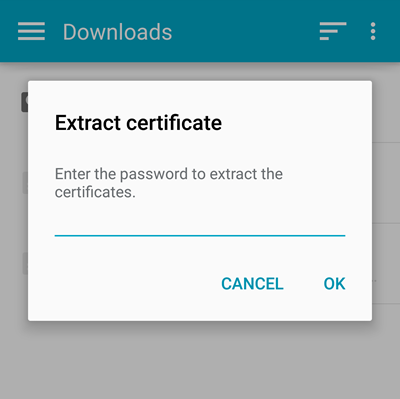
Create the password you will use during the install process.
Step 4 — Download the Certificate onto Your Device
After your certificate has been generated, you will be prompted to download the certificate to your device. The file will appear in the ‘downloads’ folder on your device.
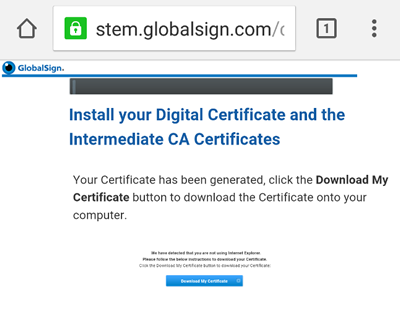
Download the certificate onto your device.
Step 5 – Name Your Certificate
Give your certificate a name so you can easily find it in your certificate store later.
How to Add a Certificate to Your Android ‘Device Credentials’
At this point you may have a warning on your phone saying ‘network may be monitored by a trusted third party’. Technically what Android is saying here is ‘if a malicious or compromised certificate is being installed here then it’s possible someone is monitoring you.’ So the warning is made a little scarier than it needs to be because a certificate doesn’t have to be genuinely malicious to trigger the warning. In the Android developer community people are calling for this feature to be removed. So fear not, let’s move onto the next step.
To complete the install and remove that pesky warning, you need to add the certificate to your device’s security credentials.
Step 6 — Navigate to Settings > Security
Select «Install from device storage» from your security settings to get the certificate file from the ‘downloads’ folder of your device.
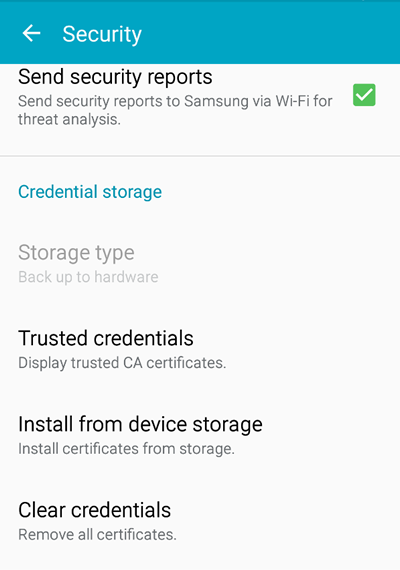
Select «install from phone storage» to find your recently downloaded certificate.
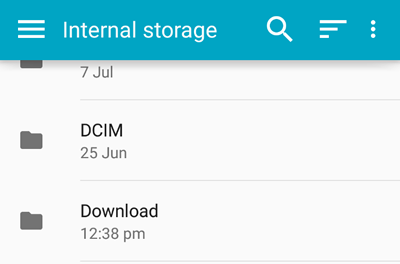
Step 7 — Locate Your Downloaded Certificate File
You should be able to find the ‘downloads’ folder in the left hand menu as soon as you click on ‘Install from device storage’.

If you can’t find it, you can navigate there by clicking «Internal storage» from the list of locations in the «Open from» window. Then navigate to the «Download» folder and select your certificate .pfx file.
Step 8 — Enter Your PKCS#12 Passphrase
Enter the password you created in Step 3 above.
Enter the PKCS#12 passphrase you created earlier.
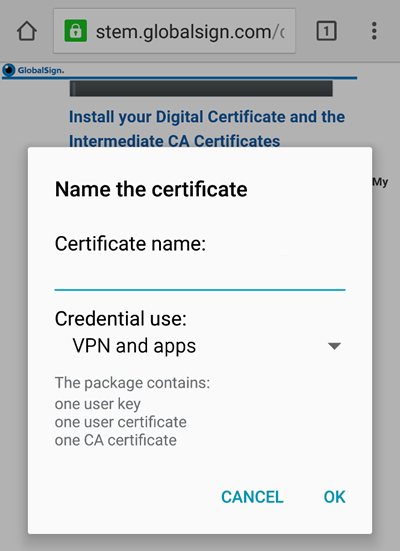
Step 9 — Adjust Certificate Settings
Now that the certificate has been added to your device’s credentials, you can set the certificate name and its use — VPN and Apps or Wi-Fi depending on where you plan on using the certificate to authenticate.
Little is known about why this option is given. A certificate should always be able to do both. My advice is to pick the one which is closest to what you want to do with your certificate, but it won’t matter which one you chose as you should still be able to authenticate into both services with an X.509 certificate from GlobalSign.
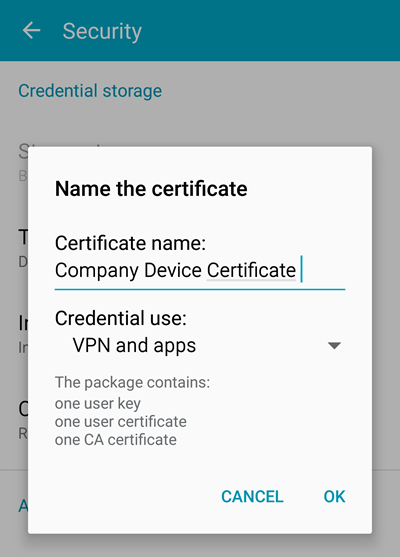
Set your certificate name and purpose.
The certificate is now successfully downloaded onto your Android device. You can now use it as an authentication factor for connecting to VPN clients, Wi-Fi, email and other corporate apps, as well as for digitally signing and encrypting emails (S/MIME).
Источник
Установка собственного корневого сертификата в Android и запуск Citrix XenApp Web Interface
В принципе, мы с shoguevara довольно давно заморачивались вопросом установки корневого сертификата в Android устройство и даже находили парочку не самых тривиальных инструкций, но до этого в таком действии надобности не было. Надобность же появилась после приобретения планшета на Android.
Немножко предыстории:
Стоит у нас в конторе Citrix XenApp для обеспечения удалённой работы из офиса. Что это за зверь и с чем его едят рассказывать не будем — кому это надо, те давно в курсе.
В этой совместной с записи мы хотим рассказать об установке корневого сертификата и настройке клиентской части — Citrix Receiver для Android.

В принципе, клиент не самый убогий — пользоваться можно, а если Вы где-то в поездке, а на руках только телефон на Android или планшет — это единственный выход для быстрого подключения и исправления что-либо через рабочий компьютер.
Вроде бы софтина не особо мудрёная да и настроек особо много не требует, а если Вы используете веб-интерфейс для запуска приложений, как это сделано в нашей организации, то и совсем никаких…
Но не все бывает так безоблачно!
Что же за проблемы могли возникнуть?
Для организации такого рода архитектуры удалённого доступа довольно часто используются сертификаты, которые подписаны центрами не входящими в список стандартных. Почему Google такие нехорошие, и не включили в свою ОСь такую простую функцию, (наряду с такой, опять же, нужной функцией, как возможность прописать прокси-сервер) как установка дополнительных корневых сертификатов ЦА, тут мы обсуждать не собираемся.
Первым признаком того, что сервер использует самоподписанный сертификат является то, что, когда Вы открываете, откуда бы то ни было веб-ресурс с помощью, например, браузера Mozilla Firefox, программа выдает сообщение о том, что не может сама принять решение о том доверять ли сертификату для установления защищённого соединения или нет — она предоставляет право выбора Вам.
Если у вас наблюдается такая картина, то эта статья как раз для Вас!
Так что же все-таки надо, чтобы запустить через Citrix Receiver приложения опубликованные на Citrix XanApp вашего предприятия?
В первую очередь, как оказалось, необходимо установить Mozilla Firefox для Android. Очень странно, но ни один другой браузер не передаёт нужный для подключения файл (launch.ica) в программу-клиент. Знаем только то, что с Firefox все работает нормально.
Во вторую очередь нужна сама программа-клиент. Тут на Android Market у нас есть выбор: стабильный Citrix Receiver, либо находящийся на этапе тестирования Citrix Labs Receiver. Второй у нас не захотел принимать сертификат ни в какую, первый же — стабильный, после бессонной ночи таки у нас и заработал.
В-третьих, необходимо иметь root-доступ к вашему устройству, либо возможность извлекать и записывать обратно файлы через adb, хотя, в этом случае тоже требуется root-доступ (как его настроить Вы сможете узнать потратив немного времени на просмотр результатов, который выдал вам Google на запрос вида » root access howto» или » adb configure howto»).
Вопросом настройки adb мы заморачиваться, опять таки, не стали, так как предпочитаем работать напрямую через файл-менеджеры с системой. В любом случае, в сети довольно много информации по этому поводу (русскоязычный ресурс, на котором больше всего информации такого плана — http://4pda.ru/forum, англоязычный — http://forum.xda-developers.com). В случае, если Вы будете использовать прямой доступ к системным файлам, то нужен файловый менеджер, который умеет использовать root-права (например, Root Explorer).
В-четвертых, нужна машина с любым из популярных Linux-дистрибутивов и установленной Java-машиной от Oracle (мы использовали Ubuntu 10.10 с установленным JRE).
И последнее в списке, но далеко не последнее по значимости — сам корневой сертификат центра сертификации (пусть он будет называться CompanyCA.crt).
От требований (если они все выполнены) переходим к действию.
Для удобства будем перечислять все по пунктам.
1. Заходим с устройства на Android Market и устанавливаем Firefox.
2. Заходим с устройства на Android Market и устанавливаем Citrix Receiver.
3.1.1 (3.1.х для тех кто предпочитает прямой доступ) С помощью файлового менеджера копируем файл /system/etc/security/cacerts.bks cacerts.bks на карту SD.
3.1.2 Подключаем устройство как накопитель к компьютеру с Linux.
3.1.3 Копируем файл cacerts.bks с корня карточки в вашу домашнюю папку.
3.2.1 (adb) копируем сертификат
$ adb pull /system/etc/security/cacerts.bks cacerts.bks
4. Этот пункт предполагает, что Вы уже установили и настроили JRE 1.6 и прописана переменная окружения JAVA_HOME (в моем случае JAVA_HOME=/usr/lib/jvm/java-6-sun/).
Скачиваем пакет bouncycastle.org/download/bcprov-jdk16-146.jar и кидаем его в папку $JAVA_HOME/jre/lib/ext/
Если у вас установлен JDK, то этот пакет, надо так же закинуть в папку /usr/lib/jvm/java-6-openjdk/jre/lib/ext
wget bouncycastle.org/download/bcprov-jdk16-146.jar
sudo cp bcprov-jdk16-146.jar $JAVA_HOME/jre/lib/ext/bcprov-jdk16-146.jar
# или sudo cp bcprov-jdk16-146.jar /usr/lib/jvm/java-6-sun/jre/lib/ext/bcprov-jdk16-146.jar
5. Кидаем файл сертификата CompanyCA.crt так же в домашнюю папку. Если его у Вас нет, но Вы соглашались принять сертификат при переходе на веб-интерфейс XenApp, то его можно экспортировать из Firefox. Как это сделать — подскажет Google. Можем лишь уточнить, что шифрование нужно X.509 PEM.
6. Скачиваем и устанавливаем Android SDK (если Вы не планируете использовать adb, то этот шаг можно пропустить):
wget dl.google.com/android/android-sdk_r10-linux_x86.tgz
tar -xvzf android-sdk_r10-linux_x86.tgz
sudo mv android-sdk-linux_x86 /usr/lib/android-sdk-linux_x86
Запускать что-либо из комплекта для нашей задачи не требуется. Но нужно прописать исполняемые файлы SDK в переменных окружения export PATH=$
В нашем случае вопрос с переменными окружения решается добавлением в конец файла
/.bashrc строчек
export PATH=$
export JAVA_HOME=/usr/lib/jvm/java-6-sun/jre
7. Открываем консоль и выполняем команду
keytool -keystore cacerts.bks -storetype BKS -provider org.bouncycastle.jce.provider.BouncyCastleProvider -storepass changeit -importcert -trustcacerts -alias CACERT -file CompanyCA.crt
Будьте внимательны — не меняйте параметр -storepass changeit, там действительно такой пароль)
В ответ на эту команду Вы должны получить информацию о сертификате и запрос «Trust this certificate? [no]: » — соответственно отвечаем «y».
Все, наш файл подготовлен. Теперь нужно загрузить его на устройство.
8.1.1 (прямой доступ) Подключаем устройство как накопитель к компьютеру;
8.1.2 Загружаем на карту файл cacerts.bks;
8.1.3 Переносим с помощью менеджера файлов cacerts.bks из папки /sdcard в папку /system/etc/security/, предварительно примонтировав её для записи;
8.2.1 (adb) Монтируем систему для записи:
$ adb shell mount -o remount,rw /system;
8.2.2 Загружаем файл:
$ adb push cacerts.bks /system/etc/security/;
8.2.2 Монтируем систему только для чтения:
$ adb shell mount -o remount,ro /system.
На этом трудная часть пройдена. Осталась пара «финтов ушами».
9. Перезагружаем устройство.
10. Запускаем Firefox и открываем страницу веб-доступа.
Появится приблизительно такая картина: 
Тут нам надо нажать на ссылку «Already installed» в верхней части экрана;
11. Выбираем приложение из списка и пробуем запустить;
Источник


