- Установка приложений Google в эмулятор Android
- Подготовка
- Создание эмулятора
- Подготовка к установке пакетов
- Установка необходимых пакетов
- Создание нового образа системы
- Первый запуск
- Installing Google Play Services on an Android Studio emulator
- Background
- Step 1
- Step 2
- Step 3
- Step 4
- Step 5
- Step 6
- Step 7
- Step 8
- Disclaimer
- How to install Google Play Services on an Android Emulator the easy way.
- Installing Google Play on Android Emulator
- The problem
- First attempts
- New Hope
- Conclusion
Установка приложений Google в эмулятор Android

В этой статье описано как установить дополнительные программы (в частности, Google Apps) в эмулятор Android. Это может понадобиться если вы хотите на эмуляторе:
1. Настроить синхронизацию с аккаунтом Google.
2. Установить календарь и календарь провайдер.
3. Установить Android Market.
4. И прочее…
Несмотря на то, что можно создать эмулятор Android с Google API, в нём отсутствуют такие важные вещи как адаптеры синхронизации контактов, календарей и прочее…
Подготовка
Итак, помимо Android SDK, нам понадобится:
1. Google Apps (в конце, я брал от CyanogenMod 7).
2. Утилита для создания нового образа системы mkfs.yaffs2.arm.
3. Если необходимо иметь полноценную работу с календарём, то добыть Calendar.apk и CalendarProvider.apk. Их можно найти как на просторах Интернет, так и откомпилировать из исходников Android.
Для удобства в системную переменную PATH добавить пути к android-sdk\tools и android-sdk\platform-tools.
Создание эмулятора
Обратить особое внимание!
SD карту создать не менее 200Мб!
Все последующие команды предполагают, что в данный момент активен только один эмулятор. Если у вас запущено несколько эмуляторов/устройств, то к командам с утилитой adb необходимо добавлять параметр -s.
Подготовка к установке пакетов
Запустить эмулятор с увеличенным системным разделом
Перемонтировать системный раздел для записи (спасибо за лёгкий способ перемонтирования ArtRoman):
Удалить пакет от SDK, который при загрузке эмулятора возвращает все настройки к дефолтным:
Войти в шелл:
Установка необходимых пакетов
Извлечь приложения из архива с Google Apps (папка system\app).
Установить пакеты:
Подобным образом устанавить дополнительные приложения (например, Calendar.apk и CalendarProvider.apk).
Создание нового образа системы
Загрузить в эмулятор утилиту создания образа:
Дать права на запуск этой утилиты
Проверить, что все пакеты попали в /system/app:
Сделать образ системы на SD карту
Теперь придётся набраться терпения, и слить полученный образ «adb pull /sdcard/system.img d:\temp». Скорость примерно 59Кб/с, примерно 25 минут для 100Мб образа.
Закрыть эмулятор.
Из c:\Users\\.android\avd\emulator_2.3.3.avd\ удалить cache.img и userdata-qemu.img (если они есть). Залить в эту папку полученный образ system.img.
Первый запуск
Нас встречает робот
Меняем язык на русский
Войти под аккаунтом Google из этого мастера настроек у меня не получилось. Не смог выдвинуть клавиатуру :).
В итоге пришлось настраивать синхронизацию позже
Источник
Installing Google Play Services on an Android Studio emulator

Mar 6, 2017 · 2 min read
Using Open GApps prebuilt packages
Background
While there’s a lot of posts about using Genymotion emulators, few posts are written about Android Studio emulators. This short article shows the steps how to install Google Play Services on Android Studio emulators. We assume that Android Studio is already installed. The description is for API Level 23, but it may work with other levels. It’s tried on OSX, but it should work on Linux, and possibly work on Windows if you change commands properly.
Step 1
Install a system image.

Step 2
Open Android Virtual Device (AVD) Manager.
Create a virtual device.

Step 3
Downl o ad a Open GApps zip file from the site.

As of writing, the downloaded zip file is: open_gapps-x86_64–6.0-pico-20170304.zip
Step 4
Start an emulator.
Step 5
Step 6

You might see “Unfortunately, Google Play services has stopped” message.
Step 7
Open Play Store and sign in.
Step 8
Stop the emulator and start it again.
Then, stop it and start it again normally.
Disclaimer
These steps worked for me, but there’s no guarantee that they are correct. Please try them at your own risks. Note also that things might change soon, and this article will be obsoleted in the future.
Источник
How to install Google Play Services on an Android Emulator the easy way.

Aug 12, 2018 · 5 min read
We all have come across more than one reason to install Google’s “Play Store” app on our android virtual devices(AVD). In fact, starting with Android studio 2.3.2 now we get an option to create an AVD that has pre-installed “Play Store” application.
But before we start celebrating thinking that we will be able to use “Play Store” on all hardware and API configurations, there is a catch!
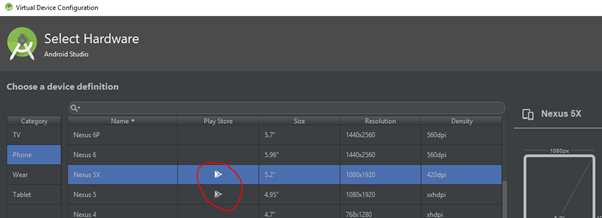
Pre-installed “Play Store” applic a tion is only supported for below use cases only:
· The device hardware configuration should be Nexus 5 or 5X only and API level should be above 24 (Android 7.0).
· wear OS.
You can see play store icon for supported devices only. There is no support for tablets yet (Aug-2018).
But what if we want to test some other screen sizes, tablets, API level below 24, different hardware profile, etc. Well, in that case, we will have to look the other way and I shall explain the process in the easiest way.
Install and configure 7zip:
7zip is a free open source tool for unarchiving. Download from here (https://7-zip.org) and install.
Now go the installed location of 7zip software.
The default location is
“C:\Program Files\7-Zip” for 64-bit windows machines and
“C:\Program Files (x86)\7-Zip” for 32bit machines.
Create a new sub-folder named “Formats” inside “7zip” folder. It should look like this

Now we need to download “LZip” plugin which is required to extract files with “lz” extension. Don’t worry you will understand just be patient 🙂 . Download the plugin from here http://tc4shell.com/en/7zip/lzip/.
After the download is complete extract the “LZip.zip” file. You will find these files after extraction.

Depending upon the variant of 7zip you installed x86(32 bit) or x64(64 bit) you need to copy one, either “Lzip.32.dll” or “Lzip.64.dll” and also copy the “lzip.ini” file and paste it inside the “Formats” folder we just created. This is how the “Formats” folder will look for windows 64-bit machines.

Now we need to install the Google GApps package. This contains all the essential Google apps that are required for “Play Store” to work. To download click here https://opengapps.org. You will be redirected to website where you will need to fill in the configuration before download. Please follow the below configurations:
· Android: 7.0 (don’t download 7.1 and above as of now they don’t have the “GoogleLoginService.apk” that is required for “Play Store” to work.)
· Variant: You can choose any variant but for minimal apps, I would recommend going with “ pico”.
Once the Gapps is downloaded, extract it with 7zip. In the extracted files open the folder “Core” > inside it you will see “vending-x86.tar.lz”.
Here comes the part for which we configured 7zip with Lzip plugin. Use 7zip to extract the file and then you will get another file with “tar” extension, extract that also with 7zip. Then go into below mentioned directory.

From here copy the “Phonesky.apk” and place it on your desktop for now. Similarly, extract “gsflogin-all.tar” file and copy the “GoogleLoginService.apk” to desktop.(For location see image below).

Now go to the android studio AVD and create any virtual device with API level 24 (7.0). It should be equivalent to the Gapps we downloaded.
Give an easy name to a virtual device like “Pixel2” as you will need to type it in command prompt :P.

We have to go to the location where Android SDK is installed. It should be something like this for windows user.
C:\Users\YOUR_USER_NAME\AppData\Local\Android\Sdk\tools
we have to start command prompt and run the following command
cd C:\Users\ YOUR_USER_NAME\AppData\Local\Android\Sdk\tools

Then we start the AVD we created using command prompt because we want to run the emulator in writable mode. Do not start the virtual device from AVD UI, use the command mentioned below. If you get any error make sure android emulator is installed in the android studio by checking in SDK manager> SDK tools.
Now type the below command:
This should start the virtual device. Don’t close this command prompt window and start another command prompt instance. We need to run ADB using it. The location of ADB will be something like:
“C:\Users\ YOUR_USERNAME\AppData\Local\Android\Sdk\platform-tools”
In the new command prompt instance, we run below commands to access ADB shell with root permission:
cd C:\Users\ hitec\AppData\Local\Android\Sdk\platform-tools
ADB shell
su

By default, the file system is read-only so now we have to make it writable. Run below command

We have to write the red marked area in the screenshot above and type below command
mount -o rw,remount /dev/block/vda /system
To verify that the file system is writable, we have to run below command again and you will see “rw”(read-write) instead of “ro”(read-only)

Now copy the Phonesky.apk” and “GoogleLoginService.apk” that we kept on the desktop to “platform-tools” folder where adb is located. We are pasting these APKs here to make commands look simpler. We can delete them once we push them to our emulator.
Now in the Command prompt press “ Ctrl +D” twice to exit the ADB shell.

Now the final part to push APKs 🙂
Enter the following commands
ADB root
adb push Phonesky.apk /system/priv-app/
adb push GoogleLoginService.apk /system/priv-app/

Now we just need to stop and start ADB with below commands and it’s done.
This should restart the emulator and now you should see the Play Store application on AVD.
Источник
Installing Google Play on Android Emulator
Posted by: Piotr Buda in Android Core May 15th, 2013 1 Comment Views
The problem
I wanted to install Google Play on emulator. Problem is no guide on the net could tell me precisely how to do this. I’m not sure why, it seemed that they worked with old Android Market (pre version 3 era) or at least people shown some screenshots of that but I couldn’t make it work at home. The difference was that I tried to install Google Play on an Ice Cream Sandwitch emulator (API level 15) and it always failed.
First attempts
I first found this site. I tried setting up everything from there but I just couldn’t make it work. Possible because their Vending.apk couldn’t start, I have no clue. Then I found this site and I somehow managed to install Vending.apk on emulator using this guide, but I couldn’t reproduce that.
One of the problems with those guides (which made me spend a lot of time on something useless) was that both these guides made me delete two files from AVD: cache.img and userdata-qemu.img. Why? Apparently when you wanted to restart emulator, these files were responsible for reinitialization of emulator to it’s starting state (like full wipe/factory reset). I tried and tried and I always ended up without my changes.
New Hope
After that I found that there is a snapshot option in AVD configuration window so I just checked it and finally I was able to see last state of emulator. Maybe it’s not perfect – it works like hibernation on your laptop – but it works and after a whole day of fight it was enough.
I then though why do I install some obsolete Vending.apk and GoogleServicesFramework.apk? Why can’t I have a new one there? So I connected my phone and pulled those apks from it. Of course it didn’t work, but I was not sure why. But I remembered something – CyanogenMod has Google apps packed in a zip (UPDATE: CyanogenMod does no longer host Google Apps, but you can find them here! So I downloaded their package and extracted everything I needed – Vending.apk and GoogleServicesFramework.apk. But it was not enough.
So I had an AVD set up with snapshots enabled and I proceeded to installing my new apks – full script will be posted at the end.
- You have to remount system partition in read-write mode.
- Then it’s necessary to allow writing to /system/app directory
- After that is done just push apks to /system/app/. (notice the dot at the end)
- Just for the sake of other guides I also remove /system/app/SdkSetup* (both apk and odex)
Voila! Google Play is installed on emulator! But it still doesn’t work. In order for it to start working, you need an account – Google account. This step also cost me some time. My AVD was based on Android 4.0.3, not the Google APIs one. So I changed it and… still nothing.
Apparently in recent releases Google decided to decouple their account provider from the OS so they have a separate apk that allows configuration of Google accounts – it’s called GoogleLoginService.apk. Pushing this to emulator solved all the problems – you don’t even need Google APIs (you can set up against Android 4.0.3 option). Now when you enter Play Store you get prompted for an account and it works!
Conclusion
After two days of trying I finally was able to launch and browse Google Play Store on an Android emulator with Ice Cream Sandwitch. Phew.
Command I use to start my emulator
That script will work as long as you run it from a dir in which you have all the necessary apks. Of course you have to have your PATH environment variable set correctly (so that all those commands are actually accessible) but I suppose you know that already.
Источник


