- How to install Android 10 — a step by step guide
- Method 1: Download the OTA update
- Method 2: Flashing Android 10 on your device
- Download the proper files
- Here’s what you need to get started:
- Unlocking your phone’s bootloader
- Step-by-step instructions:
- Flash Android 10 on your Pixel device
- Step-by-step instructions:
- What if the Flash-all method didn’t work?
- Returning to Android Pie is easy as… pie
- How To Install Android 10 on your Android [Download Links]
- Android 10 Features
- Pre-Requirements to Android 10 ROMS
- Download Android 10 for Your Android
- Android 10 For Xaiomi phones
- Android 10 For OnePlus phones
- Android 10 For MotoRola phones
- Android 10 For Asus phones
- Android 10 for Samsung Phones
- How to Install the Androdi 10 On Your Android
- How to download and install Android 10 on your smartphone
- Jump to:
- Android 10: The story so far
- On which devices can I install Android 10?
- When will I receive the update to Android 10?
- How to install Android 10 as an OTA update
- How to install Android 10 manually
- 1. Reset before installing the update
- 2. Unlocking the bootloader
- 3. Downloading from the Factory Images
- 4. Installing Android 10 on your computer
- 5. Install Android 10 on your smartphone
- Problems installing Android 10? Here are the solutions
- USB debugging
- Boot loop
- Problems with ADB
- It is not possible to start the flash-all.bat file.
How to install Android 10 — a step by step guide
In August we learned Google was rebranding its Android effort, and that included plans to ditch dessert names going forward. Today the latest version of Android finally moved out of beta, and as promised is now officially called simply Android 10. As you can imagine, Android 10 will take months to reach most devices but for lucky Pixel owners you can get in on the fun starting today. Below is a quick guide on how to install Android 10 on your Pixel.
Method 1: Download the OTA update
![]()
This is the easiest and generally preferred way to upgrade to Android 10, as you don’t have to reinstall anything.
To upgrade to Android 10 on your Pixel, head over to your phone’s settings menu, select System, System update, then Check for update. If the over-the-air update is available for your Pixel, it should automatically download. Reboot your phone after the update has installed, and you’ll be running Android 10 in no time!
If you don’t want to wait for the OTA update or want a clean slate, we’ve got instructions for you on how to install Android 10 via factory images and OTA files.
Method 2: Flashing Android 10 on your device
Flashing Android 10 on your device takes more time and work than the OTA method. If you don’t want to install the over-the-air update for some reason, you can sideload the factory image or OTA file manually. Here’s how to do it:
Download the proper files
Google has already posted Android 10 factory images and OTA files for all four Pixel phones. You’ll need to download the proper file for your device before you get started.
Here’s what you need to get started:
- A compatible Pixel device and a USB cable to connect it to your computer.
- The Android SDK installed on your machine with ADB and Fastboot command successfully working — check the tutorial here.
- 7zip or a similar program that can handle .tgz and .tar files.
- An unlocked bootloader on your phone.
Unlocking your phone’s bootloader
Now let’s get down to the nitty-gritty. The first thing you have to do is unlock your phone’s bootloader by following the step-by-step instructions below. It’s easy to do and does not require lots of technical knowledge. Unlocking the bootloader will wipe all the data off your device, so make sure you back it up first.
Step-by-step instructions:
- Turn on developer options by going to “About Phone” and tapping “Build Number” seven times.
- Enable USB debugging and OEM unlock on your device in the “Developer options” section.
- Plug in the Pixel to your PC with a USB cable.
- Open the command window on your PC.
- Boot your Pixel device into bootloader mode using the following command: adb reboot bootloader (if it requests you to authorize this, say yes).
- When your device boots into bootloader mode, type in this command: fastboot flashing unlock.
- A confirmation screen will pop up. Press the volume up key to highlight yes and the power button to start the bootloader unlocking process.
- Once unlocked, your device will reboot into bootloader mode. Now you simply need to type in fastboot reboot to finish the process.
Flash Android 10 on your Pixel device
Flashing Android 10 on your smartphone is pretty straightforward, but you can still run into problems if you don’t carefully follow the instructions listed below.
Step-by-step instructions:
- Head into the bootloader menu to test that your device and PC are communicating by typing in fastboot devices — if it comes back with your device’s serial number, you’re good to go.
- Prepare the factory image you downloaded earlier. Use 7zip to extract the .tgz file you downloaded and then again to extract the .tar file you extracted from the .tgz. This will create a folder with several files in it.
- Copy all those files and paste them in the platform-tools folder in the Android SDK on your computer. You should find it in the Program Files (x86) folder on Windows.
- There are two flash-all files. Windows users should double-click the one that has the gear logo and says “Windows Batch File” on the right. If you’re on Linux, double-click the flash-all.sh.
- A box will pop up and you should see the installation taking place. While this is going on, do not unplug your device for any reason!
- When the installation process has finished, your device will automatically reboot. You can then disconnect your device from your computer and start playing with Android 10.
What if the Flash-all method didn’t work?
For whatever reason, not everyone has luck with the Flash-all scripts. If they fail for you, there’s another way. It’s actually pretty simple. First, make sure you are still in the proper bootloader state and connected to your PC. On your PC you’ll want to type the following:
- First we flash the bootloader with the following command: fastboot flash bootloader .img
- Next type: fastboot reboot-bootloader
- Now we flash the radio with the following command: fastboot flash radio .img
- Next type: fastboot reboot-bootloader
- Flash the image with : fastboot flash -w update .zip
- After this your device may reboot automatically, if not type: fastboot reboot
Returning to Android Pie is easy as… pie
Something went wrong installing Android 10 or ran into an unexpected issue? While it’s better to have the latest version of Android possible, if you do run into an issue the good news is going back to Android Pie is simple. Essentially follow the same flashing steps above, but this time you don’t need to unlock the bootloader and you’ll simply use a Pie factory image.
Источник
How To Install Android 10 on your Android [Download Links]
Here is the Guide to install Android 10 on your android phone. After the release of Android 10 by Google for the Pixel phones, most of the developers are working on Android 10 Custom ROMs and many of them released the stable version of Android 10. Some popular custom ROM like Lineage OS and Pixel experience are available for many smartphones. And all these custom rom are based on the latest build of Android 10.
Android 10 (aka Android Q) is now official and Pixel devices, Essential Phone, Redmi K20 Pro, OnePlus 7 Pro devices are receiving the latest Android version update. But most of the devices are missing this update, and if you are waiting for Android 10 for your phone, then here is the guide which helps you to update your devices with the latest Android 10 update.

Here in this post, we will share with you a List of Android 10 Custom ROM Supported devices and the ROMS download link too. Which you can install on your phone with the help of Custom TWRP recovery and enjoy all the features of Android 10. But before that first, take a look at the Android 10 features and overview.
Table of Contents
Android 10 Features
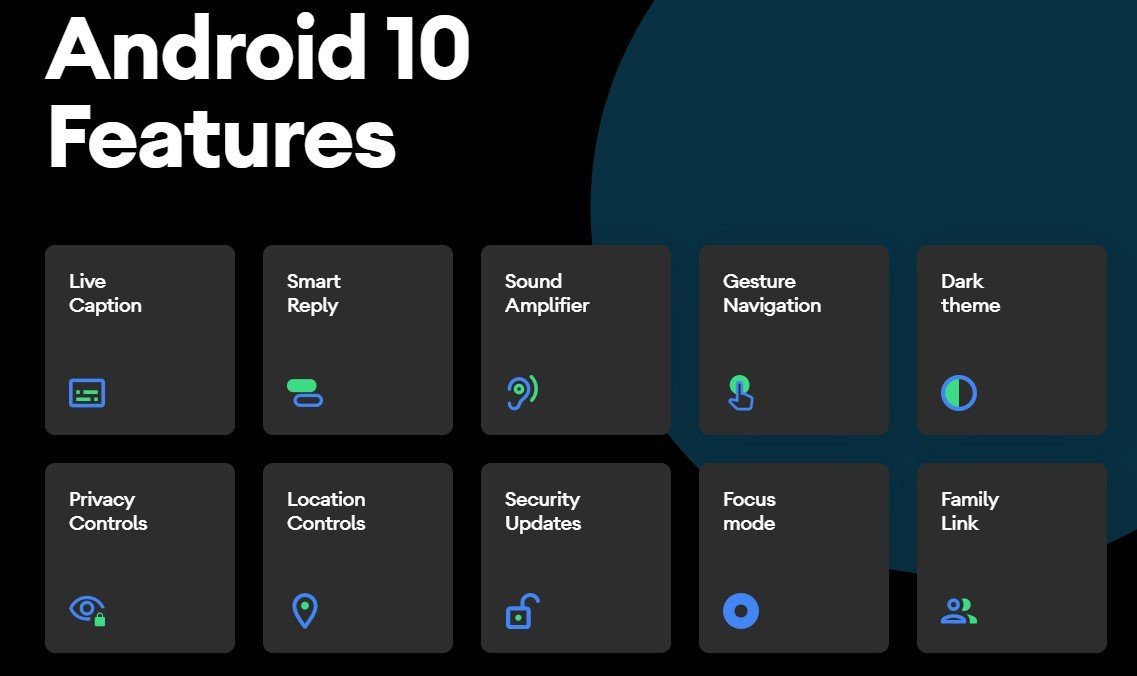
Dark theme – Android’s new Dark theme uses true black to keep your battery alive longer. Plus, it also changes how your Google apps look, like Calendar and Photos.1
Gesture Navigation – In Android 10 you will see the new Gesture Navigation. That’s totally different from the last android versions. In the new update, the back button is now ditched and you can easily go backward or forward via swiping left or right. Gestures are now quicker and more intuitive than ever.
Sound Amplifier – With Sound Amplifier, your phone can boost sound, filter background noise, and fine-tune to how you hear best. Yes, this also the new feature in Android 10. And many users are waiting for this feature from long time.
Smart Reply – Smart Reply is one of handy feature in Android 10 update. With this new feature, you can quickly reply to the message that you receive in your notification panel.
Live Caption – With a single tap, Live Caption automatically captions videos, podcasts, and audio messages. This feature will be available on Google Pixel smartphones very soon.
Focus Mode – The focus mode is the improved version of Digital Wellbeing which allows users to select and control app usage. Digital Wellbeing was introduced in Android 9.0 Pie version.
Family Link – Now with this new features you can manage your phone for your family or kids that what content they see. You can set screen time limits, view app activity, manage apps and content restrictions, and see where they are.
Pre-Requirements to Android 10 ROMS
- Make sure that the bootloader of your smartphone is unlocked.
- You should have a custom TWRP recovery installed on your phone.
- Take a full backup of your device data. In case anything goes wrong, you can restore the backup.
- Charge your device battery up to 60% at least for a smoother process.
Download Android 10 for Your Android
Here is a list of Android 10 Custom ROM Supported devices that you can easily download from here. Just download the ROM zip file and follow the below mention installtion instruction on your device to update your phone with Android 10 update.
Android 10 For Xaiomi phones
- Xiaomi Mi 8 (dipper) Android 10: Click Here
- Xiaomi Mi A1 (tissot): Click Here
- Xiaomi Mi A2 (jasmine_sprout): Click Here
- Xiaomi Mi Mix (lithium): Click Here
- Xiaomi Poco F1 (beryllium): Click Here
- Xiaomi Redmi 3S/3X (land): Click Here
- Xiaomi Redmi 6 Pro (sakura): Click Here
- Xiaomi Redmi K20 Pro/Mi 9T Pro (raphael): Click Here
- Xiaomi Redmi Note 5 Global/Pro (whyred): Click Here
- Xiaomi Redmi Note 5/Plus (vince): Click Here
- Xiaomi Redmi Note 7 (lavender): Click Here
- Xiaomi Redmi Note 7 Pro (violet): Click Here
Android 10 For OnePlus phones
- OnePlus 5 (cheeseburger) Android 10: Click Here
- OnePlus 5T (dumpling): Click Here
- OnePlus 6 (enchilada): Click Here
- OnePlus 7: Click Here
- OnePlus 7 Pro: Click Here
Android 10 For MotoRola phones
- Motorola Moto G5S Plus (sanders): Click Here
Android 10 For Asus phones
- Asus Zenfone Max Pro M1 (X00TD): Click Here
- Asus Zenfone Max Pro M2 (X01BD): Click Here
Android 10 for Samsung Phones
- Samsung Galaxy Grand Prime: Click Here
- Samsung Galaxy Tab E 9.6: Click Here
- Sprint Galaxy Tab E 8.0: Click Here
- Samsung Galaxy J5: Click Here
- Samsung Galaxy Alpha: Click Here
- Samsung Galaxy S2: Click Here
- Samsung Galaxy S4: Click Here
- Samsung Galaxy S4 Mini: Click Here
- Samsung Galaxy Mega 6.3: Click Here
- Samsung Galaxy J: Click Here
- Samsung Galaxy Tab A 9.7: Click Here
- Samsung Galaxy S6: Click Here
- Samsung Galaxy S7: Click Here
- Samsung Galaxy S7 Edge: Click Here
- Samsung Galaxy Note 3: Click Here
- Samsung Galaxy S5 [klte]: Click Here
- Samsung Galaxy S5 Plus: Click Here
- Galaxy S5 Active: Click Here
- Samsung Galaxy Tab S3: Click Here
- Samsung Galaxy J7 Prime: Click Here
- Samsung Galaxy Note 4: Click Here
- Samsung Galaxy A3 2017: Click Here
- Samsung Galaxy A7 2017: Click Here
- Samsung Galaxy A5 2017: Click Here
- Samsung Galaxy Ace 2: Click Here
- Samsung Galaxy A8 2018: Click Here
- Galaxy S6 edge: Click Here
- Samsung Galaxy J2 Core: Click Here
- Galaxy A7 2018: Click Here
- Samsung Galaxy Jean: Click Here
- Samsung Galaxy Tab S4: Click Here
- Samsung Galaxy Tab A Series: Click Here
So, guys, that was the list of Android devices that are supported with Android 10 [Custom ROM development]. Now, just in case, if you can’t didn’t find your device on the list, then don’t worry at all. We would be updating the list from time-to-time. So check after some time, we will update the Androdi 10 Download List soon.
How to Install the Androdi 10 On Your Android
No matter which Android smartphone you own, the custom ROM installation will always the same. Follow the process and install the Android 10 Update on your device.
1. First, install the custom TWRP recovery on your phone, Without this you can’t flash the Androdi 10 Custom ROM on your phone.
2. Now boot your phone in custom TWRP recovery. Once your phone in the TWRP custom recovery mode. Go to Wipe button, then select “Advanced Wipe” from the following screen. From here, tick the boxes next to the Dalvik Cache, System, Data, and Cache options, then swipe the slider at the bottom of the screen.

3. Go back to TWRP main menu, tap on “Install” and select the Android 10 ROM zip file and flash it. And after that Flash the Google Apps zip file ( If needed for Your ROM ).

4. Once your ROM is successfully flashed you’ll see “Wipe cache/dalvik” option Tap on it and after that Reboot System.

So this way you can install the Androdi Q update on your phone with the help of custom recovery. If you have any question about the guide or facing some problem during the process then leave the comments below, and we will help you to fix it up.
Источник
How to download and install Android 10 on your smartphone
After months of beta testing, it was in September 2019 that Google released the stable version of Android 10 for select devices. As of 2021, even with the release of Android 11 (and Android 12 around the corner), Android 10 continues to be the most used version of Android as of this writing. In this article, we take a look at how you can install Android 10 on your device in case you’re still running an older version of Android on your phone.
Jump to:
Android 10: The story so far
Google officially released Android 10 in September 2019, and it was initially available for several Google Pixel devices. Other smartphones that were included in the list of phones that got the first taste of Android 10 included Xiaomi’s Redmi K20 Pro (in select markets) and the Essential Phone. The OnePlus7T — announced in the same month — was the first (new) phone to roll out with Android 10 pre-installed.
 Android 10 was released in September 2019 and has since then been succeeded by Android 11/ © AndroidPIT
Android 10 bought several improvements over Android 9, including a completely revamped gesture-based navigation system and much sought-after support for system-wide dark mode. There were several improvements made on the privacy aspects, with users getting control on restricting apps access to location and other data. Android 10 also — for the first time on Android — bought the scoped storage system that essentially prohibits apps from accessing files unrelated to them without explicit user consent.
Android 10, since its release nearly two years ago, has been succeeded by Android 11, which as of this writing, is the newest stable version of Android. As of January 2021, more than 43 percent of Android devices were running software based on Android 10. While handsets from most major smartphone brands have already been updated to Android 10 and beyond, this guide could be useful for you in case you have an old 3 or 4-year-old smartphone that is still running Android 8 or Android 9.
On which devices can I install Android 10?
If you’re using a fairly new device (that is around a year old), chances are your phone is already running Android 10. In case you have a smartphone that was released in 2017-18, you will need to get in touch with your manufacturer to know if an official update to Android 10 is available for your device.
We have a separate section below where we tell you how to install Android 10 and how to check the Android version your phone is running.
When will I receive the update to Android 10?
As mentioned earlier, the deployment of Android 10 on most major devices released since late 2019 and 2020 has already been completed, and chances are high your smartphone already runs Android 10. Once you have checked if your phone is already on Android 10, the only thing you need to worry about is to look for monthly security patches that Google issues for Android. Make sure you check for software updates at least once a month so that your phone is always updated to the latest version of Android available to you.
Note that if you own flagship handsets released in 2017-2018, your device, too should ideally be receiving an official update to Android 10. However, the issuance of Android updates is highly dependent on your manufacturer, and you are at their mercy to receive periodic software updates.
- Also read: Is your smartphone compatible with Android 10?
 Android 10 is officially out for many smartphones. / © NextPit
How to install Android 10 as an OTA update
The easiest way to install Android 10 on your device is to go the official route and check for OTA updates released by your smartphone manufacturer. In case you are using a fairly old phone that is still running Android 9, and you have read that an official update to Android 10 was released for your phone, you will almost certainly receive the official update. Here’s what you need to do.
The first thing is to learn how to check your Android version and then check for updates. To do that, please ensure that your smartphone is connected to a stable Wi-Fi network and has at least 60 percent charge.
Open Settings -> Tap on About phone and look for the Android version in the menu.
If it says Android 10 (or Android 11), you no longer need to «install» Android 10 since you are already using it or are on an even newer version.
If you have a really old phone and have figured that it is still running Android 9, repeat the same steps as above and tap on the Check for updates option.
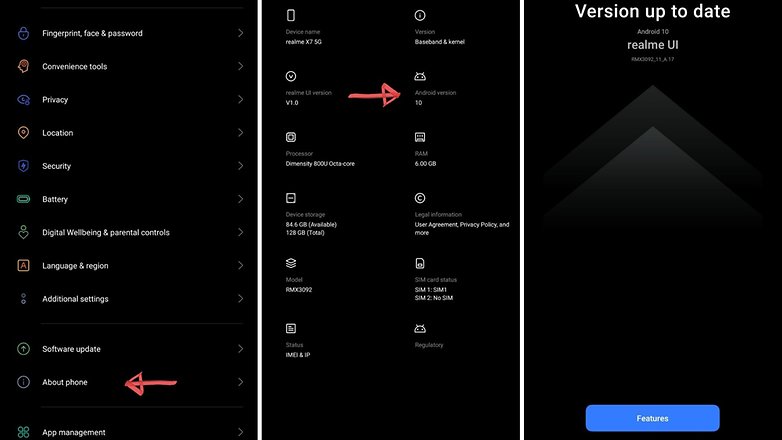 Periodically check for software versions from the Settings -> About phone menu/ © NextPit
In case your device manufacturer has issued newer updates for your device, you will ideally receive a notification saying that a newer version is available for your device. At times, you may be required to download and install now or more software updates to finally get to the latest software version available for your phone.
You can do the same procedure for devices already on Android 10 or Android 11 to check and see if newer updates are available for your device.
In case your smartphone does not show any fresh updates even after checking repeatedly, and you are sure the internet connection is fine as well. well, you are out of luck. It is quite likely that your phone isn’t eligible for Android 10 or the hardware is simply too old.
The only resort left now is to check for alternate custom ROMs that may be available for your device. However, the world of custom ROMs and unlocked bootloaders is recommended only for users who have the technical know-how to do it. General consumers should ideally stay away from them just to be on the safer side.
The steps below are from 2019 and are no longer applicable for newer devices that are already on Android 10/11 or beyond. However, if you would like to tinker with manual Android installation techniques on an older eligible smartphone lying around, these steps could be useful for you.
In case you would like to do the same, but for a newer version of Android ( Android 12), check the link below.
How to install Android 10 manually
1. Reset before installing the update
As mentioned above, please be aware that this step is not mandatory but just a tip. Installing a new software version can cause errors that did not exist before. Whenever you want to make any major changes to the system of your Android smartphone, it is advisable to reset it and back it up beforehand.
We recommend a manual installation of Android 10 for experts only! It is still an unstable version, which could make it more difficult to use the device.
2. Unlocking the bootloader
To flash the new Android version, you first have to open the bootloader and activate it via the developer options and the USB debug mode:
3. Downloading from the Factory Images
Now all you have to do is download the Android 10 factory images, which vary from device to device. On this page, you will find links to the supported devices:
Here are the links to the system images for your Google Pixel phone:
- Pixel
- Pixel XL
- Pixel 2
- Pixel 2 XL
- Pixel 3
- Pixel 3 XL
- Pixel 3a
- Pixel 3a XL
![]() Ready to discover the new features of Android 10 on your Google Pixel? / © NextPit
Ready to discover the new features of Android 10 on your Google Pixel? / © NextPit
4. Installing Android 10 on your computer
Before you can proceed with the actual installation, you need to unzip the zip files, including those found in the unzipped files — i.e., zip in zip. Now you can continue with the installation:
- Download the Android SDK from this website.
- Add the SDK tool and the Platform Tool folder to the PATH variable:
- Mac: Type the command «export PATH=$PATH: Properties>Advanced>Environment variables. Changes the variable PATH and adds the path for the Android SDK.
- For Windows, your Google’s USB driver needs to be found in the SDK folder: Go to Tools>Google USB Driver in Manager. Connect your smartphone to your PC and right-click on Computer>Management. Click in the left area with the right mouse button on the device, and you see Peripherals>Update Driver. If manual installation is selected, the driver is found under path SDK>/extra/google /usb_driver.
- Now check if the device number appears in the list of connected devices, and everything is done!
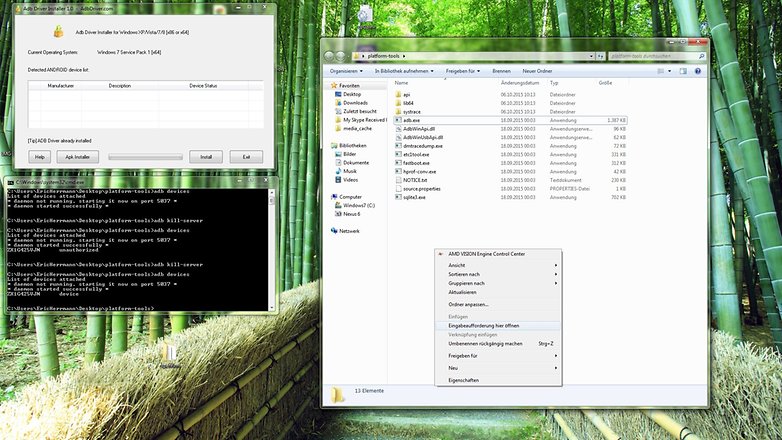 If you follow all the above steps, you can install Android 10 without any problems / © ANDROIDPIT
5. Install Android 10 on your smartphone
- Turn off your device.
- Press and hold the Power and Quieter keys to restart the device in bootloader mode.
- Connects your smartphone to your PC via a USB cable.
- Opens Windows Explorer and searches for the previously downloaded firmware in the ADB Tool folder.
- Double-click on the file flash-all.bat and wait until the process is completed.
Your phone will automatically restart with the new version of Android 10, and if the process is unsuccessful, read the section about possible problems that occurred during the process.
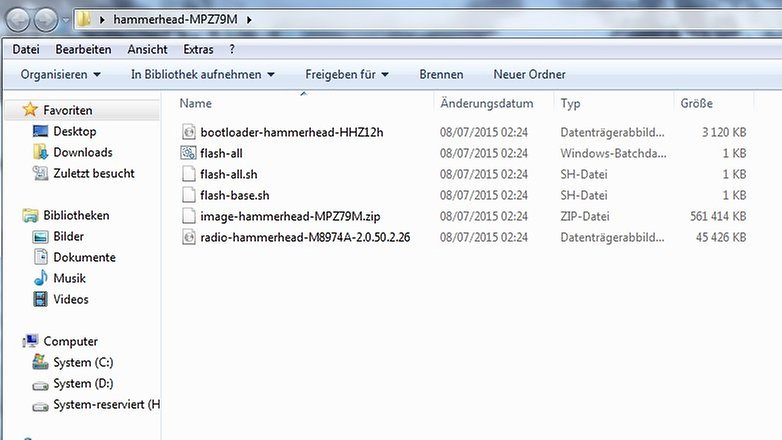 Double-click the file flash-all .bat / © ANDROIDPIT
Problems installing Android 10? Here are the solutions
USB debugging
If you encountered a problem before installing, make sure you have activated USB debug mode and unlocked the boot loader.
Boot loop
If you are in a boot loop, you can first attempt to clear the cache partition by returning to the boot loader and using the volume keys to switch to recovery mode (press the power key to confirm). After you have deleted the cache partition, the device will restart.
If you are still locked on the home screen after this operation, return to Recovery and select Delete Data/Factory Reset and press the Power button to confirm. This way, you should be able to solve the problem.
Problems with ADB
If you receive an error message at the command prompt informing you that the file system.img is missing, proceed as follows:
- Unpacks the Image.zip file.
- Copy and paste the files into the same folder where you saved the other unzipped files (in the ADB-Tool folder next to adb.exe and fastboot.exe).
- Opens a command window (press Shift and right-click, then select Open Command Window and type the following commands):
- Fastboot Flash Bootloader .img
- Fastboot Flash Radio .img
- Quick Start Restart — Bootloader
- Fastboot Flash Recovery.img
- Quick Start Flash Boot Boot.Img
- Fastboot Flash System.img
- Fastboot Flash Cache.Img Cache Cache Cache
- Quick Start Flash User Data userdata userdata.img
It is not possible to start the flash-all.bat file.
Make sure that you have clicked on flash-all.bat in administrator mode (right mouse button, Run as administrator).
Did you manage to install Android 10 on your smartphone? Was it difficult? Let us know.
Источник


