- Archive:HOW-TO:Install Ubuntu and XBMC on Apple TV 1
- Contents
- 1 Prerequisites
- 2 Create the bootable USB flash drive
- 3 Linux installation
- 3.1 Backup!
- 3.2 Make space for Linux
- 3.3 Start Linux installation
- 3.4 Post installation fix
- 3.5 Linux setup
- 3.5.1 Set the MAX_CSTATE
- 3.5.2 Install alsa-driver 1.0.19
- 3.5.3 Install Xserver and NVIDIA 100.14.19 drivers
- 3.5.4 Install atvclient
- 3.5.5 Install crystal HD driver and library
- 3.6 Time to install XBMC
- 3.7 Set up the HDMI audio output
- 3.8 What next?
- 4 Faster boot
- 5 Runing Firefox
- 6 VNC Server
- 7 External Links
- Как я делал идеальный медиапроигрыватель из Apple TV
Archive:HOW-TO:Install Ubuntu and XBMC on Apple TV 1
 | THIS PAGE IS OUTDATED: |
This page or section has not been updated in a long time, no longer applies, refers to features that have been replaced/removed, and/or may not be reliable.
This page is only kept for historical reasons, or in case someone wants to try updating it.
Installing Linux on the AppleTV is already quite well documented and easy thanks to atv-bootloader. If you plan on installing Linux on your AppleTV, you should definitively start there.
With Broadcom Crystal HD now out, the AppleTV can handle 1080p and this makes it a very nice media center alternative. XBMC works fine under the AppleTV OS, but there are a few pro’s for having Linux and some might just prefer it.
That said, setting up Linux can be a bit tricky. If you want sound over HDMI, you have to use at least alsa-driver-1.0.18a and NVIDIA 100.14.19 drivers that compile only on Ubuntu 8.04. Any more dissent release seems affected by a regression bug #385076 and it need to be resolved first.
This guide explains how to achieve it using Ubuntu 8.04 for now. Linux will be installed on the AppleTV internal disk without removing the AppleTV OS
I would not recommend this guide if you are not familiar with Linux and the CLI.
If you are not a fan of vi, just use nano instead.
Contents
1 Prerequisites
- A USB Hub
- A USB keyboard
- A USB flash drive of 256MB or greater (64MB should even be enough)
- A network with a DHCP server
- A wired network connection to the AppleTV
- A Mac or Linux computer on the same network (Windows should probably work as well)
2 Create the bootable USB flash drive
If you have a Mac, just download and run the OS X version of atvusb-creator. Choose «ATV-Bootloader» for the installation and create your bootable flash drive. When done, if you unplug/plug the USB disk, you should see an empty PATCHSTICK partition.
Download Hardy netboot image and copy the needed files to the empty PATCHSTICK partition created by ATV USB creator.
If you only have a Linux machine, just follow those instructions: LinuxUSBPenBoot. Make another partition to copy linux and initrd.gz from the netboot image.
3 Linux installation
Connect the USB keyboard and flash drive previously created to your AppleTV using a USB Hub. Reboot the AppleTV and telnet in from your computer (username/password: root). You should see the IP address on your TV screen.
3.1 Backup!
Before touching the disk partition, you should do a backup! We gonna follow the ATVBackup procedure but do a tar instead of a copy. This ensures that permissions won’t be changed, no matter the file system on your USB flash drive partition.
Run «parted» and make a copy of the original partitioning for the internal PATA disk. The disk can then be re-partitioned back to the original later using this file as a guide. Copy this to the first partition of the USB flash drive for safe keeping.
Check the file. This is how my 40GB disk looked like:
If you need to restore the disk to its original state, just follow the Restore procedure (watch the sdb partition number), but instead of doing:
3.2 Make space for Linux
I didn’t exactly follow the procedure described here (btw, it seems Apple doesn’t always follow the same naming convention). I just did a resize on my «Customer» partition and it worked fine. I didn’t have to perform a «Factory Restore» and didn’t lose anything.
But from my Linux experience, when doing a resize on a disk, you should be ready in case it doesn’t work. That means, if you have data on that partition you don’t want to lose, backup first!
Note that we did NOT backup that partition previously (only the Recovery partition was). This partition is where you might have synced, pictures, movies. If the resize doesn’t work, you’ll have to remove the partition and do a «Factory Restore». Read this page for more explanations.
You can adjust the partitions sizes to your needs.
Here is how the disk should now look like:
3.3 Start Linux installation
Bootstrap into netboot installer
You should now see the Ubuntu install screen on your TV. Proceed with the keyboard you connected earlier.
Follow the steps of the installer.
When asked for partitioning Method, choose manual
Select the ext3 partition you created previously: sdb5 (the USB stick shows up as sda, so the internal disk is sdb)
Use as : Ext3
Mount point: /
sb6 should already be selected as swap
Write the changes to disk
When asked for username, do NOT use “xbmc”, create an admin user
If you are asked to select a specific kernel, just take the default choice (generic kernel)
When you come to the “Software selection” window, choose only «OpenSSH server»
When the install is done, reboot.
3.4 Post installation fix
Telnet again to your AppleTV.
Change the USB flash drive, so that it will boot automatically to Linux next time
-> change patchstick to auto
Edit your menu.lst
Change it to something like this (check your kernel version):
Bootstrap to this new kernel (or just reboot)
3.5 Linux setup
You can now ssh to your AppleTV. Use the user you created during installation.
3.5.1 Set the MAX_CSTATE
You may experience dropped ethernet packets if you do not adjust the maximum cstate for the AppleTV’s processor. Cstates are different levels of power that the processor will operate at. The intention is to conserve energy when the system is not in use, but in Linux’s case this can cause a few issues. I have seen better and more reliable network activities after performing the following steps.
Add the following line to your /etc/modprobe.d/options file:
Then update the initrd image using the following command:
The initrd image is now updated to include the option. Then reboot. Verify if it works:
3.5.2 Install alsa-driver 1.0.19
At least 1.0.18a is needed but it failed to compile on my system. 1.0.19 worked fine.
3.5.3 Install Xserver and NVIDIA 100.14.19 drivers
Take the opportunity to edit your xorg.conf
Turn off the use of TurboCache by the nvidia binary driver by adding (see ATV blog):
Some people experienced problem with refresh rate due to NVIDIA’s DynamicTwinView feature, so disable it by adding:
Your nvidia driver section should look like:
3.5.4 Install atvclient
To get the front LED stop flashing and get the Apple Remote to work, just install atvclient See https://github.com/Evinyatar/atvclient/wiki/Installation-on-Ubuntu-8.04
3.5.5 Install crystal HD driver and library
svn trunk and git trees might be unstable. So use the last tag from http://code.google.com/p/crystalhd-for-osx/ (it contains both osx and linux source code).
3.6 Time to install XBMC
To get Official PPA and SVN PPA, update your system’s software sources:
Add the keys and update your list of software:
Create xbmc user:
Here is one way to have XBMC started automatically at boot. You could as well choose to just install xbmc-live.
Change tty1 for automatic login:
Change this line:
Update your Xwrapper.config
Replace console by anybody
Login as xbmc and create a .bash_profile
Create a .xsession:
3.7 Set up the HDMI audio output
After reboot, XBMC should start up automatically. You might have some strange colors. Just unmute the HDMI audio output by running alsamixer.
ssh to your appletv
-> unmute IEC958 1 (that’s the HDMI audio output)
Save the driver setup:
You can check the device by running:
Go to XBMC Audio output settings and choose custom for the Audio output device.
Set it to: plughw:0,3 Do the same thing for Passthrough output device.
That’s it, you should have sound over HDMI!
3.8 What next?
If you don’t want to have to plug/unplug the USB stick to boot into Linux/AppleTV OS, check: https://github.com/Evinyatar/atvclient/wiki/AppleTV-Linux-bootmenu
I don’t really like to put a password in clear text in a script. I removed the password from the script, and added the script to the sudoers file instead:
Same can be done on the AppleTV OS side
4 Faster boot
atv-bootloader boots a default Linux kernel and then finds and boots your Linux kernel using kexec. You can avoid this double boot process by creating a custom atv-bootloader. To do so you need a Mac computer with the Developer Tools installed (it should be possible under Linux with the darwin-cross tools to compile/link).
On your Mac, get the atv-bootloader source code:
Copy from your atv to that directory your ubuntu kernel (check your kernel version) and run make
You should now have a custom mach_kernel.
To use it to directly boot into your Linux installation, you just need to give the arguments that will get passed to the Linux kernel in the com.apple.Boot.plist.
- If you use an USB flash drive to boot into Linux, replace the mach_kernel by the one you created and replace the plist by the following one:
Check the kernel arguments on the last line. They should be the same as the ones you have in your /boot/grub/menu.lst file. Note that there is no need for the «atv-boot=auto» line.
- If you switch plist to boot into ATV OS / Linux as explained here, just replace the /mach_kernel_linux with the one you created and edit the /System/Library/CoreServices/com.apple.Boot.plist.linux file to add the kernel arguments as described above.
5 Runing Firefox
Exit XBMC and at the terminal install Firefox and Flash:
Create a script to start firefox:
Make firefox.sh executable:
Edit rc.local to restore launching xbmc at boot.
Increase font size:
Add an option DPI in the «monitor» section:
ps.: It can take up to 3min to load firefox at first time. ps2.: to return to terminal: Ctrl+Alt+backspace
6 VNC Server
Set a password (optional)
Make X to load X11vnc at startup
7 External Links
This guide is based on differents sources. Thanks to the original authors (sorry if I forgot some):
Источник
Как я делал идеальный медиапроигрыватель из Apple TV
Хочу рассказать как я делал для себя медипроигрыватель на базе старой Apple TV первого поколения. Получилось устройство полностью подходящее под мои требования.
Описание стандартной конфигурации приставки:
Процессор: 1 ГГц Intel «Crofton» Pentium M
Память: 256 МБ 400 МГц DDR2 SDRAM
Накопитель: 40 или 160 ГБ жёсткий диск
Графика: Nvidia GeForce Go 7300 с 64 МБ VRAM
Связь: Wi-Fi (802.11b/g и draft-n), 10/100 Ethernet
В качестве операционной системы была установлена модифицированная сборка OS X v10.4 c натянутым поверх нее Front Row.
Данной конфигурации не хватало для воспроизведения небольших видео 720p, большинство видеофайлов даже этого формата смотреть было невозможно. Обычные фильмы размера 1,4 — 3 Gb и чуть более игрались на ура. Для 2007 года это было круто, но сейчас совсем не дело. Система очень слабая.
Да и все, что можно было делать с самой приставкой — это покупать/арендовать фильмы, смотреть трейлеры, позднее добавилась функция просмотра контента с Youtube в невысоком качестве. Можно было синхронизировать контент с iTunes, данные сохранялись на жестком диске.
Стримить контент с девайсов по AirPlay, если не ошибаюсь, на первые Apple TV было нельзя. Точно уже не помню.
Внутри находятся кулер и винчестер, по-этому приставка издавала довольно ощутимый шум, ночью было очень хорошо ее слышно. Иногда приходилось выключать приставку перед сном.
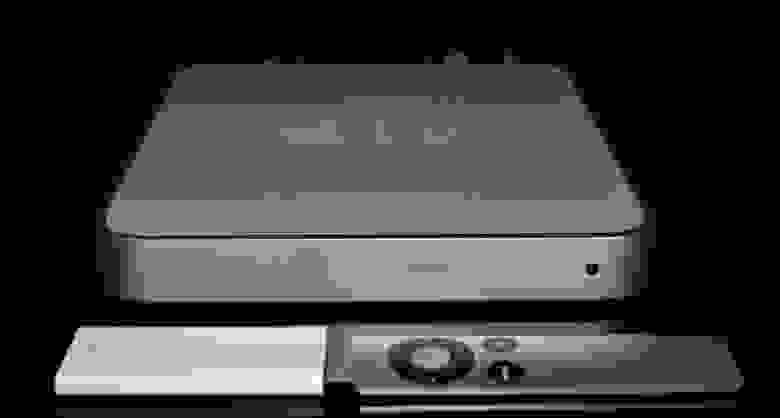
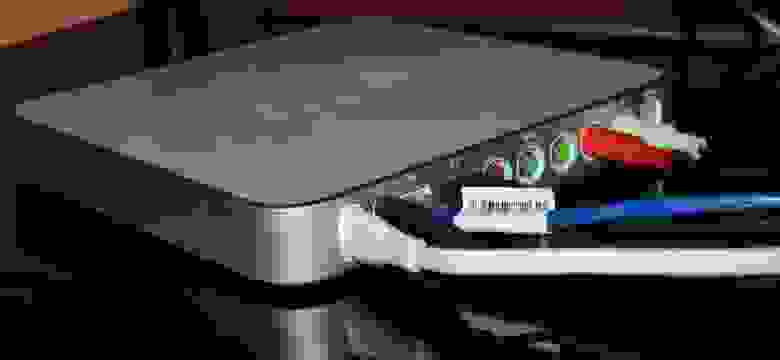
Сам девайс довольно красивый и эргономичный, удобный пульт, есть все необходимые выходы — RCA (звук и видео), HDMI, SPDIF, USB (только для сервисного использования, подключать диски нельзя было).
Вот так выглядит устройство до вмешательства:
Что было сделано:
1) Заменена операционная система. Когда-то давно бравые ребята сделали atv-bootloader, который позволял загружать Linux на этой приставке, а потом молодой парень Sam Nazarko сделал готовую операционную систему на базе Ubuntu с XBMC, которая легко ставилась на Apple TV. Называется это чудо Crystalbuntu. У проекта есть сайт и большой форум, где обсуждают проблемы и пожелания. Здесь лежат исходные файлы.
Этот же человек делает готовую сборку Raspbmc для Raspberry.
Первая версия была на Ubuntu 8.04 и ядре 2.6. Примерно год назад появились тестовые сборки на 12.04 и ядре 3.2.27, а потом вышла и полноценная версия Сrystalbuntu 2. Установка сводится к подключению флешки с образом и перезагрузки. Можно установить систему на эту же флешку, не трогая внутренний жесткий диск, а можно установить на внутренний жесткий диск. Второй способ лучше, система будет работать быстрее.
Установщик сам размечает диски, настраивает систему, скачивает последнюю версию XBMC и нужные библиотеки.
После установки Linux приставка стала гораздо шустрее, видео в 720р стали проигрываться лучше, но все равно в большинстве случаев мощности не хватало для проигрывания более-менее пристойного контента. Появилась возможность смотреть видео с сетевых накопителей, подключать внешние диски, смотреть видео с прямо интернета.
XBMC открыл много новых возможностей для приставки, доступно огромное количество плагинов, удобный в пользовании, выглядит красивее.
2) Убраны все шумящие элементы — куллер и жесткий диск, использовалась загрузка с флеш-накопителя, приставку стало не слышно, абсолютно. По поводу охлаждения беспокоится не стоит, много дела штатный куллер не делал. За годы работы ничего плохого не произошло.
3) Добавлен аппаратный декодер видео. У компании Broadcom есть потрясающая карта BCM970015 Crystal HD. Декодер легко справляется с декодированием огромных видеофайлов в 1080p. Данная плата пришла на смену BCM970012 и умеет аппаратно обрабатывать видео H.264/AVC, MPEG-2, VC-1, WMV9, MPEG-4, DivX®, Xvid, AVS и также Flash.
С ней стало можно смотреть видео любого качества, приставка проигрывает 30-гигабайтные фильмы без проблем. Появилась возможность смотреть контент прямо онлайн — плагинов для этого огромное количество в XBMC. Ролики на YouTube проигрываются в любом качестве.
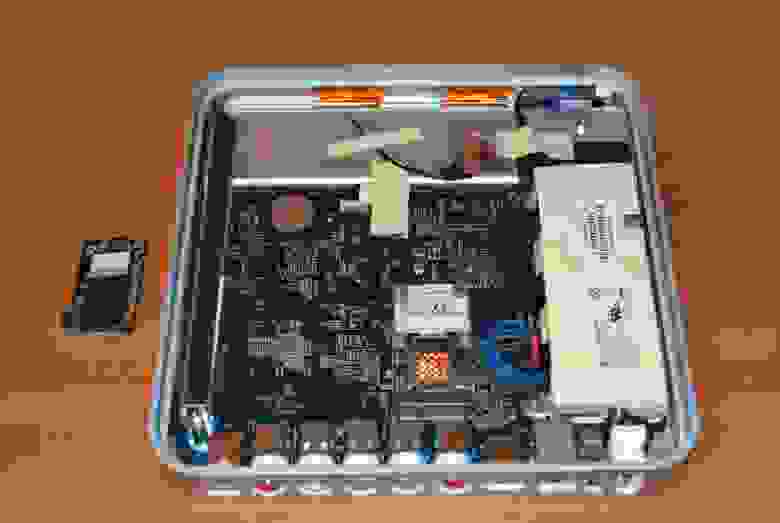
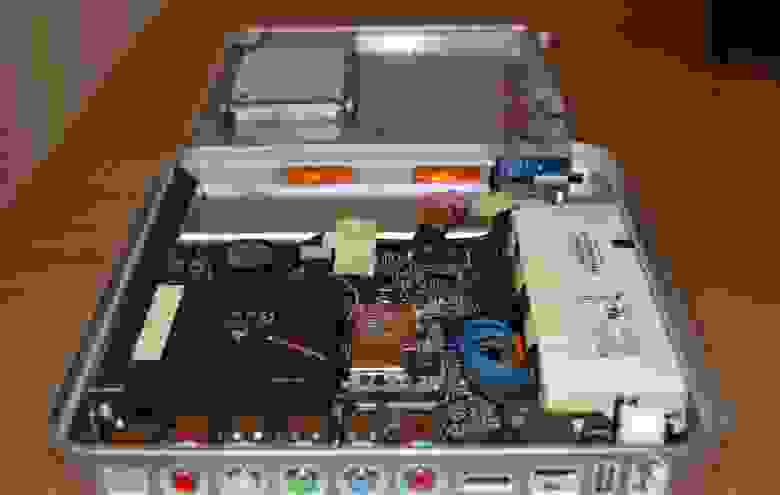
Карта вставляется вместо Wi-Fi карты (того же производителя — Broadcom 🙂 ) в слот mini-PCI. Этим лишаем себя беспроводной связи, при необходимости можно использовать внешнюю карту через usb.
4) Установлен SSD. С USB флеш-накопителя приставка работает нормально, но все-равно не так быстро как могла бы. После замены на SSD разница очень заметна, загружается и работает очень быстро, все переходы по меню очень плавные, больше нет задержек связанных с файловой системой.
В приставке есть только IDE разьем (44-pin), по-этому найти подходящий диск было сложнее. На eBay можно найти 2«5 IDE SSD диск, который бы встал на замену старого, но выбор стал еще лучше — DOM диск. Это плата с распаянными модулями памяти, которая вставляется прямо в IDE разъем. Такие платы используют во всяких встроенных решениях — кассовых аппаратах, станках и т.п.
Памяти для готовой операционной системы нам нужно около 2Gb, по-этому диска компании Kingspec на 8Gb хватило с головой. Пришлось все равно подключать через шлейф, а не напрямую в плату, потому что замок на IDE разъеме оказался повернут не в нужную мне сторону и плата не влезла упираясь в блок питания. Нужно было сразу проверить, но и подключение через шлейф меня устроило.
5) Куплен новый пульт. В первых приставках был старый пластиковый пульт. Новые пульты цельные алюминиевые, очень красивые, внешне больше подходят к приставке. Хотя, как со временем оказалось, старым пластиковым пользоваться удобнее.
Вот так выглядит устройство после вмешательства: 
(слева — это и есть SSD)
Весь мой медиаконтект хранится на NAS, который, как и приставка, подключен к гигабитному свичу через ethernet, скорости сети с головой хватает чтобы писать на NAS и читать с него приставкой HD-фильмы, никогда не было проблем. XBMC умеет читать из любых источников — NFS, SMB, FTP, UPnP, забирать контент можно из нескольких источников.
Очень приятной оказалось возможность смотреть контент сразу с интернета. У нас в Украине есть сайты ex.ua и fs.ua, для которых есть XBMC-плагины. Давно уже не качаю сериалы и многие фильмы, все можно найти там, скорости интернета хватает чтобы смотреть фильмы в HD качестве без скачивания. Ссылки на любимые сериалы легко добавляются в „Избранное“ прямо из плагина, потом легко выбирается перед просмотром из меню XBMC.
Еще плюшки:
Работает AirPlay, есть куча приложений для управление XBMC с помощью смартфона. Также есть очень приятная штука — плагин для браузера, который позволяет отправить видео из YouTube сразу на приставку. Есть плагины для IPTV.
Добавлен репозитарий плагинов для русскоязычного населения seppius-xbmc-repo, в нем есть огромное количество разнообразных плагинов — сериалы онлайн (сайты с тысячами сериалов), онлайн телевидение, радио, видеоприколы, сайты для обучения…
Да и в стандартном списке XBMC есть плагины есть на любой вкус — TED Talks, игровые каналы, VimCasts (уроки по Vim), архив Мосфильма…
Установлен MPD. К Apple TV примонтирована шара с музыкой прямо с NAS и добавлена в MPD. Теперь все домашние компьютеры умеют играть музыку по сети. Звуковая система подсоединена к приставке, по-этому теперь не нужно заморачиваться с выбором источника звука на колонках, вся музыка собрана в одном месте.
Что касается общей загрузки системы. Частота процессора регулируется автоматически от 600 до 1000 МГц, при просмотре большинства фильмов частота не поднимается выше 600 МГц, при этом процессор загружен в среднем только на половину.
Вот загрузка системы при просмотре файла размером 9Gb, 720p, средняя загрузка CPU
Вот при просмотре файла размером 15Gb, 1080p, средняя загрузка CPU
70%. Частота процессора по-прежнему 600 МГц.
Памяти в системе не много, по-этому на всякий случай выделен 1Gb памяти с SSD для swap.
Также к системе подключалась хорошая USB звуковая карта, но разницы в звуке я особо не заметил и карта была возвращена обратно на стационарный компьютер для использования с наушниками. Наверное нужна и аудиосистема подороже и слух получше чтобы услышать разницу.
Минусы: нет аппаратной кнопки выключения приставки. Можно прикупить розетку с выключателем, но руки не доходят, та и особой нужды нет, приставка всегда включена.
Также нет русской раскладки в меню поиска, но на хабре есть человек со статьей, который делал патчи. Русский поиск нужен не часто, но все же нужен, тоже нужно будет выделить время и сделать.
Источник


