- Adding SDK Packages
- Get the latest SDK tools
- Get the support library for additional APIs
- Get Google Play services for even more APIs
- Install the packages
- Build something!
- Get started
- Build for wearables
- Use Google APIs
- Полный список
- Install Android Studio
- Windows
- Linux
- Required libraries for 64-bit machines
- Chrome OS
Adding SDK Packages
By default, the Android SDK does not include everything you need to start developing. The SDK separates tools, platforms, and other components into packages you can download as needed using the Android SDK Manager. So before you can start, there are a few packages you should add to your Android SDK.
To start adding packages, launch the Android SDK Manager in one of the following ways:
- In Eclipse or Android Studio, click SDK Manager
 in the toolbar.
 - If you’re not using Eclipse or Android Studio:
- Windows: Double-click the SDK Manager.exe file at the root of the Android SDK directory.
- Mac/Linux: Open a terminal and navigate to the tools/ directory in the location where the Android SDK was installed, then execute android sdk .
 in the toolbar.
When you open the SDK Manager for the first time, several packages will be selected by default. Leave these selected, but be sure you have everything you need to get started by following these steps:
Get the latest SDK tools

As a minimum when setting up the Android SDK, you should download the latest tools and Android platform:
- Open the Tools directory and select:
- Android SDK Tools
- Android SDK Platform-tools
- Android SDK Build-tools (highest version)
- Open the first Android X.X folder (the latest version) and select:
- SDK Platform
- A system image for the emulator, such as
ARM EABI v7a System Image
Get the support library for additional APIs
The support library is required for:
It also provides these popular APIs:
The Android Support Library provides an extended set of APIs that are compatible with most versions of Android.
Open the Extras directory and select:
- Android Support Repository
- Android Support Library
Get Google Play services for even more APIs
The Google Play services APIs provide a variety of features and services for your Android apps, such as:
To develop with Google APIs, you need the Google Play services package:
Open the Extras directory and select:
- Google Repository
- Google Play services
Note: Google Play services APIs are not available on all Android-powered devices, but are available on all devices with Google Play Store. To use these APIs in the Android emulator, you must also install the the Google APIs system image from the latest Android X.X directory in the SDK Manager.
Install the packages
Once you’ve selected all the desired packages, continue to install:
- Click Install X packages.
- In the next window, double-click each package name on the left to accept the license agreement for each.
- Click Install.
The download progress is shown at the bottom of the SDK Manager window. Do not exit the SDK Manager or it will cancel the download.
Build something!
With the above packages now in your Android SDK, you’re ready to build apps for Android. As new tools and other APIs become available, simply launch the SDK Manager to download the new packages for your SDK.
Here are a few options for how you should proceed:
Get started
If you’re new to Android development, learn the basics of Android apps by following the guide to Building Your First App.
Build for wearables
If you’re ready to start building apps for Android wearables, see the guide to Building Apps for Android Wear.
Use Google APIs
To start using Google APIs, such as Maps or Play Game services, see the guide to Setting Up Google Play Services.
Источник
Полный список
— разбираемся, что такое Package для приложения
Package можно перевести как пакет. Этот вариант перевода я и буду использовать в уроке.
Пакет приложения мы прописываем в визарде создания приложения.
Потом его можно найти в манифесте.

Он же по дефолту становится пакетом для Java-классов

Как-то не особо значимая цель .
Может быть он используется как-то еще? Оказывается да. Более того, пакет — это крайне важная вещь при создании приложения. Пакет является идентификатором приложения в системе. Т.е. когда вы устанавливаете приложение, система смотрит его пакет и ищет уже установленное приложение с таким пакетом. Если не нашлось, то все ок и приложение устанавливается.
А вот если нашлось, то тут в дело вступает механизм подписи приложения ключом, который мы рассмотрели на прошлом уроке. Система проверяет, если установленное и устанавливаемое приложения подписаны одним и тем же ключом, то, вероятнее всего, это означает, что оба приложения создал один автор. И устанавливаемое приложение является обновлением установленного, т.к. их пакеты и ключи одинаковы. Система устанавливает новое приложение, заменяя старое — т.е. обновляет старое.
Если же система определила, что приложения были подписаны разными ключами, то это значит, что приложения были созданы разными авторами, пакеты совпали случайно, и новое вовсе не является обновлением старого. В этом случае при установке нового, старое было бы заменено, а значит потеряно (а не обновлено), т.к. приложения абсолютно разные. И система не дает поставить новое приложение, пока не будет вручную удалено старое.
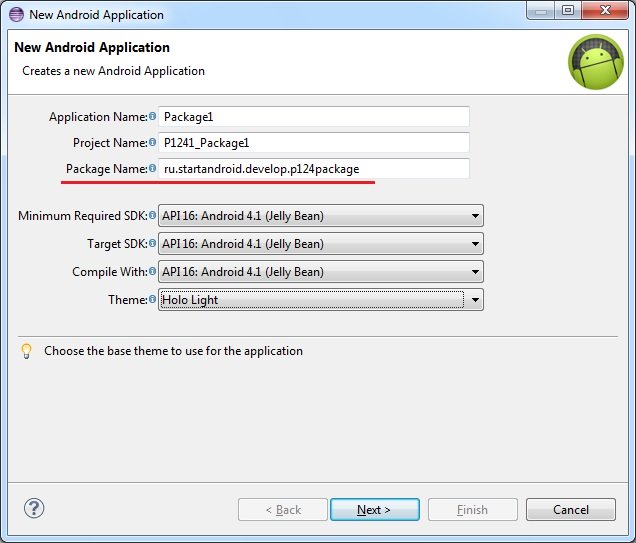
Проведем пару тестов. Я создам два приложения Package1 и Package2 с одинаковым пакетом.
Установлю первое. Оно появилось в списке.

Теперь не удаляя первое, установлю второе.
Первое исчезло. Осталось только второе.

Система решила, что второе является обновлением первого (т.к. пакеты и ключи совпадают), поэтому первое благополучно снесла и заменила вторым. Собственно, это и происходит при обычном обновлении.
Теперь подпишу Package2 другим ключом, чем оно было подписано изначально и попробую обновить через adb.

Параметр r здесь означает, что приложение надо переустановить, если оно уже существует.
Видим ошибку Failure [INSTALL_PARSE_FAILED_INCONSISTENT_CERTIFICATES]. Система сверила ключи у установленного и устанавливаемого приложений, увидела, что они разные и решила, что это будет не обновление, а просто приложение от другого разработчика ломится с тем же пакетом. И вполне разумно решила не удалять имеющееся приложение, а предупредить пользователя, что не совпадают ключи.
Если закинуть это приложение на эмулятор и поставить через файловый менеджер, получим примерно то же сообщение.

Из вышесказанного можно сделать следующий вывод: ваш ключ, которым вы подписываете приложение ни в коем случае нельзя терять или давать кому-либо.
Если вы ключ потеряете, то ваше приложение навсегда потеряет возможность быть обновленным. Даже если вы создадите новый ключ с тем же алиасом, паролем и данными владельца, это все равно будет другой ключ. И подписанная им следующая версия приложения будет рассматриваться системой не как обновление, а как попытка приложения от другого разработчика заменить ваше приложение и не даст его установить, пока не удалите установленное.
Если же вы ключ кому-то предоставите, то этот человек сможет сделать обновление для вашего приложения без вашего участия. И если этот человек имеет доступ и к вашей учетке разработчика в маркете, то он сможет залить туда свою версию вашего приложения.
Также не забывайте пароли от хранилища и от ключа. Это будет равносильно тому, что вы потеряли ключ. В общем, относитесь к вашим ключам со всей серьезностью.
И в конце урока небольшой ликбез. Пакет имеет еще одно значение. Как вы уже наверно заметили по вкладке Devices в Eclipse, пакет используется в качестве имени процесса, в котором запускается приложение. При этом, под каждое приложение система создает пользователя. Это позволяет разграничить доступ к данным. Каждое приложение запускается и работает со своими данными в отдельном процессе под отдельным пользователем. Соответственно, другие приложения не имеют к этим данным доступа, т.к. запущены под другими пользователями.
На следующем уроке:
— разбираемся с ViewPager
Присоединяйтесь к нам в Telegram:
— в канале StartAndroid публикуются ссылки на новые статьи с сайта startandroid.ru и интересные материалы с хабра, medium.com и т.п.
— в чатах решаем возникающие вопросы и проблемы по различным темам: Android, Kotlin, RxJava, Dagger, Тестирование
— ну и если просто хочется поговорить с коллегами по разработке, то есть чат Флудильня
— новый чат Performance для обсуждения проблем производительности и для ваших пожеланий по содержанию курса по этой теме
Источник
Install Android Studio
Setting up Android Studio takes just a few clicks.
Windows
To install Android Studio on Windows, proceed as follows:
- If you downloaded an .exe file (recommended), double-click to launch it.
If you downloaded a .zip file, unpack the ZIP, copy the android-studio folder into your Program Files folder, and then open the android-studio > bin folder and launch studio64.exe (for 64-bit machines) or studio.exe (for 32-bit machines).
That’s it. The following video shows each step of the setup procedure when using the recommended .exe download.
As new tools and other APIs become available, Android Studio tells you with a pop-up, or you can check for updates by clicking Help > Check for Update.
To install Android Studio on your Mac, proceed as follows:
- Launch the Android Studio DMG file.
- Drag and drop Android Studio into the Applications folder, then launch Android Studio.
- Select whether you want to import previous Android Studio settings, then click OK.
- The Android Studio Setup Wizard guides you through the rest of the setup, which includes downloading Android SDK components that are required for development.
That’s it. The following video shows each step of the recommended setup procedure.
As new tools and other APIs become available, Android Studio tells you with a pop-up, or you can check for updates by clicking Android Studio > Check for Updates.
Note: If you use Android Studio on macOS Mojave or later, you might see a prompt to allow the IDE to access your calendar, contacts, or photos. This prompt is caused by new privacy protection mechanisms for applications that access files under the home directory. So, if your project includes files and libraries in your home directory, and you see this prompt, you can select Don’t Allow.
Linux
To install Android Studio on Linux, proceed as follows:
- Unpack the .zip file you downloaded to an appropriate location for your applications, such as within /usr/local/ for your user profile, or /opt/ for shared users.
If you’re using a 64-bit version of Linux, make sure you first install the required libraries for 64-bit machines.
Tip: To make Android Studio available in your list of applications, select Tools > Create Desktop Entry from the Android Studio menu bar.
Required libraries for 64-bit machines
If you are running a 64-bit version of Ubuntu, you need to install some 32-bit libraries with the following command:
If you are running 64-bit Fedora, the command is:
That’s it. The following video shows each step of the recommended setup procedure.
As new tools and other APIs become available, Android Studio tells you with a pop-up, or you can check for updates by clicking Help > Check for Update.
Chrome OS
Follow these steps to install Android Studio on Chrome OS:
- If you haven’t already done so, install Linux for Chrome OS.
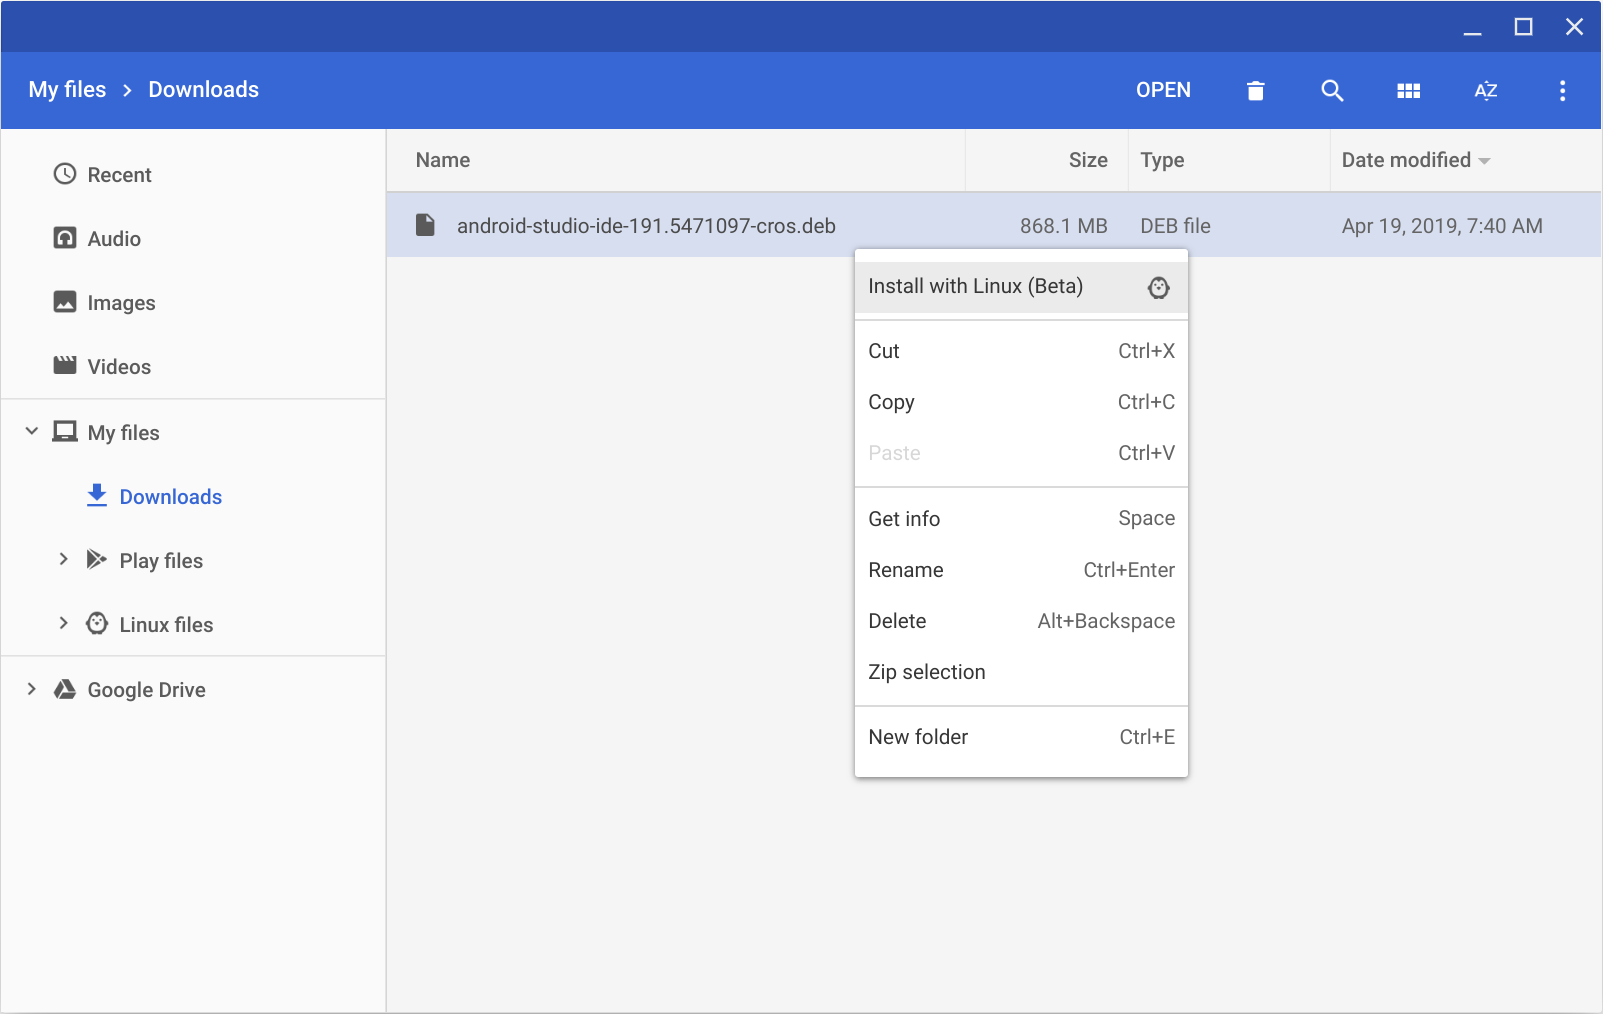
- Open the Files app and locate the DEB package you downloaded in the Downloads folder under My files.
Right-click the DEB package and select Install with Linux (Beta).
- If you have installed Android Studio before, select whether you want to import previous Android Studio settings, then click OK.
The Android Studio Setup Wizard guides you through the rest of the setup, which includes downloading Android SDK components that are required for development.
After installation is complete, launch Android Studio either from the Launcher, or from the Chrome OS Linux terminal by running studio.sh in the default installation directory:
That’s it. As new tools and other APIs become available, Android Studio tells you with a pop-up, or you can check for updates by clicking Help > Check for Update.
Content and code samples on this page are subject to the licenses described in the Content License. Java is a registered trademark of Oracle and/or its affiliates.
Источник


