- Use ADB and Fastboot Commands on Android without Root
- Installing ADB and Fastboot via Termux
- Using ADB Commands on Android without Root
- Install pkg on android
- [Guide] Running Linux on Android with 3D Acceleration / OpenGL (Root Required)
- Breadcrumb
- HolyChickenGuy
- Hentacler
- LedBass
- MishaalRahman
- NKS1608
- Richard177
- diejuse
- flunkyball
- saad maqsood
- flunkyball
- diejuse
- mr.knr
- pierro78
- zanfix
- pierro78
- zanfix
- pierro78
Use ADB and Fastboot Commands on Android without Root
ADB and Fastboot are versatile command-line tools for Android devices and emulators. It’s very easy to download and set up ADB and Fastboot on Windows, macOS, and Linux. Since Google doesn’t provide the Android SDK platform tools for Android devices officially, it’s not easy to install ADB and Fastboot on Android devices via the Termux terminal emulator app and Web ADB without root and a laptop or PC.
It’s possible to install ADB and Fastboot on Android by cloning any of the 3 Gits listed below using a terminal emulator like Termux.
Installing ADB and Fastboot via Termux
If you are a Mac user, don’t forget to check out my detailed tutorial on installing ADB and Fastboot on macOS.
Now let’s see how you can install ADB and Fastboot on an Android phone or tablet.
- Download and install Termux from the Play Store.
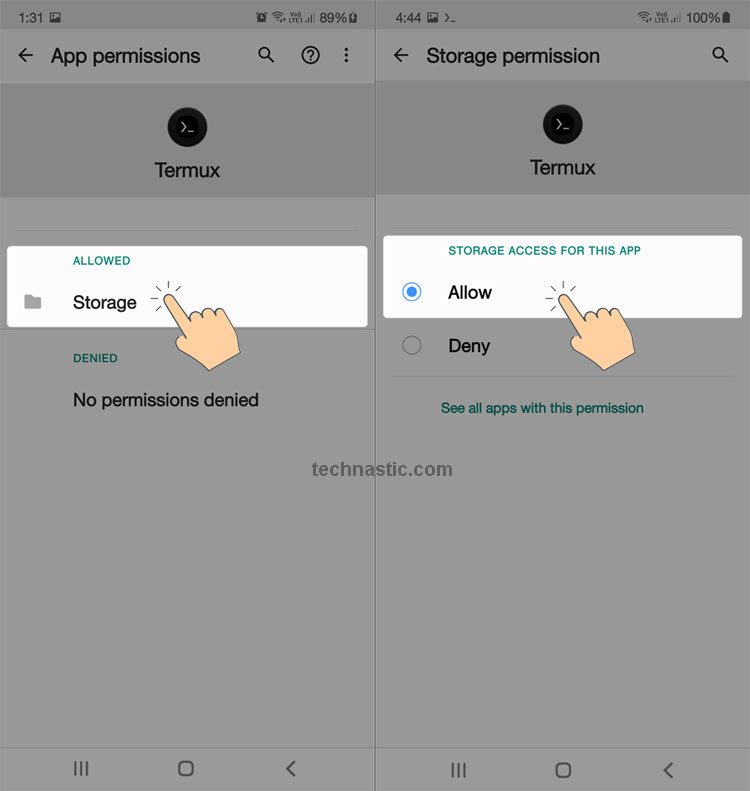
- Having installed the app, you need to grant Storage permission to Termux. To do so, go to Settings > Apps > Termux and tap on Permissions. Then tap on Storage and select Allow.

- Now open Termux, type the following command, and tap the Enter key on the keyboard.
- Now, execute the following command to upgrade Termux packages.
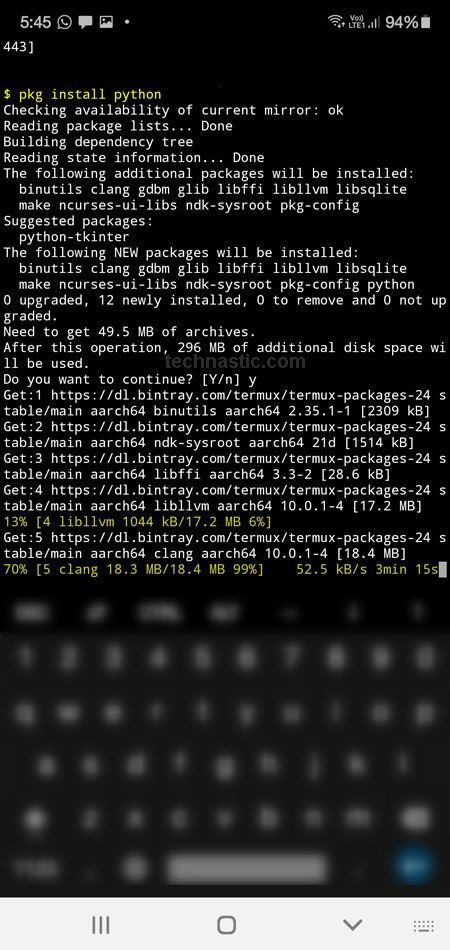
- Since ADB Fastboot Termux is a Python-based script, we need to install Python on the Android device. Issue the following command in Termux.

Okay, it’s time now to clone the ADB Fastboot Termux Git using Termux.


You can also install the ADB and Fastboot tools on your Android using a single command. This command includes all the above commands in one line.
If you own a Samsung Galaxy device, you can download Samsung firmware on your phone or tablet via Termux. Read my detailed tutorial to learn how you can do that.
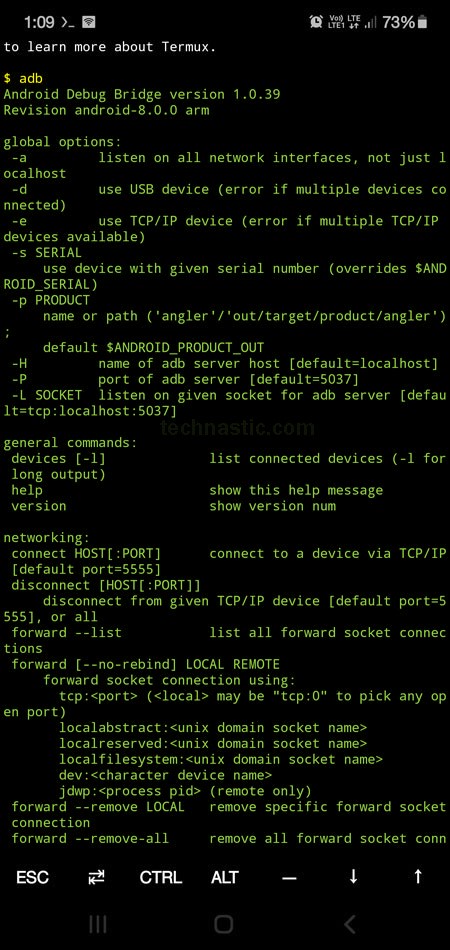
Having set up ADB and Fastboot on your Android phone or tablet, it’s time to verify that you have done everything as expected. Type one of the following commands in Termux and tap the Enter key.
As you can see below, you’ll get information such as the Android Debug Bridge version and other ADB options on your phone’s screen.
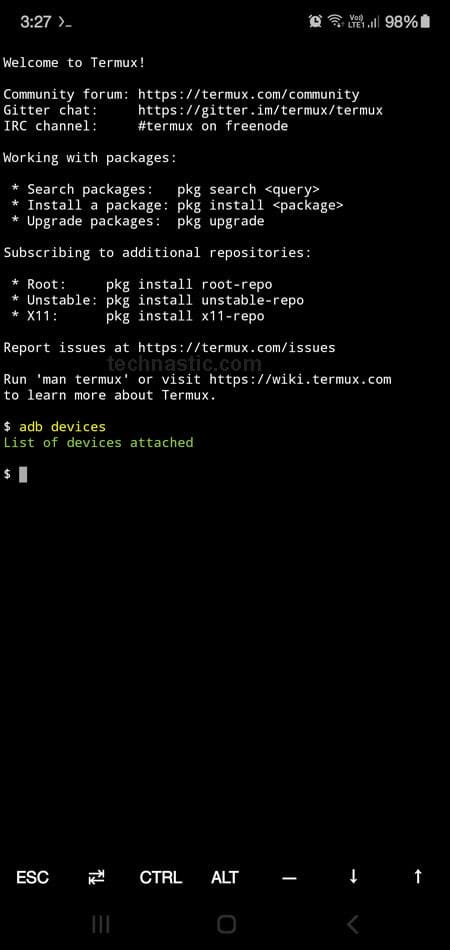
Please note that if you run the adb devices command, you won’t get any device ID under the list of devices attached because your Android device will now act like an ADB/Fastboot host.
Please note that in order to use ADB and Fastboot commands, your host Android device needs to be rooted as it can be done using a Magisk module called ADB & Fastboot for Android NDK. I’ll be updating this tutorial describing the steps to use ADB commands without a PC or laptop.
Using ADB Commands on Android without Root
Very recently, a developer named Yume Chan launched a website that lets us use ADB commands on Android devices via mobile browsers like Chrome and Microsoft Edge. It means that now we no longer need a rooted Android device to use ADB. Web ADB, as it’s aptly named, makes use of the WebUSB API found in all Chromium-based desktop and mobile browsers.
Web ADB comes with a bunch of features. It lets you send you ADB commands from one Android device to another, mirror the screen and control the other device, install APK, browse the files on the other device, capture screenshots, etc.
Prerequisites
- Two Android devices (phone or tablet).
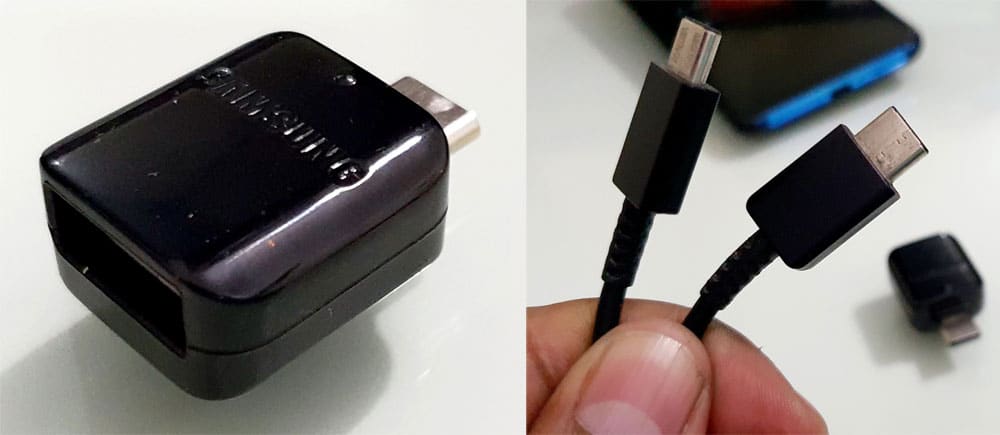
- A USB OTG or a USB Type-C to a USB Type-C cable.
- Enable USB debugging on the Android device you want to send ADB commands to.
Let’s see how to use Web ADB to run ADB commands on Android devices without root. You can one of two Android devices you have as a host to perform ADB commands on the other device.
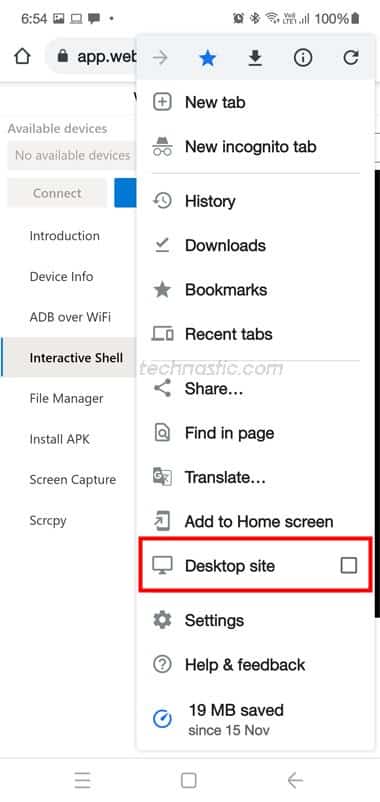
- Open Web ADB website on the Android device you want to use as a host.
- Tap the 3-dot icon in the Chrome browser and enable the Desktop site option.
- Insert the USB OTG or the USB Type-C cable on the device you want to use as a host. Now plug in the other end of the USB cable into the client Android device you want to send the command to.
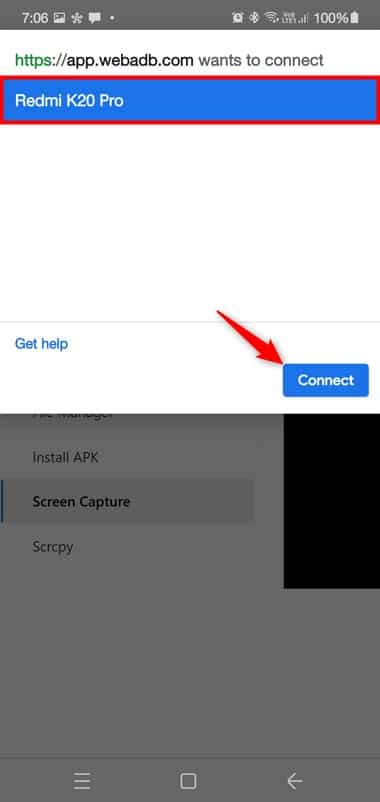
- Tap on the Add Device option on the Web ADB website. Select your device in the pop-up window and tap on the Connect button.
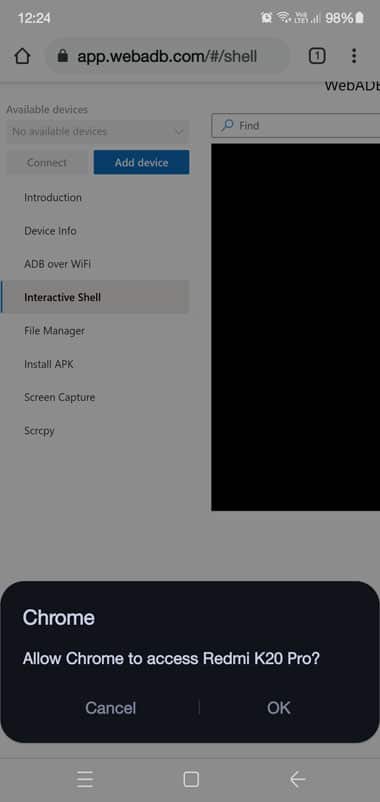
- Tap on OK when the browser asks to grant access to your connected device.
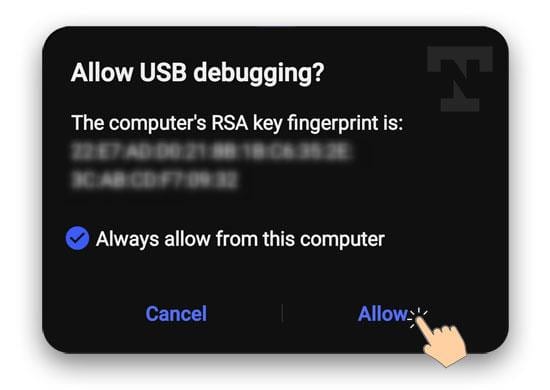
- At this point, you will receive a notification on your second device asking you to Allow USB debugging. Tap on Allow.
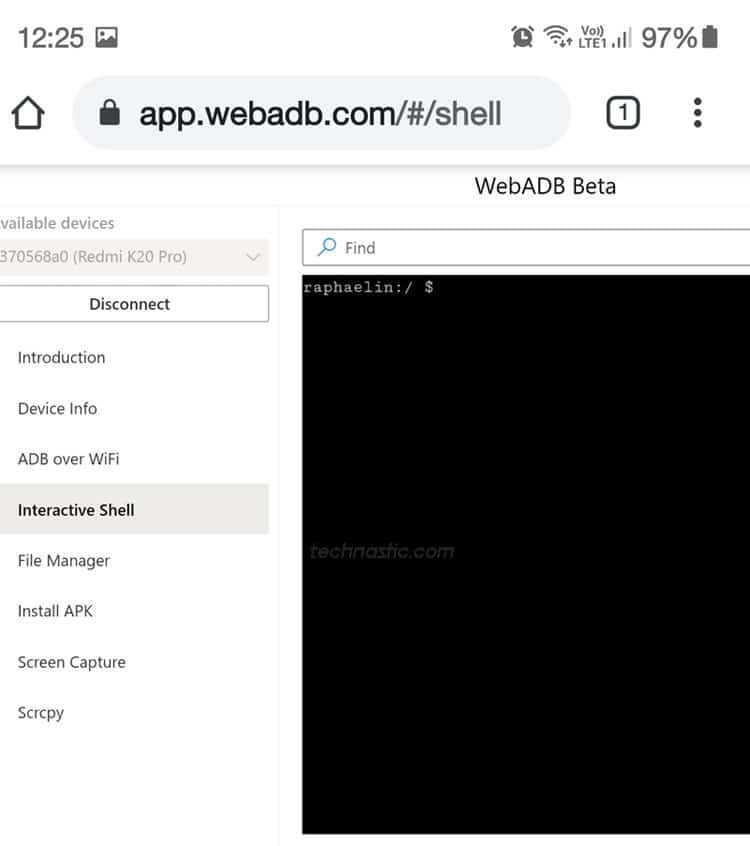
- You’ll see your device codename in the Web ADB command box. It means that both the devices have been appropriately connected for ADB operations.
- You’re now all set to use ADB commands or ADB Shell commands to control the connected Android device. Just keep in mind that you are supposed to omit “adb” and “adb shell” in the commands that you use while executing them on a computer. For example, if you want to reboot the connected Android phone or tablet into the bootloader mode, you should use just reboot bootloader and tap on the Enter key on the keyboard.

You can execute any other ADB command on your Android device without a laptop or PC without rooting your device.
Источник
Install pkg on android
Краткое описание:
Установка Linux на Android в Termux без рут-прав
Andronix lets you install a Linux system on your Android Device without root. We found out that using Linux on Android is quite useful and lets you do many heavy tasks on your Android device.
This app lets you install various popular Linux distributions on your Android device by using Termux and PRoot functionality on the Android system. The application also provides you a graphics layer or Desktop environment (Xfce, MATE, LXDE, LXQT and KDE) on the top of the Linux shell which makes the user experience much better than working on a Linux command line.
* Manjaro is now available with xfce, lxqt, lxde and mate.
* Ubuntu KDE is now available which is great success.
* KDE Performance optimization — Better performance.
* Added multiple Window manager — Better look in KDE.
* Prinstalled softwares and themes — Makes a better aesthetic.
* AndroNix Premium — We have released AndroNix Premium with tons of features.
* Dark Mode — Use AndroNix at night comfortably.
* AndroNix Commands — A special addition to the family of AndroNix. It’s all you need to manage your commands throughout your life. Just copy and paste!
* AndroNix Web App — We have also released our web app to compliment AndroNix commands on Android, so you can now access Commands on any internet connected device.
* AndroNix Feed — We saw that since the last release you guys were really happy about the blogs we posted. So now we have a dedicated blog feed to make a better use of Linux and the power it offers.
* Offline Downloads — Internet can be unpredictable sometimes, but don’t worry we’re introducing offline support of Linux distros, though you’ll be still needing internet to download some files depending upon your device at the time of installing.
* Robust Documentation — We’ve been working on writing some documentations for weeks now. This will enable you to help yourself without waiting for us to reply.
* Priority Support — AndroNix Premium bring priority support with it at no extra cost. IF you’re an AndroNix Premium member just enjoy the blazing fast support, on the platform you like!
* Communities budding — We now support official AndroNix communities on Telegram and WhatsApp. We will soon expand to other platforms as well.
* UI overhaul — We’ve redisgned almost every element the our app and worked on user experience more than ever
* Automation Added — If you choose AndroNix Premium, we’ll handle everything for you. Just login and forget the rest.
* Profile Tab Added — Profile let’s you see your current status (Premium or not). If you’re a premium member, profile section has many things for you.
* Termux is now available offline — We now offer an offline copy of Termux within
AndroNix.
If you are new to Linux, we provide you easy and hassle-free instructions which makes your first impression of Linux a lot better. In case you still face some issues you can easily contact us on various platforms mentioned in the app. We ensure you that we will contact you as soon as possible.
— No root permissions required.
— Distros we support:
* Manjaro
* Ubuntu
* Kali Linux
* Debian
* Parrot OS
* Fedora
* Arch Linux
— Desktop environments we support:
* KDE
* LXDE
* LXQT
* MATE
* XFCE
— One click install/uninstall feature.
— Features multiboot linux system.
— Termux in required.
— Android version should be at least 5.1
— Device architecture supported: ARMv7, ARM64, x64.
Требуется Android: 5.1 и выше
Русский интерфейс: Нет
Источник
[Guide] Running Linux on Android with 3D Acceleration / OpenGL (Root Required)
Breadcrumb

HolyChickenGuy
Senior Member
Now on to the tutorial!
Now you have all those apps installed lets continue
Open Termux then enter:
Open Linux Deploy and configure it to your likings
And im not gonna tell you my password
After you’ve set up your configuration scroll down and configure init, mounts and ssh
Now you’ve set this all up go back to the main overview screen of Linux Deploy, hit the tripple dot menu and install!
After the install is done, hit START
Now open Termux and install SSH:
Now open Sparkle and click «edit user.sh» and delete everything then hit «save», Go back to the main screen of Sparkle and hit «Start», you should see a notification appear in your status bar
Now to start everything go back to Termux and assuming you’re still SSH’ed into Linux type:
If you want everything to automatically start when pressing «START» in Linux Deploy than you can configure this
Open Termux and connect to Linux via SSH and change the permissions/edit the rc.local file: (edit username to the username set in Linux Deploy)
Now every time you want to use Linux just open Sparkle, hit «Start», then go to Linux Deploy and start linux and your DE will automatically load up on your screen without entering a single command!
Hentacler
Member
LedBass
New member
What version of Sparkle did you use? I’ve tried this tutorial here but received an error of wayland-0 not found when I try to run my linux installation on my device
I’ve looked in the folder /data/data/com.sion.sparkle/files and this folder is empty
Thanks for the tutorial!

MishaalRahman
Retired Editor in Chief
NKS1608
Member
I managed to use it, but with xfce KDE had a black screen, and I couldn’t use the audio even though I made the alsa plugin, and it doesn’t rotate the screen, but it’s very good.
Richard177
Member

diejuse
Member
flunkyball
Senior Member
@HolyChickenGuy
Thanks for the well done tutorial ! I followed it and it worked out of the box.
However, two issues I came accross to which I did not find the solution, yet:
1. Is there a way to rotate the screen ?
2. How can I bring the X-window to the second screen connected via USB->HDMI adapter ? I tried to set DISPLAY:1 but 1 was not found and :0 is the devices screen.
Cheers mate and keep up the good work.

saad maqsood
Member
You can Also use Termux Desktop
Termux desktop is much faster and easier to use and you can experience a complete Linux GUI with termux, and it Is also lightwight.
flunkyball
Senior Member
The described way basically is using Termux the way you propose. However it adds the 3D acceleration by using sparkle which is definitely a plus.
———- Post added at 09:49 PM ———- Previous post was at 09:47 PM ———-
@HolyChickenGuy
Thanks for the well done tutorial ! I followed it and it worked out of the box.
However, two issues I came accross to which I did not find the solution, yet:
1. Is there a way to rotate the screen ?
2. How can I bring the X-window to the second screen connected via USB->HDMI adapter ? I tried to set DISPLAY:1 but 1 was not found and :0 is the devices screen.
Cheers mate and keep up the good work.
diejuse
Member
mr.knr
Member
but what if i want to install LXQt on my device
#!/bin/bash
set -e
sudo chmod 777 /sparkle
sudo chmod 777 /sparkle/wayland-0
XDG_RUNTIME_DIR=/sparkle Xwayland &
sleep 1
export DISPLAY=:0
startplasma-x11
what should i change in the script.
pierro78
Senior Member
sorry for the probably dumb question but Xsdl seems to work work quite well in my use cases (like watching youtube videos in 360p on my Samsung Tab S5e) .
. so I am wondering : what are the advantages of Sparkle/Wayland over Xsdl ?? . will my youtube videos be smoother ??
. does Sparkle/Wayland has better touch support than Xsdl ?? . for example can you scroll a web browser window by touching inside the window (not the scrollbar) with your finger ??
zanfix
Member
sorry for the probably dumb question but Xsdl seems to work work quite well in my use cases (like watching youtube videos in 360p on my Samsung Tab S5e) .
. so I am wondering : what are the advantages of Sparkle/Wayland over Xsdl ?? . will my youtube videos be smoother ??
. does Sparkle/Wayland has better touch support than Xsdl ?? . for example can you scroll a web browser window by touching inside the window (not the scrollbar) with your finger ??
pierro78
Senior Member
wow 1080 ! that would be awesome ! thanks for the info !!
actually 360p is not so smooth on my S5e without android-shmem library .
if I understand correctly I just have to compile that in my chroot and then the shared memory feature is already supported in the Xserver xsdl that I installed from the playstore ??
zanfix
Member
wow 1080 ! that would be awesome ! thanks for the info !!
actually 360p is not so smooth on my S5e without android-shmem library .
if I understand correctly I just have to compile that in my chroot and then the shared memory feature is already supported in the Xserver xsdl that I installed from the playstore ??
android-shmem library can give you a performance boost if the application you are running can use the x server MIT-SHM extension
For video playback in a web browser, firefox-esr for example, the android-shm library will not give you any performance gain.
Since there is no hardware acceleration in xsdl, In order to put the minimum possible load on the cpu you should match the screen resolution of the xserver with the target max resolution of the videos you are planning to playback.
My tab s6 has 2560×1600 native resolution, i run the xserver at 1920×1200 so I keep the aspect ratio of the screen but match the clip (tube video) native resolution (so that no rescaling will happen)
I can get acceptable youtube video playback also on my old pixelc c, that has a quadcore a57
pierro78
Senior Member
well I don’t know what I did wrong previously . my youtube videos seem to play nice on 1080 in Xserver xsdl with arm64 vivaldi in my chroot (Tab S5e) with or without
env LD_PRELOAD=»/home/pierro78/android-shmem/libandroid-shmem-aarch64.so» icewm&
now !
and I don’t see any difference with or without LD_PRELOAD=»/home/pierro78/android-shmem/libandroid-shmem-aarch64.so» in vivaldi although it may support x server MIT-SHM extension as you said ??
also I have errors when using /home/pierro78/android-shmem/libandroid-shmem-aarch64.so when I start icewm (same errors if regular user or root) :
[email protected]:/home/pierro78# icewm&
[1] 8527
[email protected]:/home/pierro78# Failed to connect to session manager: Failed to connect to the session manager: SESSION_MANAGER environment variable not defined
shmget: key 0 size 4096 flags 01600 (flags are ignored)
shmget: bound UNIX socket /dev/shm/00002157
listening_thread: thread started
shmget: ID 0 shmid 21570001 FD 7 size 4096
shmat: shmid 21570001 shmaddr (nil) shmflg 0
shmat: mapped addr 0x735094b000 for FD 7 ID 0
shm_remove: deleting shmid 21570001
shm_remove: shmid 21570001 is still mapped to addr 0x735094b000, it will be deleted on shmdt() call
shmdt: unmapped addr 0x735094b000 for FD 7 ID 0 shmid 21570001
shmdt: deleting shmid 21570001
and when I start vivaldi as regular user :
shmctl: cmd 3 not implemented yet!
shmget: key 0 size 2946039 flags 01606 (flags are ignored)
shmget: cannot bind UNIX socket, bailing out
[7437:7437:0426/232122.758794:ERROR:CONSOLE(0)] «Unchecked runtime.lastError: The message port closed before a response was received.», source: chrome-extension://mpognobbkildjkofajifpdfhcoklimli/browser.html (0)
shmget: key 0 size 112140 flags 01606 (flags are ignored)
shmget: cannot bind UNIX socket, bailing out
shmget: key 0 size 368460 flags 01606 (flags are ignored)
shmget: cannot bind UNIX socket, bailing out
or if I start vivaldi as root user :
shmctl: cmd 3 not implemented yet!
shmget: key 0 size 2831220 flags 01606 (flags are ignored)
shmget: bound UNIX socket /dev/shm/00001f6e
shmget: ID 0 shmid 1f6e0001 FD 36 size 2834432
shmat: shmid 1f6e0001 shmaddr (nil) shmflg 0
shmat: mapped addr 0x71b6582000 for FD 36 ID 0
shm_remove: deleting shmid 1f6e0001
shm_remove: shmid 1f6e0001 is still mapped to addr 0x71b6582000, it will be deleted on shmdt() call
shmdt: unmapped addr 0x71b6582000 for FD 36 ID 0 shmid 1f6e0001
shmdt: deleting shmid 1f6e0001
listening_thread: thread started
[7990:7990:0426/232440.532571:ERROR:CONSOLE(0)] «Unchecked runtime.lastError: The message port closed before a response was received.», source: chrome-extension://mpognobbkildjkofajifpdfhcoklimli/browser.html (0)
I am not sure how to check if my libandroid-shmem-aarch64.so is working ??
I would expect some «files» in /dev/shm but there is nothing there .
Источник


