- What Is Setup Wizard On Android Phone?
- How to Install Setup Wizard on Android
- Features of Setup Wizard
- How to Run Android Setup Wizard
- How to Skip the Google Setup Wizard
- [Hack] Skip WiFi setup/ Setup wizard while booting Android for first time.
- Breadcrumb
- yourSAS
- Install Android Studio
- Windows
- Linux
- Required libraries for 64-bit machines
- Chrome OS
- How to fix Android Setup Wizard Keeps Stopping or Setup Wizard not working
- Android Setup Wizard Keeps Stopping or Setup Wizard not working or Setup Wizard Keeps Crashing
- What is the Android Setup Wizard or What is the Setup Wizard on Android phone?
- How to Skip Android Setup Wizard: Fix Android Setup Wizard keeps stopping or Android Setup Wizard keeps crashing.
- Method one to fix Android setup wizard keeps stopping by clearing app’s data.
- The second method to fix the Android setup wizard not working is a little complex. You have to Factory reset your device but it’s not guaranteed that it will fix the problem.
- Custom ROM setup wizard keeps stopping or setup wizard keeps stopping in custom ROM after first boot in Android 11 or Android 10 ( can’t install GAPPS )
- Here is a video guide in case you don’t understand the process.
What Is Setup Wizard On Android Phone?

Have you ever wondered how you can set up a Wizard on your android phone? Or you do not know what setup Wizard on an android phone is? Then this article will take you step- by –step on how to setup Wizard on android phone.
A setup wizard is a tool that is installed in the android phone to help the user to manage applications. The setup wizard performs various functions. The primary purpose of the setup wizard that has a premium license is to allow the user to restore previous applications on a new phone. The setup wizard also enables the user to install a custom ROM.
How to Install Setup Wizard on Android
Apart from enabling the user to restore previous applications on a new phone and to install a custom ROM, android setup wizard also provides multiple profiles for users with various Android devices.
Features of Setup Wizard
The characteristic feature of the setup wizard is that it assists the user to initialize an android phone. The Wizard can internalize the already installed apps and categorize them in a wizard way. The setup wizard has a feature that provides multiple profiles for different devices for premium users.
The setup wizard is useful in the installation of the commonly used apps in android phone. The wizard searches for apps categorically and gives a back-up of currently installed apps. The back-up feature is for the premium users. Get comprehensive features of Android setup wizard.
How to Run Android Setup Wizard
Follow the following steps to run the android setup wizard:
1. The first step to run the android setup Wizard is to select the default language. This is done by tapping on the icon ‘’Changing the Default Language.’’ By tapping, the user can manually choose the new default language.
2. The Android setup allows you to change the hearing, vision, or dexterity issues. Changing of the font is optional and is done by tapping Settings-> Accessibility. By tapping this icon, the user can review or modify the Accessibility settings like font size.
3. After you have set the default language and display font size, the user can now move to the next step. On the opening screen, select Start and then Next on the Accessibility screen to move to the next level.
4. Ensure that your network is stable. If the system you are using is stable, select the network’s name and enter your network password. Tap Connect->Next to proceed.
5. You are required to read the End User License Agreement (EULA) carefully. Tick on the ‘’I Understand’ box after you have read.
6. You need to read the Consent to get the Diagnostic and Usage Data information. It is optional; therefore, you can choose Yes or No Thanks. Then choose Next.
7. To access the Android services and apps, the user requires a Google/ Gmail account.
Select Yes and enter the account information if you already have a Google / Gmail account.
Tap on ‘Get an Account’ to create a Google/ Gmail account if you don’t have one.
8. Tap the checkboxes to set Google location preferences. Select Next.
9. You will see a message ‘This phone belongs to…’ Enter your name to personalize your phone. Tap on the right arrow icon to continue.
10. For the Samsung user, some Samsung apps require a free Samsung account.
Tap Sign In to register now if you already have a Samsung account. You will be required to enter your email address and Samsung password.
Select Create Account if you do not have a Samsung account to create one.
11. There is an option of editing the name that will be used to identify the phone.
12. You can also enable Easy mode for a simpler user interface for your Android phone.
13. Tap on Finish to dismiss the Wizard.
Some versions of the Android phones may display additional options, and dialogue boxes as Wizard configure the phone to initial use. Just follow the prompts, and you are good to go.
How to Skip the Google Setup Wizard
The Google setup wizard is part of the Android Operating System, and usually, it cannot be skipped. However, you can skip the Google setup wizard using the Honeywell provisioner. Skipping of Google setup wizard only applies to Android phones with mobility hardware of; 75e Android, CT50 Android, CT60 Android, CN51 Android, CN75, CK75, EDA50, and Android 4.x, Android 6.x, Android 7.x Operating systems. Follow these steps to skip the Google setup wizard:
1. For mobility, use EZConfig on a PC and open the applicable DeviceConfig.xml initially retrieved from the device.
2. Set the required parameters at 0. These parameters include ‘Other Settings’>’GoogleStartupWizard.’
3. Print the configuration barcode. You can also download the code from File 1.
4. The Google Setup Wizard will appear after a factory reset of the device.
To activate the settings, scan the setup barcodes and save Deviceconfig.xml in IPSM/ Honeywell/persist.
6. The device will show the ‘desktop.’
7. As the Deviceconfig.xml is stored in IPSM/ Honeywell/ persist, a factory rest (without the option ‘Erase IPSM’ ticked) will skip the Google Setup Wizard again.
Note: After the Factory Reset during the normal setup, the wizard screens will have to be answered one-by-one as shown below:
1. Language screen> Press ‘Start.’
2. Wi-Fi screen>Press ‘Skip’> ‘Skip Anyway’
3. Google & Location screen> Press ‘Right Arrow’>’Right arrow’
4. Date & Time screen >Press ‘Right Arrow’
5. ‘This device belongs to’ screen> Press ‘Right Arrow’>’Right Arrow.’
6. Google Services screen> Press ‘Right Arrow’> ‘Finish’
Источник
[Hack] Skip WiFi setup/ Setup wizard while booting Android for first time.
Breadcrumb
yourSAS
Senior Member
We had plenty of sweet surprises for Mi 4i recently, especially considering the Nougat ROMs. This also implies that you’ll be busy in flashing a plenty of times.
You should also have noticed by now that when you flash a new ROM, you can’t entirely Skip the network connection requirement after the first boot. This annoyed me so much because I have a slow, conservative bandwidth.
Fortunately, I have found a solution; but make no mistake, I’m NOT the author of this solution. This method was originally for Nexus 7 by organophosphate. I’m just extending this amazing trick to Mi 4i.
If you want, you can read the original post.
What do you need?
- PC
- Your phone
- TWRP recovery
- ADB on PC
Have them all before proceeding.
1. After installing your ROM through TWRP, mount system partition(Advanced>Mount>check system).
2. Connect your phone to PC via USB. Let the phone be in recovery. All the work is to be done in the same.
3. Launch ADB. Just ensure proper connection by first using adb usb and then adb devices commands. It should then show your phone connected in recovery mode.
4. Now, the important part.
- If you want to skip only the WiFi setup part but not the rest of initial setup, execute adb shell sed -i ‘s/ro.setupwizard.wifi_required=true/ro.setupwizard.wifi_required=false/g’ /system/build.prop
- If you want to skip entire setup and directly goto home screen, launch Shell by executing adb shell and then execute the command echo «ro.setupwizard.mode=DISABLED» >> /system/build.prop.
5. Reboot your phone, either by using adb reboot (or just reboot in Shell) or using Reboot option in recovery.
6. Now, you should see a Skip button in WiFi setup page or Home screen depending on your choice in step 4.
7. Enjoy/explore your new OS
Few personal notes:
1. Entire procedure should happen while your phone is in recovery mode.
2. Skipping the setup wizard entirely has more working chance(almost every time) than skipping just WiFi setup. Skipping WiFi setup rarely worked for me. So, I’d recommend the former option.
3. Skipping initial setup entirely won’t cause any trouble as it just for collecting the very basic information. Those details can be set manually later.
5. This method won’t cause any trouble usually. That said, I’m not responsible for bootloops(although I haven’t encountered it yet). This is not to discourage you but to let you know of worst case scenario. Should this happen, please refer to original article mentioned earlier.
Credits :
organophosphate for this amazing hack.
I(yourSAS) may/may not deserve credit for extending the method and sharing, depending on your result
Источник
Install Android Studio
Setting up Android Studio takes just a few clicks.
Windows
To install Android Studio on Windows, proceed as follows:
- If you downloaded an .exe file (recommended), double-click to launch it.
If you downloaded a .zip file, unpack the ZIP, copy the android-studio folder into your Program Files folder, and then open the android-studio > bin folder and launch studio64.exe (for 64-bit machines) or studio.exe (for 32-bit machines).
That’s it. The following video shows each step of the setup procedure when using the recommended .exe download.
As new tools and other APIs become available, Android Studio tells you with a pop-up, or you can check for updates by clicking Help > Check for Update.
To install Android Studio on your Mac, proceed as follows:
- Launch the Android Studio DMG file.
- Drag and drop Android Studio into the Applications folder, then launch Android Studio.
- Select whether you want to import previous Android Studio settings, then click OK.
- The Android Studio Setup Wizard guides you through the rest of the setup, which includes downloading Android SDK components that are required for development.
That’s it. The following video shows each step of the recommended setup procedure.
As new tools and other APIs become available, Android Studio tells you with a pop-up, or you can check for updates by clicking Android Studio > Check for Updates.
Note: If you use Android Studio on macOS Mojave or later, you might see a prompt to allow the IDE to access your calendar, contacts, or photos. This prompt is caused by new privacy protection mechanisms for applications that access files under the home directory. So, if your project includes files and libraries in your home directory, and you see this prompt, you can select Don’t Allow.
Linux
To install Android Studio on Linux, proceed as follows:
- Unpack the .zip file you downloaded to an appropriate location for your applications, such as within /usr/local/ for your user profile, or /opt/ for shared users.
If you’re using a 64-bit version of Linux, make sure you first install the required libraries for 64-bit machines.
Tip: To make Android Studio available in your list of applications, select Tools > Create Desktop Entry from the Android Studio menu bar.
Required libraries for 64-bit machines
If you are running a 64-bit version of Ubuntu, you need to install some 32-bit libraries with the following command:
If you are running 64-bit Fedora, the command is:
That’s it. The following video shows each step of the recommended setup procedure.
As new tools and other APIs become available, Android Studio tells you with a pop-up, or you can check for updates by clicking Help > Check for Update.
Chrome OS
Follow these steps to install Android Studio on Chrome OS:
- If you haven’t already done so, install Linux for Chrome OS.
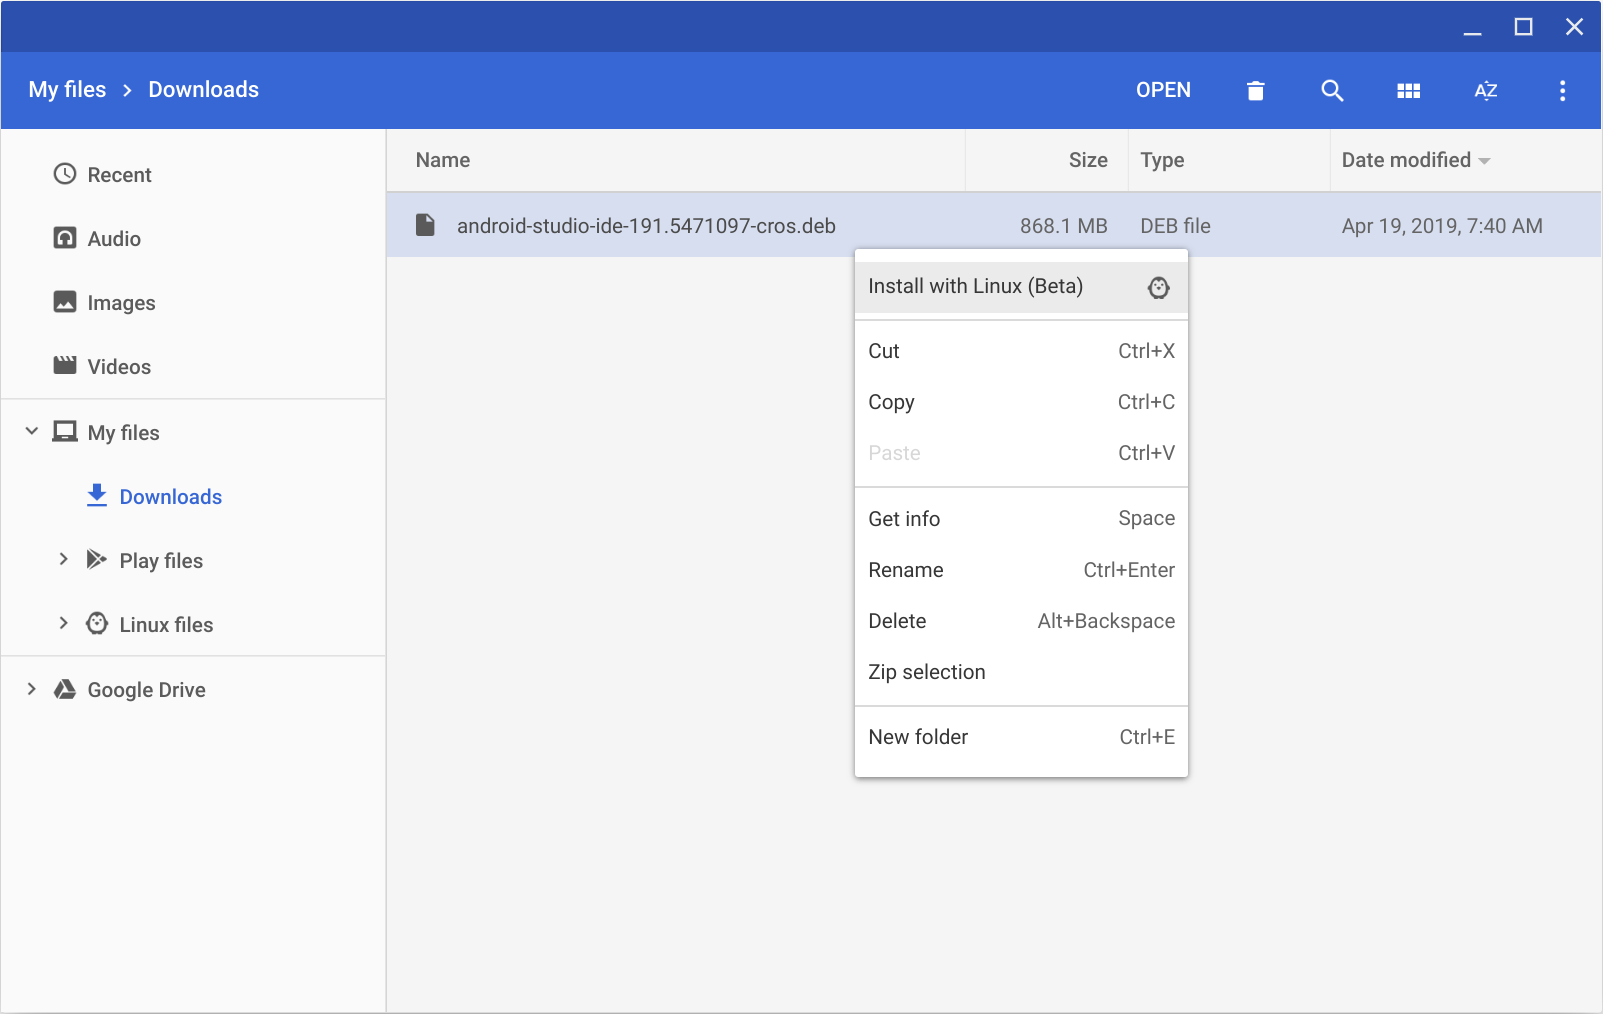
- Open the Files app and locate the DEB package you downloaded in the Downloads folder under My files.
Right-click the DEB package and select Install with Linux (Beta).
- If you have installed Android Studio before, select whether you want to import previous Android Studio settings, then click OK.
The Android Studio Setup Wizard guides you through the rest of the setup, which includes downloading Android SDK components that are required for development.
After installation is complete, launch Android Studio either from the Launcher, or from the Chrome OS Linux terminal by running studio.sh in the default installation directory:
That’s it. As new tools and other APIs become available, Android Studio tells you with a pop-up, or you can check for updates by clicking Help > Check for Update.
Content and code samples on this page are subject to the licenses described in the Content License. Java is a registered trademark of Oracle and/or its affiliates.
Источник
How to fix Android Setup Wizard Keeps Stopping or Setup Wizard not working
Android Setup Wizard Keeps Stopping or Setup Wizard not working or Setup Wizard Keeps Crashing
Android setup wizard keeps stopping in your phone that’s why you are here right? Maybe you are getting this error because you have successfully installed custom ROM and GAPPS and even after booting and successfully making it to the home screen or you are stuck with Android setup wizard keeps stopping and you are not able to to move forward and you are stuck in here. The cause happens due to Google Security features embedded into Google Apps.
So this issue can be solved easily and is quite simple to do. But I will not be responsible if anything happens to your phone or your phone goes into bootloop or gets bricked. So do at your own risk. But I am positive that this thing won’t happen. So let’s start with what is Android setup wizard?
What is the Android Setup Wizard or What is the Setup Wizard on Android phone?
Android setup wizard or setup wizard is a system tool that is used to set up the phone for the first time. When you first buy your phone and boot it for the first time then the setup wizard occurs.
The setup wizard includes language, country, default mobile data connection, default message, Wi-Fi settings, wallpaper settings, screen lock settings, backup settings, etc.
Android setup wizard is not necessary on the first boot and it can be set up later on. But people forget to set up the phone so that’s why it appears on the first boot. But it can be irritating and problematic if the Android setup wizard itself gets unresponsive and the setup wizard keeps crashing.
The Android setup wizard won’t let you move further ahead until the Android setup wizard activation is complete. If the Android setup wizard activation is incomplete then you will have to bypass the Android setup wizard. Now let’s look at how to fix the setup wizard.
How to Skip Android Setup Wizard: Fix Android Setup Wizard keeps stopping or Android Setup Wizard keeps crashing.
Setup wizard keeps stopping Android can be fixed by clearing the Setup Wizard’s data or factory resetting. This method will work if you have a working Android operating system but the setup wizard is unresponsive or the setup wizard is crashing. To fix this issue follow the steps below.
Method one to fix Android setup wizard keeps stopping by clearing app’s data.
Step 1: Go to system settings
Step 2: Then go to Apps and Notification or Apps and Features or All Apps.
![]()
Step 3: Choose ” See all apps ” or if you have 3 dots on the right or left corner, click on it and choose all apps.
Step 4: Check for three dots on the left or right corner and select ” Show system apps “
![]()
![]()
Step 5: Search for ” Android Setup ” and click on it.
Step 6: Now select and click ” Force Stop ” and then click on ” Storage option ” or ” Storage and Cache “
 force stop
- force stop app
- storage and cache
Step 7: click on ” Clear Cache ” and ” Clear Data ” and click on ok whenever it asks to confirm the action.
- clear data or clear storage
- clear app data
The second method to fix the Android setup wizard not working is a little complex. You have to Factory reset your device but it’s not guaranteed that it will fix the problem.
Step 1: Backup everything from your device. ( Internal, Messages, Calls, Contacts, Photos, Videos, etc. )
Step 2: Go to system settings
Step 3: Then go to ” System and Language ” or ” System “
Step 4: Choose ” Reset options ” or ” Factory and reset “
Step 5: Click on ” Erase all data ” or ” Factory Reset Device ” and it will start factory resetting and it will automatically boot the device. ( Do at your own risk )
- erase all data in factory reset
- factory reset option in android
Custom ROM setup wizard keeps stopping or setup wizard keeps stopping in custom ROM after first boot in Android 11 or Android 10 ( can’t install GAPPS )
With the Android 11 release, users are unable to flash Vanilla custom ROM variant with GAPPS because the setup wizard keeps stopping in custom ROM after the first boot. That is why they can’t move forward because Android setup wizard activation is incomplete. The Vanilla variant of custom ROM is great for extra customizability but because of this problem users are unable to install GAPPS.
Here is a video guide in case you don’t understand the process.
So here is the fix to custom ROM setup wizard keeps stopping. Follow the steps below to successfully fix this problem.
Step 1: Boot into custom recovery
Step 2: Go to wipe section and clean Dalvik, Cache, Data, and System
Step 3: Now go to Zip Flash or Files and choose a ROM to install
Step 4: After choosing ROM File, add another Zip and choose GAPPS file
Step 5: Swipe to confirm flash
Step 6: After flashing ROM and the GAPPS file, go to the wipe section and Format data.
Step 7: To format data, choose format section and type yes, and then hit enter, after this, the format data process will start
Step 8: Reboot your smartphone
Step 9: After rebooting the smartphone, you should see the Android setup wizard keep stopping or the Android setup wizard keeps crashing.
Step 10: Now, press and hold your power button and reboot into recovery.
Step 11: Now go to the Mount section in TWRP or go to the menu in Orange Fox and then go to Mount and Mount System partition.
- orange fox menu
Step 12: After Mounting System go to Files or File manager then go to this location. (root)/System_root/system/priv-app/(AndroidSetupWizard)
Step 13: Now after going to this location, delete the Android setup wizard folder by pressing and holding on to the folder then choose ” delete ” and then ” swipe to confirm ” to successfully delete the folder.
Step 14: Now go back and Reboot your smartphone and you should directly land on the home screen.
This is the method to successfully Boot Vanilla Custom ROM with GAPPS. This method was tested on Redmi Note 9 Pro or Redmi Note 9S (globally), but this method should work on all phones with Android 11 ROMs. I hope you also get the same result as me.
Источник


