- How to Install Windows on Your Android Phone
- Introduction: How to Install Windows on Your Android Phone
- Step 1: The Concept
- Step 2: Software
- Step 3: Making and Configure the Virtual Machine
- Step 4: Installing Windows
- Step 5: FUN
- Be the First to Share
- Recommendations
- Reclaimed Materials Contest
- Cookie Speed Challenge
- Hide It Challenge
- 4 Comments
- Инструкция: устанавливаем Windows Subsystem for Android на любой сборке Windows 11
- Инструкция
- Установка Windows Subsystem for Android
- Установка APK-файлов
- How to install Windows on Android phone And Tablets
- Can I Install Windows on Android?
- How to Install Windows on Android Mobile and Tablet?
- Installing Windows on Android-Thing you Will Need
- Installing Windows on Android-Prepare Devices
- Best iOS Emulator for Windows PC | Run iOS Apps on Windows
- Installing Windows on Android-Starting Installation
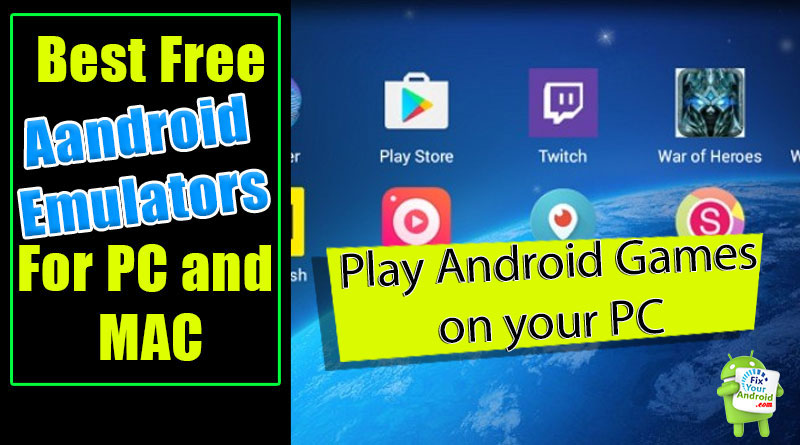
- Best Free Android Emulator for Windows PC and Mac 2021
- Rolling Back To Android from Windows
- Reverting back to Android
- Installing Windows on Android: Final Words
How to Install Windows on Your Android Phone

Introduction: How to Install Windows on Your Android Phone


Ever wanted to run Windows XP on your Android Device? Ever thought if running desktop OS on your mobile? You will need the limbo application to install windows on your phone. Using this application you can install Windows 98 / ME / CE / XP / Vista / 7/8 / 8.1 / 10 and linux DS / Kali. The phone application is free. To install windows xp on your phone you need 1.5GB of free space and 2 hours of free time.
Step 1: The Concept
The basic concept behind running windows on your Android device is emulation of the operating system.
- We will first download and install application limbo
- Then we will copy the iso windows image to our phone
- Then we will install windows XP
- Finally play with Windows!
Step 2: Software
- Copy the ISO Windows XP image to our android device
- Download application limbo: https://www.mediafire.com/file/5o5rjwta1l9rubj/limbo-androidarm-x86-release.2.10.0.apk/file
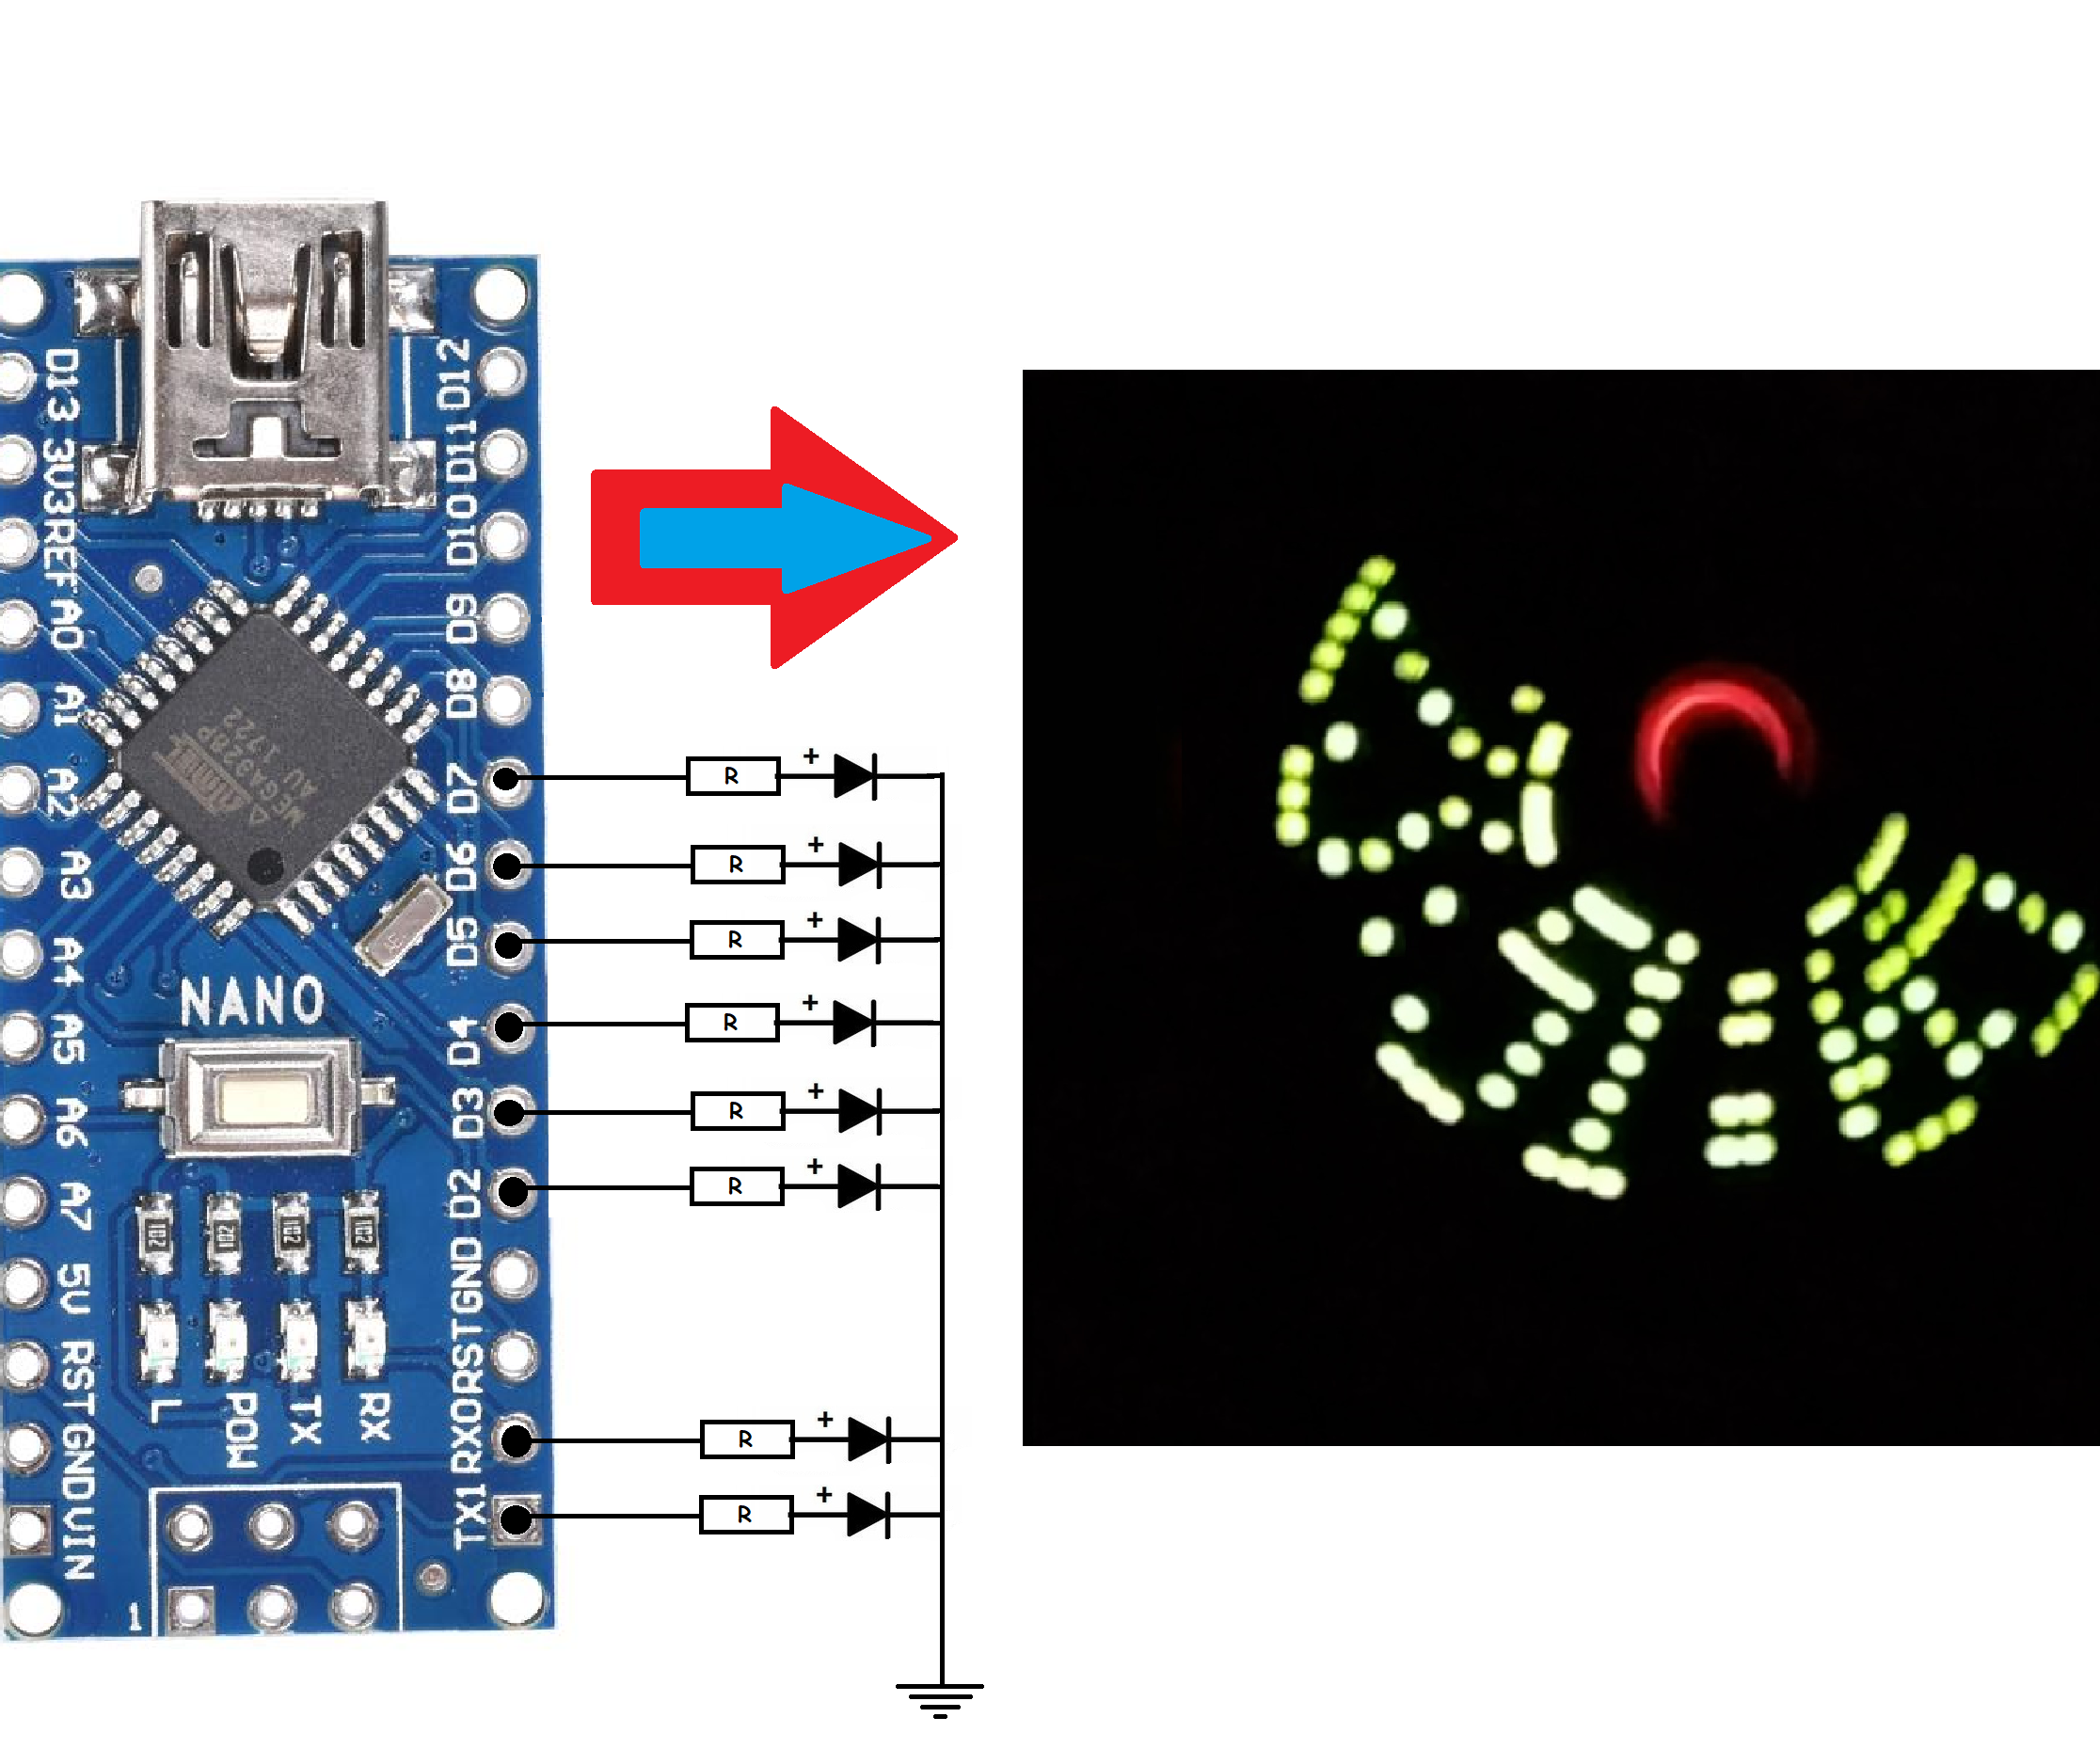
Step 3: Making and Configure the Virtual Machine
Set the following parameters:
Create New Virtual Machine
CPU / BOARD
- architecture: 32 or 64 Machine Type: PC CPU
- Model: qemu32 / qemu64
- CPU Cores: max
- Ram Memory : minimum 512mb
Storage
Removable Storage
- Select a windows image
Graphics
Boot Settings
- Boot from Device: Default
User Interface
- User Interface : SDL
- Select Fullsreen
Step 4: Installing Windows
Now, we’l install Windows XP in the virtual machine. This process takes about an hour so please wait 😛
Now just click the green start button and launch off! Follow the instructions to install Windows XP. It’ll take about 5 minutes to load drivers and then main installation will start. This is going to be fun installing and testing old applications.
Step 5: FUN
I will play a minesweeper game. Have fun 🙂
Be the First to Share
Did you make this project? Share it with us!
Recommendations


Reclaimed Materials Contest

Cookie Speed Challenge

Hide It Challenge

4 Comments

Question 4 months ago
What amount of time did it take for formatting to complete?
Источник
Инструкция: устанавливаем Windows Subsystem for Android на любой сборке Windows 11
Несколько дней назад Microsoft начала тестирование подсистемы Windows Subsystem for Android (WSA), которая позволяет запускать Android-приложения в Windows 11.
Сейчас функция доступна только участникам программы Windows Insider на канале Beta, что несколько удивительно, так как обычно все новшества вначале появляются на канале Dev. Но даже если вы используете канал Beta, то для установки подсистемы из Microsoft Store потребуется сменить регион на США в самой Windows 11.
Microsoft обещает, что инсайдеры на канале Dev также вскоре получат доступ к Windows Subsystem for Android, но какие-либо конкретные сроки не называются. Если вы не хотите ждать, то можете установить подсистему вручную. Для этого вам потребуются прямые руки и небольшие навыки работы в PowerShell.
Важно! Все действия вы делаете на свой страх и риск.
Благодарим aleks242007 и участников чата Community в Telegram за помощь в составлении инструкции.
Инструкция
Установка Windows Subsystem for Android
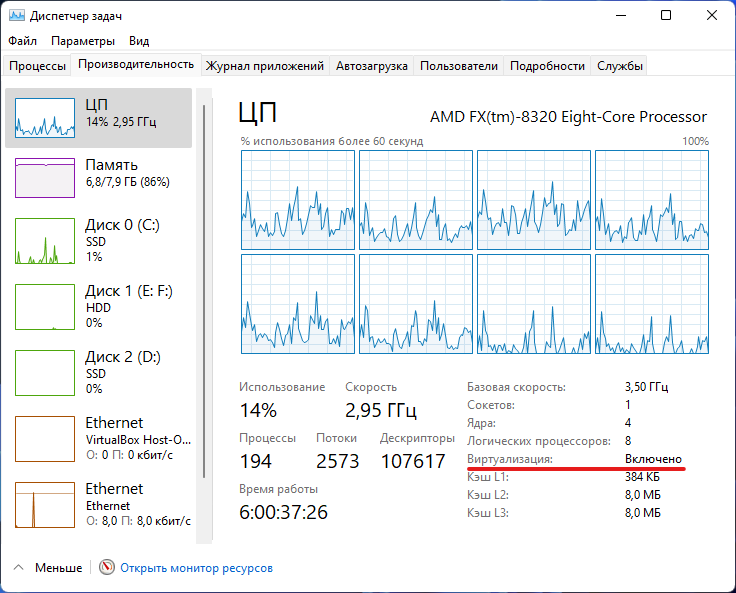
- Для начала убедитесь, что ваш компьютер поддерживает виртуализацию. Для этого откройте «Диспетчер задач», перейдите на вкладку «Производительность», выберите CPU и посмотрите текст под графиком. Там должно было указано: «Виртуализация: Включено».

- Если виртуализация отключена, то вам необходимо включить её в BIOS. У разных производителей настройка может располагаться в разных разделах и называться по-разному, так что можно поискать информацию в Google для вашего конкретного устройства.
- Если в BIOS настройка отсутствует или значение в «Диспетчере задач» не меняется, то вы вряд ли сможете запустить Windows Subsystem for Android на своём компьютере.
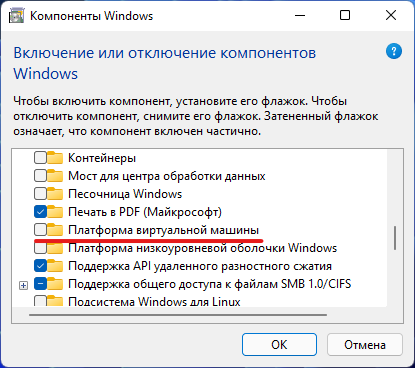
- Следом откройте меню «Пуск», введите в поле поиска «Включение или отключение компонентов Windows» и выберите соответствующий результат.
- В открывшемся окне установите галочку напротив пункта «Платформа виртуальной машины», нажмите «ОК», дождитесь применения изменений и перезагрузите ПК.
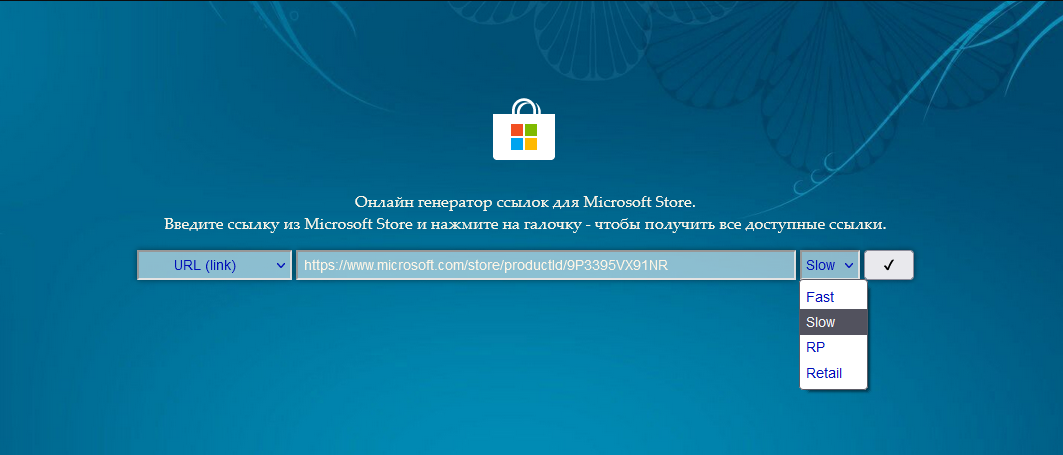
- Далее нам потребуется скачать установщик Windows Subsystem for Android в формате MSIXBUNDLE с сервера Microsoft Store:
- Перейдите на сайт Microsoft Store — Generation Project (от rgadguard) по этой ссылке.
- В поле на сайте вставьте следующую ссылку:
- Справа от поля в выпадающем меню выберите Slow и нажмите на галочку.
- В появившемся списке найдите файл с примерно таким названием (номер версии может отличаться):
- Нажмите на название этого файла и сохраните файл в любой папке на вашем компьютере. Обратите внимание, что файл должен быть в формате .MSIXBUNDLE. Если это не так, то просто смените расширение файла на нужное. Файл должен весить примерно 1,2 ГБ.
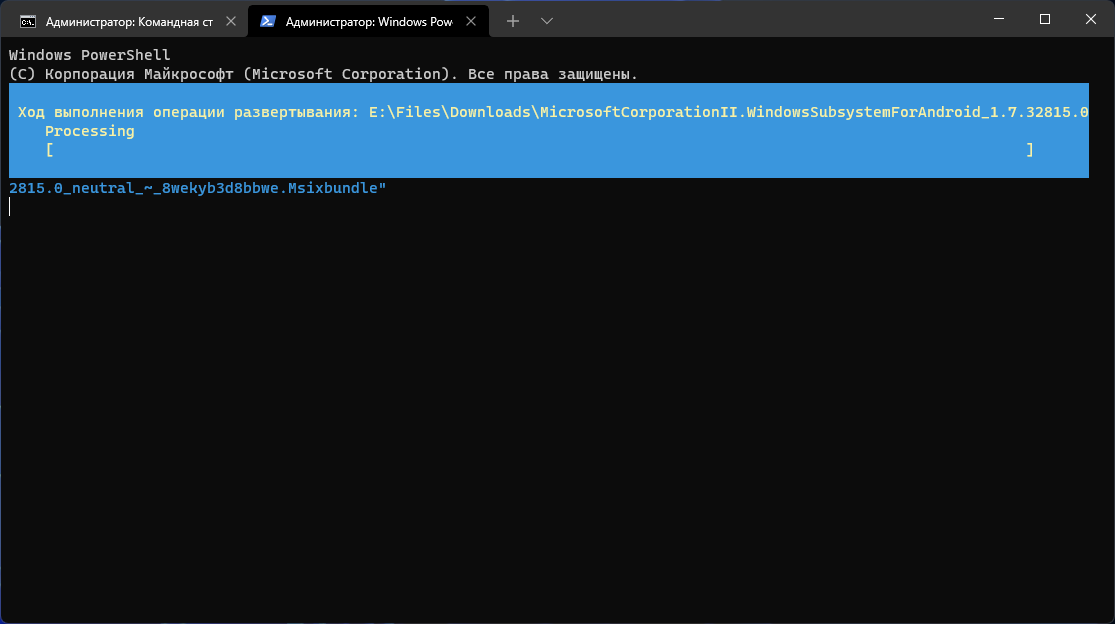
- Запустите PowerShell или Windows Terminal (нужна вкладка с PowerShell) от имени администратора.
- Введите в консоль следующую команду:
- «C:\Users\user1\Desktop\MyApp.msix» — путь к файлу MSIXBUNDLE, сохранённому на шаге 4. Чтобы быстро его получить, вы можете нажать правой кнопкой мыши по файлу в «Проводнике» и выбрать пункт «Копировать как путь».
- Решение ошибки:
Если вы увидели такое сообщение в PowerShell, то введите следующую команду:
После этого вновь введите команду Add-AppxPackage из шага 6.
- Нажмите Enter и дождитесь завершения установки.
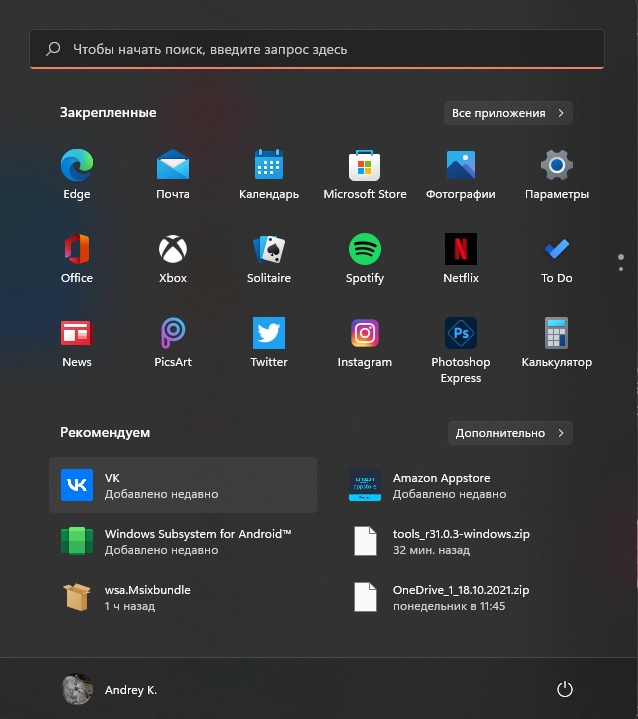
- Если всё прошло успешно, то в меню «Пуск» появится приложение под названием Windows Subsystem for Android.
Установка APK-файлов
Теперь подсистема Windows Subsystem for Android работает, однако с установкой приложений есть некоторые сложности. Как вы уже знаете, вместо Google Play здесь используется Amazon Appstore. Причём отображаются там лишь приложения, которые Microsoft и Amazon протестировали на работоспособность в подсистеме.
Правда воспользоваться Amazon Appstore всё равно не получится. Приложение не только требует учётную запись Amazon, но и проверяет ваше местоположение. Можно, конечно, подключить VPN, но есть ли в этом смысл?
К счастью, Windows Subsystem for Android поддерживает установку приложений с помощью APK-файлов. Вы можете воспользоваться либо утилитой WSATools, о которой мы рассказали в статье по этой ссылке, либо устанавливать вручную с помощью командной строки по инструкции ниже.
- Скачайте SDK Platform Tools для Windows с сайта Android, перейдя по этой ссылке.
- Извлеките папку platform-tools , например, в корень диска C (рядом с папками Windows, Program Files и т. д.)
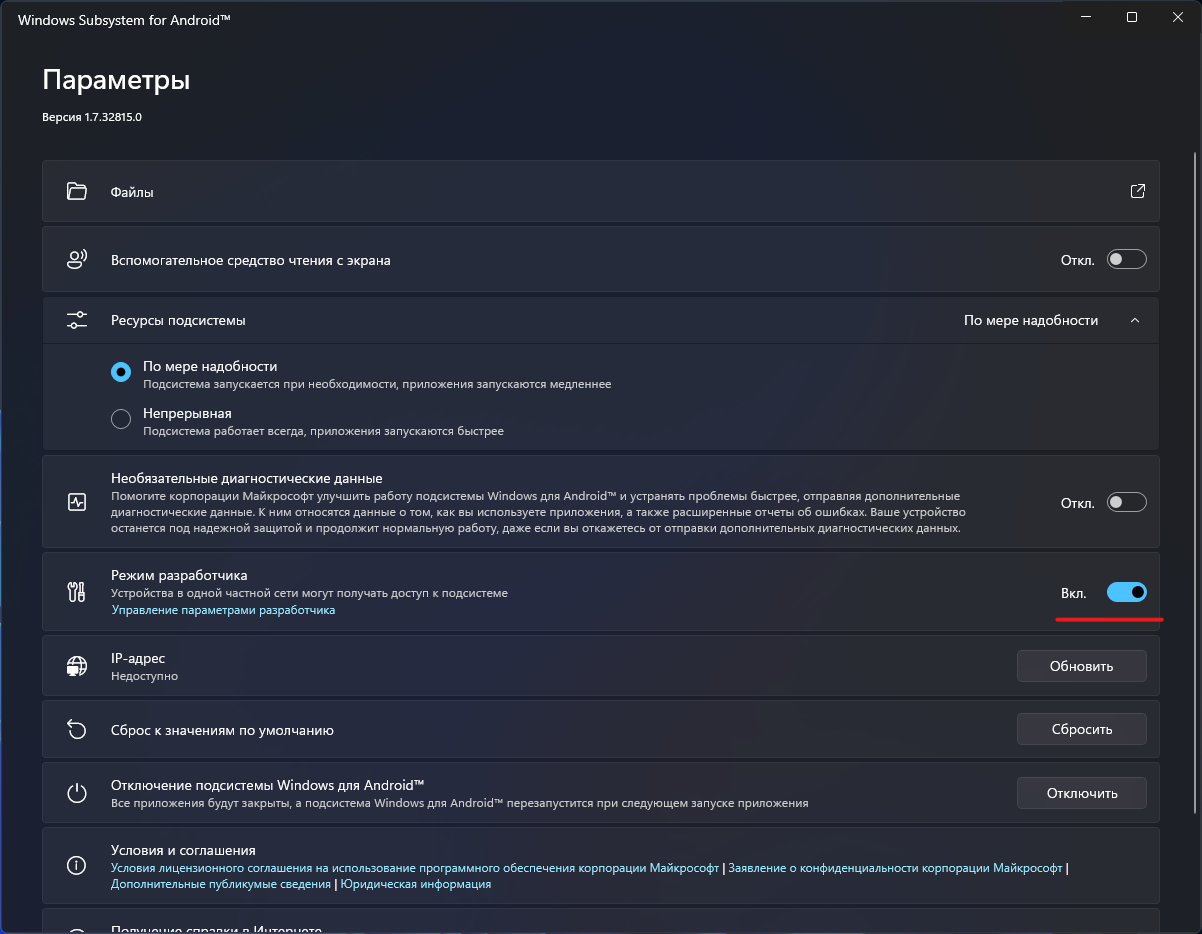
- Откройте приложение Windows Subsystem for Android и включите «Режим разработчика».
- Нажмите на кнопку рядом с элементом «Файлы». Начнётся запуск подсистемы Windows Subsystem for Android.
- Нажмите на кнопку «Обновить» рядом с элементом «IP-адрес».
- В описании для элемента «Режим разработчика» появится IP-адрес, который мы будем использовать для подключения к подсистеме с помощью ADB.
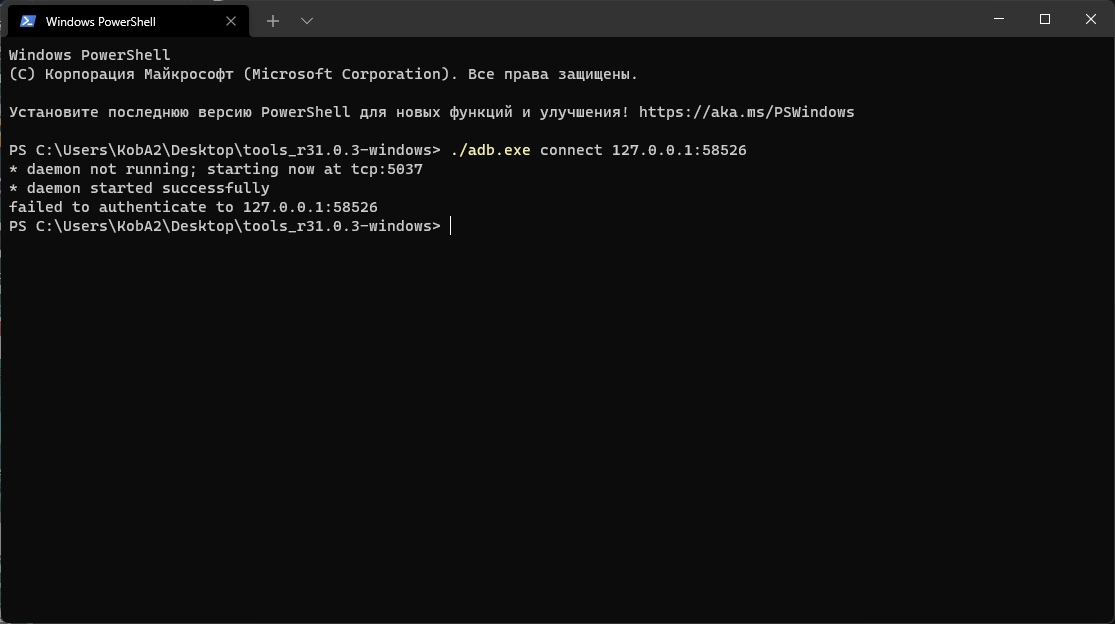
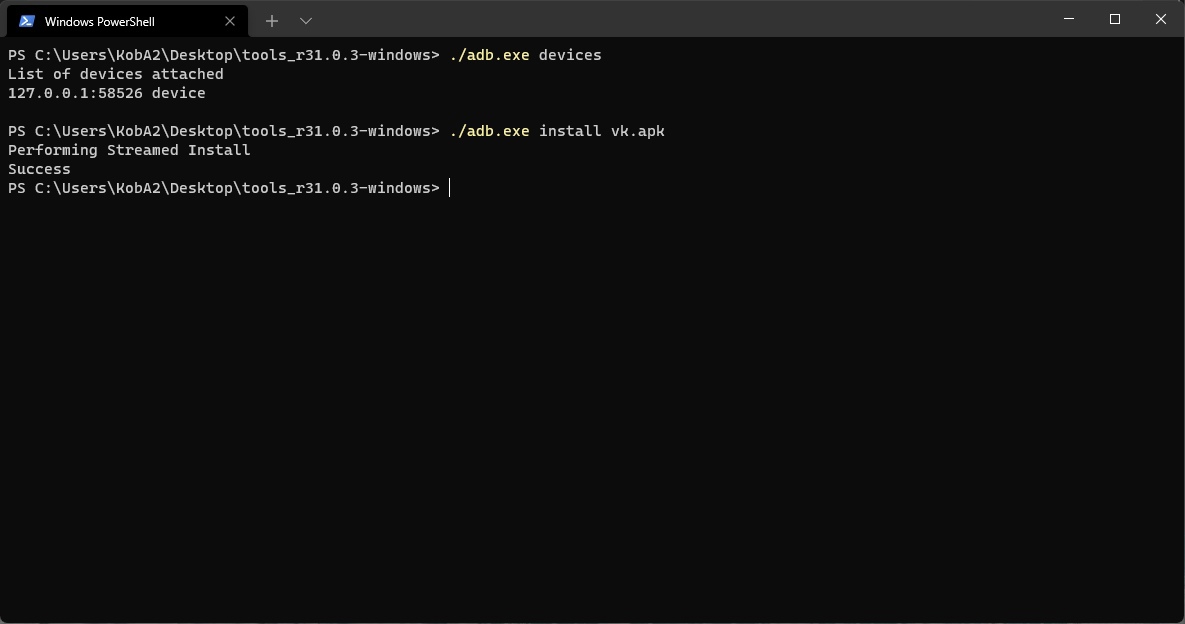
- Откройте командную строку (или Windows Terminal) и перейдите в папку с установленным SDK Platform Tools, подставив нужный путь к папке:
- Введите следующую команду, подставив в неё IP-адрес из предыдущего пункта:
Примечание. Если выполнять команды через PowerShell, то перед ADB следует прописать ./
Чтобы быстро скопировать путь к файлу, нажмите по нему правой кнопкой мыши и выберите «Копировать как путь». Затем вставьте его после adb.exe install и нажмите Enter.
Поделиться впечатлениями о работе Windows Subsystem for Android и обсудить сценарии её использования вы можете в нашем чате в Telegram. Там же можете задавать вопросы, если возникли какие-либо сложности с установкой подсистемы или Android-приложений.
Поскольку далеко не все Android-приложения корректно работают в подсистеме, пользователи решили составить таблицу с информацией о работоспособности приложений в WSA. Найти и внести свой вклад вы можете на GitHub.
Источник
How to install Windows on Android phone And Tablets
Do they want to run the Windows operating system on an Android device? Ever imagined if you can run a desktop on your mobile device? Actually there are some Windows emulators for Android to install Windows operating system on Android.
But before you proceed let me warn you installing a window desktop operating system on your Android mobile or Tablet will void your warranty. So if you are still interested you can proceed further.
 How to install Windows on Android phone And Tablets
Can I Install Windows on Android?
Installing Windows on Android device is basically using and Windows emulator for Android copying the ISO Windows Image automobile and install the operating system.
You can actually install windows operating system on Android just like you install on your PC. All you need is is a Windows emulator android mobile or Tablet you want to install Windows on.
How to Install Windows on Android Mobile and Tablet?
Installation of the Windows operating system on Android mobile and tablet are identical. You can install any version of the Windows operating system ranging from 7,8,8.1 and 10.
Installing the external OS on your Android device will void your warranty as the tools used to install Windows OS on android devices are not certified by Google itself.
There are several applications available for free to get Windows installed on Android. But, before you begin you need some tools to download from the internet.
Installing Windows on Android-Thing you Will Need
- USB Cable
- High-Speed Internet Connection
- Android Mobile/Android Tablet
- Laptop/PC running on Windows
- File Transfer Tool
Installing Windows on Android-Prepare Devices
Once you have downloaded all the essentials from the internet it’s time to proceed to the next step of installation of the Windows operating system on an Android tablet or Android phone.
- Install the change my software application on Windows.
- Connect the Android device to PC using USB cable.
- Go to the setting and enable developer mode on Android.
Best iOS Emulator for Windows PC | Run iOS Apps on Windows
ios emulator for windows pc to run iOS applications and play Apple games on Windows 7,8,8.1 and 10. We have collected a …
Installing Windows on Android-Starting Installation
Know your prepare your Android to install Windows operating system it’s time to install the change my software application on PC. After installing the application on PC, connect Android to PC and follow the steps below.
- Connect the Windows PC to the internet
- Make sure the window pc you are using is connected to high-speed internet.
- Connect Android device to Windows PC via USB cable.
- Make sure to enable the developer option on Android.
- Open the version of Windows on change my software tool you want to install on Android.
- This will start downloading the required driver from Windows PC to Android.
- Once the process is done, click on “install” to start the installation of Windows on Android.
- Make sure to keep your Android connected to your PC until the process finished.
- Once windows installed on your device. Either it will boot automatically to Windows OS or to the boot screen where you can select to boot with Windows or Android operating system.
Best Free Android Emulator for Windows PC and Mac 2021
Find the list of Top free Android Emulator for PC. Use these Free Android Emulators to install and use the Android app …
Rolling Back To Android from Windows
If you are done with using Windows operating system on your Android device and want to revert back to Android all you need is to connect your Android back to PC and reverse the process.
Reverting back to Android
- Reconnect Android tablet/phone to Windows PC.
- Launch the “change my software” tool on PC and select the “restore to original condition” option in the main menu.
- Wait for the process.
- This will remove Windows from Android tablet/mobile and install Android OS on the device.
Installing Windows on Android: Final Words
Installing Windows on Android devices is however a great idea. But still, installing a custom OS on the android device will void your warranty. You can revert back to the Android operating system from Windows on Android anytime. But, this will remove all your existing data from Android device so it is advised to create a complete backup of your Android mobile or Tablet before attempting to install Windows on Android.
Источник


