- Программы для обновления Android: скачать
- Обновление Android через телефон
- Приложения для обновления Android телефона, планшета
- Программы для обновления Android на ПК
- Обновление Android с помощью прошивки
- Обновление программного обеспечения 16.6 для Андроид
- Функции
- Преимущества и недостатки
- Android Update Manager: Get Better Performance of Your Android Phone
- Android Manager — One Stop Solution to Manage Your Mobile Lifestyle
- Part 1: How to Update Android Operating System
- Part 2: How to Update Android Firmware with Android Update Manager App
- Part 3: How to Update Android ROM with Android System Update Manager
- Part 4: How to Update Android Apps with Android App Update Manager
- How to Install Android SDK Manager on Ubuntu 18.04
- Install Android SDK Tools Package
- Android SDK Manager usage from terminal
- List installed, available packages and updates
- Install, update and uninstall packages using sdkmanager
- Read also :
Программы для обновления Android: скачать
Автор: Юрий Белоусов · 14.10.2019
В поисках легких путей, пользователи часто ищут программы для обновления Android, чтобы избавить себя от необходимости самостоятельно обновлять операционную систему на своем телефоне или планшете.
Стоит отметить, что само по себе обновление Android – процесс не сложный. И в этой статье мы его максимально подробно разберем.
Важно понимать, что обновление и прошивка – разные вещи. Если смартфон или планшет – старые, то они не смогут обновиться, скажем с Android 7 до Android 8 или 9 с помощью встроенных функций. Перевод на новую операционку очень старого мобильного устройства, не поддерживающего данную ОС – весьма небезопасный процесс, так как новые версии ОС не адаптированы под «древние» гаджеты. А значит, могут появится ошибки, баги, глюки и различного рода неисправности в работе телефона.
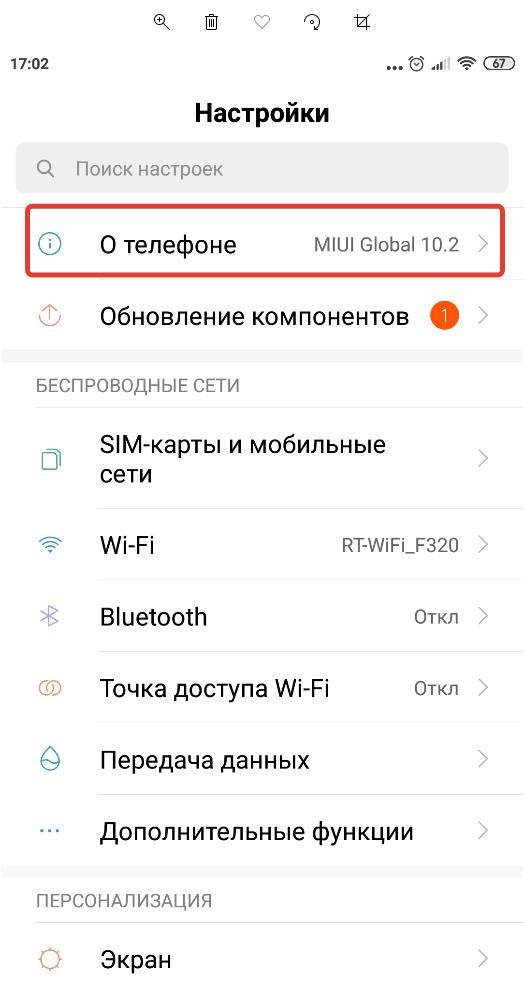
Обновление Android через телефон
Современные мобильные устройства уже имеют в своих настройках функцию автоматического обновления Android до последней версии, для это не нужны никакие специальные приложения или программы.
Как обновить систему Android через телефон:
- Следует зайти в настройки Android, нажав на значок на рабочем столе;

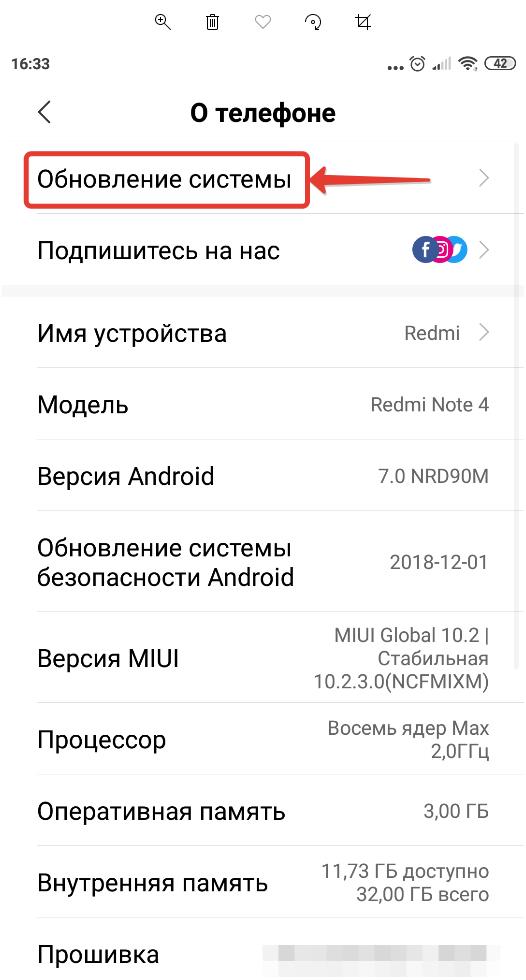
- Перейти в раздел «О телефоне»;
- Выбрать пункт «Обновление системы»;
- Если обновление найдено – вам будет предложено его загрузить. Если пишет, что обновления не найдены, то установить более новую версию операционной системы получится только с помощью прошивки телефона. А это двойной риск, так как сам процесс прошивки – небезопасный в руках неопытного пользователя, да и нет гарантий, что новая прошивка «ляжет» на старый телефон, не вызвав каких-либо неполадок.

Приложения для обновления Android телефона, планшета
Поискав в Play Market приложения для обновления Android можно найти такие:
Но стоит спешить их устанавливать , лучше взглянуть на отзывы пользователей, которые уже установили их и оставили свои комментарии. Из них можно сделать вывод, что данные приложения не обновляют операционную систему, а лишь показывают информацию о том, можно ли обновить телефон или планшет до новой версии Android, и то – не всегда.
Поэтому лучше всего использовать стандартный предустановленный апдейтер и отказаться от использования подобных сомнительных приложений.
Программы для обновления Android на ПК
Если при обновлении мобильного устройства стандартным способом возникают какие-либо проблемы, то можно воспользоваться специализированным софтом от официальных разработчиков.
Программы для обновления Android на компьютере:
Для того чтобы начать пользоваться программой для обновления Android нужно скачать ее на компьютер и установить, подсоединить свое мобильное устройство с помощью USB-кабеля к ПК, а затем запустить софт и найти в меню раздел обновления операционной системы.
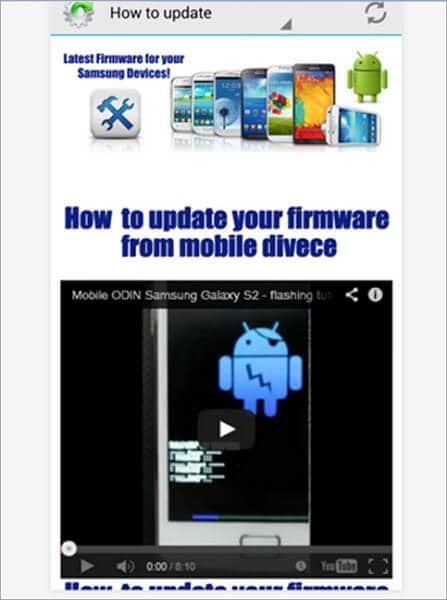
Обновление Android с помощью прошивки
Если мобильное устройство не поддерживает обновление до новой версии ОС, то в таком случае можно установить новую прошивку на свой телефон или планшет.
Как уже было сказано, данный процесс небезопасен и может навредить устройству. Поэтому все действия нужно выполнять на свой страх и риск.
О том, как перепрошить Android можно прочитать в этой статье:
Также можно использовать программу Android Update Manager для поиска и установки прошивки.
Не нашли ответ? Тогда воспользуйтесь формой поиска:
Источник
Обновление программного обеспечения 16.6 для Андроид

Обновление программного обеспечения — приложение для автоматического обновления компонентов Андроид. Сканирует установленные пользователем программы и игры, а также анализирует системные службы. На основе собранных сведений составляется список материалов с информацией об используемых версиях. Пользователь сможет проверить и скачать апдейт при наличии файлов. Проверка ведется через официальные ресурсы, к которым относятся магазин Play Market и серверы Google).
Функции
Основные возможности Android Update Manager:
- Сканирование пользовательского ПО. В список помещаются все мессенджеры, социальные сети, графические редакторы, игры и так далее.
- Проверка системных компонентов. Сканирует фоновые процессы и службы, отвечающие за работоспособность телефона.
- Анализ ОС. Через приложение Обновление программного обеспечения для Андроид можно перейти к штатному меню и проверить наличие апдейтов.
- Информация о программах и службах. Для каждого из установленных компонентов предусмотрена таблица с номерами текущей и доступной версий, пакетом идентификатора, названием установщика и датой инсталляции.
Преимущества и недостатки
- Отсутствие рекламы.
- Подробные сведения о приложениях.
- Бесплатная проверка источников установщиков.
- Безопасность и работоспособность скачиваемых патчей.
- Нет русского языка интерфейса.
- Отсутствие дополнительных настроек.
Обновление программного обеспечения загружает на Андроид файлы и распаковывает автоматически, без потери настроек и кэша. Достаточно запускать сканирование раз в неделю, чтобы иметь дело только с новыми ПО и играми.
Источник
Android Update Manager: Get Better Performance of Your Android Phone
There is an essential necessity to frequently update your Android devices to increase the functionality and performance. Android update manager freshens and improves both functionality and performance of any Android device by constantly updating the devices. The main features of Android update manager include a quick check of the latest versions of your favorite ROM and instant update of the available apps.
The following are the updates that Android users do:
- Android OS versions.
- Android firmware: This fixes problems like bugs, lags and other problems that you may or may not be aware of. These problems always occur frequently as a result of the continued interaction with the Android OS and it is best advised to regularly update them to maintain the best performance of the device.
- Android system/ROM: This application requires ROOT access to install ROMs as well as enabling you to use tools. It downloads ROM updates for CyanogenMod, MIUI, AOKP or other alternative ROMs like manual repository.
- Android apps: There are many apps in each Android phone and the app provider will update the versions of the apps now and then to get better experience of the apps.

Android Manager — One Stop Solution to Manage Your Mobile Lifestyle
- Backup your music, photos, videos, contacts, SMS etc. to computer and restore them easily
- Manage, export&import your Contacts and SMS, deduplicate Contacts, reply SMS with computer
- One-click Root — root your Android phones/tablets to take full control of your device
- Phone to Phone Transfer — transfer music, photos, videos, contacts, SMS between two mobiles ( both Android and iPhone are supported)
- App Manager — Install, uninstall, import or backup Apps in batch
- Gif Maker — create Gif from photos, motion photos, videos
- iTunes Manager — Sync iTunes Music to Android or transfer music from Android to iTunes
- Fully compatible with 3000+ Android devices (Android 2.2 — Android 8.0) from Samsung, LG, HTC, Huawei, Motorola, Sony etc.
Part 1: How to Update Android Operating System
With the rapid advanced technology, new features are added to the newer Android OS, device functionality and performance has been improved greatly. Most devices inform you of the availability of an update, but this may come later. You can avoid this by updating the OS yourself by following these simple steps.
Step 1 Back up your data: Even though there are slim chances of losing data or crashing in the process of updating your Android OS, you should not neglect it. To protect against data loss, effectively back it up by ticking built-in «Backup and restore» option or use one external tool like Wondershare TunesGo for Android to back up all data on your android device to the computer.
Step 2 Go to Settings:hYou can locate Settings by tapping the menu button on home screen and select Settings.
Step 3 Go further down to «About phone/tablet».
Step 4 Tap «Software update».
Step 5 Go to «pdate». Other devices may have «Check for updates».
Step 6 Tap «Restart & Install». Your device needs to restart for it to install the update.
Part 2: How to Update Android Firmware with Android Update Manager App
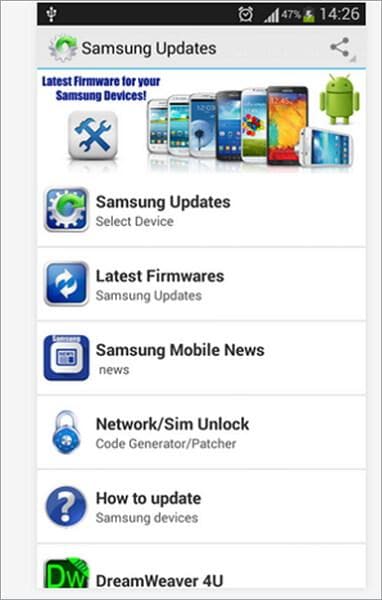
There are different firmwares developed from different device manufacturers for example «Galaxy Firmware & Updates» is a news and Android update manager application that is dedicated to Samsung mobile devices.
Let’s take Samsung smartphone (S2, S3, S4) as an example to demonstrate how to update firmware. The guide is as follows:
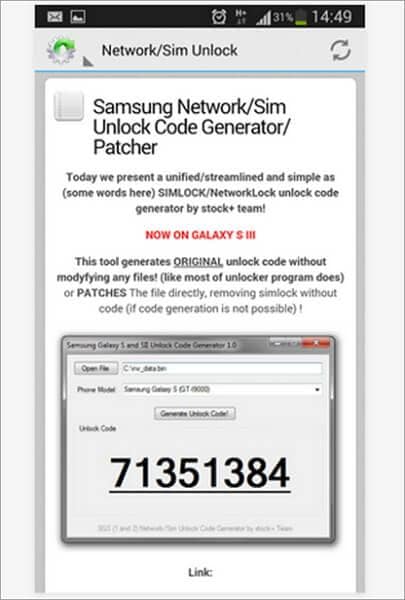
Step 1 Choose «Phone settings» from the Settings menu, identify and tap «Network/Sim unlock». It will demand for phone model number. Insert the model number and tap «Generate unlock code». It will automatically generate unlock code as shown below.
Step 2 Flash the Firmware
Tap the right side pointing arrow to manually flash the firmware as in the figure below.
Disclaimer! Before flashing the firmware, you should aware of the following:
- Have a proper backup of all the vital data on the device.
- The handset must be during charging or have at least 85% battery power.
3. Select your device
Then, you see «Select Device». Scroll down the arrow until you see your device, then select it. This should lead you to Samsung updates.

4. Tap «Latest Firmwares» to finally update your phone’s firmware and speed up your device performance.
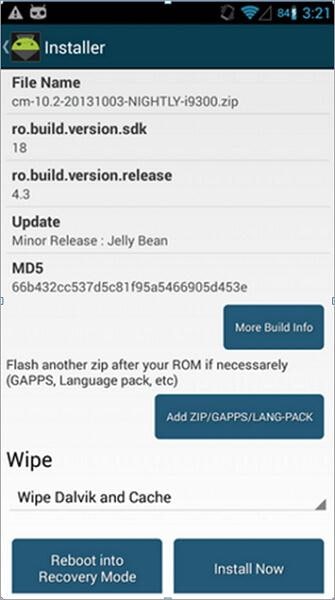
Part 3: How to Update Android ROM with Android System Update Manager
Updating ROM can be tricky at times, but once you have mastered it, it is a painless affair. To update ROM, here is the guide:
1. On the home screen, locate the Menu and tap it
2. Tap «Apps» icon. Depending on your device, swipe sideways or downwards to locate the apps icon and select. Ensure that your device is connected to a Wi-Fi network as you proceed.
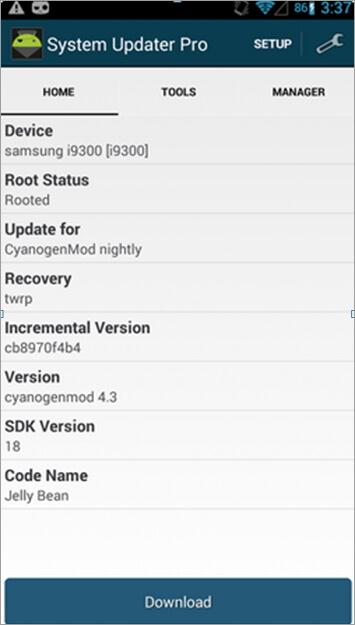
3. Go to «System updater pro» option. This will show you the device model, root status, what you are updating for. Tap «Download» option at the bottom of the screen.
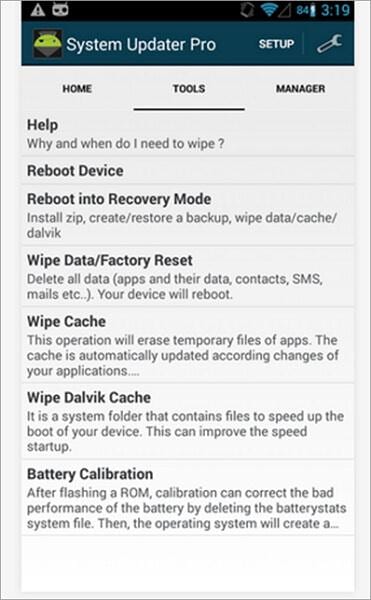
4. Tap «Wipe cache» and «Wipe Dalvik». This will wipe temporary files and avoid errors and conflicts that may occur during ROM installation. This should be done, especially when you install a major update (eg Android 2.3 to 4.0)
5. Select «Create update.zip» by tapping. This will help you to locate where your wiped/files will temporarily be stored.
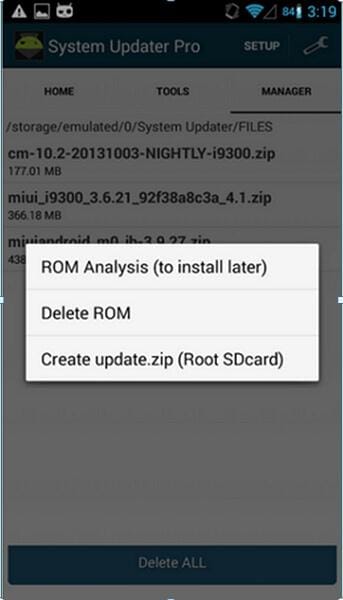
6. Select the zip you created from the below list. The device gives you a list of places where you can safely store your files in the repository

7. Select Install now on the bottom right side of your screen to install the ROM update.
Part 4: How to Update Android Apps with Android App Update Manager
It’s so easy to update Android apps as sometimes apps will send notifications to you that there is new version. Or sometimes when you open an app, it will ask you for update if it has a new version. Just click upgrade, you will be able to update it. Here is the guide to manage updates on Android in bulk with Android app update manager — System Updater (ROM Download)
Step 2 Open Android app update manager.
Step 3 Go to App Usage Report.
Step 4 Tap one app and the detailed information will be displayed.
Step 5 Choose Update check. If there is a new version, click Upgrade.
Источник
How to Install Android SDK Manager on Ubuntu 18.04

The sdkmanager is a CLI tool that allows users to view, install, update, and uninstall available packages for the Android SDK.
This tutorial is going to teach you how to install Android SDK Manager on Ubuntu 18.04 using terminal. Earlier we have seen how to Install Android SDK Manager on Ubuntu 16.04.
If you’re already using Android Studio, you don’t need to use sdkmanager as you can manage your SDK packages from the IDE instead. The sdkmanager tool is provided in the Android SDK Tools package, so we are going to install the latter to be able to use sdkmanager.
Install Android SDK Tools Package
Before installing the preferred tool, we need to update all packages and install JAVA, as the Android SDK requires it to run. To do so you can run the following commands in the order mentioned below:
Once JAVA is installed on the machine we can run the following command to check the java version and to be sure it has been installed correctly:
The output must look like this
After successful JAVA installation, we can proceed to the installation of Android SDK. We need to download the binaries from Android Developers Website. If you open the link above in the browser you can find available zip files under the «Command Line Tools only» part. To download binaries from terminal run the command below:
Once it’s installed unzip with the following command
A new directory will be created named tools. To complete the installation we need to add the following paths to our PATH environment variable. To do so, you can run the command below:
If you’ve downloaded or unzipped the SDK-tools package into other directory, please don’t forget to use appropriate paths. To add the directories permanently, just add the line above to the
Android SDK Manager usage from terminal
Once Android SDK has been installed we can use sdkmanager tool to view, install, update and uninstall packages for the Android SDK from terminal.
List installed, available packages and updates
To list all installed, available packages and ones that have update we can run:
The output will look like the one below:
You can have issues when running this command. E.g. the output of the command can be an error like the one below:
To resolve this issue edit the sdkamanger script which is located in bin folder of the installation folder (in our case the full path to the file was /home/ubuntu/tools/bin/sdkamanager ) and add the following line in the 31st line:
After the editing, that line must look like below:
Once you’ve edited the file and saved you can run the sdkmanager —list command again. Only installed packages will be shown and another error message will appear which will be like the one below:
Actually there are two separate errors in the message above. One is related to secure connection due to which it cannot view available packages and check the packages for updates. The second one says that sdkmanager cannot load /home/ubuntu/.android/repositories.cfg file.
To fix the errors we create the repositories.cfg file (as it hasn’t been created by default) and run the sdkmanager —list command with —no_https flag. Run the following commands in the order below:
After running these commands you will be able to see the output shown above in this article.
Install, update and uninstall packages using sdkmanager
To install package, run the following command:
If you want to uninstall several packages you can add them to a file and use —package_file flag. For example
Note that package_name must be from available packages list and if you don’t use no_https flag it will throw the same error when we ran the sdkmanager —list command.
To update all packages, you can run:
Note that if you update SDK tools you need to edit /home/ubuntu/tools/bin/sdkamanager file again and add -XX:+IgnoreUnrecognizedVMOptions —add-modules java.se.ee in the 31st line, as the mentioned above file will be fetched from the server and will become the default one.
To uninstall package, run the command below:
Read also :
The installation of Android SDK Manager itself is very simple, but during the process you may face different issues which are related to JAVA. However, there are workarounds described for types of issues you can face. So using this tutorial you can be sure that you’ll make it work.
Источник


