- Installing git on android
- Proper Git client on Android
- Enter Termux
- External Storage support
- Copy SSH keys
- ADB Root method
- Manual copy method
- Secure your keys
- Test it out
- Extras
- Tune Termux
- SSH into your Termux
- Install Tig
- Как установить Git на Android
- Что вам нужно
- Установка Termux
- Установка Git и SSH
- Настройте хранилище Git
- Подключение к GitHub
- Вход в Git
- Using Git on Android – Free Tools and Guide
- Android Git tools
- Using SGit on Android
Installing git on android
Краткое описание:
Клонирование репозиториев, работа с ветками, коммитами, тегами, push, pull, fetch и т.д.
Описание:
Pocket Git это самостоятельный git-клиент для Android со следующими особенностями:
★ Простой интерфейс.
★ Поддерживается клонирование репозиториев.
★ Поддержка https и SSH.
★ Пароли и приватные ключи (с поддержкой парольных фраз).
★ Автоматом подхватывает GitHub и BitBucket ссылки.
★ Переключение между локальными и удаленными ветками, коммитами и тегами.
★ Stage, unstage and коммиты.
★ Создание, объединение и удаление веток.
★ Создание и удаление тегов.
★ Создание файлов и папок.
★ Редактируйте файлы в сторонних приложениях (например QuickEdit, DroidEdit и т.д.).
★ Отмена изменений для конкретных файлов или даже для веток.
★ Связь с удаленными репозиториями (push, pull и fetch)
★ Проекты с более чем одним удаленным репозиторием.
★ Визуальная информация по веткам и коммитам.
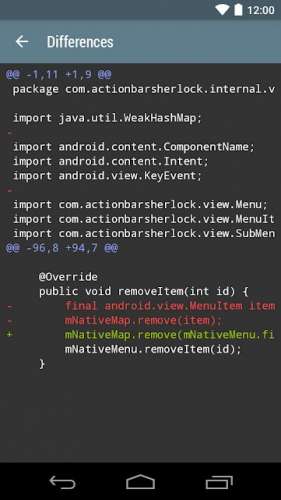
★ Просмотр разницы перед коммитом.
★ Просмотр разницы для каждого из сделанных коммитов.
★ Просмотр разницы для любого файла между текущим рабочим каталогом и HEAD (заголовками? Буду признателен если кто подскажет как это написать правильно) .
Требуется Android: 4.0
Русский интерфейс: Нет
Скачать: версия: 1.5 Pocket Git [1.5].apk ( 3.62 МБ )
Источник
Proper Git client on Android
For a while now I was looking into finding a good, preferably open-source solution to having a git client on an Android device. I’ve tested almost every Android application out there that could potentially achieve this, and here are my conclusions:
- Most solutions do not actually allow you to clone a git repository, but are instead implementations of specific service APIs such as GitHub or BitBucket. Because of this you end up locked up on their UI when it comes to managing files found in the repository. Some of them are even dependent on constantly requesting the server for each new directory or file you open so forget about proper offline support for those. In essence they are not true git clients, but rather service-specific clients.
- SGit (now MGit) and GitPocket are what we could call true git clients and they do allow you to clone the actual git repository but they always lack some important feature such as no proper ssh support, or allowing you to clone a repository to the external storage. Also as a matter of preference I try to stay away from a closed-source solutions for this one, since this application will be holding my ssh keys.
Enter Termux
Eventually I found that the best solution for me was to use Termux. In their own words, «Termux is an Android terminal emulator and Linux environment app that works directly with no rooting or setup required.«. Git is one of the many tools you can install via the built-in package manager apt , and it will work exactly like the one on a Linux machine. Better yet, it *is* the same command-line git that you use on a desktop machine, and it is up-to-date ( 😀 git and openssh packages like this:
Notice that by default, Termux stores the $HOME folder into the application’s private storage, the one provided by Android application sandbox and which by design is unique and only accessible to the app itself (expect for root and system user’s of course). This is a good thing because it means your SSH keys won’t be accessible to applications outside Termux.
External Storage support
If you want a cloned repository to be accessible by other Android applications, so you can edit or view the files externally, you’ll want to clone them to the external storage. This used to be the sdcard on older versions of Android, but nowadays it is usually just a separate partition on the device that is accessible by any application that has been given external storage permissions. On the new Android phones that support sdcards you’ll basically have more than 1 external storage. So don’t worry if you don’t have an actual sdcard as you’ll always have an external storage within your device.
You should configure the external storage for usage with Termux by issuing the following command:
Note: On newer versions of Android you’ll be asked to give the application access to your external-storage, which is expected.
This is create a directory on your $HOME directory with the name storage , which is a symlink to the external storage directory. The storage directory will in turn contain several sub-directories that serve various different purposes, the one we’ll be using is storage/shared which is the root of your device’s external directory, the same one that can be accessed by other Android applications.
Copy SSH keys
The directory .ssh on your Termux’s Home was created automatically when you installed the openssh package. Now you should copy your ssh keys to that directory. In my case I had adb with root permission, so I’ve simply copied my keys via adb. I’ve written 2 different methods below, use the one that fits you best.
ADB Root method
If you’ve root on your device, you may start adb as root like this:
You’re then able to copy your keys directly to the secure .ssh on the Termux home directory this way:
Manual copy method
If you cannot start adbd as root then an alternative is to copy the files to your sdcard and then from Termux move them from the sdcard to the .ssh directory. This is the basic procedure:
- Copy your keys to your device’s sdcard. You can use MTP for file transfer or use adb.
- Open Termux, and navigate to /sdcard/ as you normally would on the command line.
- Use mv to move the files to /data/data/com.termux/files/home/.ssh/
- Make sure you didn’t leave any keys on the sdcard after you’ve confirmed that the keys were successfully copied to .ssh . Read Secure your keys below to know why you should be careful with this.
Secure your keys
After copying the keys to the .ssh directory erase any trace of them from your external storage. Do NOT leave your ssh keys on the external storage of your phone! This would make it easy for them to be read and therefore stolen by any application on your Android phone that have the permission to read external storage. Even if you trust that you’ve installed only trustful applications, one of those applications might get hijacked and the attacker would get the same permissions as the hijacked application has (applications like your browser and social network apps are usual targets for this type of attack).
Test it out
You’re done!
You can test if your ssh keys are working properly by cloning a private repository that you’ve assigned that key. Remember that on Termux the home directory is on accessible to Termux alone, so if you want to use the files of a repository with other applications installed on your Android device clone to /storage/shared instead which is a symlink to the root of your device’s external storage.
I recommend that you check-out Termux web-page and learn more about it, and while you’re at it think about donating to help the project’s developers continue their good work (I’m not affiliated in any way).
Extras
Here are some cool tips on using Termux that will make your life easier.
Tune Termux
Using a command line with a touchscreen as input is not easy but Termux has some built-in features that make the experience better. While on Termux, Volume-Down acts as the CTRL key and Volume-Up is used for special keys. Touch Volume-Up + Q on your virtual-keyboard to make Termux display a row on top of the keyboard that has practical shortcuts for commonly used keys.
Also, you might notice that basic command line tools you’ve come to expect from a Linux environment are somewhat ‘defective’. For example, in many Android devices this parameterized command ls -la will not be recognized as a valid one. You can fix this by installing the coreutils package:
SSH into your Termux
Termux help page has a very good entry on the subject of running a openssh server on Termux.
Install Tig
Tig is an ncurses-based text-mode interface for git. It makes it easier to browse a git repository, therefore defeating the need for a dedicated Android application for this purpose. When using it note that on Termux you can emulate the keyboard arrow keys for navigating ncurses by simply swiping on the screen in the same direction of the arrow key you’re trying to use. To install tig :
Got some cool tips that I’ve missed? Let me know in the comments or shoot me a tweet. ✌
Источник
Как установить Git на Android
Если вам нужно работать с Git на ходу, установите его на Android с помощью Termux.

В некоторых случаях вам нужно работать с Git, и единственное устройство, которое у вас есть, это ваш смартфон на Android. Когда это так, что ты делаешь? Благодаря удобному инструменту под названием Termux, можно установить инструмент командной строки Git на мобильном устройстве.
Я собираюсь провести вас через процесс настройки и запуска. Я продемонстрирую на Android 9, работающем на Essential PH-1.
После установки у вас будет полный набор инструментов, найденных в версии Git для командной строки.
УВИДЕТЬ: Политика использования VPN (TechRepublic Premium)
Что вам нужно
Единственное, что вам нужно, это устройство с версией 5.0 или новее платформы Android и учетная запись GitHub. Вот и все.
Давайте сделаем это.
Установка Termux
Первое, что нужно сделать, это установить Termux. Это сделано из Google Play Store, выполнив следующие действия:
- Открой Google Play Store на вашем устройстве Android.
- Поиск Termux.
- Найдите и коснитесь записи Фредрик Fornwall.
- Нажмите Установить.
- Разрешить установку для завершения.
После установки вы увидите панель запуска Termux на главном экране и / или в вашем App Drawer. Найдите этот лаунчер и откройте приложение. Когда приложение откроется, вы должны увидеть несколько знакомое окно терминала (Рисунок А)
Рисунок A: Терминал, который должен быть знаком любому, кто когда-либо использовал Linux.

Установка Git и SSH
Прежде чем вы сможете запустить команду установки, вам нужно обновить и обновить. Для этого выполните команду (Рисунок Б):
Рисунок B: Обновление и обновление termux.

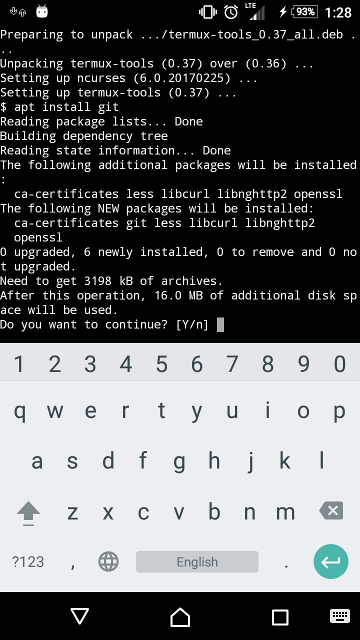
После завершения обновления вы готовы установить Git и SSH. Для этого выполните команду:
Эта команда (Рисунок С) установит оба необходимых приложения.
Рисунок C: Установка Git и OpenSSH.

Настройте хранилище Git
Настало время настроить Termux Storage. Это делается с помощью команды (из терминала Termux):
После запуска этой команды вам будет предложено разрешить приложению доступ к хранилищу. Сделайте это, и вы готовы к Git.
Подключение к GitHub
Это где это становится немного сложнее. Из терминала Termux вы должны сначала создать пару ключей ssh. Для этого выполните команду:
Где EMAIL – ваш адрес электронной почты, связанный с вашей учетной записью GitHub.
После того, как вы сгенерируете ключ, я предлагаю вам использовать команду scp, чтобы скопировать его на настольный компьютер. Перейдите в каталог .ssh (в Termux) с помощью команды:
Из этого каталога выполните команду:
Где USER – это удаленное имя пользователя, а IP – это удаленный адрес рабочего стола в той же сети, что и ваше устройство Android (которое принимает соединения SSH).
Как только вы сохраните этот файл на удаленном рабочем столе, вам необходимо войти в систему GitHub (с рабочего стола теперь находится файл .pub) и перейдите в Настройки | SSH ключи. Скопируйте этот ключ id_rsa.pub в Git и сохраните его.
Вход в Git
Теперь, когда вы скопировали свой открытый ключ SSH в GitHub, вы можете войти в свою учетную запись GitHub с помощью команды:
После аутентификации вы готовы начать работу с Git со своего устройства Android. Создание репозиториев, push, pull и многое другое. Вы можете также сделать себе одолжение и установить редактор nano через Termux (с помощью команды apt install nano), чтобы вы могли редактировать код.
И вот, пожалуйста. Удобный способ работы с Git на вашем Android-устройстве. Теперь… позвольте работать.
Источник
Using Git on Android – Free Tools and Guide
The biggest challenge, as well as need for freelancers and remote teams, is to «go mobile» nowadays. Although mobile code editors help programmers to develop on the go, without mobile support for version control systems like Git, developers hardly use such IDEs.
There are, however, some apps to set up and use Git repositories on Android platform. Git Clients, Servers and IDEs for Android help coders to code on the go and push the same to cloud repos on GitHub, BitBucket and others or to a local repository. That’s not all, you can also create and clone repos, checkout and merge branches and so much more.
In this post, we’re going to share the best free tools for using Git on Android devices and a few step-by-step tutorials on how to do a quick start with Git repos using one of the tools.
Android Git tools
SGit is undoubtedly the best Git client for Android. It’s an open-source program that supports all the basic features of any such client. The app stores all the repositories in your phone’s internal storage, keeping your private repos secure from thieves and hackers.
Moreover, it’s being actively developed and comes with the following features (at the time of writing):
- Creates and deletes local repos
- Adds and clones remote repos
- Pulls from and pushes to remote repos
- Checkouts and merges branches and tags
- Browses and diffs commits from a repo
- Edits and saves files (using external editors)
- Highlights syntax when browsing the files

Pros:
- Provides dark theme for night usage
- Allows importing repos from the computer
- Supports HTTP, HTTPS and SSH protocols
- Supports user/pass and SSH key authentications
- Supports choosing storage directory for local repos
- Allows choosing of code’s language for syntax highlighting
Cons:
- Doesn’t provide text editor natively
- Doesn’t support SD card for storage
AIDE, Android IDE, is an integrated development environment for writing Java and viewing Android projects on the Android platform, like how Eclipse or Android Studio does for desktop systems.
It provides features for the full build-compile-run cycle. The app provides interactive coding guides and step-by-step instructions for writing and compiling code.
The app has got an intuitive user interface for a smooth experience for new users. It has a rich editor and provides refactoring and smart code navigation along with real-time checking of errors.
Additionally, AIDE also integrates basic features of a Git client including:
- Edits and saves code files
- Commits and discards files or changes
- Pushes to and pulls from remote repos
- Branches from and merges to the repos
- Provides a built-in text editor for viewing files

Pros:
Supports SSH protocol for the connection
Cons:
- Doesn’t support cloning repos
Git is a super-basic and read-only Git client for Android. The app gives offline access to your remote Git repositories (from GitHub, BitBucket and others) but doesn’t present all required features offered by other clients.
Git provides various simple features such as:
- Clones remote repos to your device
- Browses files and logs from the repos
- Checkouts branches and tags from repos
- Pulls changes from origin (of remote repos)
- Supports both HTTP and HTTPS protocols

Pros:
Cons:
- Doesn’t support SSH protocol
- App crashes while cloning a repo, sometimes
Gidder
Gidder is a Git server for Android same as GitHub, BitBucket GitLab or others. It’s like carrying your own GitHub projects with you on the go. That also means more security for your sensitive projects.
The app works on top of an SSH server and lets people access the projects using WiFi. It allows multiple users to access the repositories (if permitted) and do operations on the repos. It provides following features for using repos over local wireless network:
- Creates, edits and deletes repos
- Allows cloning repos from its server
- Supports push to and pull from repos
- Creates, edits and deletes users that can access repos
- Activates or deactivates the Git server when WiFi switches on/off
- Integrates Dynamic DNS support for people working in different networks

Pros:
- Its SSH-based server improves the connection security
- Allows assigning permissions to users for controlled access
Cons:
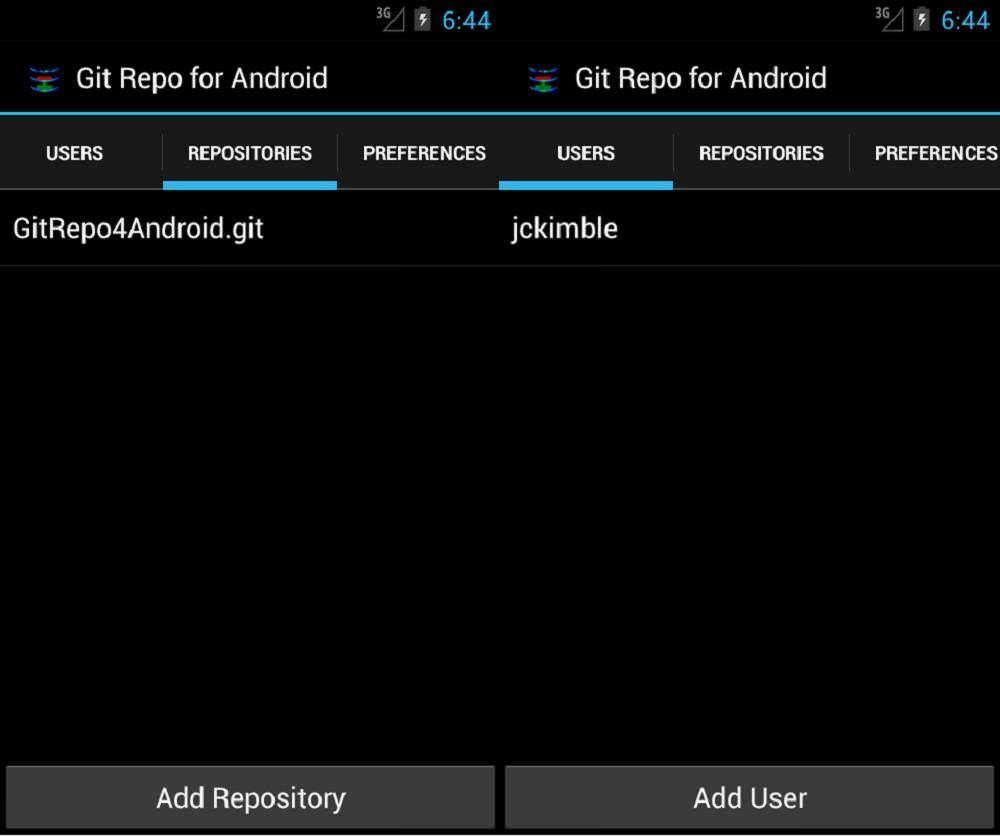
Git Repository Server
Git Repository Server is another Git server for Android that’s quite similar in features to Gidder. The app performs well for hosting Git repos locally on your smartphone similar to how GitHub, BitBucket or others host your projects on their servers.
It allows you to carry your projects with you on the run. Its use of your phone’s internal storage ensures your projects are safe from accidental deletion or theft. It mostly does all the required job and avails features listed below:
- Creates, edits and deletes repos
- Supports cloning repos from its server
- Starts with boot, i.e., auto-starts when phone starts
- Creates, edit and deletes users for accessing the repos
- Allows setting Dynamic DNS if your networks keep changing
Pros:
- Provides SFTP storage too as a secure file storage
- Supports Maven repos apart from Git for keeping project files
- Allows setting user permissions for rule-based controlled access
Cons:
- Doesn’t operates over SSH
Using SGit on Android
I’d like to take this opportunity to show you how to use Git on Android. To do this, I’m using SGit as the example. Let’s look at how you can clone a remote repository and create a local repository with SGit.
Clone a Remote Repository using SGit
- Open the SGit client, if you have not already.
- Tap on the + icon (in the action bar) to add a new repository
- Enter the remote repo’s URL and its local name
- Enter its username and password too if case it’s a private repository and if it requires your user credentials for cloning
- Click on the Clone button. SGit will clone (download) the remote repo locally.

Create a Local Repository using SGit
- Tap on the + icon (in the action bar) to add a new repository.
- Click on the Init Local button to create a local repository.
- Enter the name of your local repository.
- Click on the Init button. SGit will create a local repository per the filled details.

That’s all about tools and guides for using Git on Android. Do you already use Git or develop code on your Android? We’d like to hear about your experience of coding on the go.
Источник


