- Install Android Development Tools
- Before You Begin
- Background
- What Do You Need?
- Install and Set Up Android Studio
- Install an Android SDK Platform Package
- Create and Start an Android Virtual Device
- Install the Java SE Development Kit 8
- Create Environment Variables
- Урок 2. Установка и настройка Android Studio. Установка JDK. Настройка Android SDK
- Installing the Android Development Tools
- Installing the JDK/SDK/NDK
- Handling an Android SDK Manager Issue on Windows 8
- Configuring RAD Studio to Work with Your Installed SDK
- Adding Java as a User Override to Your System Path
 Install Android Development Tools
 Install Android Development Tools
Before You Begin
 Before You Begin
This 15-minute tutorial shows you how to install Android Studio, which includes the Android SDK, and create an Android Virtual Device (AVD) on which you install an Oracle JavaScript Extension Toolkit (Oracle JET) hybrid mobile application during a later tutorial. The time to complete doesn’t include processing time as a result of your activities.
Background
The Oracle JET command-line interface invokes the Android SDK that you install with Android Studio to build an Android application package (APK) file from the source files of your hybrid mobile application. This APK file is installed on an AVD to enable you to test the hybrid mobile application.
What Do You Need?
- A computer that meets the system requirements to install Android Studio. See System requirements at https://developer.android.com/studio/
Install and Set Up Android Studio
 Install and Set Up Android Studio
Depending on the operating system of your computer, the Android Studio installation wizard prompts you with dialogs where you choose between standard or custom install types. Choose the options recommended by the Android Studio installation wizard as these options include the components that you require to create and install a hybrid mobile application on an AVD. They also include an Android emulator and an emulator accelerator appropriate for your computer, be that Windows, Mac, or Linux.
- Go to the Download page for Android Studio on the Android Developer’s website at https://developer.android.com/studio/ and click DOWNLOAD ANDROID STUDIO.
- Review and accept the terms and conditions in the Download Android Studio dialog that appears and click DOWNLOAD ANDROID STUDIO FOR PLATFORM where PLATFORM refers to the operating system of your machine, such as Windows, Mac, or Linux.
- Go to the Install Android Studio guide at https://developer.android.com/studio/install and follow the instructions for your operating system to install and start Android Studio.
- If you run Android Studio behind a firewall or secure network, an Android Studio First Run dialog appears which displays a button (Setup Proxy) that you click to enter the proxy server settings for your environment. This allows Android Studio to complete the download of the components for a standard install.
- In the Welcome to Android Studio dialog, select Start a new Android Studio project, and then, in the Create New Project wizard, accept the default options to progress to the final screen in the wizard and click Finish.
This enables the Android Studio toolbar with the options that you need to create an AVD. It also downloads and configures the Gradle build tool that the Android SDK invokes to build the APK file when you complete the creation of your Oracle JET hybrid mobile application.
If you run Android Studio behind a firewall or secure network, a Proxy Settings dialog appears that enables you to configure proxy settings for the Gradle build tool that Android Studio downloads and configures. Provide the proxy settings for your environment to ensure that the Gradle build tool functions correctly.
Install an Android SDK Platform Package
 Install an Android SDK Platform Package
- In the Android Studio toolbar, click the SDK Manager icon () to open the Android SDK page in the Default Settings dialog.
- In the SDK Platforms tab, select Android 8.0 (Oreo) with an API Level value of 26, and click Apply. Description of the illustration sdkmgrdialog.png
- Click OK in the confirmation dialog that appears and accept the license agreement to proceed with the installation.
- Once the installation completes, click Finish and then click OK to close the Default Settings dialog.
 ) to open the Android SDK page in the Default Settings dialog.
 Description of the illustration sdkmgrdialog.png
Create and Start an Android Virtual Device
 Create and Start an Android Virtual Device
- In the Android Studio toolbar, click the AVD Manager icon ( ) and click Create Virtual Device in the Android Virtual Device Manager dialog that opens.
- In the Phone category of the Choose a device definition page of the Virtual Device Configuration dialog, select Nexus 5X and click Next.
- In the Recommended tab of the Select a system image page, click Download for the Oreo entry with an API Level of 26. Description of the illustration downloadoreo.png The SDK Quickfix Installation wizard opens.
- Accept the license agreement to proceed with the download of the system image for Android 8.0 with API Level 26. Once the installation completes, click Finish and then click Next in the Select a system page.
- In the Verify Configuration page, review and accept the default settings such as the AVD Name value of Nexus 5X API 26, then click Finish.
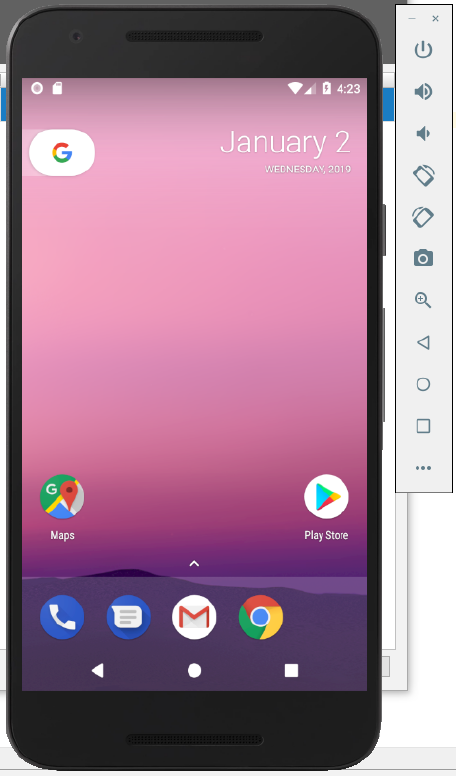
- In the Android Virtual Device Manager dialog, click the Launch this AVD in the emulator icon () under the Actions column for the newly-created Nexus 5X API 26 AVD.
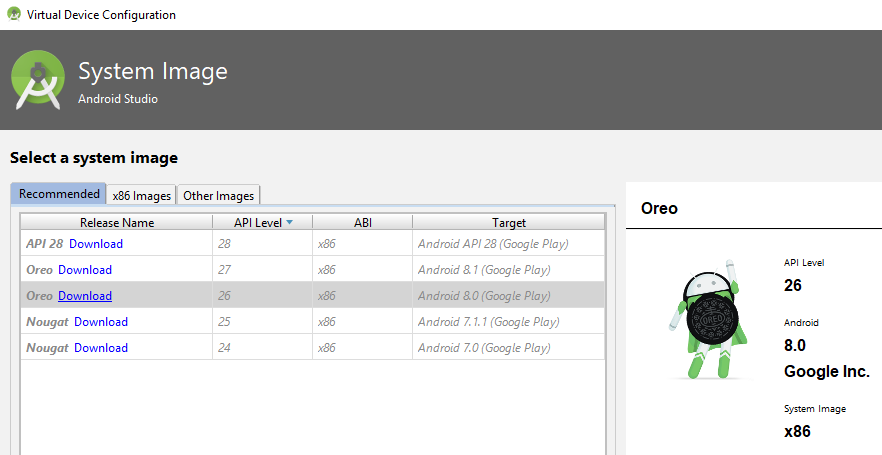 Description of the illustration downloadoreo.png The SDK Quickfix Installation wizard opens.
 ) under the Actions column for the newly-created Nexus 5X API 26 AVD.
The Android emulator starts and loads the Nexus 5X API 26 AVD. A toolbar appears to the right of the AVD that provides UI controls to interact with the AVD.
 Description of the illustration sdkmgrdialog.png
Install the Java SE Development Kit 8
 Install the Java SE Development Kit 8
- Go to the Java SE Development Kit 8 Downloads page at http://www.oracle.com/technetwork/java/javase/downloads/jdk8-downloads-2133151.html, accept the license agreement, and download the Java SE Development Kit installation file for your platform.
- Follow the JDK installation instructions for your platform at https://docs.oracle.com/javase/8/docs/technotes/guides/install/toc.html.
Create Environment Variables
 Create Environment Variables
To function correctly, the Apache Cordova command-line interface that the Oracle JET command-line interface communicates with requires that you configure environment variables. These environment variables reference the installation location of the Android SDK that is installed by Android Studio and the Java SE Development Kit 8.
- For Windows.
- Open the Environment Variables dialog from the System Properties dialog by navigating Control Panel >System and Security >System >Advanced System Settings >Environment Variables.
- Click New in the Environment Variables dialog and set the values of the variables to the location of the JDK and Android SDK locations, as shown in the following image. You can obtain the Android SDK location from the Android SDK page of the Default Settings dialog that you access in Android Studio by clicking Tools >SDK Manager. Description of the illustration envvar.png
- For Mac and Linux-type systems, the settings depend upon your default shell. For example, on a Mac system using the Bash shell, add the following lines in
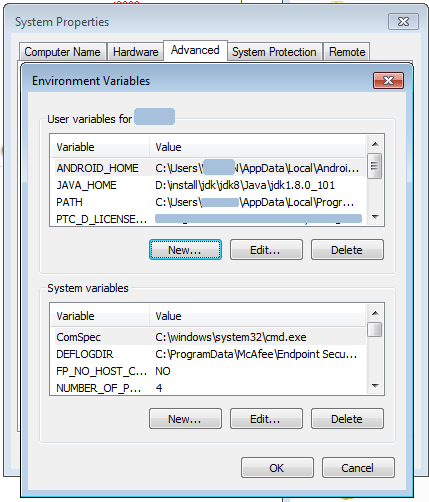 Description of the illustration envvar.png
Источник
Урок 2. Установка и настройка Android Studio. Установка JDK. Настройка Android SDK
Как создают приложения для android? Какие инструменты нужны для разработки андроид-приложений? В этом уроке вы узнаете, как установить среду разработки мобильных приложений Android Studio и как настроить все необходимые для андроид-разработчика инструменты, такие как JDK (Java Development Kit) и Android SDK tools.
Скачать JDK (Java Development Kit) можно здесь
Скачать Android Studio и SDK tools можно здесь
#android #AndroidStudio #startandroid


Нкдавно начало выдавать в логах вот это: Gradle sync failed: C:\Users\admin\.gradle\caches\3.3\scripts-remapped\ijinit_6k62mi942oki7vsduv5w047ih\4ut6sil9ssn94pl2jxyri0vh2\init0a81367d9b026a15ebd85a3a1f50120f\cache.properties (Не удается найти указанный файл).
Подскажите, как решить проблему? Переустановка AS и JDK не помогает.
Привет, обращаюсь уже ни в первый раз, не получается скачать Android Studio, в чем может быть причина? Все оплачено, ни один из вариантов загрузки не грузит!
День добрый, не могу скачать Андроид Студио, не подскажете в чем может быть причина? Win 7/32 bit? не один из вариантов на сайте не качает, качаю по сылке https://developer.android.com/intl/ru/sdk/index.html#Other
При первом запуске андроид студии
Error launching Android Studio
The environment variable JAVA_HOME (with the value of C:\ProgramFiles\Java\jdk1.8.0_77) does not point to valid JVM installation.
Подскажите, что делать если при запуске эмулятора выскакивает это сообщение:
Cannot launch AVD in emulator.
Output:
emulator: ERROR: x86 emulation currently requires hardware acceleration!
Please ensure Intel HAXM is properly installed and usable.
CPU acceleration status: HAX kernel module is not installed!
Компьютер 32 ядерный, Java установила x86. Что еще не так??
Пожалуйста помогите, третий день мучаюсь.
Здравствуйте.
помогите при создании нового проекта в Android studio выдает ошибку
Error:C:\Users\Чеслав\.gradle\caches\2.8\scripts\asLocalRepo6_6sv5w2d3lgnmhlg42gale6i9k\init\cache.properties (Не удается найти указанный файл)
при этом по указанному адресу такой файл существует с расширением lock . пробовал переустановить Android studio и jdk не помогает. Что не так?
У вас кириллица в пути — это источник проблемы
Здравствуйте!
В Android studio при попытке создания нового проекта открывается пустое окно. Что можно сделать?
Cannot launch AVD in emulator.
Output:
emulator: ERROR: x86 emulation currently requires hardware acceleration!
Please ensure Intel HAXM is properly installed and usable.
CPU acceleration status: HAX kernel module is not installed!
Источник
Installing the Android Development Tools
Important: You do not need to install the Android tools yourself.
- The installer for RAD Studio installs the current recommended and tested versions of the Android development tools during the RAD Studio product installation.
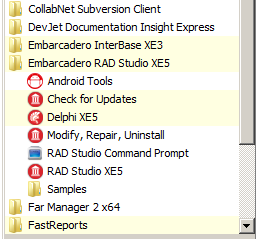
- The Android development tools are conveniently accessible using Start > All Programs > Embarcadero RAD Studio > Android Tools, as shown here:
- The Android Tools menu item opens the Android SDK Manager, from which you can start the Android Virtual Device Manager.
- The installer gives you the option to not install the Android SDK and NDK. If you opt out in the installer, you can either:
- Use a previously installed Android SDK and NDK.
- Install the Android development tools yourself, following the steps in this topic.
Be aware that you need to use the recommended versions of the Android development tools; alternate versions might introduce changes that cannot be supported by RAD Studio. Note: The JDK is installed if you do not have the recommended version of Java (1.6 or 1.7), regardless of whether the Android development tools are installed for you during product installation.
Having the Android development tools installed on your development system is required for developing Android apps using RAD Studio. To build mobile apps for the Android target platform, you also need to add an Android SDK to the RAD Studio SDK Manager.
Here are the default installed locations of the Android development tools as installed by the RAD Studio installer:
- Java Development Kit (JDK): C:\Program Files\Java\jdk1.7.0_25
- Android Software Development Kit (SDK): C:\Users\Public\Documents\RAD Studio\12.0\PlatformSDKs\adt-bundle-windows-x86-20130522\sdk
- Android Native Development Kit (NDK): C:\Users\Public\Documents\RAD Studio\12.0\PlatformSDKs\android-ndk-r8e
Installing the JDK/SDK/NDK
- Install the JDK (Java development kit):
- On the PC, download and run the JDK installer, which is available here: http://www.oracle.com/technetwork/java/javase/downloads/index.html
- Install the Android SDK (software development kit):
- In your browser on the PC, open the Android SDK download page and click Download the SDK Tools ADT Bundle for Windows.
- On the Get the Android SDK page, you can select either 32-bit or 64-bit, according to your Windows platform.
- This download includes the SDK tools and the Eclipse IDE. After the download completes, you can safely delete the SDK\adt-bundle-windows-x86_64-20130522\eclipse folder, unless you want to use the Eclipse IDE.
- From your directory, run SDK Manager.exe. Tips: If the Android SDK Manager does not start, try these suggestions:
- Right-click SDK Manager.exe and choose Run As Administrator.
- Run android.bat from the \tools directory inside your directory.
- In the Android SDK Manager tree, check (enable) the following nodes:
- Tools node
- SDK Platform node within the Android (API ) node, where must be 9 or a higher value (for example, «18»). Note: RAD Studio supports Android 2.3 and later versions regardless of which SDK Platform you download. Android SDK platforms are backward compatible.
- Click Install packages, click Accept License to accept the required licenses, and click Install to install the required software.
- You can close the Android SDK Manager when the installation finishes.
- In your browser on the PC, open the Android SDK download page and click Download the SDK Tools ADT Bundle for Windows.
- Install the Android NDK (native development kit):
- On the PC, download and unzip the NDK for your Windows version (32-bit or 64-bit), available here: http://developer.android.com/tools/sdk/ndk/index.html.
After installing these tools, you need to add an Android SDK to RAD Studio, as described in the next section, and then you can start building mobile applications for the Android platform.
Handling an Android SDK Manager Issue on Windows 8
On Windows 8, you might see errors when you start the Android SDK Manager. If this happens, you might not be able to download any additional SDKs.
The solution is to edit the android.bat file and change the line that launches the Android SDK Manager. Add -Djava.net.preferIPv4Stack=true to the call to Java, as follows:
call %java_exe% -Djava.net.preferIPv4Stack=true %REMOTE_DEBUG% -Dcom.android.sdkmanager.toolsdir=»%tools_dir%» -Dcom.android.sdkmanager.workdir=%work_dir% -classpath «%jar_path%;%swt_path%\swt.jar» com.android.sdkmanager.Main %*
This issue seems to be related to Windows 8 wanting to use Internet Protocol V6.
Configuring RAD Studio to Work with Your Installed SDK
You can use specific versions of the Android SDK simply by pointing the RAD Studio SDK Manager to your installed location.
- Open the Create a New Android SDK wizard by using either Tools Options or Project Manager:
- Choose Tools > Options > Environment Options >SDK Manager | Add | Add new.
- In the Project Manager:
- Right-click the Android target platform and select Properties from the context menu.
- In the SDK field on the Platform Properties dialog box, click Add new in the dropdown list.
- On the Add a New SDK dialog, click Add new in the dropdown list.
- In the Android SDK Base Path and the Android NDK Base Path fields, browse to and select your installed and locations, respectively.
- The Create a new Android SDK wizard now populates the rest of the fields here and on the Android tools locations page. Allow a moment for this process to complete.
- For any fields that are not auto-populated or are marked with , click the entry field and browse to the installed location of that library on your system.
 , click the entry field and browse to the installed location of that library on your system.
Adding Java as a User Override to Your System Path
If you installed the JDK yourself, Java might not be in your system path. For example, if Java is not in your system path, you must use android.bat to start the Android SDK Manager (instead of SDK Manager.exe). If you want to optimize for Android development, you should add Java to your system path environment variable.
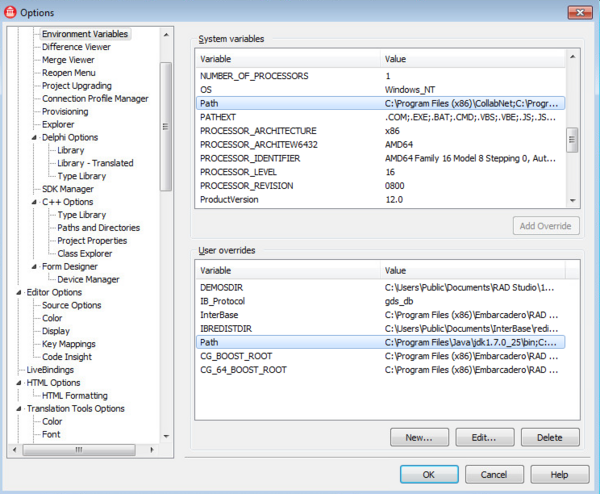
- Choose Tools > Options > Environment Options >Environment Variables .
- In the System variables pane, double-click the Path item.
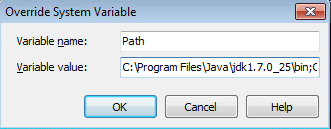
- In the Override System Variable dialog box, click the Home button on your keyboard to bring the focus to the beginning of the path.
- Add the path to Java at the beginning of your system path (it must precede all references to System32). For example, the default installed path to java.exe in RAD Studio is: C:\Program Files\Java\jdk1.7.0_25\bin Note that you should only need to add an override if your Java installation is different from this. End your path entry with a semicolon (;):
- Click OK on the Override dialog box, and click Yes on the Confirm dialog box that follows.
- Verify that you see the path to Java shown at the start of the Path field in the User overrides pane:
- Click OK to close the Tools Options Dialog Box.
Источник


