- How to Install a Custom ROM on your Android Phone to give it a fresh new look!
- Pre-requisites to Install a Custom ROM
- How to Install a Custom ROM
- Step 0: Back up your data
- Step 1: Downloading the correct ROM
- Step 2: Downloading GApps or Google Apps
- Step 3: Booting into TWRP
- Step 4: Installing the Custom ROM
- How to install Custom ROM on Android Device
- Prerequisites
- How to Install Custom ROM
- Backup your device
- Install smartphone drivers on PC
- Install Android SDK Platform-Tools
- Enable Developer Options, USB debugging and OEM unlocking
- Unlock bootloader
- Install Custom Recovery
- Install Custom ROM
- Install Gapps for Google services (optional)
- Install Magisk for Root access (optional)
- Factory Reset and first boot up
How to Install a Custom ROM on your Android Phone to give it a fresh new look!
Every smartphone comes with a default ROM or UI pre-installed. It can be AOSP-based with not a lot of added features, more commonly referred to as Stock Android, or it can be a custom skin from a particular brand. Samsung phones, for example, use a custom UX based on Android called OneUI. Xiaomi phones use MIUI, Oppo uses ColorOS, OnePlus uses OxygenOS, etc. Every UI looks different and has a different set of features.
While some may like a certain UI or skin, others may not. Some users prefer a feature-rich interface with the ability to install themes and modify system elements while some may want a clean, simple experience with no frills. This is where installing a custom Android ROM comes into the picture.

A custom ROM essentially replaces the stock ROM or skin on your phone with the one you choose to install. For example, if you have a Xiaomi or Redmi phone running on MIUI but you don’t like the interface, you can install a custom ROM that will change the UI to stock Android or something else you like.
There are multiple benefits to installing a custom Android ROM. If the UI you’re currently using has a lot of ads or bloatware, you can install a custom ROM to get rid of them. If your phone’s OEM has stopped updating your device and you’re stuck on an older Android version, you can use a custom ROM based on a newer version of Android. If you like a different OEM’s UI and want to try it on your phone, you can install a custom ROM.
Now that you know what a custom ROM can do, let’s tell you how you can install it on your Android phone. Note that there’s no universal custom ROM, although Project Treble somewhat materialized it by introducing the concept of the Generic System Image (GSI). While it is possible to install a GSI sprinkled with all the goodies from your favorite custom ROM, keep in mind that it may not offer you the same level of stability and performance that you can get from a fine-tuned dedicated custom ROM for your device. So with all of this being said, you’ll have to install a ROM that’s specifically made for your phone. Failing to do so may result in bricking your phone. You’ll then have to find ways to recover it or take it to the service center.
Note: Installing a custom ROM can void the warranty on some devices since it involves unlocking the bootloader. Proceed with caution as you can cause temporary/permanent damage to your device if you don’t follow all the steps correctly.
Sometimes, installation instructions can have some variations depending on your device. These are generic instructions. Please double-check with your device forums for variations.
Pre-requisites to Install a Custom ROM
There are certain things you need before you can start installing a custom Android ROM on your phone. Let’s go over all of them so your device is ready for the installation process.
- An Android device.
- An unlocked bootloader (if you don’t know how to unlock the bootloader of your phone, head over to the XDA Forums and search for your device name followed by “unlock bootloader” and you’ll find a guide. The process is different for every phone so make sure you follow the one specifically meant for your device.)
- A custom recovery: TWRP is a good option, you can follow our detailed guide to install TWRP on your phone. However, some custom ROMs have specific recommendations on the recovery you need to use, so please follow that if such instructions are present.
- A custom ROM zip file that you want to install (again, head over to the XDA Forums and search for your device, go through all the available ROMs, and choose the one you want to install.)
- Please note again that custom ROM installation instructions can and do vary by device and ROM. If your ROM of choice comes with its own instructions, please follow them instead of this guide. This guide is a general list of instructions and does not take into account any special device instructions.
- GApps or Google Apps.
- A little bit of patience.
How to Install a Custom ROM
Now you have everything ready to install a custom ROM, we can begin the process.
Step 0: Back up your data
There’s one more thing you need to do before starting the installation though, and that’s to make a backup of all your data. We have a detailed guide to help you back up every aspect of your phone’s data so make sure you do that so it’s easy to restore your data once you install a new ROM.
Step 1: Downloading the correct ROM

As we mentioned earlier, the best way to do this is to head over to the XDA Forums for your device and look for a ROM that best suits your needs. Custom ROMs are device-specific so download a ROM that’s made specifically for your device. Also, there can be multiple variants of the same device based on carrier, region, etc. so keep this in mind too. Locate the appropriate custom ROM for your exact device. If you’re not sure, ask about compatibility in the XDA Forums.
Once you’ve found the ROM you want to install, download the zip file either on your computer or on your phone. Note that you will need to data wipe your phone in some of the later steps, so it is advisable to do the file transfer later on, after the data wipe — but ensure that your phone can connect to your computer and can receive files, just to be clear that your device drivers are in place. Later on, you will need to copy the ROM file to the root of your phone’s internal storage. Don’t extract the zip file.
Step 2: Downloading GApps or Google Apps

Custom ROMs do not come with Google’s apps and services pre-installed (with the exception of a few). So if you want to be able to sign in with your Google account and use Google’s services like Sync, Play Store, Gmail, Drive, etc., you’ll need to install a separate GApps package. There are multiple variants of GApps you can install. You can refer to our guide on finding the right Gapps package for you and download one that’s appropriate for you. This will also be in the form of a zip file. Download and transfer it to your phone’s internal storage. You can also install them right from your PC/Mac if you opt for the adb sideload method.
Note: Some custom ROMs like Pixel Experience come with GApps pre-installed. In such cases, you don’t have to flash the GApps file separately.
Step 3: Booting into TWRP

Once you’ve copied the ROM and GApps files to your phone’s internal memory, it’s time to boot into TWRP to flash the files. If you’re not familiar with booting into recovery mode on your phone, we have a guide telling you how to boot into recovery on your phone so you can follow that to boot into TWRP. Once you’re in TWRP, there are a few things you need to do before installing the ROM which we’ll go over in the next step.
Step 4: Installing the Custom ROM
Once you’re in TWRP, it’s a good idea to take a nandroid backup of your entire system before proceeding further. This can be useful in case you end up with a failed installation. You’ll be able to boot into TWRP and restore the backup to go back to the previous state of your device.
- To do this, select the Backup option in TWRP and select Boot, System Image, Data, Modem, and EFS, and then Swipe to backup. Wait till it’s done.

- This step will wipe your entire phone: Go back to the main menu of TWRP and select Wipe. Then, Swipe to Factory Reset. Select the Format Data option and type in ‘yes’ and select the tick mark to format your phone. Note that formatting the /data partition will need you to reboot once so that TWRP can properly identify the newly created file system.

- Moreover, since the internal memory of the device is wiped during formatting, you must copy the ROM and GApps files once again to your phone’s storage.
- You can do this from within TWRP itself. Head over to the Mount section and select the Enable MTP option.
- Now, connect your phone to your PC and it should be detected as a storage device. Transfer the ROM and gapps files.

- Once done, go back to the main menu on TWRP and select Install. Browse to the location where you saved the ROM and GApps files. First, select the ROM and Swipe to Install it.
- Head back to the previous menu and select the GApps file. Install that as well. Once the installation is complete, select Reboot to System.
- If your installation does not boot with this sequence of steps, you may need to flash/install the ROM, reboot back into recovery, and then flash the GApps file. This additional reboot is needed in some cases.

You now have a custom Android ROM installed on your phone! Wait for your phone to boot up. It may take a while for the initial boot process so don’t panic, your phone will boot into the setup process.

That’s how you can install a custom Android ROM on your phone. It’s a fairly simple process and with a little bit of time and patience, you can enjoy a fresh new ROM on your phone with added features, customization, theming, and more. If you installed a custom ROM and you don’t like it or it has issues, just download a new ROM and repeat the installation process.
Источник
How to install Custom ROM on Android Device
Updated on June 26, 2021
If you’re reading this post that means you have decided to install a custom ROM on your Android device.
Believe me, you’re forever going to be thankful you took this step. Not everybody does.
While this may sound dramatic, I do mean it. Because you’re missing out on so much by sticking to the normal way of using your Android.
The normal way here means what most people do. They buy the device and stick to the settings and the operating system that the manufacturer provides. And then they trash it once it seems to be not usable anymore. (But is it? We will find out soon)
Although it might be fine to an extent, you’re not tapping the full potential of the device and the incredible Android community that is happy to support it.
If you’re an Android enthusiast, there are several ways to enhance your experience with the device, such as:
- Enable Developer Options
- Root your Android
- Install custom ROM on Android
In this article, we’re going to focus on the third point, i.e., how to install custom ROMs on your Android device.
Before that, a quick recap on what custom ROMs are and why they are so cool.
Custom ROMs are aftermarket versions of the Android operating system that are developed by Android enthusiasts by forking the open-source Android code.
- They allow you to experience the latest Android versions on devices that don’t receive updates from the manufacturer anymore.
- Almost all custom ROMs are based on AOSP and retain the look and feel of pure Android without stupid skins.
- Most custom ROMs offer a wide array of features, tweaks and customizations to enhance your Android experience.
- Unlike stock ROMs, they are not loaded with bloatware.
- Custom ROMs allow you more access to the hardware and performance aspects of your device that most manufacturers put a restriction on.
- Overall, they breathe fresh life into your old devices.
Here’s an article on everything you need to know as a beginner about custom ROMs and their pros and cons.
A few very important things to keep in mind:
- This is a generic guide, which means that these are the steps that apply to most Android devices. It is advisable to cross-check them with the XDA thread of the ROM for your device.
- I would advise reading this tutorial on your computer so that the steps, commands and screenshots are easy to follow.
- If you’re in doubt at any point, stop. Check for other guides online to see if they can answer your queries before proceeding. Else you can always put in a comment here, although it means you have to wait for my response which can take some time.
Table of Contents
Prerequisites
Before you start with the process, make sure you have the prerequisites in place.
- Your Android device: Fully charge your device.
- PC/Laptop: It should be in perfect working condition. Sudden freezes and reboots can get you into a problem.
- USB data cable: Preferably the original cable that came with your device.
- Android SDK Platform-Tools: Download the latest files to your PC/Laptop.
- Custom recovery: Download the latest TWRP recovery for your device on your laptop.
- Custom ROM: Download a custom ROM compatible with your device on your laptop. Refer to our list of the best custom ROMs for Android.
- Gapps (optional): If you want to use Google services, download the latest Gapps compatible with your device architecture and custom ROM Android version from here on your laptop.
- Magisk (optional): If you want root access, download the latest Magisk from here on your laptop.
- Patience: This is a long (and somewhat scary) process for beginners. You have to diligently follow the steps if you love your device.
Let’s dive into the process.
How to Install Custom ROM
The process of flashing a custom ROM on Android involves multiple steps. It starts with preparing your PC and Android device so that all necessary files, drivers and settings are in place. Thereafter, the actual process of modifying your device starts. I will cover the steps one by one and try to be as descriptive as possible while staying within the scope of this tutorial.
Backup your device
Before you start with the process of flashing a custom ROM on your Android smartphone, it is important to backup all important data such as photos, videos, application settings, etc. This is because by the time you finish with the steps, all your data will be wiped off and recovering them will not be straightforward.
There are several ways of doing this. I would recommend connecting your device to your PC and transferring all the files you want to retain. For app settings, I would recommend syncing them to your Google account if you wish to have them retrieved automatically once you boot into your new ROM. However, this is not recommended and I would always suggest clean installing the apps from Google Play and setting them up afresh.
Install smartphone drivers on PC
To make sure the PC recognises your smartphone, you have to install the necessary drivers. This usually happens automatically when you connect your smartphone to the computer via a USB cable. However, if it doesn’t, you will need to manually download the drivers for your model from the manufacturer’s website and install them on the PC.
Install Android SDK Platform-Tools
This is an important step. Download and install the Android SDK Platform-Tools for your PC. This will provide the necessary ADB and Fastboot binaries and allow your PC to recognise your device in ADB and Fastboot modes.
Enable Developer Options, USB debugging and OEM unlocking
Step 1: To enable Developer options on your Android device, navigate to the path below.
Step 2: Next, tap the Build Number 7 times. You will receive a notification that says “You are now a developer!”.
Step 3: After this, you need to enable USB debugging. This allows your device to communicate with the Android SDK over a USB data cable. To achieve this, navigate to the path below.
Look for “USB debugging” and turn on the toggle.
Step 4: In the same menu, turn on OEM unlocking.
Unlock bootloader
The time has come to get your hands dirty.
Step 1: Connect your Android device to the PC via USB cable.
Step 2: Open the folder where the Platform-Tools files are stored and open Command Prompt. This can be done with a Shift+Right click on an empty area and selecting ““Open command window here”. Alternatively, you can type “cmd” in the address bar and hit Enter. Command Prompt has now been launched.
Step 3: You need to make sure the Android SDK recognises the device. To do this, enter the command below.
The result will be a “List of devices attached” along with a random device code. This means the connection is successful. If the device is not recognised, recheck all the previous steps. Also, make sure the USB cable is a working one.
Step 4: Now you need to boot your device into the bootloader (fastboot mode). To do this, type in the below command and press Enter.
Your device will now restart and boot into fastboot mode. On most devices, it will be a black screen with a green Android robot with some device information below.
Step 5: To confirm if your device is successfully communicating with Android SDK in fastboot mode, type in the below command.
This will return the same device code that you got with the “adb devices” command sometime back.
Step 6: At this point, we will perform the actual bootloader unlocking. Execute the below command to unlock the bootloader.
If this command doesn’t work, don’t worry. For older devices, you may try the command below.
If your device prompts you to confirm the process, use the volume up/down button to select “Yes” and the power button to confirm the selection. Note that this doesn’t apply to all devices.
The bootloader unlocking process will now start and should not last more than a minute.
Step 7: Once the bootloader is successfully unlocked, the device will reboot itself back into fastboot mode. Enter the below command on your PC to reboot into the operating system.
Hang on, your device will be reset to factory settings during the reboot so it may take a while. The boot up screen may show a warning that your device is unlocked and is not secure. No need to worry, just let it finish the process.
Do a quick setup on your device. You don’t need to add your Google account at this point if you want to flash a custom ROM as it will be erased again. However, if you just want to install a custom recovery, you can do a proper account setup.
You will not notice any difference on your device yet. Now that the bootloader is unlocked, you are ready to flash a custom recovery, root your device and install a custom ROM.
Install Custom Recovery
Now it’s time to install a custom recovery on your Android device. This will allow you to install any custom ROM later. Another advantage is that custom recovery is far more powerful and feature-rich than the stock one that comes preinstalled on your device.
For this tutorial, we will use TWRP recovery. TWRP stands for TeamWin Recovery Project. It is the most popular custom recovery and gets updated with features and bug fixes regularly.
However, you can use other custom recoveries as well, such as OrangeFox recovery, which is in fact based on TWRP. I will write a separate article dedicated to OrangeFox recovery later.
For most devices, TWRP recovery consists of just an image file (.iso). However, for some devices, you will get two files, an image file as well as a zip installer. The steps are a little different for the two types of TWRP installers, so you have to be very careful with the process.
To install TWRP recovery, follow these steps:
Step 1: Enable Developer options and USB debugging by following the steps we discussed before. We are doing this again because your device was factory reset at the end of the unlocking bootloader process.
Step 2: On your computer, rename the recovery image file to twrp.img and place it in the folder that contains the Platform-Tools files.
If your device’s TWRP has a zip installer as well, place it in the internal storage of your device.
Step 3: Connect your device to the computer via USB cable.
Step 4: Launch Command Prompt inside the folder again as you did before.
Step 5: Run the below command to reboot into the bootloader.
Your device will restart and boot again into fastboot mode.
Step 6: Execute the below command to make sure the device is communicating with the Android SDK over fastboot mode.
If it returns the device code then we can proceed. Note that this is an optional step, but it’s good practice to follow.
Step 7: Run the below command to flash TWRP recovery on your device.
Now, wait for the process to finish. If things go well, you will see a success message in your Command Prompt window.
Step 8: Lastly, execute the below command to reboot into the just installed TWRP recovery.
Your device will now restart and boot into TWRP recovery.
If your device’s TWRP installer is just an image file, the TWRP boot up will patch the OS on your device to prevent it from replacing TWRP with the stock recovery on the next boot up. This happens behind the scenes and you don’t have to do anything.
If your device’s TWRP consists of both an image and a zip installer, you have a few more steps to follow to make the TWRP installation permanent.
Step 9: Tap on Install in the TWRP menu.
Step 10: Select the ZIP file from the internal storage.
Step 11: Swipe the button at the bottom of the TWRP screen to flash the installer file.
The flashing process will not last more than a minute and will return a success message if everything goes well.
Well done! You have now successfully replaced the useless stock recovery on your device with a polished custom recovery.
You can now reboot to your current OS. To do so, go to the main menu of TWRP recovery, tap on Reboot and select System.
Install Custom ROM
So, you’re now in the final stages of installing a custom ROM on your Android. The good part is, if you have reached this far, the remaining steps are a cakewalk.
Step 1: Copy the custom ROM, Gapps (optional) and Magisk (optional) files to your device’s internal storage.
Step 2: Remove security settings such as pins, patterns and fingerprint locks that you have set up. Also, remove your Google account from Settings > Accounts.
Step 3: Next, you have to boot into recovery. This can be done in two ways:
If you’re connected to your computer via USB cable and USB debugging is enabled, run the following command in Command Prompt the same way we were doing before.
Alternatively, you can press and hold Power+Volume Up button for a few seconds. The device will restart and you will need to release the buttons once you see the manufacturer logo at boot up.
For some devices, the combination will be Power+Volume Down. I would recommend a quick Google search to find out the combination for your device.
After this, the TWRP screen will show up.
If TWRP asks you to confirm whether to Keep System Read only, swipe across where it says Swipe to Allow Modifications. This is important since keeping the system read-only will prevent TWRP from making changes.
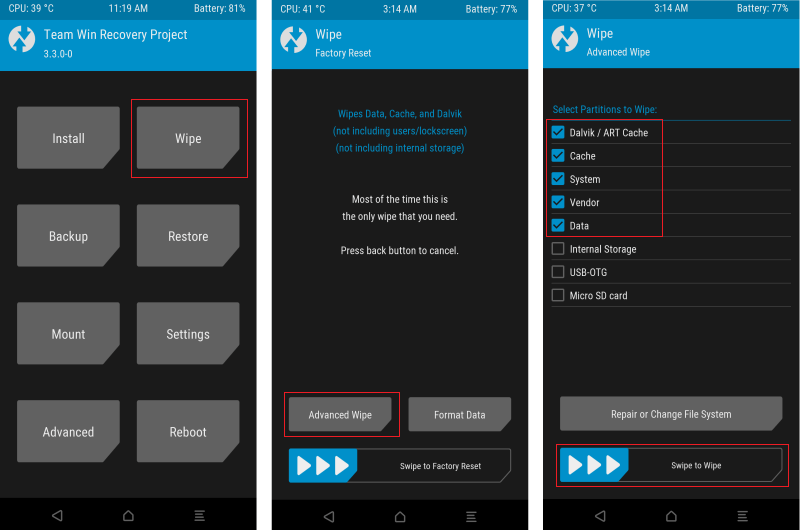
Step 4: Now we need to wipe the existing operating system and data from the device. To do this, tap on the Wipe option in the TWRP menu. On the next screen, tap on Advanced Wipe.
Select Dalvik / ART Cache, Cache, System and Data partitions. For some custom ROMs, you may have to select Vendor as well. Cross-check this with the ROM specific installation guide.
Then swipe across the screen where it says Swipe to Wipe. This operation will format the selected partitions and will take a few seconds to complete.
Step 5: At this step, we will flash the custom ROM. To do this, go back to the TWRP home menu and tap on Install. This will open your device’s internal storage file system where you have to select the file you want to install. Select the custom ROM ZIP. On the next screen, swipe across the screen where it says Swipe to confirm Flash.
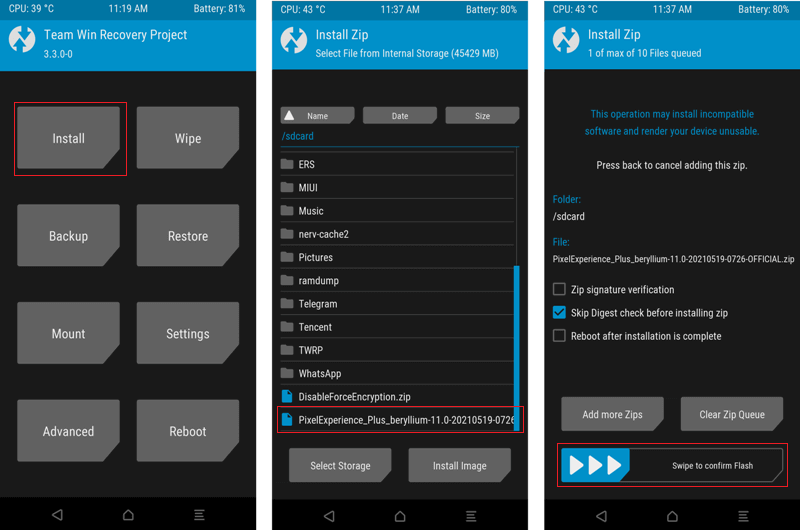
The process for custom ROM installation will now begin. It will take some time to finish, until then don’t mess with the device.
Once the flashing is complete, you will see a success message on your screen.
Super stuff there! You just installed a brand new custom ROM on your dear Android device.
Important: Don’t reboot the device yet. If you want to install Gapps and/or Magisk, read the next two sections. Else jump to the last part.
Install Gapps for Google services (optional)
Although an optional step, you must flash the Google apps package aka Gapps if you want access to Google Play services for your apps. Installation follows the same process as flashing the custom ROM.
Assuming you have already copied the Gapps installer zip to your internal storage. Tap on Install on the TWRP home menu and select the Gapps package zip. Then swipe to confirm the flash on the next screen like you did before.
The installation process will take a few seconds to complete after which you will see a success message.
Install Magisk for Root access (optional)
Lastly, if you want root access on your Android device, you have to install Magisk. It is not mandatory to flash it right away as you can do it any time later.
Anyway, I’m assuming you want to get access to your device’s root and have already copied the Magisk installer zip to the internal storage.
You can flash it just like you flashed Gapps. Tap on Install on the TWRP home screen, select the Magisk zip and swipe to confirm the flash.
Read our tutorial on rooting Android for further understanding.
You will see a success message once the installation is completed.
Factory Reset and first boot up
Now that you have installed a custom ROM on your device, and probably Gapps and Magisk as well, it’s time to perform one final step.
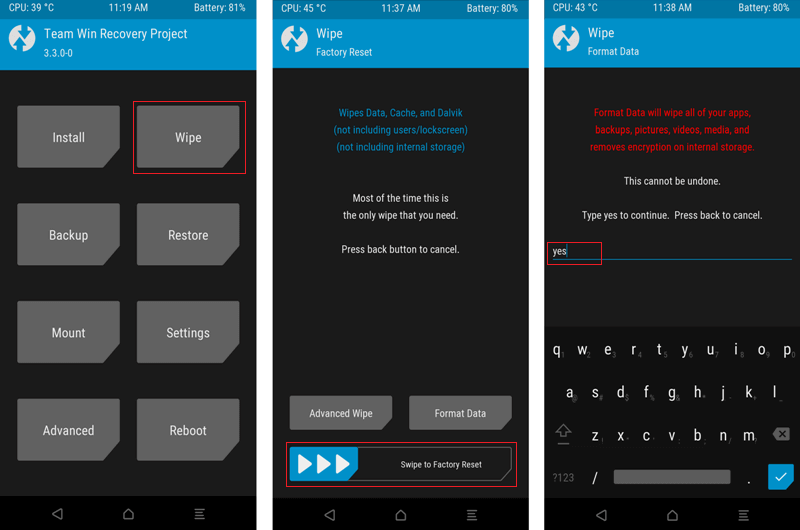
You need to do a Factory Reset. To do this, tap on Wipe and swipe to confirm where it says Swipe to Factory Reset. You will get a prompt to reconfirm that you want to format the data. Type “yes” and tap Okay on the keypad.
Note that this is not a mandatory step. However, I would recommend doing this as it completely cleans up your internal storage before the first boot up.
Once the Factory Reset is done, simply tap on Reboot.
Your device will now start booting into Android and you will be greeted by its bootanimation of the custom ROM.
From here on, you won’t need any guidance. Just perform the usual setup such as setting up your Google account, WiFi, etc. Note that this setup process depends on whether you have installed Gapps or not, so don’t be surprised if you directly land on the Android home screen without any initial setup.
That’s it, enjoy the custom ROM experience!
Now that you’ve reached the end of the tutorial, I really hope you’ve succeeded in what you started without any hiccups. I have tried to write this tutorial keeping in mind the absolute beginners. Yet, if there are things I can improve, I would be glad to hear about them.
Источник


