- Инструкция: устанавливаем Windows Subsystem for Android на любой сборке Windows 11
- Инструкция
- Установка Windows Subsystem for Android
- Установка APK-файлов
- How to Install Windows on Your Android Phone
- Introduction: How to Install Windows on Your Android Phone
- Step 1: The Concept
- Step 2: Software
- Step 3: Making and Configure the Virtual Machine
- Step 4: Installing Windows
- Step 5: FUN
- Be the First to Share
- Recommendations
- Reclaimed Materials Contest
- Cookie Speed Challenge
- Hide It Challenge
- 4 Comments
- Windows Subsystem for Androidв„ўпёЏ
- Set up your development environment
- Prerequisites
- Install the Amazon Appstore
- Settings app
- Input compatibility considerations for Windows devices
- Keyboard input
- Mouse input
- Window management and resizing
- Minimum screen requirement
- Letter & pillar boxing
- Additional resizing considerations
- Test and debug
- Enable developer mode in Windows Settings
- Connect to the Windows Subsystem for Android for debugging
- Connect to a test device
- Debug your app
- VM lifecycle considerations
- VM Properties
- Security
- Amazon Appstore
- Troubleshooting issues with Amazon Appstore
- Building Universal APKs
- Uninstalling Windows Subsystem for Android
Инструкция: устанавливаем Windows Subsystem for Android на любой сборке Windows 11
Несколько дней назад Microsoft начала тестирование подсистемы Windows Subsystem for Android (WSA), которая позволяет запускать Android-приложения в Windows 11.
Сейчас функция доступна только участникам программы Windows Insider на канале Beta, что несколько удивительно, так как обычно все новшества вначале появляются на канале Dev. Но даже если вы используете канал Beta, то для установки подсистемы из Microsoft Store потребуется сменить регион на США в самой Windows 11.
Microsoft обещает, что инсайдеры на канале Dev также вскоре получат доступ к Windows Subsystem for Android, но какие-либо конкретные сроки не называются. Если вы не хотите ждать, то можете установить подсистему вручную. Для этого вам потребуются прямые руки и небольшие навыки работы в PowerShell.
Важно! Все действия вы делаете на свой страх и риск.
Благодарим aleks242007 и участников чата Community в Telegram за помощь в составлении инструкции.
Инструкция
Установка Windows Subsystem for Android
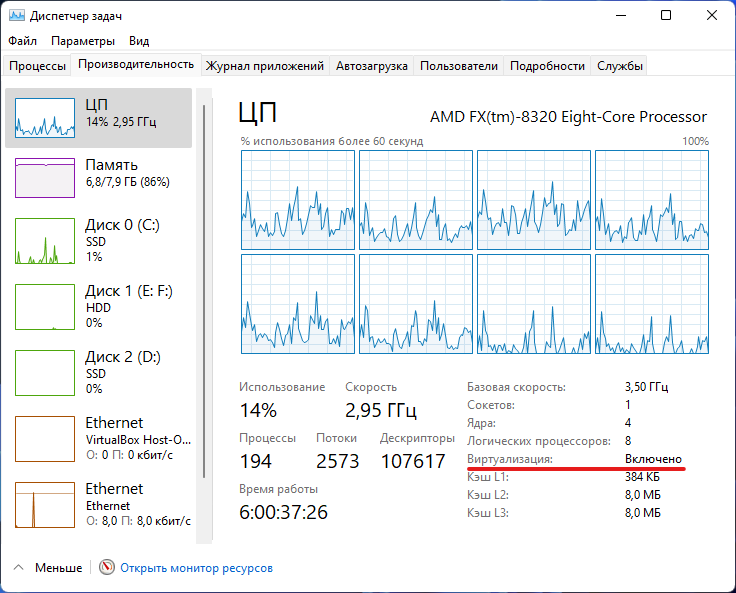
- Для начала убедитесь, что ваш компьютер поддерживает виртуализацию. Для этого откройте «Диспетчер задач», перейдите на вкладку «Производительность», выберите CPU и посмотрите текст под графиком. Там должно было указано: «Виртуализация: Включено».

- Если виртуализация отключена, то вам необходимо включить её в BIOS. У разных производителей настройка может располагаться в разных разделах и называться по-разному, так что можно поискать информацию в Google для вашего конкретного устройства.
- Если в BIOS настройка отсутствует или значение в «Диспетчере задач» не меняется, то вы вряд ли сможете запустить Windows Subsystem for Android на своём компьютере.
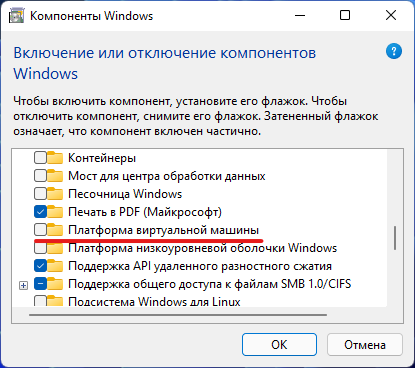
- Следом откройте меню «Пуск», введите в поле поиска «Включение или отключение компонентов Windows» и выберите соответствующий результат.
- В открывшемся окне установите галочку напротив пункта «Платформа виртуальной машины», нажмите «ОК», дождитесь применения изменений и перезагрузите ПК.
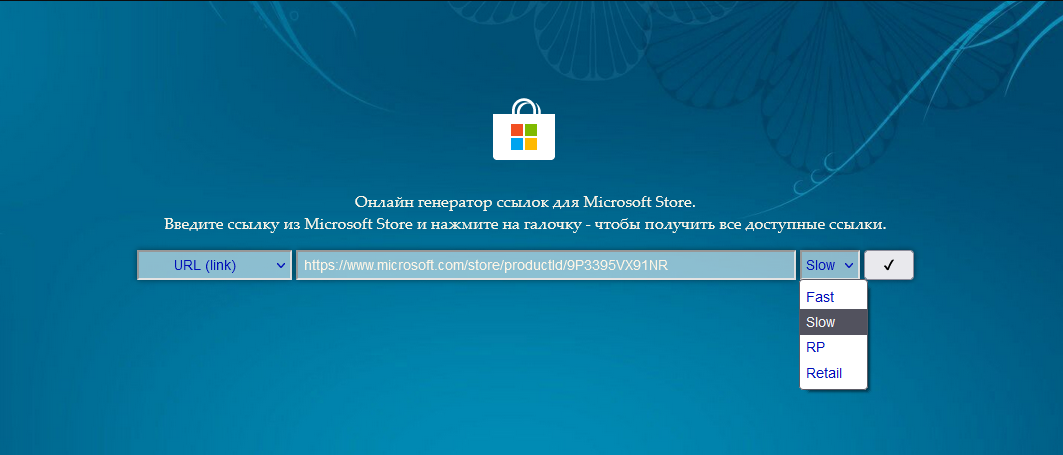
- Далее нам потребуется скачать установщик Windows Subsystem for Android в формате MSIXBUNDLE с сервера Microsoft Store:
- Перейдите на сайт Microsoft Store — Generation Project (от rgadguard) по этой ссылке.
- В поле на сайте вставьте следующую ссылку:
- Справа от поля в выпадающем меню выберите Slow и нажмите на галочку.
- В появившемся списке найдите файл с примерно таким названием (номер версии может отличаться):
- Нажмите на название этого файла и сохраните файл в любой папке на вашем компьютере. Обратите внимание, что файл должен быть в формате .MSIXBUNDLE. Если это не так, то просто смените расширение файла на нужное. Файл должен весить примерно 1,2 ГБ.
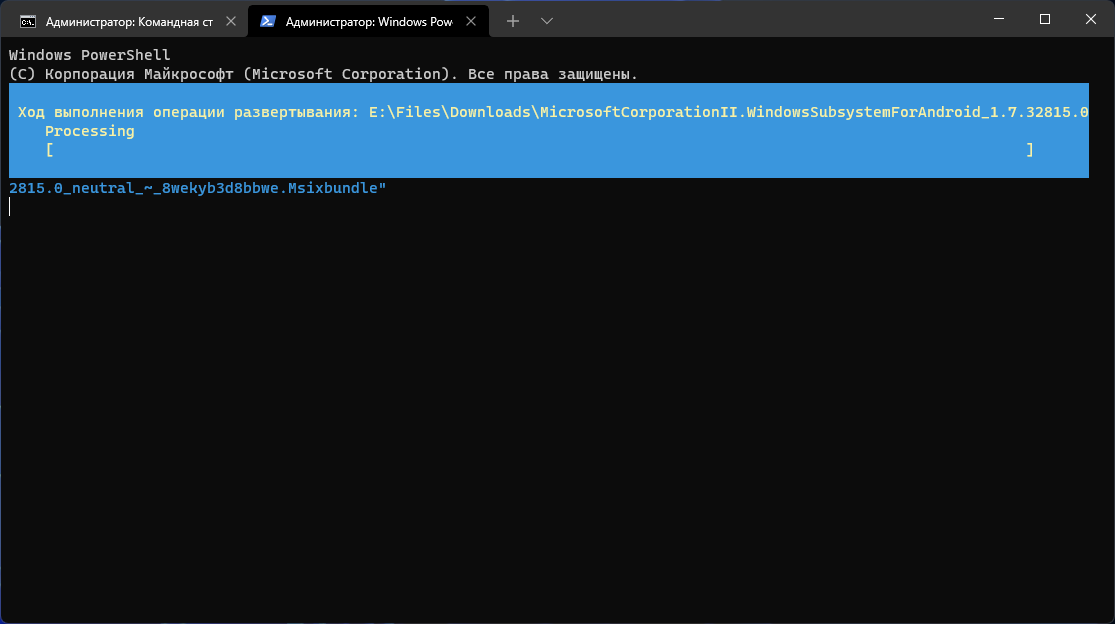
- Запустите PowerShell или Windows Terminal (нужна вкладка с PowerShell) от имени администратора.
- Введите в консоль следующую команду:
- «C:\Users\user1\Desktop\MyApp.msix» — путь к файлу MSIXBUNDLE, сохранённому на шаге 4. Чтобы быстро его получить, вы можете нажать правой кнопкой мыши по файлу в «Проводнике» и выбрать пункт «Копировать как путь».
- Решение ошибки:
Если вы увидели такое сообщение в PowerShell, то введите следующую команду:
После этого вновь введите команду Add-AppxPackage из шага 6.
- Нажмите Enter и дождитесь завершения установки.
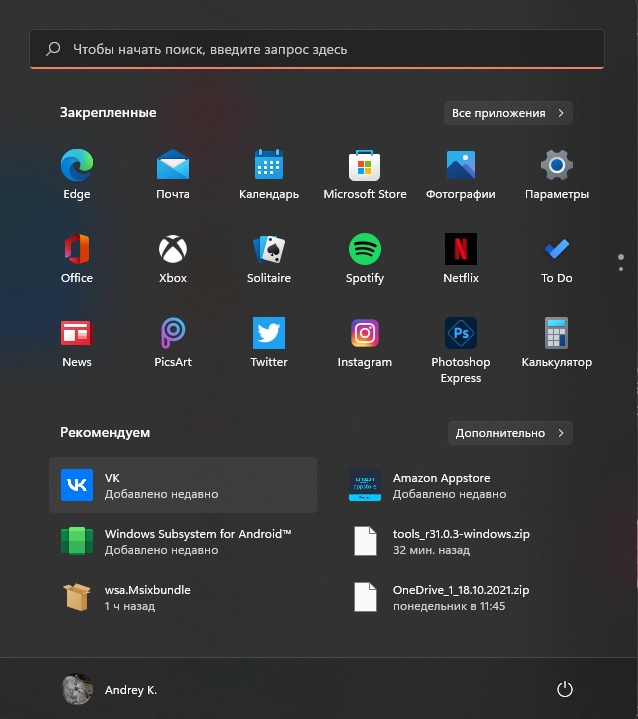
- Если всё прошло успешно, то в меню «Пуск» появится приложение под названием Windows Subsystem for Android.
Установка APK-файлов
Теперь подсистема Windows Subsystem for Android работает, однако с установкой приложений есть некоторые сложности. Как вы уже знаете, вместо Google Play здесь используется Amazon Appstore. Причём отображаются там лишь приложения, которые Microsoft и Amazon протестировали на работоспособность в подсистеме.
Правда воспользоваться Amazon Appstore всё равно не получится. Приложение не только требует учётную запись Amazon, но и проверяет ваше местоположение. Можно, конечно, подключить VPN, но есть ли в этом смысл?
К счастью, Windows Subsystem for Android поддерживает установку приложений с помощью APK-файлов. Вы можете воспользоваться либо утилитой WSATools, о которой мы рассказали в статье по этой ссылке, либо устанавливать вручную с помощью командной строки по инструкции ниже.
- Скачайте SDK Platform Tools для Windows с сайта Android, перейдя по этой ссылке.
- Извлеките папку platform-tools , например, в корень диска C (рядом с папками Windows, Program Files и т. д.)
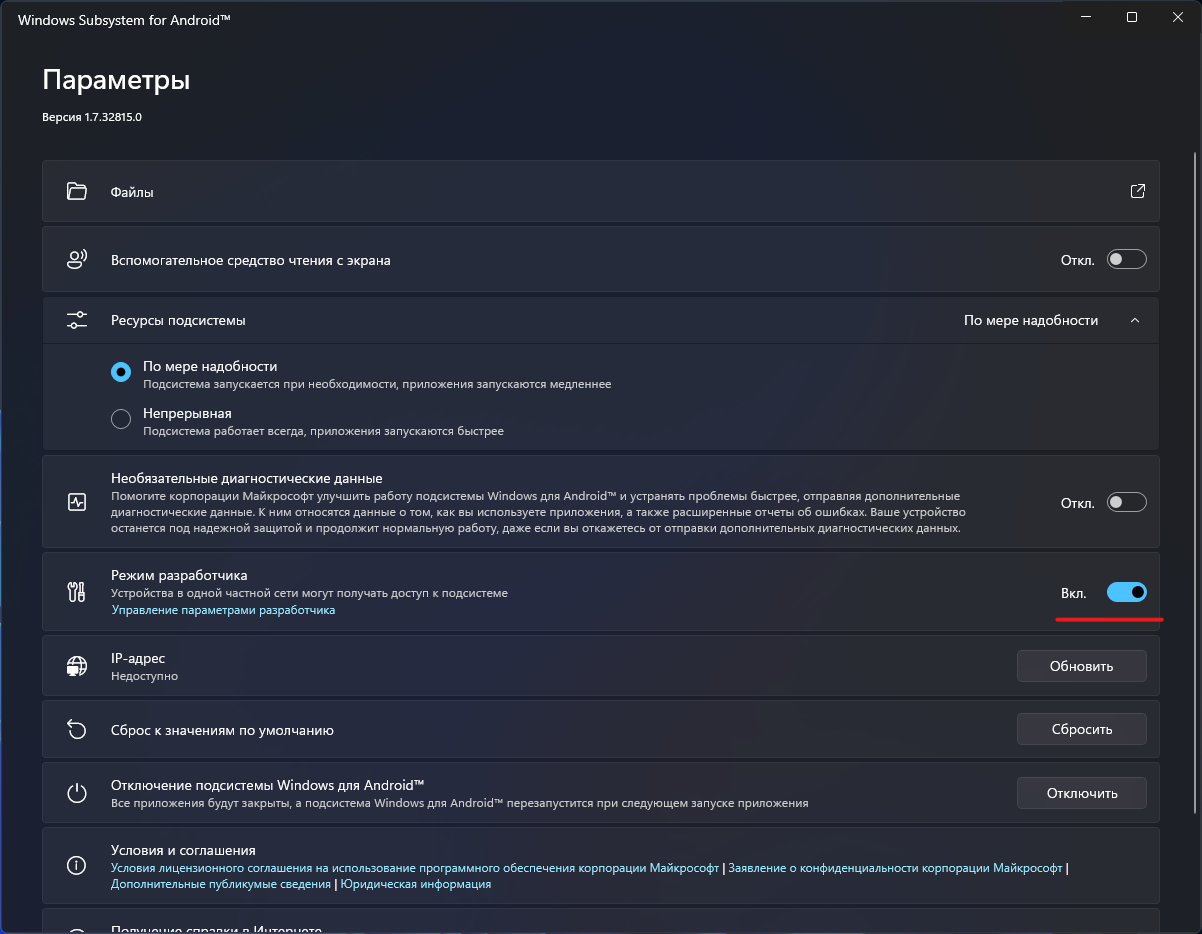
- Откройте приложение Windows Subsystem for Android и включите «Режим разработчика».
- Нажмите на кнопку рядом с элементом «Файлы». Начнётся запуск подсистемы Windows Subsystem for Android.
- Нажмите на кнопку «Обновить» рядом с элементом «IP-адрес».
- В описании для элемента «Режим разработчика» появится IP-адрес, который мы будем использовать для подключения к подсистеме с помощью ADB.
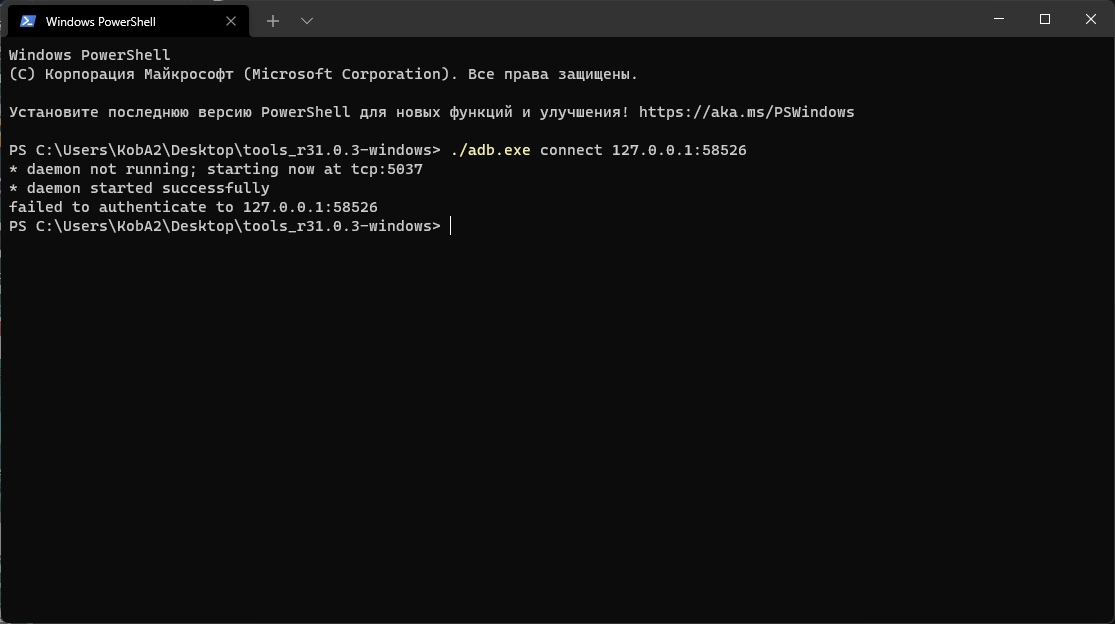
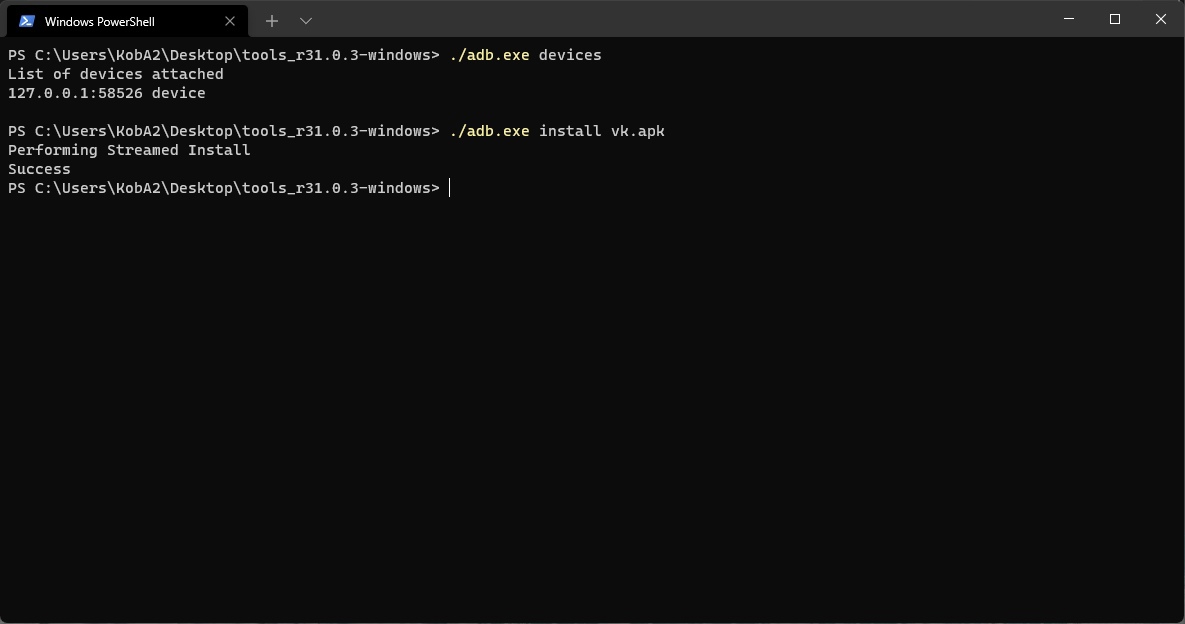
- Откройте командную строку (или Windows Terminal) и перейдите в папку с установленным SDK Platform Tools, подставив нужный путь к папке:
- Введите следующую команду, подставив в неё IP-адрес из предыдущего пункта:
Примечание. Если выполнять команды через PowerShell, то перед ADB следует прописать ./
Чтобы быстро скопировать путь к файлу, нажмите по нему правой кнопкой мыши и выберите «Копировать как путь». Затем вставьте его после adb.exe install и нажмите Enter.
Поделиться впечатлениями о работе Windows Subsystem for Android и обсудить сценарии её использования вы можете в нашем чате в Telegram. Там же можете задавать вопросы, если возникли какие-либо сложности с установкой подсистемы или Android-приложений.
Поскольку далеко не все Android-приложения корректно работают в подсистеме, пользователи решили составить таблицу с информацией о работоспособности приложений в WSA. Найти и внести свой вклад вы можете на GitHub.
Источник
How to Install Windows on Your Android Phone

Introduction: How to Install Windows on Your Android Phone


Ever wanted to run Windows XP on your Android Device? Ever thought if running desktop OS on your mobile? You will need the limbo application to install windows on your phone. Using this application you can install Windows 98 / ME / CE / XP / Vista / 7/8 / 8.1 / 10 and linux DS / Kali. The phone application is free. To install windows xp on your phone you need 1.5GB of free space and 2 hours of free time.
Step 1: The Concept
The basic concept behind running windows on your Android device is emulation of the operating system.
- We will first download and install application limbo
- Then we will copy the iso windows image to our phone
- Then we will install windows XP
- Finally play with Windows!
Step 2: Software
- Copy the ISO Windows XP image to our android device
- Download application limbo: https://www.mediafire.com/file/5o5rjwta1l9rubj/limbo-androidarm-x86-release.2.10.0.apk/file
Step 3: Making and Configure the Virtual Machine
Set the following parameters:
Create New Virtual Machine
CPU / BOARD
- architecture: 32 or 64 Machine Type: PC CPU
- Model: qemu32 / qemu64
- CPU Cores: max
- Ram Memory : minimum 512mb
Storage
Removable Storage
- Select a windows image
Graphics
Boot Settings
- Boot from Device: Default
User Interface
- User Interface : SDL
- Select Fullsreen
Step 4: Installing Windows
Now, we’l install Windows XP in the virtual machine. This process takes about an hour so please wait 😛
Now just click the green start button and launch off! Follow the instructions to install Windows XP. It’ll take about 5 minutes to load drivers and then main installation will start. This is going to be fun installing and testing old applications.
Step 5: FUN
I will play a minesweeper game. Have fun 🙂
Be the First to Share
Did you make this project? Share it with us!
Recommendations


Reclaimed Materials Contest

Cookie Speed Challenge

Hide It Challenge

4 Comments

Question 4 months ago
What amount of time did it take for formatting to complete?
Источник
Windows Subsystem for Androidв„ўпёЏ
Windows Subsystem for Androidв„ўпёЏ enables your Windows 11 device to run Android applications that are available in the Amazon Appstore.
If you’re a developer interested in targeting Windows desktop devices and optimizing for the Windows operating system, this guide is for you. Learn how to:
- Set up your development environment, including prerequisites, installing the Amazon Appstore, and using the Settings app.
- Handle input compatibility considerations for Windows devices, such as: keyboard input, mouse input, and window management and resizing.
- Test and debug your app on a Windows 11 device.
- Submit apps to the Amazon Appstore: Your app must be available in the Amazon Appstore to run on Windows 11 devices.
Set up your development environment
To test your Android app in the Windows desktop environment, a bit of set up will be required.
Prerequisites
Windows Subsystem for Android is currently only available through preview via the Beta and Dev Channels of the Windows Insiders Program (Windows 11 Build 22000.xxx series) in the U.S. only.
Your device also must meet specific Windows 11 requirements. Check the «Windows Subsystem for Android» section under «Feature-specific requirements» on the page: Find Windows 11 specs, features, and computer requirements.
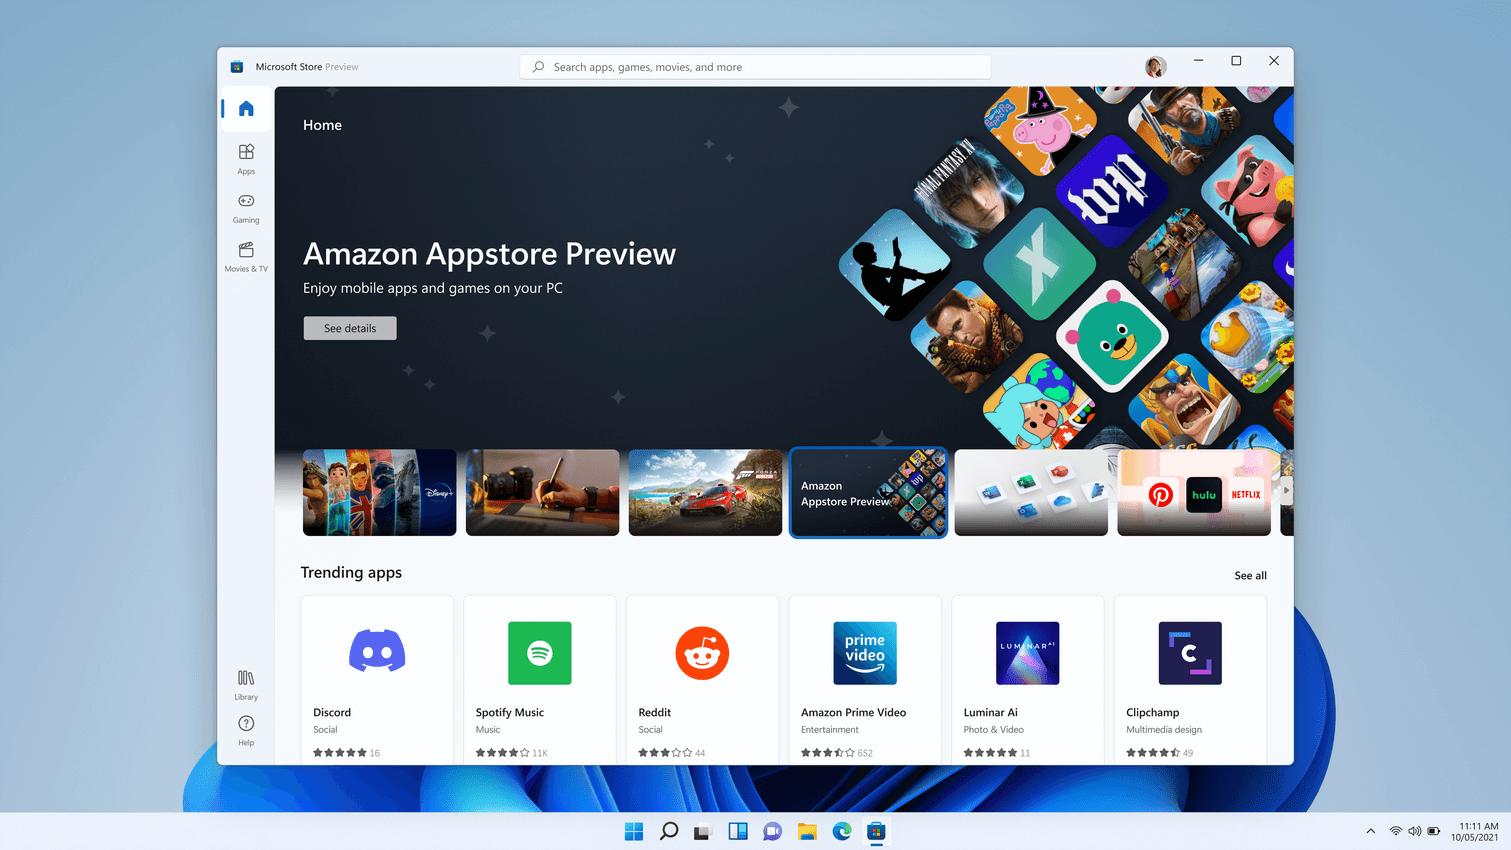
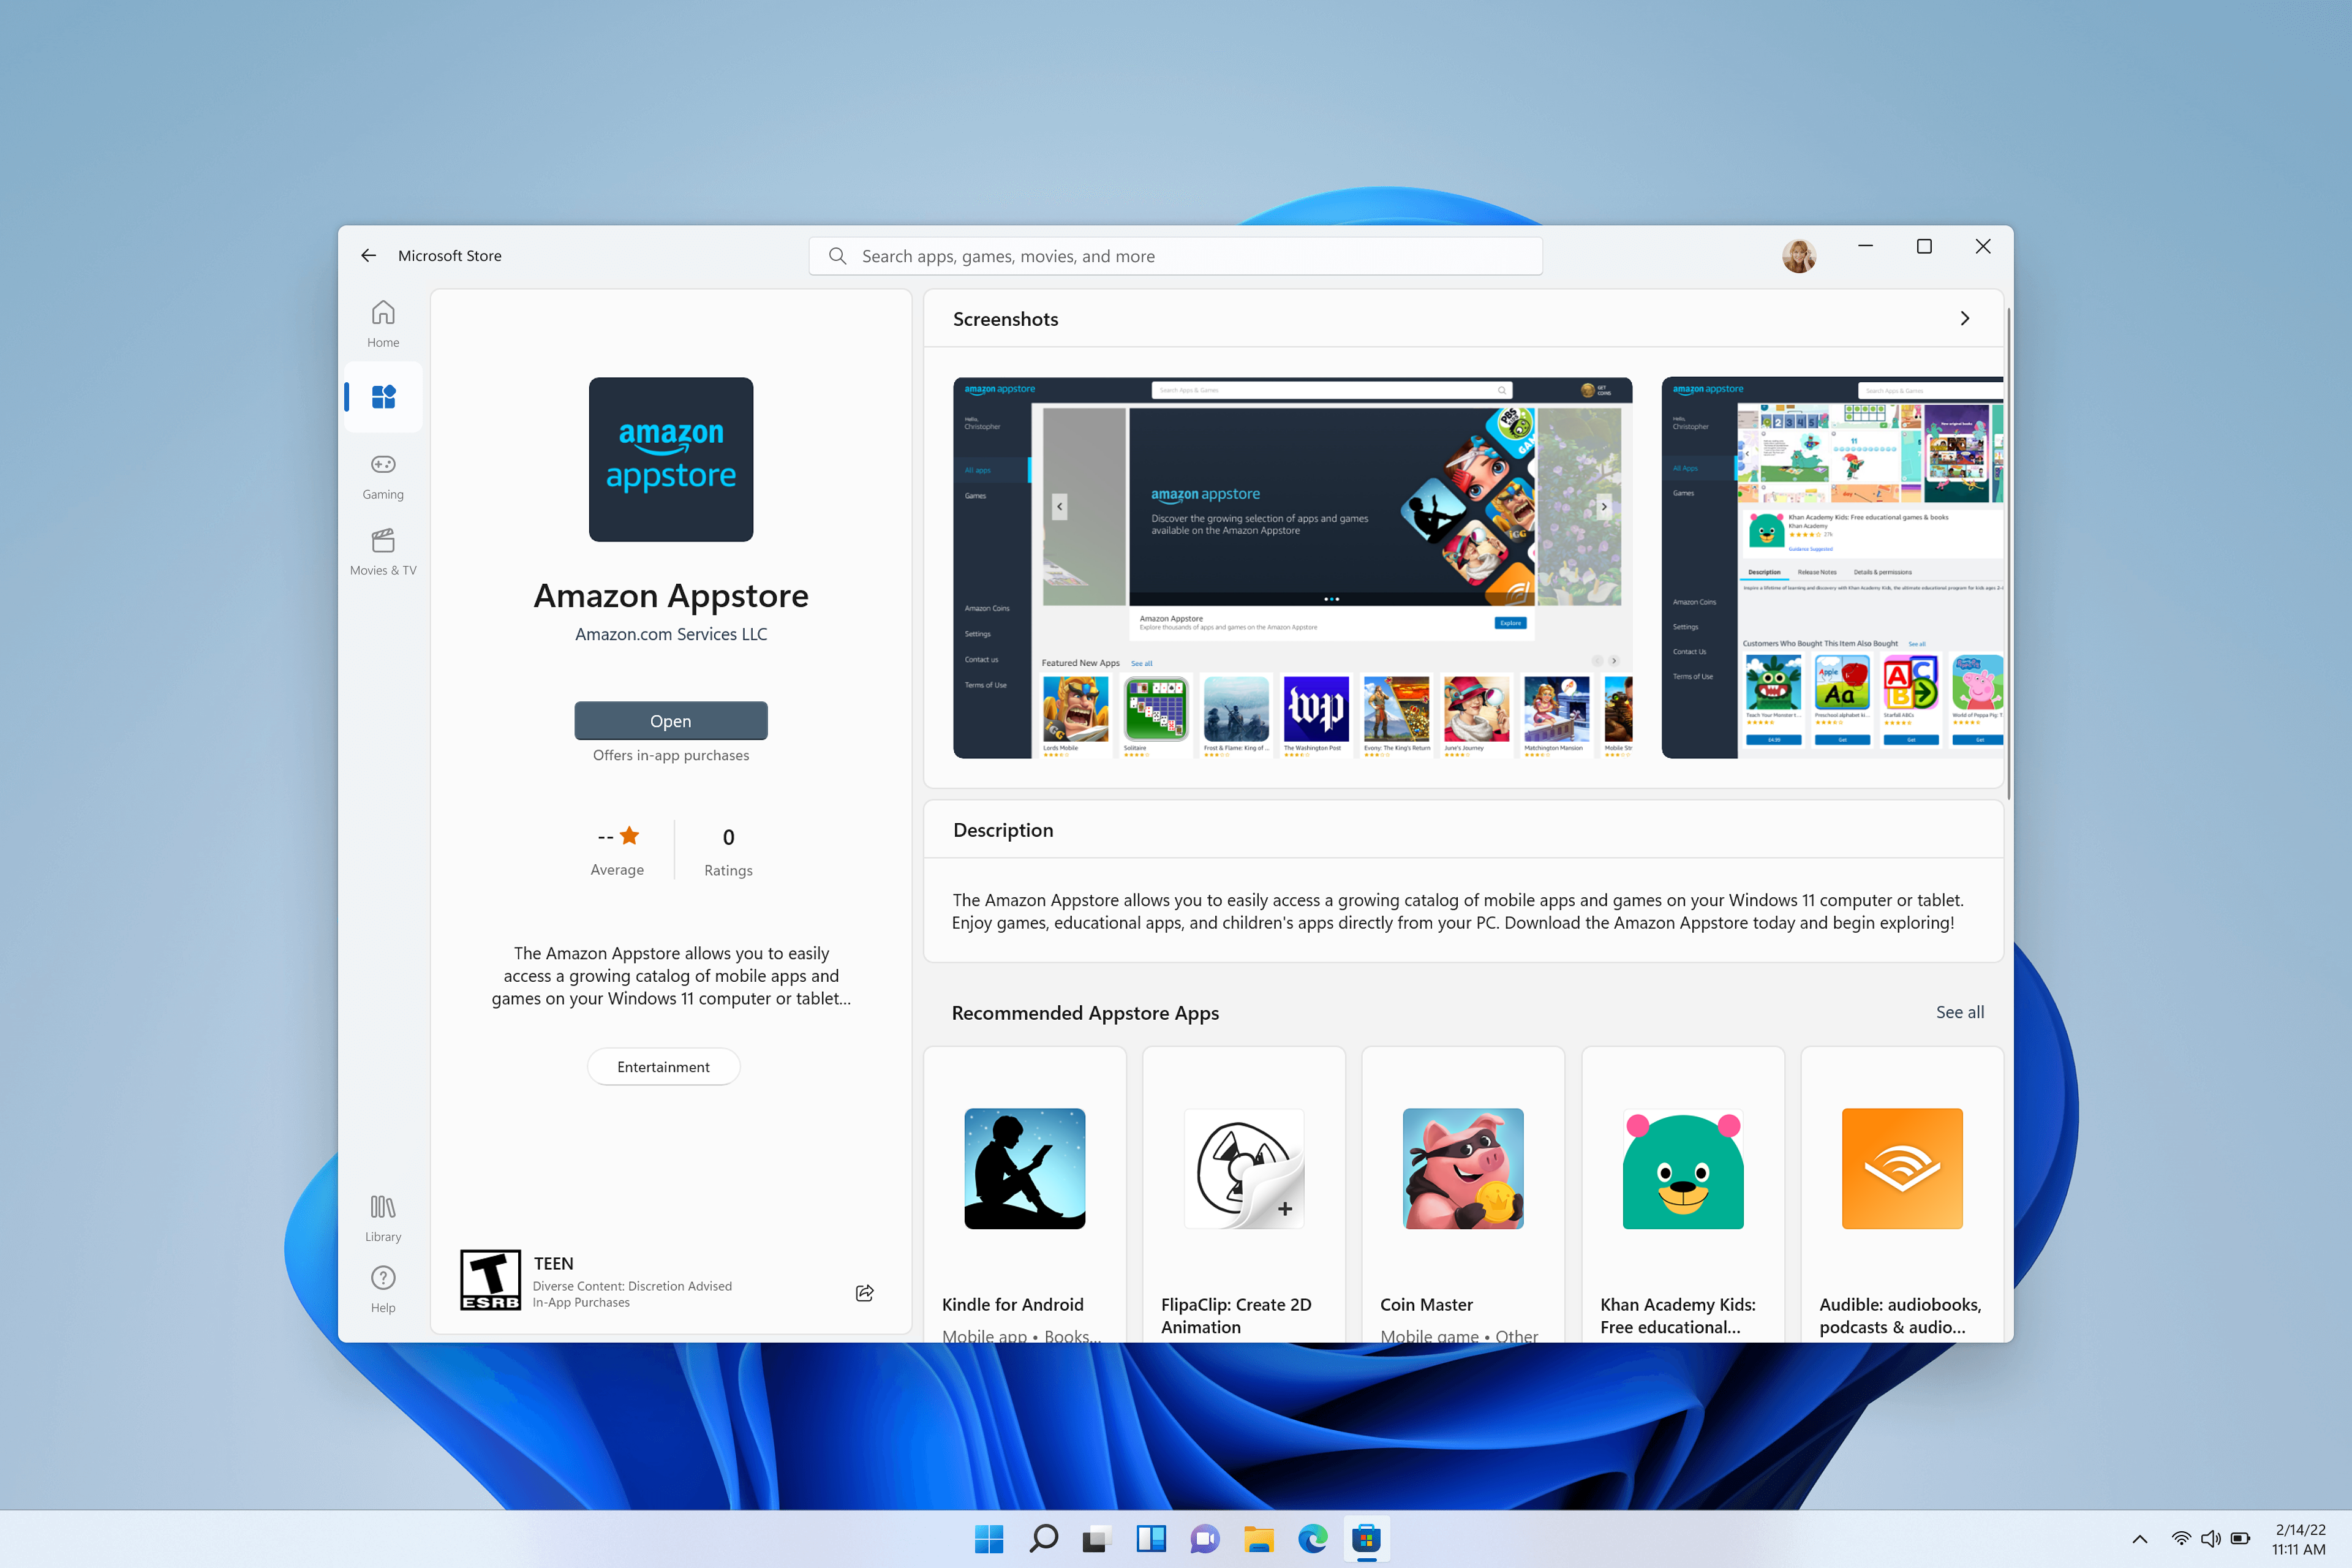
Install the Amazon Appstore
The Microsoft Store will automatically install Windows Subsystem for Android (running Android 11) silently in the background when either of the two following user actions are taken:
- Install the Amazon Appstore from the Microsoft Store.
- Install an Android or Amazon app from the Microsoft Store for the first time, which will also install the Amazon Appstore.
The Amazon Appstore will then appear in the Windows 11 Start menu and be available on search, offering a curated catalogue of Android apps.
Selecting Get will begin the installation of the app. The app will also appear in Windows Start, Search and in the Windows Programs list.
Settings app
To access the Windows Subsystem for Android Settings app, go to: Start > All Apps > Windows Subsystem for Androidв„ўпёЏ. The Settings app can be used to adjust the following settings:
Subsystem Screen Reader
If touch input isn’t working, make sure the Subsystem Screen Reader is turned off. For more info, see Microsoft Support: Accessibility on Windows Subsystem for Android.
Subsystem resources
As needed: When this is selected, the subsystem will open when a mobile app is opened. Since the subsystem needs to open first, the mobile app might take a little longer to open. Mobile apps opened after the first one might not be affected.
Continuous: The subsystem is always ready to open apps. Since it’s always open in the background, it will use more of your PC’s memory and processing power.
Enable developer mode
To test and debug your app on a Windows 11 device, you will need set Developer Mode to On.

Input compatibility considerations for Windows devices
There are a few unique input behaviors to consider that will likely require updates to your Android app code, designed for handheld devices, to be compatible when running on a Windows desktop device via the Amazon Appstore.
Keyboard input
For text input fields handled by an on-screen virtual keyboard input method (or IME), such as EditText , apps should behave as expected. (EditText class in the Android docs).
For keystrokes that cannot be anticipated by the framework, apps will need to handle the behavior themselves. If this is already implemented in-app, no extra work is required.
As an example, some games may already support movement facilitated via keyboard, through w a s d keys, alongside touch input.
The following are keyboard inputs that developers should consider code updates for when building for Windows 11 devices:
- Enter Key
- Arrow-key and Tab-key Navigation
- Change Selected Item Highlight Color
- Ctrl-based Shortcuts
Learn more about how to optimize for these keyboard input scenarios on desktop devices by following the Android documentation:
Mouse input
Developers should consider updating code for the following mouse inputs when building for Windows devices:
- Right Click
- Tooltips / Hover Text
- Hover Effects
- Mouse Scroll Wheel Action
- Drag and Drop
Mouse input, similar to keyboard input, must follow the official Android app guidelines. This means using the InputDevice class paired with the SOURCE_MOUSE constant. Learn more about how to optimize for these mouse input scenarios on desktop devices by following the Android documentation:
Window management and resizing
Unlike traditional mobile form factors, Android apps running on Windows 11 can be freely resized, should be responsive in their resizing, and can be snapped using Windows actions/gestures.
Minimum screen requirement
Windows 11 enforces a minimum screen requirement of 720p resolution (1280×720) with a >9” screen.
Letter & pillar boxing
When the aspect ratio of a window size does not align between the device screen sizes that window is being displayed on, the result may be Letterboxing (the window is wider than it is high, or horizontally longer) or Pillarboxing (the window is more narrow than it is wide, or vertically longer). The result is bars being placed on the sides of the window in order to center it. These bars may be light- or dark-themed depending on the system settings selected. This will only occur as necessary when the Android app is snapped or maximized, allowing Android apps to take advantage of the rich snapping features in Windows and integrate into the windowing model.

Additional resizing considerations
The following should also be considered when updating an Android app to run on a Windows 11 device with respect to window management and resizing:
- Initial launch size
- Window dimensions
- Content bounds
- Free form resizing
- Screen Orientation
Learn more about how to optimize for window resizing scenarios on desktop devices by following the Window Management guide in the Android docs.
Test and debug
To test and debug your app on a Windows 11 device using the Windows Subsystem for Android the following set up steps are required.
Enable developer mode in Windows Settings
You must first enable developer mode in Windows Settings. There are three ways to enable developer mode:
- Open the Windows Subsystem for Android Settings app. Once open, select Enable Developer Settings.
- Search for “Developer Settings” in Windows search.
- Navigate to Settings > Privacy and Security > For developers > Developer mode.
Connect to the Windows Subsystem for Android for debugging
To connect to the Windows Subsystem for Android VM for debugging, you have two options:
Recommended Method:
- Use localhost for connecting to debugging. The IP address of the localhost is: 127.0.0.1:58526 . Windows Subsystem for Android must be running in order to connect, the best way to launch Windows Subsystem for Android is by launching an Android app that was installed with the Amazon Appstore.
- To connect to the localhost address of Windows Subsystem for Android, enter: adb connect 127.0.0.1:58526
Alternative Method: Use the Windows Subsystem for Android Settings app to get the IP address.
- Launch the Settings app. (Use Windows Search to select and launch.)
- The IP address will be displayed under the IP address section. If there is no IP address being displayed, launch an Android app that was installed using the Amazon Appstore, then select Refresh on the IP address button in the Settings app.
Now that you have the IP address to connect to the Windows Subsystem for Android VM, connect using adb connect:
Connect to a test device
To connect to a test device (with Windows Subsystem for Android installed) on the same network from Windows/Mac:
On the test device (where Windows Subsystem for Android is installed) open a PowerShell window and identify the IP address of the test device by running the command:
Using the debugging device terminal where Android Studio and the Android SDK is installed (Mac/Windows), enter the command:
The can be found in the output of «ipconfig» from the test device. You can also deploy and debug apps from Android Studio.
To use Android Debug Bridge (ADB) to connect your development workstation directly to your Android device so you can install packages and evaluate changes, see Android Debug Bridge in the Android Open Source Project docs.
Debug your app
While apps should be installed using the Amazon Appstore, debugging an Android app on a Windows device is possible using an APK (Android application package) and adb (Android Debug Bridge).
To debug an APK using adb:
Follow the steps to connect to the Windows Subsystem for Android VM above.
Install the APK using the adb install command: adb install app-debug .apk
A successful “app installed” notification will appear in the Windows notification menu and the app will launch once selected.
VM lifecycle considerations
Windows Subsystem for Android utilizes a virtual machine (VM) which provides compatibility with the AOSP framework and devices like keyboards, mice, touch, pen, etc.
There are three possible states for the VM running apps with Windows Subsystem for Android:
- Running
- Lightweight Doze: Activated after no app activity for 3 minutes. Deactivated by user activity or an app notification.
- Not Running: Activated after no app activity for 7 minutes.
Transitions between these states are triggered by user activity, such as launching or interaction with the Android app or an app notification. Android apps are paused and then stopped when their window is minimized.

VM Properties
The properties for the Windows Subsystem for Android VM are listed below. Hardcoding these values is not recommended as that could cause future incompatibilities.
| Property | Value |
|---|---|
| Build.MANUFACTURER | Microsoft Corporation |
| Build.MODEL | Subsystem for Android |
| Build.VERSION.SDK_INT | 30 |
| Build.BOARD | windows |
Security
Windows Subsystem for Android performs per-file encryption that is software-based.
Both Windows kernel-mode drivers and Windows applications running at medium integrity level (IL) can inspect arbitrary Android containers and Android app memory. There are no plans to add detection for cheats/macro/bot/suspicious behaviors detection in the short-term.
Developers querying getSecurityLevel will get SECURITY_LEVEL_SW_SECURE_CRYPTO . Learn more about getSecurityLevel in the Android API Reference guide.
Amazon Appstore
In order to be available on a Windows 11 device, an Android app must be published to the Amazon Appstore. Currently, only a small set of apps selected by Microsoft and Amazon are available.
Developers should refer to the Amazon Device Targeting guidance for information on targeting APKs to specific devices.
Troubleshooting issues with Amazon Appstore
If you encounter issues specific to the Amazon Appstore on Windows, try the following troubleshooting steps:
- Select Windows search from the Windows task bar.
- Search for “Amazon Appstore” and right-click on the Amazon Appstore icon.
- Select “App Settings” in the dropdown options.
- Select “Storage and Cache” and click both “Clear Storage” and “Clear cache”.
- Go back and select “Force Stop”.
- Close the Amazon Apptore Settings window.
- Relaunch the Amazon Appstore.
For further troubleshooting steps relating to the Windows Subsystem for Android Settings app or to leave feedback using Feedback Hub, see Troubleshoot mobile apps on Windows.
Building Universal APKs
Windows Subsystem for Android utilizes Intel Bridge Technology to emulate ARM applications on x86 based processors. ARM applications will of course run on ARM based processors natively. The emulation layer will induce a performance overhead – for optimal performance, please submit your application for both the x86-64 and ARM64 architectures.
Uninstalling Windows Subsystem for Android
You can uninstall the Windows Subsystem for Android, but note that all associated apps will also be uninstalled.
- Uninstalling the Amazon Appstore will uninstall the Windows Subsystem for Android and all other Amazon apps.
- Uninstalling an Amazon Appstore app will only uninstall the app (same behavior as Windows apps).
- Uninstalling the Windows Subsystem for Android will uninstall the Amazon Appstore and all Amazon apps.
Источник


