- Android Studio Plugin Development
- Introduction
- Configuring IntelliJ Platform Projects for Android Studio Plugin Development
- Matching Versions of the IntelliJ Platform with the Android Studio Version
- Configuring the Plugin build.gradle File
- Configuring the Plugin plugin.xml File
- Android Specific Extension Points
- Additional Articles and Resources
- Open Source Plugins for Android Studio
- Getting Started with Gradle
- Step 1. Create a project
- Create a new Gradle Project with IntelliJ IDEA
- Step 2. Add Java code
- Add a Java class to the Gradle project
- Create a test class
- Step 3. Run the application with Gradle
- Run main class from the editor
- Step 4. Run tests
- Run tests in a Gradle project
- Step 5. Create an executable JAR file
- Step 6. Run the JAR file with Gradle
- Run the JAR file
- Gradle projects
- Navigate to the build.gradle file
- Navigate inside a multi-module project
- Unlink a linked Gradle project
- Ignore a Gradle project
- Orphan modules
- Reload a linked Gradle project
- Configure the auto-reload
- Configure Gradle Composite Build
- Use Gradle source sets
- Add a custom source set
- Use source sets for custom tests
- Add package prefixes in the Gradle project
- Specify IDE-specific settings in the build.gradle file
- Use buildSrc
- Configure the build and run actions
- Delegate a build to IntelliJ IDEA
Android Studio Plugin Development
Introduction
Android Studio plugins extend or add functionality to the Android Studio IDE. Plugins can be written in Kotlin or Java, or a mix of both, and are created using IntelliJ IDEA and the IntelliJ Platform. It’s also helpful to be familiar with Java Swing. Once completed, plugins can be packaged and distributed at JetBrains Plugin Repository.
Android Studio plugins are not Android modules or apps to run in the Android operating system, such as smartphones or tablets.
Configuring IntelliJ Platform Projects for Android Studio Plugin Development
To create a new Android Studio plugin project, follow the tutorial on the Getting Started with Gradle page. The tutorial produces a skeleton project suitable to use as a starting point for an Android Studio plugin. On the New Project Configuration Screen of the New Project Wizard tutorial, choose Gradle from the product category pane as described in the tutorial, not Android. Some minor modifications to the skeleton project are needed, as discussed below.
Matching Versions of the IntelliJ Platform with the Android Studio Version
For API compatibility, it is essential to match the version of the IntelliJ Platform APIs used for plugin development with the target version of Android Studio. The version number of Android Studio contains the version of the underlying IntelliJ Platform APIs that were used to build it.
To find the version of the IntelliJ Platform used to build Android Studio, use the Android Studio About dialog screen. An example is shown below. In this case, the (BRANCH.BUILD.FIX) version of the IntelliJ Platform is 191.8026.42 , which corresponds to the IntelliJ IDEA version 2019.1.4. The build.gradle configuration steps section below explains how to set the IntelliJ Platform version to match the target version of Android Studio.

Configuring the Plugin build.gradle File
The use-case of developing for a non-IntelliJ IDEA IDE is reviewed in the Plugins Targeting Alternate IntelliJ Platform-Based IDEs section of the Configuring Gradle for IntelliJ Platform Plugins page. The particular example in that section discusses configuring a plugin project for PhpStorm, so the details for an Android Studio plugin project are reviewed here.
Here are the steps to configure the build.gradle file for developing a plugin to target Android Studio:
The Gradle plugin attributes describing the configuration of the IntelliJ Platform used to build the plugin project must be explicitly set. Continuing with the example above, set the intellij.version value to 191.8026.42 . Alternatively, specify intellij.localPath to refer to a local installation of Android Studio.
Android Studio plugin projects that use APIs from the android plugin must declare a dependency on that plugin. Declare the dependency in build.gradle using the Gradle plugin intellij.plugins attribute, which in this case lists the directory name of the plugin.
The best practice is to use the target version of Android Studio as the IDE Development Instance. Set the Development Instance to the (user-specific) absolute path to the target Android Studio application.
The snippet below is an example of configuring the Setup and Running DSLs in a build.gradle specific to developing a plugin targeted at Android Studio.
Configuring the Plugin plugin.xml File
When using APIs from the android plugin, declare a dependency:
As discussed in the Plugin Dependencies section of this guide, a plugin’s dependency on Modules Specific to Functionality must be declared in plugin.xml . When using Android Studio-specific features (APIs), a dependency on com.intellij.modules.androidstudio must be declared as shown in the code snippet below. Otherwise, if only general IntelliJ Platform features (APIs) are used, then a dependency on com.intellij.modules.platform must be declared as discussed in Plugin Compatibility with IntelliJ Platform Products.
Android Specific Extension Points
See Android Plugin section in Extension Point List.
Additional Articles and Resources
Open Source Plugins for Android Studio
When learning new development configurations, it is helpful to have some representative projects for reference:
ADB Idea plugin for Android Studio and Intellij IDEA that speeds up Android development.
Источник
Getting Started with Gradle
In this tutorial, we’ll create a Gradle project, will run and test it, and run the executable JAR file using Gradle.
The project used in this tutorial can be found on GitHub.
Step 1. Create a project
Let’s create a Gradle project with Java.
Create a new Gradle Project with IntelliJ IDEA
On the welcome screen, click New Project .
On the page that opens, from the options on the left select Gradle .
To the options on the right, IntelliJ IDEA automatically adds a project SDK (JDK). In our tutorial we use the open JDK 14 version.
You can change the selected JDK, IntelliJ IDEA will download the appropriate Gradle version. The only thing you need to have is the internet connection.
In the Additional Libraries and Frameworks area IntelliJ IDEA selects the default option Java which is what we need for our project.

On the next page of the wizard let’s specify our project’s name (FizzBuzz) and the location. We can use the default information for ArtifactId which basically is the name of our project and leave the default information in the version and GroupId fields.

After we’ve created our project and it finished indexing, let’s see what is inside:
IntelliJ IDEA creates a project with the build.gradle file including the following code:
As you can see, IntelliJ IDEA conveniently adds a test dependency. IntelliJ IDEA supports code completion inside the build.gradle file. So, if we decide to add more dependencies, IntelliJ IDEA will quickly locate their names and versions.
IntelliJ IDEA also creates the src folder with main and test subdirectories in the Project tool window.

IntelliJ IDEA enables the dedicated Gradle tool window with a liked project and its default tasks. We will use this window to run our tasks.

If for some reason you closed this window, you can always access it from the main menu by selecting View | Tool Windows | Gradle .
The Gradle settings in our project are used to store the information about the linked projects, Gradle JVM, and build actions. You can quickly access them from the Gradle tool window (click on the toolbar).
As you can see, the build and test actions are delegated to Gradle. Also, the Gradle wrapper was used to determine Gradle for our project.
The project structure ( Ctrl+Alt+Shift+S ) contains information about the project’s JDK and a language level used in the project.

Step 2. Add Java code
Now let’s create a Java application that outputs the first 100 FizzBuzz numbers.
Add a Java class to the Gradle project
In the Project tool window open the src folder.
Click the main directory then right-click the java subdirectory and from the list select New | Package .
In the New Package dialog, let’s enter a name of our package which is com.gradle.tutorial .
Now right-click the package and select New | Java Class .
In the New Java Class dialog specify a name of your Java class and click OK . In our case it is FizzBuzzProcessor .

Add the following code to the main FizzBuzzProcessor class:
Our application is ready. Now, let’s create the necessary tests for it.
Create a test class
Open the main class FizzBuzzProcessor in the editor, place the caret at the class name and press Ctrl+Shift+T .
In the dialog that opens, let’s make sure that our testing library is JUnit4 and the destination package is com.gradle.tutorial . We add the name FizzBuzzTest and leave the rest of the default options as is and click OK .
Now open the created test class and add the following code:
Step 3. Run the application with Gradle
Let’s quickly run the application to see if it works.
Run main class from the editor
Open the main class FizzBuzzProcessor in the editor.
In the left gutter, click and select Run ‘FizzBuzzProcessor.main()’ .

Check the result in the Run tool window.

Step 4. Run tests
Now, let’s run the test we’ve created.
Run tests in a Gradle project
We can run our test from the editor or from the Gradle tool window using the test task. We will use the editor.
Click in the left gutter of the editor.

The result of the test will be displayed in the Run tool window.

If we change the default number in one of the tests, it will fail.

As you can see, the Run tool window displays information obout the failed test including the specific line of the code where the error occurred.
Step 5. Create an executable JAR file
Now let’s build our application to create an executable JAR file.
In the Project tool window, double click the build.gradle file to open it in the editor.
Add the following code:
Click in the editor to load the changes to your project.
In the Gradle tool window, open the project’s node, then the Tasks node and double-click the build task to run it.

IntelliJ IDEA creates the build directory that contains our JAR file.

You can run the created JAR file in the command line with java -jar command.
Check the Run tool window for the results.

Note that the build task includes the test task that Gradle executes. So, if we make a mistake in one of our tests, the test task will fail and the build task will fail as well.

Step 6. Run the JAR file with Gradle
Now let’s tweak the build.gradle file a little bit more, so we can execute our JAR file in the Run anything window.
Run the JAR file
In the Project tool window, double click the build.gradle file to open it in the editor.
Let’s add id ‘application’ to the plugins section and the following code:
Click in the editor to load the changes to your project.
In the Gradle tool window, open the project’s node, then the Tasks node. We can see that Gradle added the distribution node. Open the node and double-click the assembleDist task to run it.
If we check the build directory now, we’ll see that IntelliJ IDEA created additional directories.

In the Gradle tool window, click on the toobar.
In the window that opens, enter the gradlew run command.

We should have the same result as when we ran the application in the IntelliJ IDEA editor.

Alternatively, you can execute the run task under the application node.
Источник
Gradle projects
IntelliJ IDEA lets you manage Gradle projects. You can link, ignore projects, work with profiles, and synchronize changes in Gradle and IntelliJ IDEA projects. You can also configure a Gradle composite build, Gradle source sets, the build and run actions.
Navigate to the build.gradle file
In the Gradle tool window, right-click a linked project.
From the context menu, select Open Gradle config F4 .
IntelliJ IDEA navigates to the appropriate Gradle configuration file and the related build.gradle file opens in the editor.
Navigate inside a multi-module project
IntelliJ IDEA supports a navigation to subprojects inside the parent build script of a multi-module Gradle project.
Open build.gradle of the parent project.
Use the Ctrl+Click shortcut to navigate to a subproject.

You can also see the usages of a subprojects with the Alt+F7 and check the results in the Find tool window.

Unlink a linked Gradle project
When you unlink a Gradle project, IntelliJ IDEA removes all relevant modules and content roots, removes the Gradle project from the Gradle tool window and stops its synchronization. It might be helpful if you need to fully remove the previously linked Gradle project from the current IntelliJ IDEA project.
In the Gradle tool window, right-click a linked project.
From the context menu, select Unlink Gradle project ( Delete ). Alternatively, you can select the linked project and click on the tool window’s toolbar.
In the Import Gradle Projects popup, clear the checkbox against the modules if you don’t want to delete the project from the IntelliJ IDEA Project tool window.
If you need to link back the project, in the Project tool window, right-click the project’s build.gradle file or build.gradle.kts if it is a Kotlin project, and select Import Gradle Project .
Ignore a Gradle project
You can de-activate a Gradle project using the Ignore Gradle Project option. In this case, IntelliJ IDEA keeps the ignored Gradle projects and subprojects in the Gradle tool window, but stops their import (modules, content roots, tasks, and so on) to the project. However, IntelliJ IDEA synchronizes the ignored projects with the current one. It might be helpful if you need to skip an irrelevant subproject such as buildSrc .
In the Gradle tool window, right-click the project that you want to ignore.
From the context menu, select Ignore Gradle Project .
In the window that opens, select projects and modules that you want to de-activate and click OK .
If you want to activate your Gradle projects or modules, select Unignore Gradle Projects from the context menu.
Orphan modules
Orphan modules are the IDE modules that were removed during the import process in the following cases:
when you manually deleted the modules in the build.gradle file and then re-imported your project.
when you used the Ignore Project action, on a module in the Gradle tool window and then re-imported your project.
In all these cases, IntelliJ IDEA prompts you to restore removed modules.

You can select the ones you want to restore in the Orphan Modules dialog.
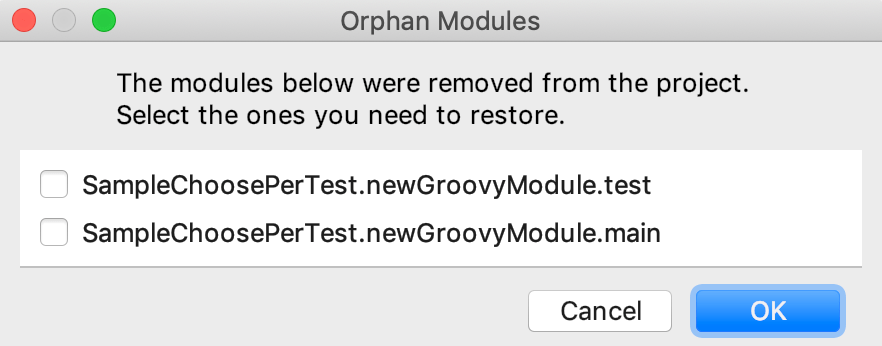
Usually you do not need to restore any modules since these are only the .iml files that contain the IDE modules settings. You only might want to restore them if you have some user-defined settings specified inside them.
Reload a linked Gradle project
When you open a Gradle project the synchronization is done automatically. Also, when IntelliJ IDEA detects any external changes to the build scripts, such as VCS updates or some edits made outside of the IDE, the related projects will be reloaded automatically.
If you need, you can manually trigger the synchronization of your project.
In the Gradle tool window, right-click a linked project.
From the context menu, select Reload Gradle project .
On invoking this action, IntelliJ IDEA parses the project structure in the Gradle tool window.
IntelliJ IDEA cannot reload just a part of your project, it reloads the whole project including modules and dependencies.
If you configure a dependency through the Project Structure dialog (click , from the main menu), the dependency will only appear in the IntelliJ IDEA Project tool window, not in the Gradle tool window. Note that the next time you re-import your project, IntelliJ IDEA will remove the added dependency since IntelliJ IDEA considers the Gradle configuration as a single source of truth.
Click on the status bar to view the results of the sync in the Build tool window.
To reload all Gradle projects, click on the toolbar, in the Gradle tool window.
Configure the auto-reload
In the Settings/Preferences dialog ( Ctrl+Alt+S ), go to Build, Execution, Deployment | Build Tools .
Alternatively, In the Gradle tool window, click and select the Auto-Reload Settings option.

In the Build tools settings, specify the following options:

Reload changes in the build scripts : this option is selected by default. If you want to disable the auto-reload and manually control the reloading process, unselect this checkbox.
Any changes : select this option if you want to automatically reload the project after any changes you make to build.gradle or external changes.
Every time you manually change the Gradle build script in the editor, you need to load the changes. IntelliJ IDEA displays a notification icon in the right part of the editor suggesting to Load Gradle Changes made to the project ( Ctrl+Shift+O ).

With the Any changes option, IntelliJ IDEA reloads all the changes automatically.
External chages : when you select this option, IntelliJ IDEA automatically reloads the project only after the VCS changes and changes made to the build files outside the IDE.
Configure Gradle Composite Build
Before you start configuring your composite build, make sure you have the Gradle version 3.1 or later configured for your project.
You can use the settings.gradle file to include Gradle builds for your Gradle composite build.
Open the settings.gradle file in the editor.
Using the includeBuild command, specify the location of the builds you want to add as dependencies to your project.
You can also use the Gradle tool window to configure the composite build.
Open a Gradle project.
Link other Gradle projects that you want to use for the composite build.
In the Gradle tool window, right-click your main project and from the context menu select Composite Build Configuration .
In the Gradle Project Build Composite dialog, select projects that you want to include in your Gradle composite build.
Re-import your main Gradle project.
IntelliJ IDEA finds the included Gradle projects and treats them as IntelliJ IDEA modules.
Use Gradle source sets
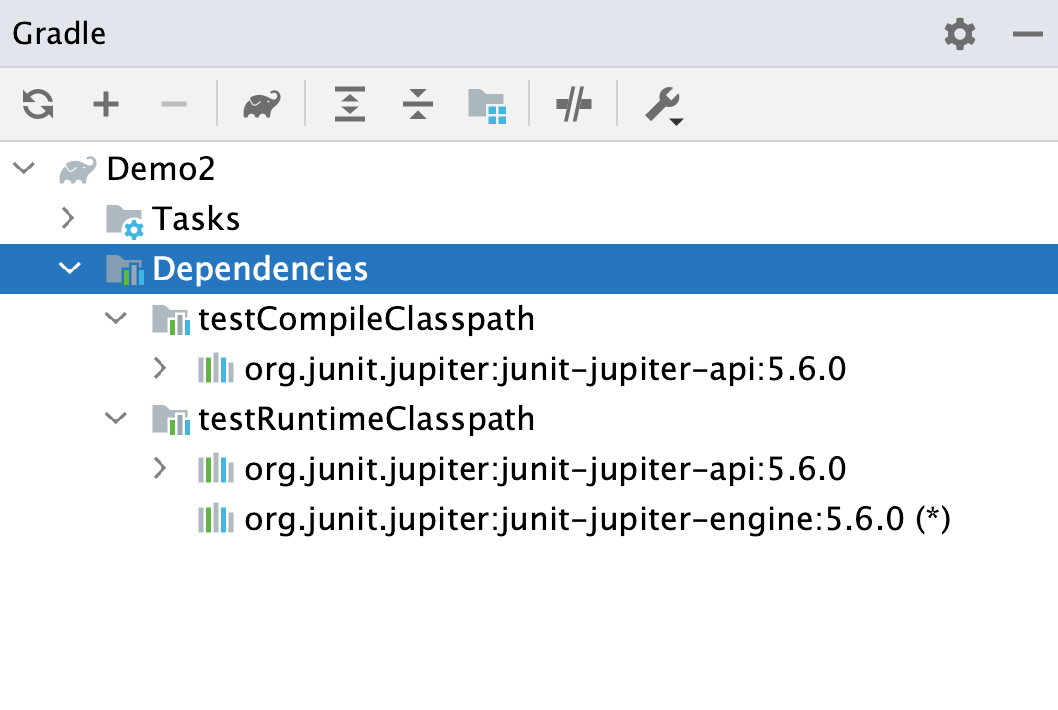
IntelliJ IDEA lets you use Gradle source sets in resolving Gradle projects. The source set is treated as a module in an IntelliJ IDEA project. You can declare a custom source set and IntelliJ IDEA adds it as a module to the project.
When you create a Gradle project, IntelliJ IDEA automatically creates a main Source Sets directory that contains two source sets — main and test . IntelliJ IDEA also displays compile and runtime configurations in the Dependencies node in the Gradle tool window.
Add a custom source set
Open the gradle.build file in the editor.
Declare a custom source set (In our example, it’s api).
(This source set contains interfaces without implementations. The implementations for the interfaces are in the default main source set.)
Open the Gradle tool window to see that IntelliJ IDEA added the api compile and runtime configurations.

The test source set contains the appropriate dependencies. Note that the default main source set has the compile dependency on the output of the api source set.
From the main menu, select File | Project Structure Ctrl+Alt+Shift+S to open the project structure. Notice that all source sets are represented as separate modules that are grouped into a single module. If you click the test module and select the Dependencies tab, you will see a list of dependencies for the source set.

Use source sets for custom tests
You can add custom tests and run them separately from the main ones using a source set feature.
Declare a source set the same way as you would declare the custom source set. Besides the name of you source set, specify an output directory and a task that will run the declared test. For example, declare an integration test integrationTest .
In the Gradle tool window, click Tasks | other .
In the list that opens, double-click the integrationTest to run it.

Add package prefixes in the Gradle project
If you use package prefixes in your Gradle project, specify them in the build.gradle file. That way, everything is saved when you reimport your project.
Open the build.gradle file.
Add the following plugin to support package prefixes:
Add the package prefixes. For example, you have the following set of source sets:
Add the package prefixes (in our case it is «org.example») to them with the following code:
Reimport your changes or use the auto-import.
Specify IDE-specific settings in the build.gradle file
Using the gradle-idea-ext plugin, you can describe project settings such as project encodings, and the encoding for properties files inside the build.gradle file.
Open the build.gradle file.
Add the following plugin to support the encodings configuration:
Describe the project encodings with the following code:
is a string constant indicating that system default encoding settings will be used.
Reimport your changes or use the auto-import.
Use buildSrc
If you have a large Gradle script that includes several Java, Groovy, or Kotlin classes, you can move such classes to the buildSrc directory and refer to them from your main Gradle script. In this case you ensure the readability of the build.gradle file.
If you don’t have and existing buildSrc , add it as a Gradle module to your main project.

Open your main build.gradle file in the editor and move the classes you need to the main subdirectory of the buildSrc directory.

Run your task from your project’s build.gradle file.

You can use the Rename Shift+F6 refactoring if you need to change the name of a class to which you refer in the Gradle script. IntelliJ IDEA applies changes to all the references.
Configure the build and run actions
By default, IntelliJ IDEA uses Gradle for building and running projects.
When you build a project ( Build | Build Project ), IntelliJ IDEA invokes the corresponding tasks using Gradle. Gradle also executes the Run and Debug actions from the Run menu. HotSwap is also gets triggered and the classes are reloaded during a debugging process.
If you have linked projects, you can configure how to build each linked project.
If you use the annotationProcessors in your project, we recommend that you delegate run and build actions to Gradle, so the annotation processor will be correctly enabled in your project.
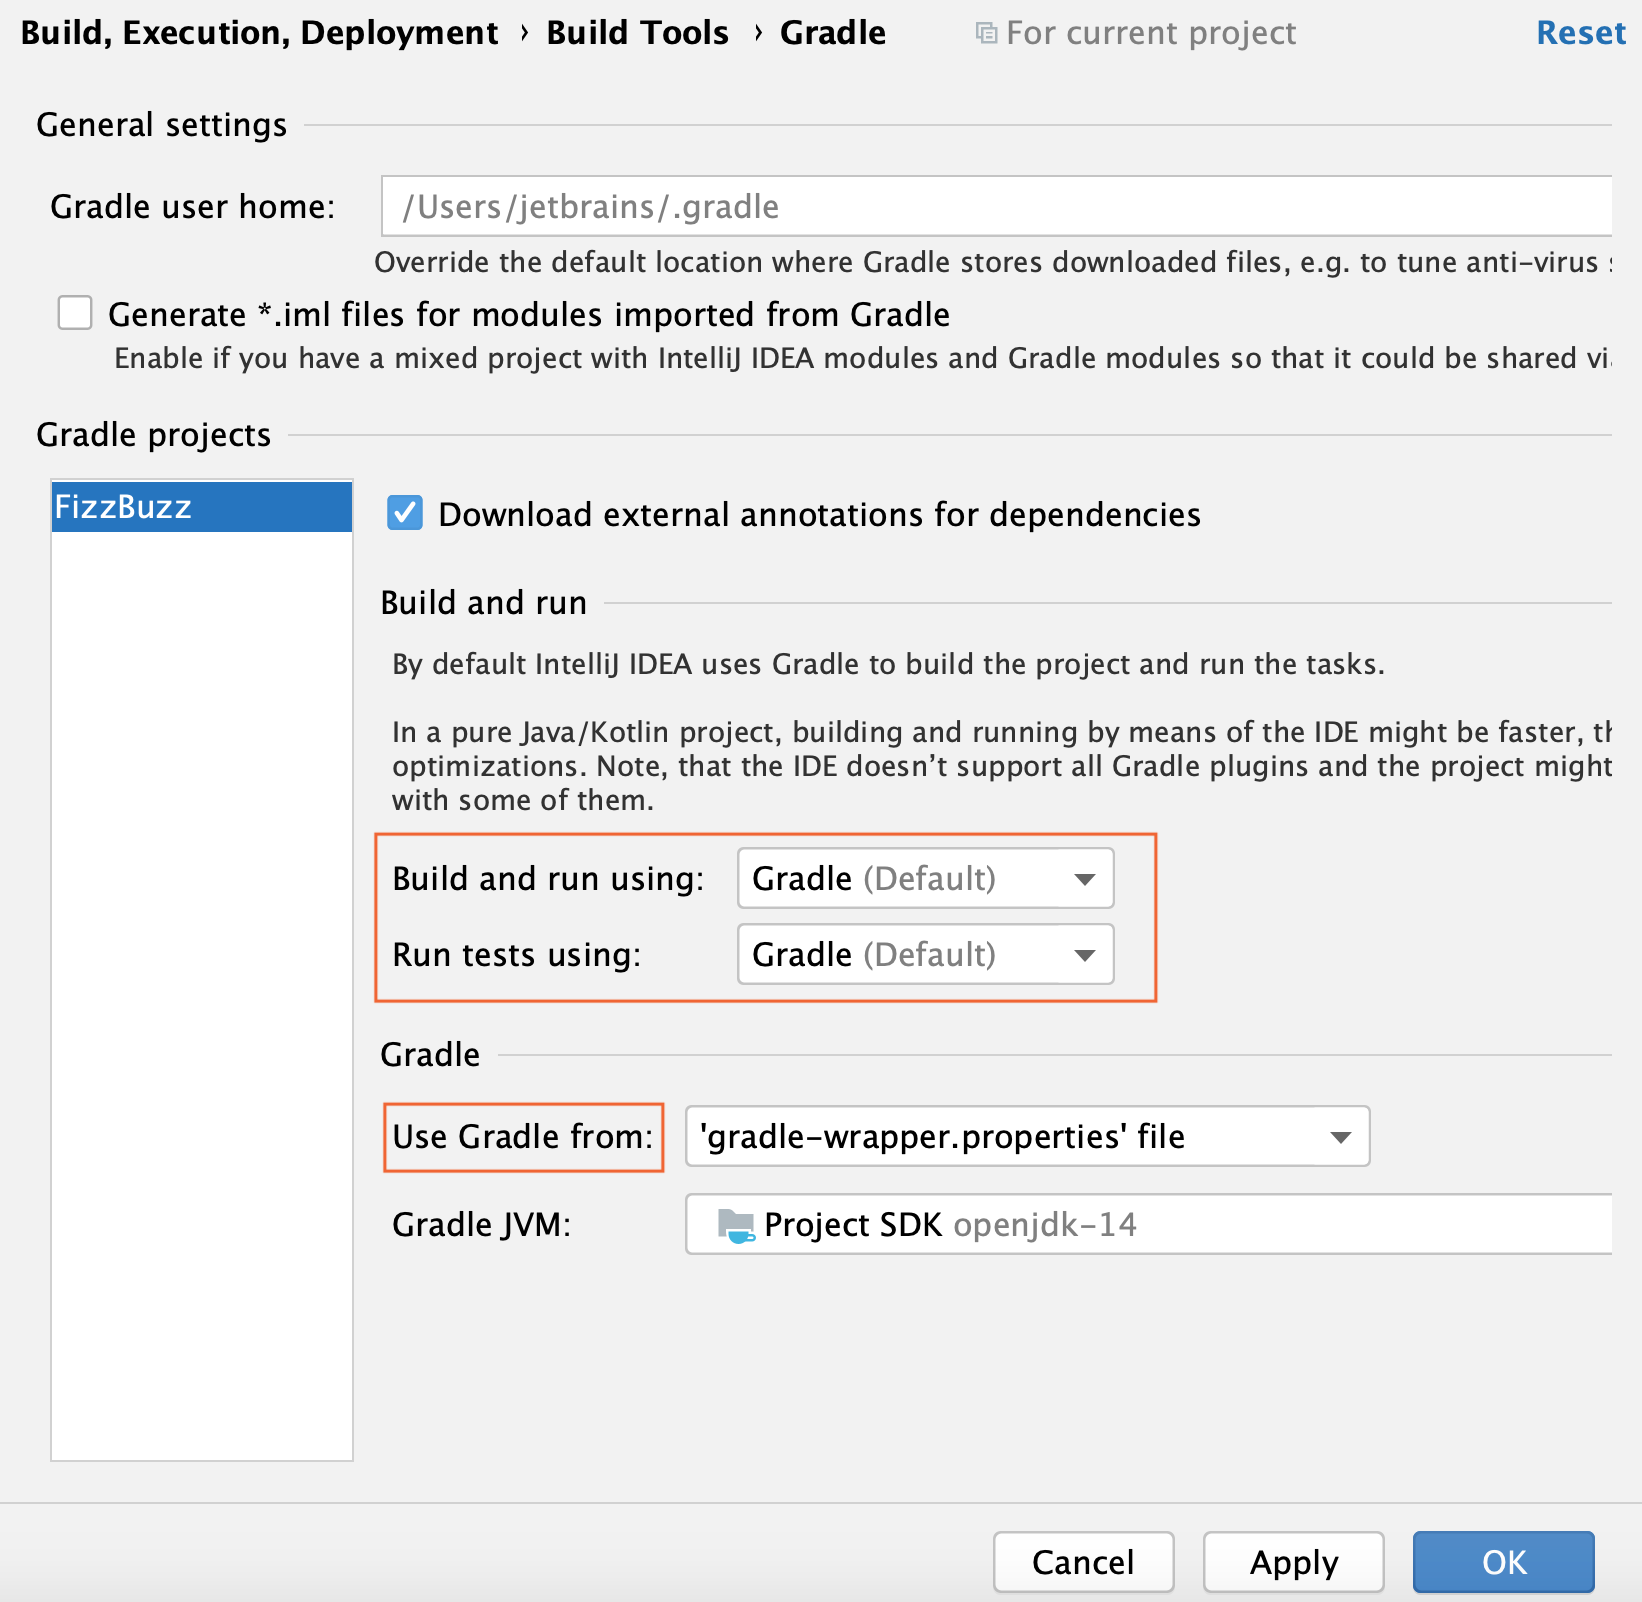
In the Settings/Preferences dialog ( Ctrl+Alt+S ), go to Build, Execution, Deployment | Gradle .
On the Gradle settings page, in the Gradle Projects section, select a Gradle project you need.
In the Build and run using list, select the appropriate option and click OK to save the changes.
If you want to use IntelliJ IDEA for building a Gradle project, you need to explicitly specify so.
Delegate a build to IntelliJ IDEA
It might be helpful to use IntelliJ IDEA for building a pure Java or Kotlin project. It could speed up the building process since IntelliJ IDEA supports the incremental build. Yet, keep in mind that the IntelliJ IDEA compiler does not support some parts of the Gradle project build processing and might cause problems in building your project correctly.
Click in the Gradle tool window.
Alternatively, in the Settings/Preferences dialog ( Ctrl+Alt+S ), go to Build, Execution, Deployment |Build Tools |Gradle .
On the Gradle page, from the Build and run using list, select Intellij IDEA .

Note that the Run test using option stays active, and you can select how you want to run your tests even if you delegated all build and run actions to IntelliJ IDEA.
Now if you build your Gradle project, it will be built with IntelliJ IDEA.
Источник


