- Intent filter android priority
- Полный список
- Intents and Intent Filters
- In this document
- See also
- Intent Types
- Building an Intent
- Example explicit intent
- Example implicit intent
- Forcing an app chooser
- Receiving an Implicit Intent
- Restricting access to components
- Example filters
- Using a Pending Intent
- Intent Resolution
- Action test
- Category test
- Data test
- Intent matching
Intent filter android priority
Most of the contents of the filter are described by its , , and subelements.
For a more detailed discussion of filters, see the separate Intents and Intent Filters document, as well as the Intents Filters section in the introduction.
attributes: android:icon An icon that represents the parent activity, service, or broadcast receiver when that component is presented to the user as having the capability described by the filter.
This attribute must be set as a reference to a drawable resource containing the image definition. The default value is the icon set by the parent component’s icon attribute. If the parent does not specify an icon, the default is the icon set by the element.
For more on intent filter icons, see Icons and Labels in the introduction.
android:label A user-readable label for the parent component. This label, rather than the one set by the parent component, is used when the component is presented to the user as having the capability described by the filter.
The label should be set as a reference to a string resource, so that it can be localized like other strings in the user interface. However, as a convenience while you’re developing the application, it can also be set as a raw string.
The default value is the label set by the parent component. If the parent does not specify a label, the default is the label set by the element’s label attribute.
For more on intent filter labels, see Icons and Labels in the introduction.
android:priority The priority that should be given to the parent component with regard to handling intents of the type described by the filter. This attribute has meaning for both activities and broadcast receivers:
- It provides information about how able an activity is to respond to an intent that matches the filter, relative to other activities that could also respond to the intent. When an intent could be handled by multiple activities with different priorities, Android will consider only those with higher priority values as potential targets for the intent.
It controls the order in which broadcast receivers are executed to receive broadcast messages. Those with higher priority values are called before those with lower values. (The order applies only to synchronous messages; it’s ignored for asynchronous messages.)
Use this attribute only if you really need to impose a specific order in which the broadcasts are received, or want to force Android to prefer one activity over others.
The value must be an integer, such as » 100 «. Higher numbers have a higher priority. The default value is 0. The value must be greater than -1000 and less than 1000.
introduced in: API Level 1 see also:
Источник
Полный список
— вызываем Activity, используя неявный вызов и Intent Filter
Последние уроки получились перегруженными теорией. Эту теорию необходимо понять, чтобы не было проблем с практикой. Эти темы являются основой – Task, Lifecycle, Intent. Если что-либо осталось непонятно, то вы всегда можете снова открыть и перечитать материал. А далее мы будем реализовывать примеры, которые будут эту теорию подтверждать и все станет понятнее.
На прошлых уроках мы научились вызывать Activity с помощью Intent и явного указания класса. Также мы знаем, что есть и другой способ вызова Activity – неявный. Он основан на том, что Activity вызывается не по имени, а по функционалу. Т.е. мы хотим выполнить определенные действия, создаем и настраиваем соответствующий Intent и отправляем его искать те Activity, которые могли бы справиться с нашей задачей.
Давайте посмотрим, как это реализуется на практике. Мы создадим приложение, которое будет отображать нам текущее время или дату. Сделаем мы это с помощью трех Activity:
— первое будет содержать две кнопки: Show time и Show date
— второе будет отображать время
— третье будет отображать дату
Нажатие на кнопку Show time будет вызывать второе Activity, а нажатие на кнопку Show date – третье Activity. Но реализуем мы это не через прямое указание классов Activity в Intent, а через Intent Filter.
Project name: P0261_IntentFilter
Build Target: Android 2.3.3
Application name: IntentFilter
Package name: ru.startandroid.develop.p0261intentfilter
Create Activity: MainActivity
Открываем main.xml и рисуем две кнопки:
Пишем реализацию MainActivity.java:
В коде мы определили кнопки и присвоили им Activity как обработчик нажатий. В методе onCilck мы определяем какая кнопка была нажата и создаем Intent.
Для создания Intent используем конструктор: Intent (String action). Т.е. мы при создании заполняем атрибут объекта Intent, который называется action. Это обычная строковая константа. Action обычно указывает действие, которое мы хотим произвести. Например, есть следующие системные action-константы: ACTION_VIEW — просмотр, ACTION_EDIT – редактирование, ACTION_PICK – выбор из списка, ACTION_DIAL – сделать звонок.
Если действие производится с чем-либо, то в пару к action идет еще один Intent-атрибут – data. В нем мы можем указать какой-либо объект: пользователь в адресной книге, координаты на карте, номер телефона и т.п. Т.е. action указывает что делать, а data – с чем делать.
Про data мы еще поговорим на следующих уроках, а пока будем использовать только action. Выше я уже перечислил некоторые системные action-константы, но мы можем использовать и свой action.
Как вы видите из кода, я придумал и использую такие action:
ru.startandroid.intent.action.showtime
ru.startandroid.intent.action.showdate
Первый будет означать, что я хочу вызвать Activity, которое мне покажет текущее время. Второй – Activity с датой.
Здесь надо четко понимать следующее: action – это просто текст. И я мог с таким же успехом придумать action abcdefg123456. Но текст showtime – отражает то, что я хочу сделать, он нагляднее и понятнее. А префикс ru.startandroid.intent.action я использую, чтобы не было коллизий. В системе может быть приложение, которое уже использует action showtime — я не хочу с ним пересекаться. Поэтому мой action – это ru.startandroid.intent.action.showtime.
Итак, мы создали Intent с action и запустили его в систему искать Activity. Чтобы Activity подошла, надо чтобы ее Intent Filter содержал атрибут action с тем же значением, что и action в Intent. Значит нам осталось создать две Activity, настроить их Intent Filter и реализовать отображение времени и даты.
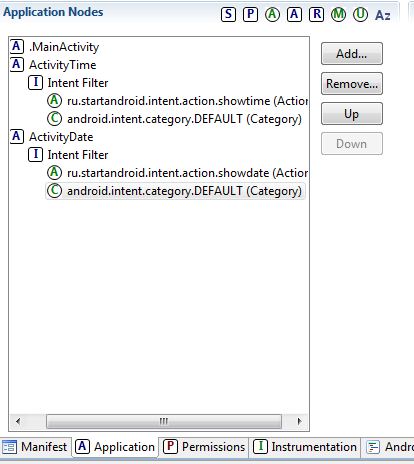
Activity создается как обычно — создаем класс ActivityTime с суперклассом android.app.Activity и прописываем его в манифесте как Activity. После того, как прописали в манифесте, надо будет там же создать Intent Filter. Для этого выделяем ActivityTime, жмем Add, выбираем Intent Filter и жмем ОК.
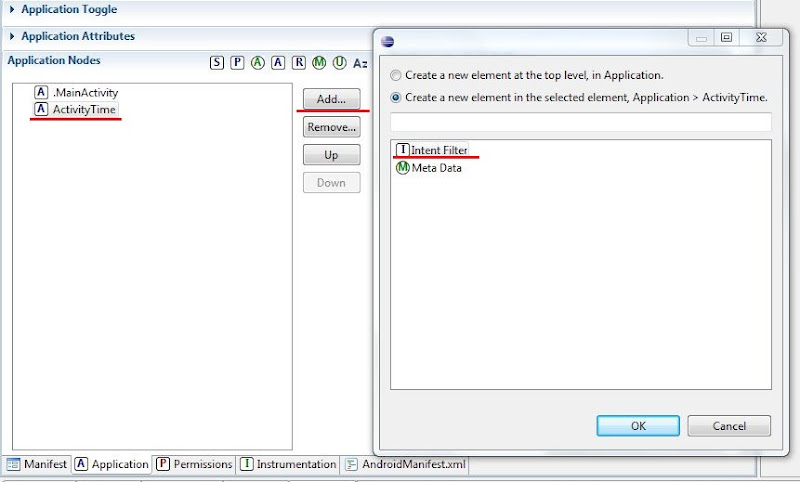
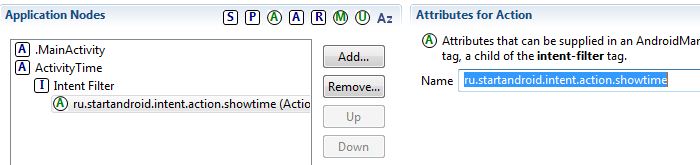
Далее в Intent Filter аналогично создаем Action и в поле Name прописываем ru.startandroid.intent.action.showtime
Также в Intent Filter надо создать Category и в поле name выбрать из списка android.intent.category.DEFAULT. Пока не будем разбираться детально зачем она нужна. Но без этого вызов startActivity(Intent) не найдет Activity.

Создадим layout для нового Activity, назовем его time.xml:
Пишем код в ActivityTime.java:
Тут все просто — вычисляем текущее время и показываем его в TextView.
Все сохраним и запустим приложение.

Жмем кнопку Show time:

отобразилось время. Т.е. Intent с action = ru.startandroid.intent.action.showtime нашел и отобразил Activity, у которого action также равен ru.startandroid.intent.action.showtime в Intent Filter.
Вернемся назад (кнопка Back) и нажмем теперь кнопку Show date. Приложение выдаст ошибку, т.к. оно не смогло найти Activity, которое соответствовало бы Intent с action = ru.startandroid.intent.action.showdate (мы создали только для showtime).
Давайте создадим такое Activity, назовем его ActivityDate. Действия все те же самые, что и при создании ActivityTime:
— создание класса
— создание Activity в манифесте и создание для него Intent Filter (c action = ru.startandroid.intent.action.showdate и category = android.intent.category.DEFAULT)
Layout-файл назовем date.xml:
Все сохраняем, запускаем приложение, жмем Show date и видим дату. Это значит, что Intent с action = ru.startandroid.intent.action.showdate нашел и отобразил ActivityDate подходящее ему по Intent Filter.
Чтобы закрепить тему, проделаем еще кое-что. Если помните, в уроке №22, где я рассказывал про Intent Filter, я говорил, что один Intent может найти несколько подходящих Activity. В этом случае пользователю предоставляется выбор, какое Activity использовать. Давайте сами спровоцируем такой случай. Мы сделаем еще одно Activity, которое будет реагировать на Intent с action = ru.startandroid.intent.action.showdate. И будет отображать текущую дату аналогично ActivityDate. Но формат отображения даты будет немного другой.
Давайте создадим такое Activity, назовем его ActivityDateEx. Действия все те же самые, что и при создании ActivityDate:
— создание класса
— создание Activity в манифесте и создание для него Intent Filter (с action = ru.startandroid.intent.action.showdate и category = android.intent.category.DEFAULT)
Новый layout-файл создавать не будем, используем уже существующий date.xml. В принципе, все три Activity у нас могли использовать один layout, т.к. они совершенно одинаковы – один TextView.
Как видим, отличие от ActivityDate только в формате даты.
Сохраним все и запустим. Жмем Show date и видим такой выбор:

Intent нашел два Activity, но показал для каждого из них название родительского приложения и package. В нашем случае – оба Activity из нашего приложения, поэтому текст одинаков и не разберешь, какое из них какое. Давайте пофиксим это, прописав нормальные имена.
Нажмите Back, чтобы закрыть диалог выбора. Идем в манифест и для Activity пропишем label:

Date basic для ActivityDate
Date extended для ActivityDateEx
Сохраняем и запускаем. Жмем Show date и видим такой выбор:

Так значительно лучше. Жмем Date extended и видим дату в расширенном формате на ActivityDateEx.
Итак, мы создавали и посылали Intent с action. Этот Intent находил Activity с подходящим Intent Filter и отображал его. Если находил несколько – давал выбор. Примеры отлично показывают механизм.
Если запутались, чего и где создавать, привожу скрин проекта и содержимое манифеста.

Содержимое манифеста (вкладка AndroidManifest.xml):
На следующем уроке:
— читаем action из Intent
Присоединяйтесь к нам в Telegram:
— в канале StartAndroid публикуются ссылки на новые статьи с сайта startandroid.ru и интересные материалы с хабра, medium.com и т.п.
— в чатах решаем возникающие вопросы и проблемы по различным темам: Android, Kotlin, RxJava, Dagger, Тестирование
— ну и если просто хочется поговорить с коллегами по разработке, то есть чат Флудильня
— новый чат Performance для обсуждения проблем производительности и для ваших пожеланий по содержанию курса по этой теме
Источник
Intents and Intent Filters
In this document
See also
An Intent is a messaging object you can use to request an action from another app component. Although intents facilitate communication between components in several ways, there are three fundamental use-cases:
An Activity represents a single screen in an app. You can start a new instance of an Activity by passing an Intent to startActivity() . The Intent describes the activity to start and carries any necessary data.
If you want to receive a result from the activity when it finishes, call startActivityForResult() . Your activity receives the result as a separate Intent object in your activity’s onActivityResult() callback. For more information, see the Activities guide.
To start a service:
A Service is a component that performs operations in the background without a user interface. You can start a service to perform a one-time operation (such as download a file) by passing an Intent to startService() . The Intent describes the service to start and carries any necessary data.
If the service is designed with a client-server interface, you can bind to the service from another component by passing an Intent to bindService() . For more information, see the Services guide.
To deliver a broadcast:
A broadcast is a message that any app can receive. The system delivers various broadcasts for system events, such as when the system boots up or the device starts charging. You can deliver a broadcast to other apps by passing an Intent to sendBroadcast() , sendOrderedBroadcast() , or sendStickyBroadcast() .
Intent Types
There are two types of intents:
- Explicit intents specify the component to start by name (the fully-qualified class name). You’ll typically use an explicit intent to start a component in your own app, because you know the class name of the activity or service you want to start. For example, start a new activity in response to a user action or start a service to download a file in the background.
- Implicit intents do not name a specific component, but instead declare a general action to perform, which allows a component from another app to handle it. For example, if you want to show the user a location on a map, you can use an implicit intent to request that another capable app show a specified location on a map.
When you create an explicit intent to start an activity or service, the system immediately starts the app component specified in the Intent object.

Figure 1. Illustration of how an implicit intent is delivered through the system to start another activity: [1] Activity A creates an Intent with an action description and passes it to startActivity() . [2] The Android System searches all apps for an intent filter that matches the intent. When a match is found, [3] the system starts the matching activity (Activity B) by invoking its onCreate() method and passing it the Intent .
When you create an implicit intent, the Android system finds the appropriate component to start by comparing the contents of the intent to the intent filters declared in the manifest file of other apps on the device. If the intent matches an intent filter, the system starts that component and delivers it the Intent object. If multiple intent filters are compatible, the system displays a dialog so the user can pick which app to use.
An intent filter is an expression in an app’s manifest file that specifies the type of intents that the component would like to receive. For instance, by declaring an intent filter for an activity, you make it possible for other apps to directly start your activity with a certain kind of intent. Likewise, if you do not declare any intent filters for an activity, then it can be started only with an explicit intent.
Caution: To ensure your app is secure, always use an explicit intent when starting a Service and do not declare intent filters for your services. Using an implicit intent to start a service is a security hazard because you cannot be certain what service will respond to the intent, and the user cannot see which service starts. Beginning with Android 5.0 (API level 21), the system throws an exception if you call bindService() with an implicit intent.
Building an Intent
An Intent object carries information that the Android system uses to determine which component to start (such as the exact component name or component category that should receive the intent), plus information that the recipient component uses in order to properly perform the action (such as the action to take and the data to act upon).
The primary information contained in an Intent is the following:
Component name The name of the component to start.
This is optional, but it’s the critical piece of information that makes an intent explicit, meaning that the intent should be delivered only to the app component defined by the component name. Without a component name, the intent is implicit and the system decides which component should receive the intent based on the other intent information (such as the action, data, and category—described below). So if you need to start a specific component in your app, you should specify the component name.
Note: When starting a Service , you should always specify the component name. Otherwise, you cannot be certain what service will respond to the intent, and the user cannot see which service starts.
This field of the Intent is a ComponentName object, which you can specify using a fully qualified class name of the target component, including the package name of the app. For example, com.example.ExampleActivity . You can set the component name with setComponent() , )»>setClass() , setClassName() , or with the Intent constructor.
Action A string that specifies the generic action to perform (such as view or pick).
In the case of a broadcast intent, this is the action that took place and is being reported. The action largely determines how the rest of the intent is structured—particularly what is contained in the data and extras.
You can specify your own actions for use by intents within your app (or for use by other apps to invoke components in your app), but you should usually use action constants defined by the Intent class or other framework classes. Here are some common actions for starting an activity:
ACTION_VIEW Use this action in an intent with startActivity() when you have some information that an activity can show to the user, such as a photo to view in a gallery app, or an address to view in a map app. ACTION_SEND Also known as the «share» intent, you should use this in an intent with startActivity() when you have some data that the user can share through another app, such as an email app or social sharing app.
See the Intent class reference for more constants that define generic actions. Other actions are defined elsewhere in the Android framework, such as in Settings for actions that open specific screens in the system’s Settings app.
You can specify the action for an intent with setAction() or with an Intent constructor.
If you define your own actions, be sure to include your app’s package name as a prefix. For example:
Data The URI (a Uri object) that references the data to be acted on and/or the MIME type of that data. The type of data supplied is generally dictated by the intent’s action. For example, if the action is ACTION_EDIT , the data should contain the URI of the document to edit.
When creating an intent, it’s often important to specify the type of data (its MIME type) in addition to its URI. For example, an activity that’s able to display images probably won’t be able to play an audio file, even though the URI formats could be similar. So specifying the MIME type of your data helps the Android system find the best component to receive your intent. However, the MIME type can sometimes be inferred from the URI—particularly when the data is a content: URI, which indicates the data is located on the device and controlled by a ContentProvider , which makes the data MIME type visible to the system.
To set only the data URI, call setData() . To set only the MIME type, call setType() . If necessary, you can set both explicitly with setDataAndType() .
Caution: If you want to set both the URI and MIME type, do not call setData() and setType() because they each nullify the value of the other. Always use setDataAndType() to set both URI and MIME type.
Category A string containing additional information about the kind of component that should handle the intent. Any number of category descriptions can be placed in an intent, but most intents do not require a category. Here are some common categories: CATEGORY_BROWSABLE The target activity allows itself to be started by a web browser to display data referenced by a link—such as an image or an e-mail message. CATEGORY_LAUNCHER The activity is the initial activity of a task and is listed in the system’s application launcher.
See the Intent class description for the full list of categories.
You can specify a category with addCategory() .
These properties listed above (component name, action, data, and category) represent the defining characteristics of an intent. By reading these properties, the Android system is able to resolve which app component it should start.
However, an intent can carry additional information that does not affect how it is resolved to an app component. An intent can also supply:
Extras Key-value pairs that carry additional information required to accomplish the requested action. Just as some actions use particular kinds of data URIs, some actions also use particular extras.
You can add extra data with various putExtra() methods, each accepting two parameters: the key name and the value. You can also create a Bundle object with all the extra data, then insert the Bundle in the Intent with putExtras() .
For example, when creating an intent to send an email with ACTION_SEND , you can specify the «to» recipient with the EXTRA_EMAIL key, and specify the «subject» with the EXTRA_SUBJECT key.
The Intent class specifies many EXTRA_* constants for standardized data types. If you need to declare your own extra keys (for intents that your app receives), be sure to include your app’s package name as a prefix. For example:
Flags Flags defined in the Intent class that function as metadata for the intent. The flags may instruct the Android system how to launch an activity (for example, which task the activity should belong to) and how to treat it after it’s launched (for example, whether it belongs in the list of recent activities).
For more information, see the setFlags() method.
Example explicit intent
An explicit intent is one that you use to launch a specific app component, such as a particular activity or service in your app. To create an explicit intent, define the component name for the Intent object—all other intent properties are optional.
For example, if you built a service in your app, named DownloadService , designed to download a file from the web, you can start it with the following code:
The )»>Intent(Context, Class) constructor supplies the app Context and the component a Class object. As such, this intent explicitly starts the DownloadService class in the app.
For more information about building and starting a service, see the Services guide.
Example implicit intent
An implicit intent specifies an action that can invoke any app on the device able to perform the action. Using an implicit intent is useful when your app cannot perform the action, but other apps probably can and you’d like the user to pick which app to use.
For example, if you have content you want the user to share with other people, create an intent with the ACTION_SEND action and add extras that specify the content to share. When you call startActivity() with that intent, the user can pick an app through which to share the content.
Caution: It’s possible that a user won’t have any apps that handle the implicit intent you send to startActivity() . If that happens, the call will fail and your app will crash. To verify that an activity will receive the intent, call resolveActivity() on your Intent object. If the result is non-null, then there is at least one app that can handle the intent and it’s safe to call startActivity() . If the result is null, you should not use the intent and, if possible, you should disable the feature that issues the intent.
Note: In this case, a URI is not used, but the intent’s data type is declared to specify the content carried by the extras.
When startActivity() is called, the system examines all of the installed apps to determine which ones can handle this kind of intent (an intent with the ACTION_SEND action and that carries «text/plain» data). If there’s only one app that can handle it, that app opens immediately and is given the intent. If multiple activities accept the intent, the system displays a dialog so the user can pick which app to use..

Figure 2. A chooser dialog.
Forcing an app chooser
When there is more than one app that responds to your implicit intent, the user can select which app to use and make that app the default choice for the action. This is nice when performing an action for which the user probably wants to use the same app from now on, such as when opening a web page (users often prefer just one web browser) .
However, if multiple apps can respond to the intent and the user might want to use a different app each time, you should explicitly show a chooser dialog. The chooser dialog asks the user to select which app to use for the action every time (the user cannot select a default app for the action). For example, when your app performs «share» with the ACTION_SEND action, users may want to share using a different app depending on their current situation, so you should always use the chooser dialog, as shown in figure 2.
To show the chooser, create an Intent using createChooser() and pass it to startActivity() . For example:
This displays a dialog with a list of apps that respond to the intent passed to the createChooser() method and uses the supplied text as the dialog title.
Receiving an Implicit Intent
To advertise which implicit intents your app can receive, declare one or more intent filters for each of your app components with an element in your manifest file. Each intent filter specifies the type of intents it accepts based on the intent’s action, data, and category. The system will deliver an implicit intent to your app component only if the intent can pass through one of your intent filters.
Note: An explicit intent is always delivered to its target, regardless of any intent filters the component declares.
An app component should declare separate filters for each unique job it can do. For example, one activity in an image gallery app may have two filters: one filter to view an image, and another filter to edit an image. When the activity starts, it inspects the Intent and decides how to behave based on the information in the Intent (such as to show the editor controls or not).
Each intent filter is defined by an element in the app’s manifest file, nested in the corresponding app component (such as an element). Inside the , you can specify the type of intents to accept using one or more of these three elements:
Note: In order to receive implicit intents, you must include the CATEGORY_DEFAULT category in the intent filter. The methods startActivity() and startActivityForResult() treat all intents as if they declared the CATEGORY_DEFAULT category. If you do not declare this category in your intent filter, no implicit intents will resolve to your activity.
For example, here’s an activity declaration with an intent filter to receive an ACTION_SEND intent when the data type is text:
When you want to handle multiple kinds of intents, but only in specific combinations of action, data, and category type, then you need to create multiple intent filters.
Restricting access to components
Using an intent filter is not a secure way to prevent other apps from starting your components. Although intent filters restrict a component to respond to only certain kinds of implicit intents, another app can potentially start your app component by using an explicit intent if the developer determines your component names. If it’s important that only your own app is able to start one of your components, set the exported attribute to «false» for that component.
An implicit intent is tested against a filter by comparing the intent to each of the three elements. To be delivered to the component, the intent must pass all three tests. If it fails to match even one of them, the Android system won’t deliver the intent to the component. However, because a component may have multiple intent filters, an intent that does not pass through one of a component’s filters might make it through on another filter. More information about how the system resolves intents is provided in the section below about Intent Resolution.
Caution: To avoid inadvertently running a different app’s Service , always use an explicit intent to start your own service and do not declare intent filters for your service.
Note: For all activities, you must declare your intent filters in the manifest file. However, filters for broadcast receivers can be registered dynamically by calling registerReceiver() . You can then unregister the receiver with unregisterReceiver() . Doing so allows your app to listen for specific broadcasts during only a specified period of time while your app is running.
Example filters
To better understand some of the intent filter behaviors, look at the following snippet from the manifest file of a social-sharing app.
The first activity, MainActivity , is the app’s main entry point—the activity that opens when the user initially launches the app with the launcher icon:
- The ACTION_MAIN action indicates this is the main entry point and does not expect any intent data.
- The CATEGORY_LAUNCHER category indicates that this activity’s icon should be placed in the system’s app launcher. If the element does not specify an icon with icon , then the system uses the icon from the element.
These two must be paired together in order for the activity to appear in the app launcher.
The second activity, ShareActivity , is intended to facilitate sharing text and media content. Although users might enter this activity by navigating to it from MainActivity , they can also enter ShareActivity directly from another app that issues an implicit intent matching one of the two intent filters.
Note: The MIME type, application/vnd.google.panorama360+jpg , is a special data type that specifies panoramic photos, which you can handle with the Google panorama APIs.
Using a Pending Intent
A PendingIntent object is a wrapper around an Intent object. The primary purpose of a PendingIntent is to grant permission to a foreign application to use the contained Intent as if it were executed from your app’s own process.
Major use cases for a pending intent include:
- Declare an intent to be executed when the user performs an action with your Notification (the Android system’s NotificationManager executes the Intent ).
- Declare an intent to be executed when the user performs an action with your App Widget (the Home screen app executes the Intent ).
- Declare an intent to be executed at a specified time in the future (the Android system’s AlarmManager executes the Intent ).
Because each Intent object is designed to be handled by a specific type of app component (either an Activity , a Service , or a BroadcastReceiver ), so too must a PendingIntent be created with the same consideration. When using a pending intent, your app will not execute the intent with a call such as startActivity() . You must instead declare the intended component type when you create the PendingIntent by calling the respective creator method:
Unless your app is receiving pending intents from other apps, the above methods to create a PendingIntent are the only PendingIntent methods you’ll probably ever need.
Each method takes the current app Context , the Intent you want to wrap, and one or more flags that specify how the intent should be used (such as whether the intent can be used more than once).
More information about using pending intents is provided with the documentation for each of the respective use cases, such as in the Notifications and App Widgets API guides.
Intent Resolution
When the system receives an implicit intent to start an activity, it searches for the best activity for the intent by comparing the intent to intent filters based on three aspects:
- The intent action
- The intent data (both URI and data type)
- The intent category
The following sections describe how an intents are matched to the appropriate component(s) in terms of how the intent filter is declared in an app’s manifest file.
Action test
To specify accepted intent actions, an intent filter can declare zero or more elements. For example:
To get through this filter, the action specified in the Intent must match one of the actions listed in the filter.
If the filter does not list any actions, there is nothing for an intent to match, so all intents fail the test. However, if an Intent does not specify an action, it will pass the test (as long as the filter contains at least one action).
Category test
To specify accepted intent categories, an intent filter can declare zero or more elements. For example:
For an intent to pass the category test, every category in the Intent must match a category in the filter. The reverse is not necessary—the intent filter may declare more categories than are specified in the Intent and the Intent will still pass. Therefore, an intent with no categories should always pass this test, regardless of what categories are declared in the filter.
Note: Android automatically applies the the CATEGORY_DEFAULT category to all implicit intents passed to startActivity() and startActivityForResult() . So if you want your activity to receive implicit intents, it must include a category for «android.intent.category.DEFAULT» in its intent filters (as shown in the previous example.
Data test
To specify accepted intent data, an intent filter can declare zero or more elements. For example:
Each element can specify a URI structure and a data type (MIME media type). There are separate attributes — scheme , host , port , and path — for each part of the URI:
In this URI, the scheme is content , the host is com.example.project , the port is 200 , and the path is folder/subfolder/etc .
Each of these attributes is optional in a element, but there are linear dependencies:
- If a scheme is not specified, the host is ignored.
- If a host is not specified, the port is ignored.
- If both the scheme and host are not specified, the path is ignored.
When the URI in an intent is compared to a URI specification in a filter, it’s compared only to the parts of the URI included in the filter. For example:
- If a filter specifies only a scheme, all URIs with that scheme match the filter.
- If a filter specifies a scheme and an authority but no path, all URIs with the same scheme and authority pass the filter, regardless of their paths.
- If a filter specifies a scheme, an authority, and a path, only URIs with the same scheme, authority, and path pass the filter.
Note: A path specification can contain a wildcard asterisk (*) to require only a partial match of the path name.
The data test compares both the URI and the MIME type in the intent to a URI and MIME type specified in the filter. The rules are as follows:
- An intent that contains neither a URI nor a MIME type passes the test only if the filter does not specify any URIs or MIME types.
- An intent that contains a URI but no MIME type (neither explicit nor inferable from the URI) passes the test only if its URI matches the filter’s URI format and the filter likewise does not specify a MIME type.
- An intent that contains a MIME type but not a URI passes the test only if the filter lists the same MIME type and does not specify a URI format.
- An intent that contains both a URI and a MIME type (either explicit or inferable from the URI) passes the MIME type part of the test only if that type matches a type listed in the filter. It passes the URI part of the test either if its URI matches a URI in the filter or if it has a content: or file: URI and the filter does not specify a URI. In other words, a component is presumed to support content: and file: data if its filter lists only a MIME type.
This last rule, rule (d), reflects the expectation that components are able to get local data from a file or content provider. Therefore, their filters can list just a data type and do not need to explicitly name the content: and file: schemes. This is a typical case. A element like the following, for example, tells Android that the component can get image data from a content provider and display it:
Because most available data is dispensed by content providers, filters that specify a data type but not a URI are perhaps the most common.
Another common configuration is filters with a scheme and a data type. For example, a element like the following tells Android that the component can retrieve video data from the network in order to perform the action:
Intent matching
Intents are matched against intent filters not only to discover a target component to activate, but also to discover something about the set of components on the device. For example, the Home app populates the app launcher by finding all the activities with intent filters that specify the ACTION_MAIN action and CATEGORY_LAUNCHER category.
Your application can use intent matching in a similar way. The PackageManager has a set of query. () methods that return all components that can accept a particular intent, and a similar series of resolve. () methods that determine the best component to respond to an intent. For example, queryIntentActivities() returns a list of all activities that can perform the intent passed as an argument, and queryIntentServices() returns a similar list of services. Neither method activates the components; they just list the ones that can respond. There’s a similar method, queryBroadcastReceivers() , for broadcast receivers.
Источник


