- Easy Steps to Increase Internal Memory of Android Phone and Tablet
- About RAM on Android Device
- Why Increase Internal Memory in Android?
- How to Increase Internal Memory for Android Mobile and Tablet?
- Increase Internal Memory in Android Mobiles in Easy Steps
- Conclusion
- How to Repartition Android Internal Memory for Better App Management?
- Why want Android to repartition internal memory?
- Before repartitioning internal memory of Android device
- How to repartition Android internal memory?
- Verdict
- Android Storage: Internal, External, Removable. Часть 1/3
- Internal Storage
- То, что пользователи считают Internal Storage
- Что Google считает Internal Storage
- Где хранится Internal Storage … Иногда
- Где хранится Internal Storage … Остальное время
- Исследуем Internal Storage
- Ограничения внутреннего хранилища
- F.A.Q. по Internal Storage
- Должен ли я делать файлы во внутреннем хранилище World-Readable или World-Writeable?
- Ну, а как насчет android:sharedUserId ?
- Как запретить пользователям rooted устройств доступ к моим файлам во внутреннем хранилище?
Easy Steps to Increase Internal Memory of Android Phone and Tablet
Learn how to increase internal memory (RAM) for Android device, phone and tablet like Galaxy Y/Ace/Mini, HTC Explorer/HD2 by partitioning SD card in easy steps.

By Lucas  / Last Updated December 29, 2020
About RAM on Android Device
The internal memory of an Android device normally refers to the Random Accessed Memory (RAM) of that device. The RAM of Android phone or Android tablet is relatively unchanged. That is to say, it keeps the capacity when you purchase the device. In general, the capacity of Android internal memory varies from 512MB to 3GB. Among which, 1GB and 2GB are the most common size of the internal memory nowadays.
Nevertheless, the Android device that produced at an early time is built with small RAM. For example, HTC Explorer that released in 2011 has only 512MB RAM; HTC HD2 has 576MB RAM; Samsung Galaxy Y series even has 290MB RAM; and Galaxy Ace has 384MB (accessible 278MB) and Galaxy Mini series also has less than 1GB RAM. Other than these mentioned Android phones, the device with 1GB or 2GB RAM may no longer meet our daily requirement.
Why Increase Internal Memory in Android?
As we know, internal memory of Android device, to a large extent, affects the number of running programs on your phone or tablet. Therefore, when you start many programs in a small internal memory device, you are likely to get the “low space in internal memory” warning. Meanwhile, to run heavy software like games, it may stop or exit the program now and then. Some system programs may not function normal as well, which will dramatically affect the user experience.
Unlike the desktop, we cannot increase internal memory (RAM) of Android device by adding an extra RAM, nor can we expand it like expand ROM by replacing a larger SD card. What’s more, to purchase another Android phone or tablet is costly. Then, what’s the best way to increase RAM of your Android device at a low cost? Following will show you how to increase internal memory of device on Android by partitioning SD card. You can use this way to increase internal memory of any Android phone.
How to Increase Internal Memory for Android Mobile and Tablet?
Clear internal memory through closing all running software will not solve the low space in RAM thoroughly. Also, you can prevent some software or programs from running at backstage. However, chances are that you’ll encounter the same issue in the near future.
In a nutshell, you can increase internal memory using SD card for your Android phone. The theory is, create two partitions with different file systems on the SD card. One is FAT32 which is used as storage (ROM), and the other is EXT2, EXT3 or EXT4 that is used to increase internal memory (RAM). This is simple yet you have to meet several conditions and prepare some tools at the same time.
Your Android phone or tablet has to be rooted before. This is used to move built-in programs to new space as well as authorize follow-up operations.
Your SD card has redundant free space. If it is almost full or under similar conditions, it is suggested to buy a new SD card, 32GB or more and class4 or more.
A Windows-based PC and a SD card reader that used to connect the SD card to the computer.
A reliable partition tool like AOMEI Partition Assistant Professional. It is supported in Windows 10, 8, 7, XP, and Vista.
A Link2SD application to install on your Android phone or tablet to move programs.
Increase Internal Memory in Android Mobiles in Easy Steps
Note: It is advised to back up all data on the SD card using easy-to-use free AOMEI Backupper before you start because the below steps may format it and cause data loss.
Step 1. Insert the SD card to the card reader and plug into the computer. Install and run AOMEI Partition Assistant Professional. For a free trial, you can download its Demo version and preview the process.
Step 2: at the main interface of this partition tool, you’ll find your SD card marked as removable disk. If it is a new SD card, it will show up as unallocated space. You can right-click the space and select “Create Partition”.
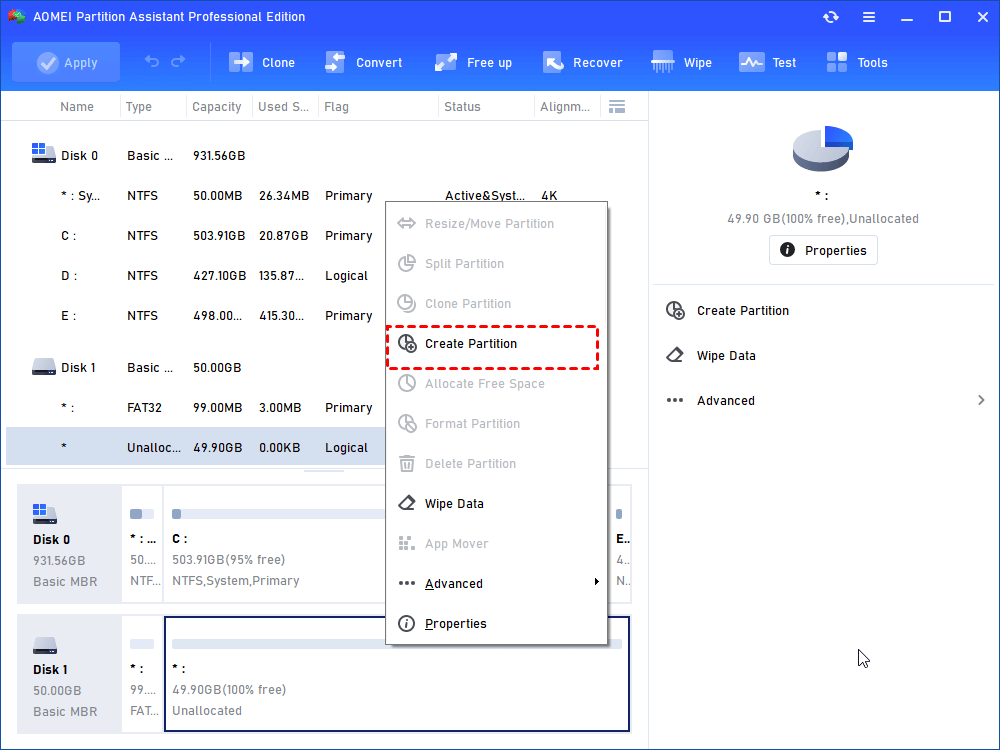
Tips: If this is your old SD card and it has a lot of free space, you can resize the SD card first and then create a new partition with EXT2/3 file system using the generated space. This will not cause data loss. For more information, please see partition SD card.
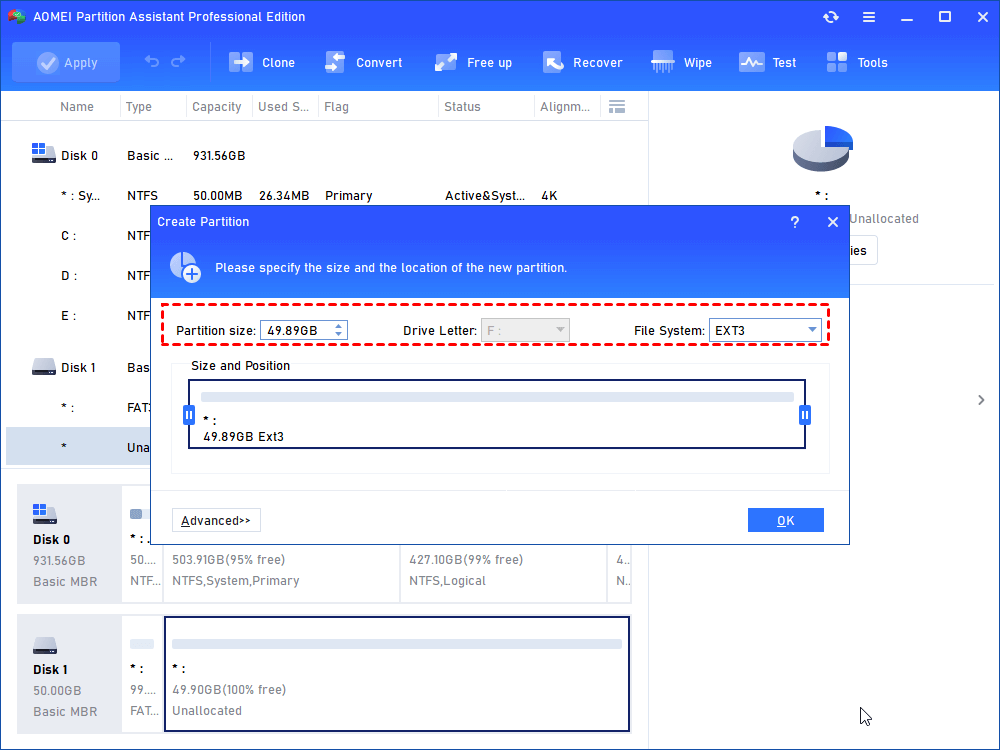
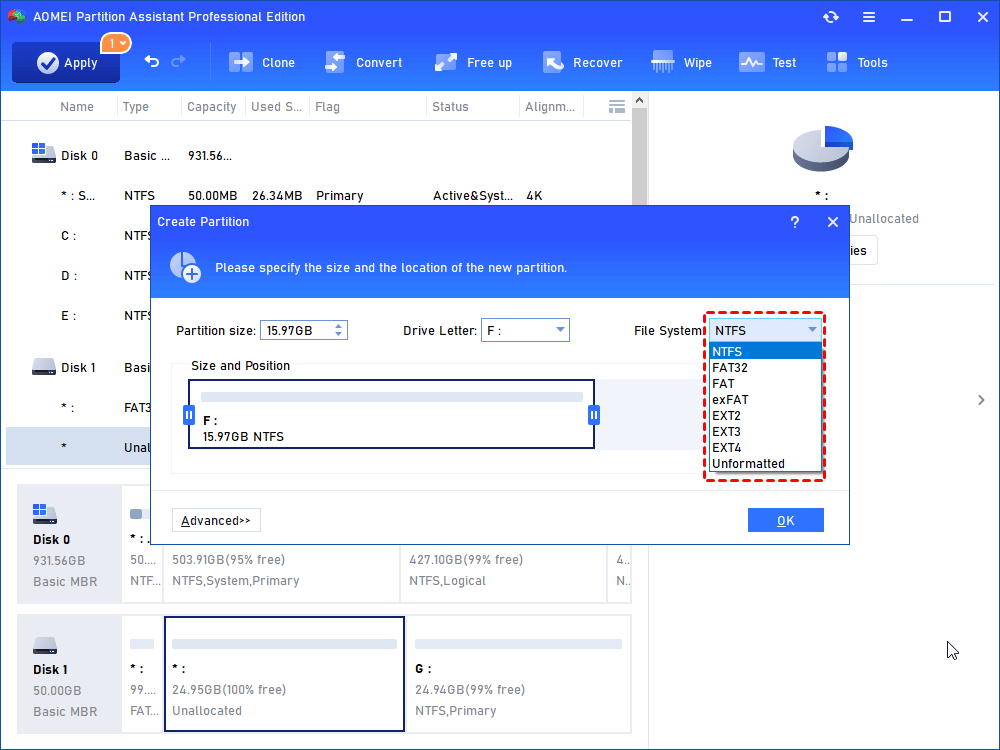
Step 3: in the pop-up window, adjust the partition size, assign drive letter, and select FAT32 as the file system.

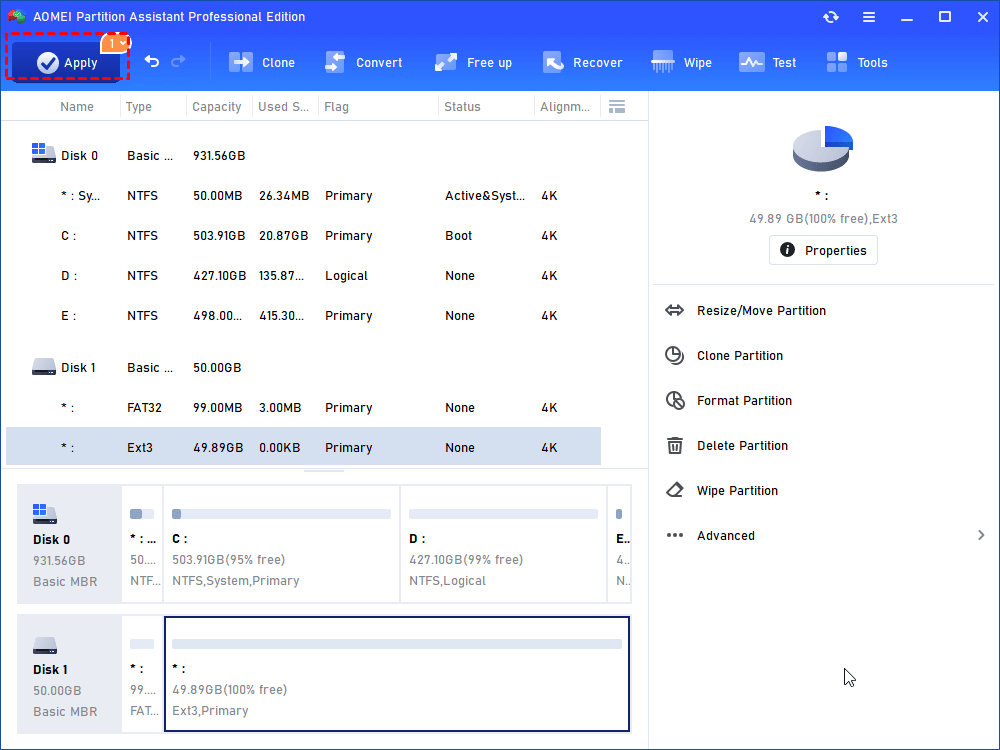
Step 4: click “Apply” and later “Proceed” to execute this operation first. Otherwise, you cannot move to next step.
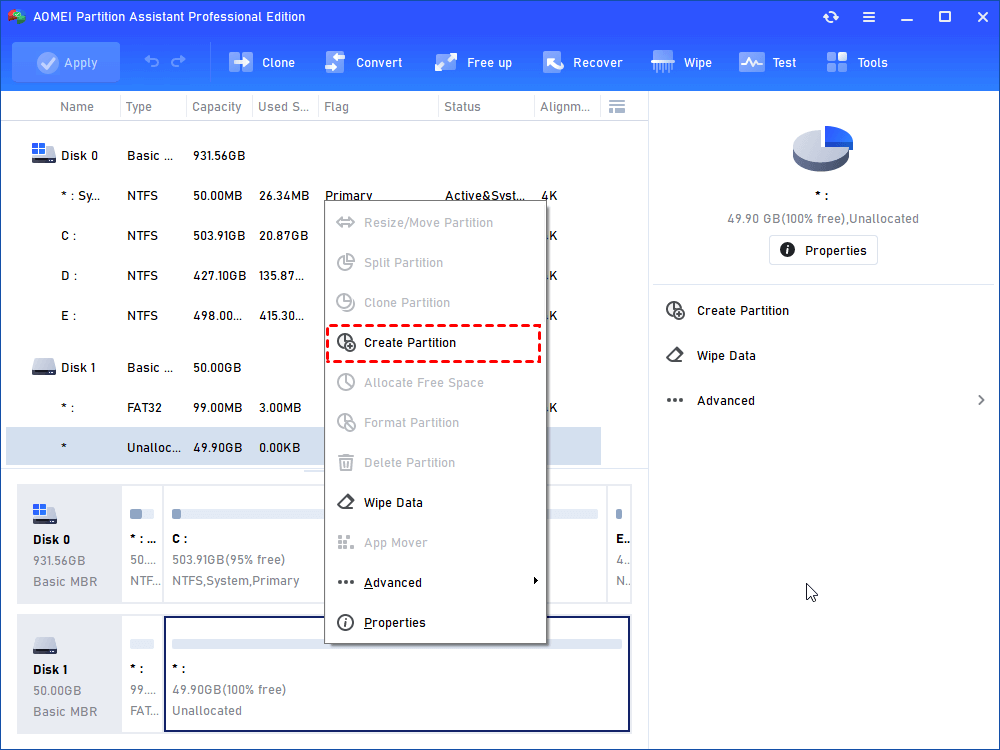
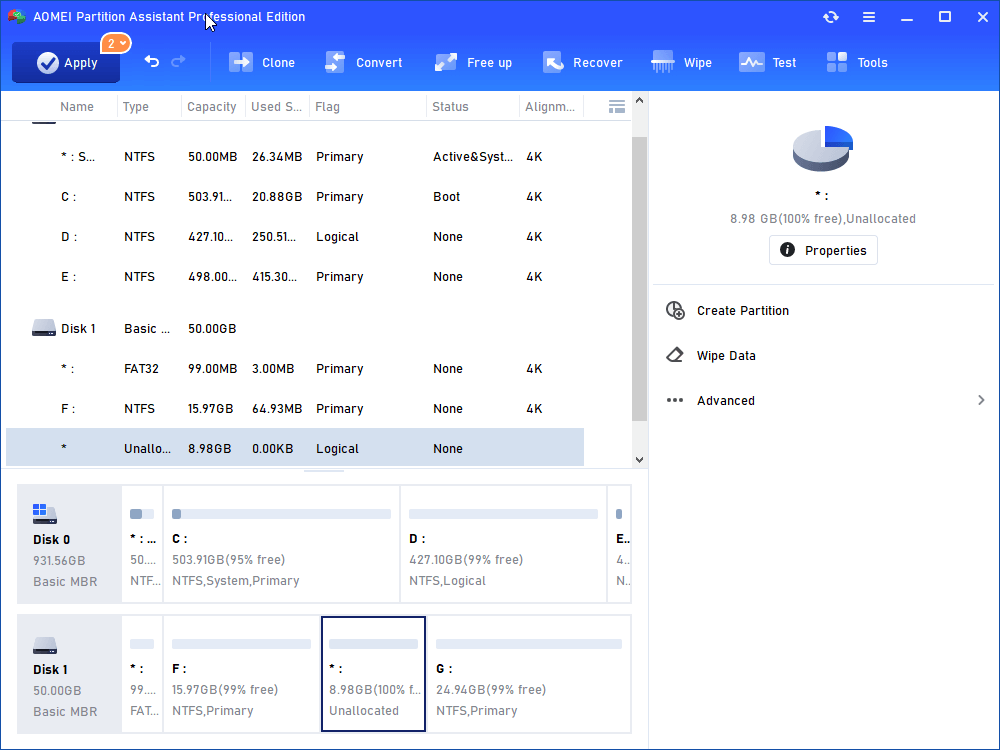
Step 5: right-click the left space and select “Create Partition” again. It will prompt you that the second partition on a removable device cannot be assigned with a drive letter since Windows will not recognize it. Click “Yes” to continue.
Step 6: you have to only select the EXT3 as the file system at this time.
Step 7: remember to click “Apply” to comply the operation.
Step 8: unplug the SD card and insert it back to your Android phone or tablet. Check out and you’ll find the internal memory is expanded. You may need to restore the backup image if you backed up before. Install the Link2SD to move applications to SD card if the need ever arises.
Warning: this method consumes the SD card lifespan greater than using it as storage only. Therefore, try this method with caution and back up important data at any time just in case.
Conclusion
The question, how to increase internal memory of your Android device, is perfectly solved by now. Increasing the RAM of Android mobile by partitioning SD card could be the most suitable one for normal user. As a matter of fact, AOMEI Partition Assistant can help you format SD card for 3DS as well. Besides, for large capacity SD card that cannot be formatted to FAT32 in Windows, you can still turn to this tool. For more information with screenshots, please see software to format 64GB SD card to FAT32 and format 128GB SD card to FAT32.
Источник
How to Repartition Android Internal Memory for Better App Management?
Need to repartition internal memory storage in Android device? Refer to this post to learn how to achieve the goal.
By Lucas / Last Updated June 16, 2021
Why want Android to repartition internal memory?
“Hello, all. How can I repartition my Android device so that the storage for my phone internal usage (like applications or internal memory) can be increased in lieu of decreasing the User available memory? I have 740MB internal memory and 2GB user available space. How can I repartition to move some phone storage or the user available space to internal memory? I have extra SD card so I don’t require the 2GB in the phone storage. Please help.”
As we know, low internal memory on Android phone or tablet will cause new applications cannot be installed and old programs not functional problem. Many Android smartphones have small internal memory, the entry level phones in particular. For example, Lenovo S820 and S920 have only 1GB RAM. The RAM in Galaxy Note and S2 is 2GB. The operating system takes up some internal memory so there is few memory left for applications and personal data. After a period of time, the low space in internal memory notification will appear. As a result, the intent is to partition your internal memory is for better app management as well as Android internal memory increasing.
Before repartitioning internal memory of Android device
Obviously, move applications to external SD card can solve this trouble to some extent. However, the same issue will come back soon in the near future. What’s worse, some software don’t support to installed on SD card. Therefore, you have to adjust the memory. To repartition Android internal memory, your Android device has to meet some requirements and you have to prepare some necessary tools.
в–Є The Android device (phone/tablet) has to be rooted before.
в–Є An SD card larger than 2GB. If your current SD card has redundant free space, then just partition it. If not, it is necessary to buy another SD card.
в–Є A Windows PC with AOMEI Partition Assistant Professional installed.
в–Є A memory card reader that you can attach your SD card to.
в–Є Download Link2SD from Google Play and install it on the Android device. You can also download a root checker program to check if your phone is rooted or not.
Note: The SD card will be formatted during this process. Please back up important data if necessary. You can copy these files on SD card to any other folder of Windows in File Explorer or you can backup SD card with free backup software.
How to repartition Android internal memory?
1. Attach the SD card of your Android device to the memory card reader and plug the reader into your PC. Make sure it can be detected by your PC. Install and run AOMEI Partition Assistant.В
PS.: You can download the demo version of AOMEI Partition Assistant Professional to have a try!
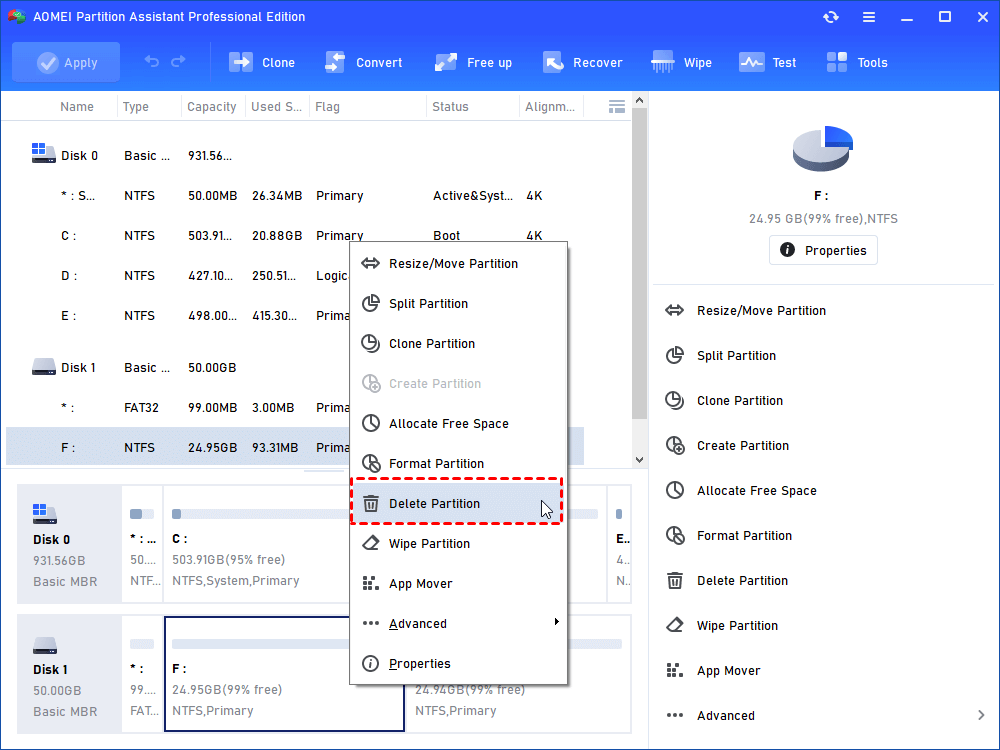
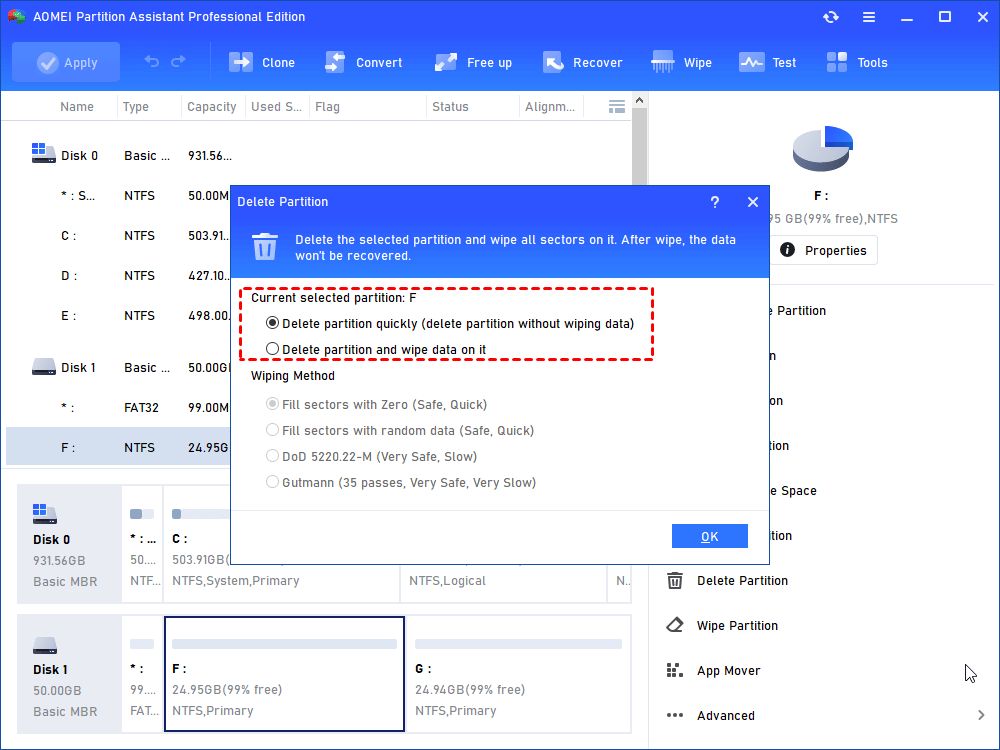
2. At the main interface of the software, you can see your SD card is marked as a removable disk. Right-click the partition and select “Delete Partition” to remove the partition. Complete the deletion and remember to click “Apply” to execute the operation.
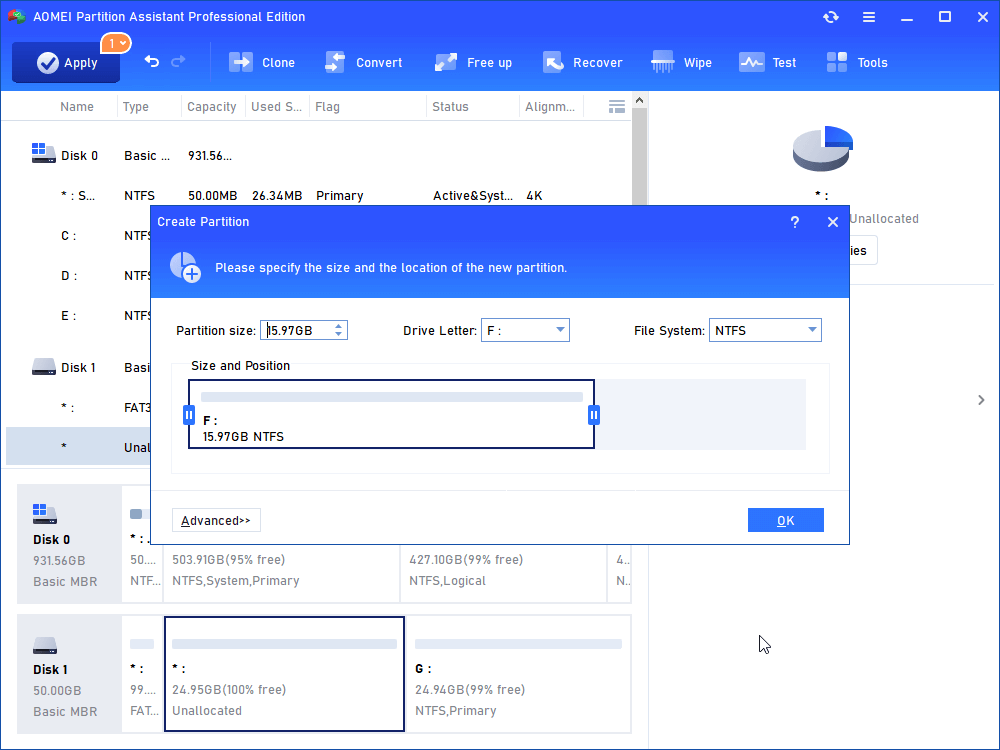
3. Now your SD card shows as unallocated space. Right click the space and select “Create Partition”.
4. In the pop-up window, specify the partition size, drive letter, and file system. Be sure you have some space for the next partition. Select FAT32 if the SD card is larger than 4GB. Select FAT if it is less than 4GB.
5. Click “Apply”, otherwise, you cannot continue.
6. Create another partition with the left unallocated space. Repeat the above steps to create a new partition.
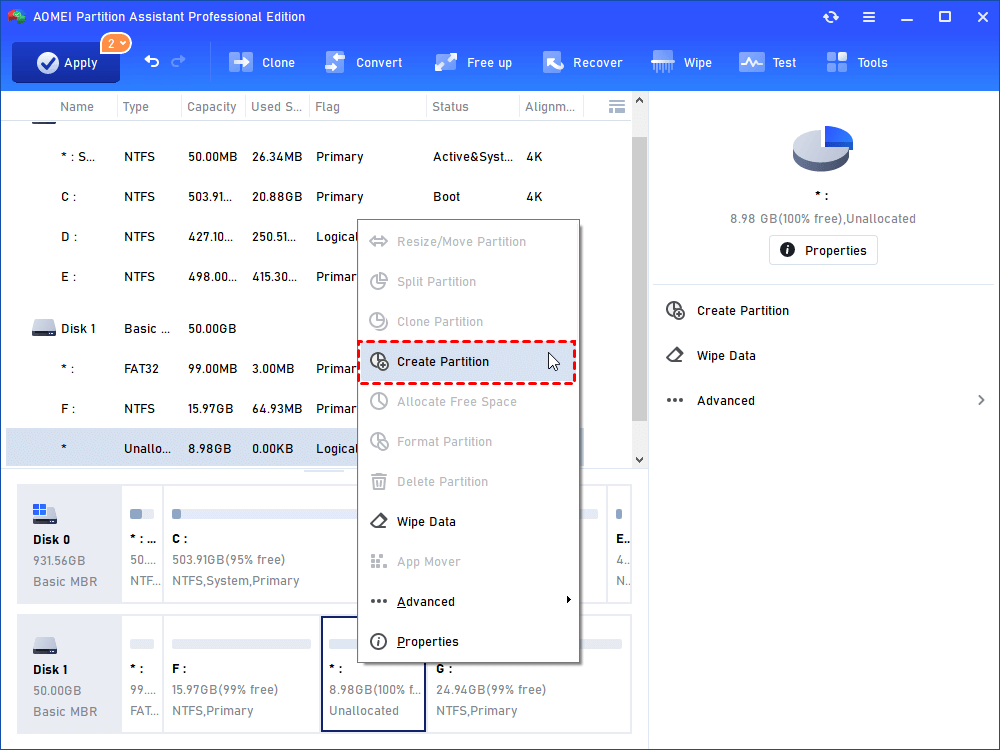
7. Select EXT2 or EXT3 this time in the pop-up window.
8. Then click “Apply” again.
Tips: Windows will recognize only the first partition (primary or logical) so the second partition will not have a drive letter. Also, you cannot view this partition in Windows Explorer.
9. Copy or restore previous files to SD card and insert it back to the Android device. Start the Link2SD to move some applications to the SD card and also you’ll find the internal memory is increased.
Verdict
How do you repartition internal memory in Android device? To my knowledge, this is a workable method to increase Android internal memory storage. AOMEI Partition Assistant can also format SD ard for 3DS. When you cannot format large capacity removable device to FAT32, you can refer to format 128GB SD card for Android for more information.
Источник
Android Storage: Internal, External, Removable. Часть 1/3
Всем, кто, несмотря ни на что, сумел сделать правильный выбор.
Это перевод серии статей от Mark Murphy из CommonsWare, широко известного на stackoverflow, а так же автора книг “The Busy Coder’s Guide to Android Development”, “Android’s Architecture Components”. Некоторые термины оставлены не переведенными специально.
Internal Storage
Существует много путаницы в отношении модели хранилища Android. Путаницы стало значительно больше с изменениями Android 4.4 в Storage Model, и с тех пор ситуация не улучшилась. Есть бесчисленное множество вопросов на Stack Overflow и тому подобных ресурсах, где люди явно не совсем разбираются в различных моделях хранилищ Android.
То, что пользователи считают Internal Storage
В зависимости от модели вашего устройства пользователи в конечном итоге придут в «Настройки» —> «Хранилище на этом устройстве» (Settings —> Storage on their device) или в эквивалентном месте, и могут видеть экран, который описывает «Внутреннее хранилище».
Пользователь думает, что вся встроенная флешка — это «внутреннее хранилище» (Internal Storage). К счастью, Google начал менять этот термин с Android 8.0, перейдя к «general storage» вместо «internal storage».
Тем не менее, пользователи могут по-прежнему видеть «внутреннее хранилище» в таких местах, как окно проводника в Windows, когда их устройство подключено через USB.
Что Google считает Internal Storage
Увы, то, что видят пользователи это не то же самое, что Android SDK считает «внутренним хранилищем», что приводит к некоторой путанице. Если вы читали документацию на Android по внутреннему хранилищу, то это описание … как минимум туманно (прим. текст изменился со времени написания статьи):
Вы можете сохранять файлы непосредственно во внутренней памяти устройства. По умолчанию файлы, сохраненные во внутреннем хранилище, являются приватными для вашего приложения, и другие приложения не могут получить к ним доступ (также как и пользователь). Когда пользователь удаляет приложение, эти файлы удаляются.
По правде говоря, Android SDK определяет «внутреннее хранилище» как особый каталог, уникальный для вашего приложения, где ваше приложение может размещать файлы. Как было предложено в документации, эти файлы по умолчанию предназначены для чтения и записи для вашего приложения и запрещены для любого другого приложения (исключение: пользователи, работающие с файловыми менеджерами с привилегиями суперпользователя на rooted устройствах могут получить доступ ко всему).
В Context есть несколько базовых методов, которые предоставляют вам доступ к внутреннему хранилищу, в том числе:
- getCacheDir()
- getDir()
- getDatabasePath()
- getFilesDir()
- openFileInput()
- openFileOutput()
Другие методы будут опираться на них, такие как openOrCreateDatabase() . Другие классы также будут полагаться на них, такие как SQLiteOpenHelper и SharedPreferences .
Где хранится Internal Storage … Иногда
Если вы просматриваете различные сообщения в блогах, ответы на StackOverflow и книги, выпущенные в 2012 году или ранее, вам сообщается, что «внутреннее хранилище» вашего приложения находится по адресу: /data/data/your.application.package.name .
Внутри будут некоторые каталоги, автоматически созданные Android, поскольку вы используете некоторые из методов Context. Например, getFilesDir() возвращает объект File , указывающий на каталог files/ во внутреннем хранилище вашего приложения.
Где хранится Internal Storage … Остальное время
Однако не всегда внутреннее хранилище вашего приложения находится в указанном месте. Для разработчиков есть одно правило, которое вы должны усвоить из этой серии сообщений в блоге, это:
NEVER HARDCODE PATHS.
Время от времени я вижу, что разработчики делают что-то вроде этого:
File f=new File(«/data/data/their.app.package.name/files/foo.txt»);
Это не преступление, это хуже, это — ошибка.
Правильный ход, да и писать меньше:
File f=new File(getFilesDir(), «foo.txt»);
Что еще более важно, внутреннее хранилище не всегда находится в одном месте. Примечательно, что у нас есть понятие отдельных профилей пользователей (separate user profiles), начиная с Android 4.2 для планшетов и Android 5.0 для телефонов. Каждый пользователь получает свое собственное «внутреннее хранилище». Хотя вышеупомянутый каталог по-прежнему используется для основного пользователя, не гарантируется, что он же будет использоваться для вторичных учетных записей.
Исследуем Internal Storage
Device File Explorer tool в Android Studio 3.0+ может просматривать все внутренние хранилища на эмуляторе, а также внутреннее хранилище отлаживаемых приложений на продакшн устройствах.
В командной строке вы можете использовать adb с опцией run-as .
Например, чтобы загрузить базу данных из внутреннего хранилища основного пользователя на вашу девелоперскую машину, вы можете использовать:
adb shell ‘run-as your.application.package.name cp /data/data/your.application.package.name/databases/dbname.db /sdcard’
Обратите внимание, что:
- Вам нужно будет изменить пункт назначения туда, где на вашем устройстве монтируется внешнее хранилище (показано здесь как /sdcard/ , которое не будет одинаковым на всех устройствах)
- Возможно, вам придется использовать cat вместо cp на старых устройствах
- После того, как файл будет находиться на внешнем хранилище, вы сможете использовать adb pull , чтобы загрузить его на свой компьютер, или получить доступ к нему другими обычными способами (например, путем монтирования устройства в качестве диска).
Ограничения внутреннего хранилища
На старых устройствах Android 1.x и 2.x внутреннее хранилище обычно находилось в выделенном разделе файловой системы, и этот раздел обычно был довольно крошечным. HTC Dream (a.k.a., T-Mobile G1), оригинальное Android-устройство, обладал огромными 70 МБ встроенной памяти для использования всеми приложениями (это не опечатка, в то время мы измеряли память в мегабайтах).
К тому времени, когда вышли 2.3 устройства, внутреннее хранилище могло быть размером 1 ГБ.
Android 3.0 изменил модель хранилища, так как внутреннее хранилище стало больше объемом. У устройств, которые рекламируют как имеющее 4 ГБ, 8 ГБ, 16 ГБ и т.д. пространства для хранения, обычно имелось все это (минус существующее содержимое) доступное для внутреннего хранилища. Мы рассмотрим, что изменилось в Android 3.0 и его влияние на модель хранилища в следующих постах про внешнее хранилище.
Для Android 1.x и 2.x внутреннее хранилище было действительно только для небольших файлов, и вам нужно было использовать внешнее хранилище для всего остального. Android 3.0+ означает, что для большинства устройств и большинства пользователей внутреннее хранилище отлично подходит для файлов, которые не предназначены для обычного использования другими приложениями или доступны пользователю независимо от вашего приложения. Однако некоторые опытные пользователи обнаруживают, что даже on-board flash недостаточна для того, что они хотят хранить, поэтому они переходят на съемные хранилища… которые представляют собой банку с червями (прим. имеются в виду ἕλμινς) — источник многих непредсказуемых и сложных проблем.
F.A.Q. по Internal Storage
Должен ли я делать файлы во внутреннем хранилище World-Readable или World-Writeable?
О, $БОГИ, нет. Используйте FileProvider и обслуживайте этот контент с помощью реализации ContentProvider . После этого вы, по крайней мере, имеете возможность использовать систему разрешений Android для управления доступом к этим файлам, в отличие от вашего варианта, когда любое приложение в системе может испортить эти файлы.
Ну, а как насчет android:sharedUserId ?
android: sharedUserId — это атрибут, который вы можете поместить в манифест, который указывает логический идентификатор пользователя, который будет использоваться для вашего приложения. Любое другое приложение, которое установлено, которое подписывается одним и тем же ключом подписи и запрашивает тот же android:sharedUserId будет использовать одного и того же пользователя Linux с точки зрения безопасности. Эффект заключается в том, что эти два приложения смогут безнаказанно работать с файлами друг друга, так как эти файлы принадлежат одному и тому же пользователю Linux.
Этот атрибут реально предназначен для предварительно установленных приложений, таких как software suite предварительно загруженный производителем устройства, мобильным оператором или разработчиком модифицированной ROM прошивки. В частности, как только вы единожды установите свое приложение, вы не сможете затем безболезненно изменить свое значение android:sharedUserId не заблокировав при этом доступ пользователю к любым существующим файлам… поскольку Android не изменяет права владельца на существующие файлы при изменении учетной записи пользователя Linux, под которой запускается приложение.
Существуют различные риски при одновременном доступе нескольких процессов к файлам. Некоторые подсистемы, такие как SQLite, имеют встроенную логику для решения этой проблемы. Но если вы сами организуете свой собственный доступ к файлу (например, через File и Java I/O), вам нужно что-то делать с одновременным доступом, а это сложно.
Вам также нужно обрабатывать ситуацию, когда одно приложение деинсталлируется, удаляя файлы, которые использовало другое приложение. В модели hub-and-spoke, например, с приложением и набором плагинов, возможно, это не так рискованно. В других моделях, где приложения более равноправны, вы не можете позволить себе потерять данные своего приложения только потому, что пользователь решил удалить какое-то отдельное приложение.
Наконец, вы не знаете, что может принести будущее. Прямо сейчас вы можете рассматривать свой набор приложений в виде набора с тесной связью. Кто-то, кто приобретает эти приложения или приобретает вашу фирму, может пожелать пойти другим путем. Использование возможностей совместного доступа к данным, которые более слабо связаны, например ContentProvider , дает вам большую гибкость. В идеальном мире ваше приложение должно относиться к другим приложениям как к достаточно надежному, но не всегда доступному ресурсу, так же, как к вашему собственному веб-сервису.
Как запретить пользователям rooted устройств доступ к моим файлам во внутреннем хранилище?
Просто не помещайте файлы во внутреннее хранилище. Пользователи rooted устройств могут получить доступ к тому, что им нужно на устройстве, поэтому единственный способ предотвратить их доступ к вашим данным — не иметь их на устройстве.
Некоторые разработчики попытаются зашифровать свои файлы с помощью жестко запрограммированного пароля, чтобы пользователи rooted устройств не могли использовать эти файлы. Это создаст эффект «лежачего полицейского» на короткое время. Все, что требуется, — это один заинтересованный в реверс-инжиниринге вашего приложения человек, определивший, как расшифровать эти файлы, а затем написавший сообщение в блоге или форуме о том, как это сделать.
В целом, относительно мало людей с rooted устройствами — я оцениваю их на уровне менее 1%. ИМХО, вы преуспеете больше, сосредоточив свою инженерную работу на написании лучшего приложения, вместо того, чтобы тратить время на защиту от рутованных устройств.
Источник


