- Top 10 Photo Collage Apps for Any Purpose
- Retoucher Online
- Blend Pic
- Pic Collage
- LiveCollage
- Photo Grid
- Photo Collage Maker
- Mixbooth
- Piclay
- Split Pic
- Pic Stitch
- PicsArt Photo Studio
- Sync photos between your Mac and iPhone or iPad
- Sync photos to your device
- Remove automatically synced photos from your device
- How to Transfer Photos from iPhone to New iPhone (iPhone 12 Supported)
- iPhone to iPhone Transfer Tips
- PhoneTrans – Full-Way iPhone Photos Transfer Tool
- Method 1:В Transfer Photos Videos with Photo Transfer Tools
- #1. PhoneTrans –В Transfer Pictures from iPhone to iPhone inВ Minutes
- #2.В AnyTrans – A Professional Data Management Tool
- AnyTrans – iPhone Photos Transfer
- Option 1. Selectively TransferВ with AnyTrans
- Step 1. Connect your devices to transfer photos.
- Step 2. Transfer photos to a new iPhone.
- Option 2. Transfer All Photos in 1-Click
- Step 1. Connect your devices and choose Phone Switcher.
- Step 2.В Confirm your target iPhone.
- Step 3. Transfer photos from iPhone to iPhone.
- Using iCloud Photos to Transfer Photos from iPhone to iPhone
- Let’s checkВ howВ toВ sync photos from iPhone to iPhone using iCloud:
- How to Transfer Photos from the old iPhone to the new iPhone:
- Method 3: Transfer Photos from iPhone to iPhoneВ UsingВ iTunes
- AirDrop Photos from iPhone to iPhone
- Step 1. Enable AirDrop on two iPhones
- Step 2. Select photos you want to transfer from the Photos app
- Step 3. Receive photos from the target iPhone
- Send Photos from One iPhone to Another via Email
- How to Transfer Photos from iPhone to iPhone via Copy iCloud Link
- The Bottom Line
Top 10 Photo Collage Apps for Any Purpose

With iPhone picture apps, you can merge multiple images into one, make collages and blend them gradually. There is no need to spend entire hours tuning Photoshop as a lot of great effects are available right on your iPhone.
Retoucher Online
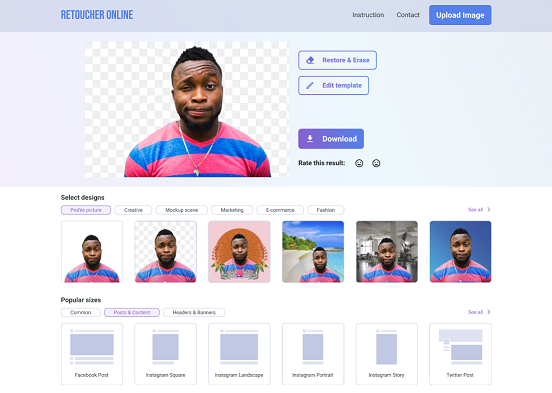
Retoucher Online is a free online background remover that offers a wide variety of photo editing options. You can choose a white, transparent, or custom background, erase unnecessary details, add blur or shadows, and much more. This online service also offers to resize your image automatically to the most popular sizes like Instagram Story or Facebook Post.
All features are free, so this tool looks like the perfect solution to create great content for your social media, make a marketing banner or even prepare a product photo for a marketplace.
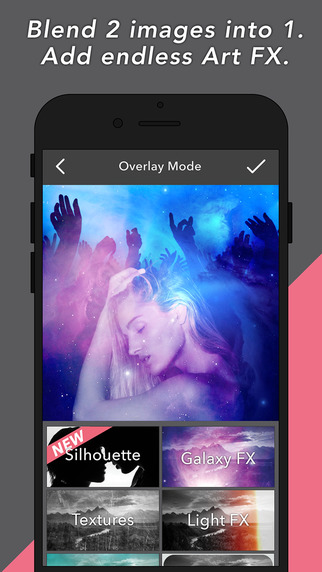
Blend Pic
 BlendPic is a collage app for combining two photos into one by making one of them transparent. What you need to do is to choose 2 photos from library or take new ones with your iPhone camera, set one of them as a background and start merging.
Set the amount of transparency to achieve different effects. The next step is to choose one of the 18 blending styles. Besides, you can add various lens. They are situated at different points and serve to highlight different details.
And if you need to change the photo color, there is also an option. The outcome photos look fantastic and natural. So, if you want to get an artistic pic of two photos, this app is right for you.
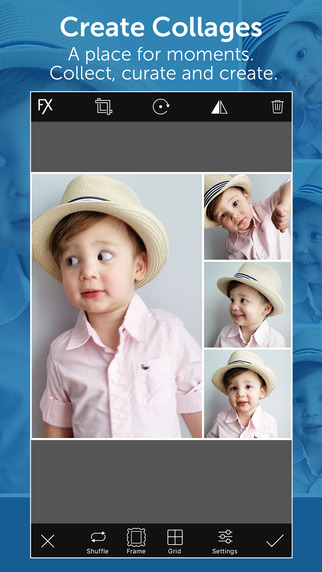
Pic Collage
Pic Collage is a perfect app with numerous backgrounds and collage styles for your holiday pictures. It lets you import photos from your camera roll, Facebook account, Instagram and even search for images online in a built-in browser. When your pic is added, use simple gestures to crop, rotate or resize it. You can also adjust picture borders and add funny text or sticker to make your collage more personal. The latest app update includes Grid option, and thus expands the borders for your imagination.
When you are done with collage making, share your pic on Facebook, Twitter or Instagram. Alternatively, you can create an account with Pic Collage to post your collages and check ones of other users.
All in all, Pic Collage is a great tool with almost all necessary options for collage creation.
LiveCollage
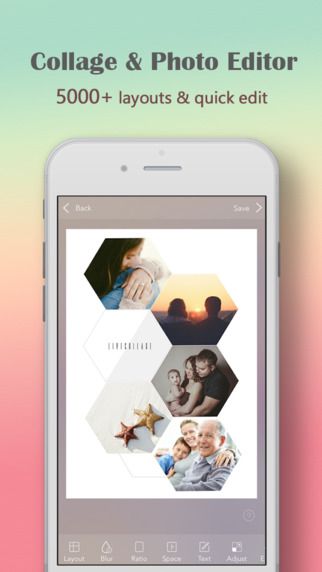
LiveCollage was originally developed to give Instagram users an option to create simple collages of their pics. However, it has turned into a great app with over 5000 layouts that let you combine up to 16 pics at once. Each of the pics can be edited separately. It means you can add various filters to your photos and create a really great and unique image. After you finish your job with filters, add a text message or cute stickers and export your picture to social networks, send by email or in a multimedia message.
The only drawback of the app is numerous ads.
Use LiveCollage if you prefer to make extraordinary images.
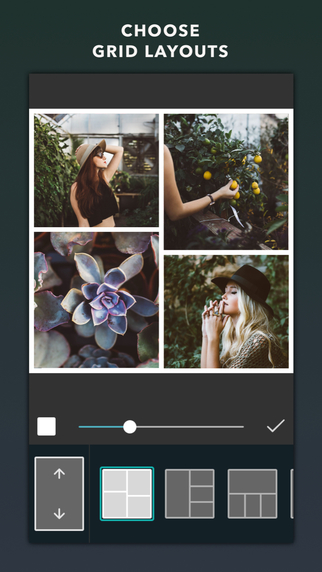
Photo Grid
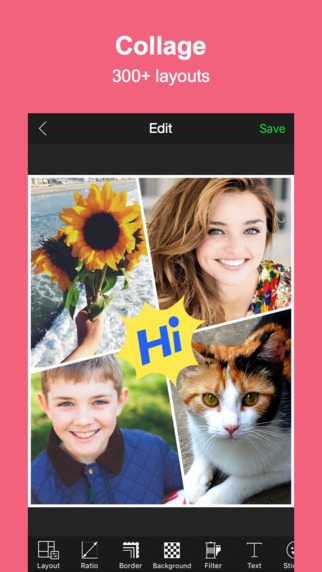
Photo Grid app lets you combine several images into one collage with the help of over 300 styles. The app is very easy-to-use. Simply choose a style and add the corresponding number of pictures. Then tap the one you need to make changes. You can add separate filters to each image from the collage. After that type your text and add a frame if necessary.
The app also offers a great amount of stickers to choose from. You can even create your own sticker if you didn’t find the right one for you.
To cut a long story shot, if you need a simple app with basic options, Photo Grid is the one you should install.
Photo Collage Maker

Photo Collage Maker is one more app to make simple collages. It has less styles than Photo Grid, but there are some nice ones to choose from. As for the rest, the options of these two apps are pretty much the same. Choose a layout and a background, add your pics, make edits and share your masterpiece with your friends on Facebook, Twitter and Instagram.
Again, it will be helpful to those who are searching for a quick and easy-to-use tool.
SEE ALSO: How to Put two Videos or More Videos Together
SEE ALSO: DVD Slideshow Maker for your Best Photos
Mixbooth

Mixbooth is an app for merging faces. If you need to merge a couple of portraits and create a hilarious prank, use this app. You can merge your own photo with the one from the app library or just blend together two pictures from your camera roll. The app will detect eyes, lips and other face parts to provide a better result. You may use it to change skin tone, add mustache, change eye color and make other possible improvements to a face.
It is very quick-to-launch and easy to use. You can export your image to Facebook and Twitter or simply save it to a camera roll.
This app is nice for all those who prefer to have fun with few efforts.
Piclay
Piclay is a stylish app for quick photo blending. Here you take a photo or choose the ones from your album and blend or combine them. Adjust and edit the color, brightness and sharpness of your images. Correct saturation, exposure and other color parameters. Add FX effect to give your image the professional look.
Piclay offers great options for picture editing. However, collage layouts are not numerous. Moreover, you’ll have to pay to unlock the best layouts and functions. Install this app in case you need simple yet professionally looking pictures.
Split Pic

Split Pic is a great app for performing collage-like blending. You create a standard collage and then you can add the lines and transparency to it. The outcome looks really artistic and atmospheric. Besides, you can add different filters and enhance the photo if you wish.
The app provides you with an easy Instagram share. It also offers to explore best accounts with merged pics in the profile.
Pic Stitch
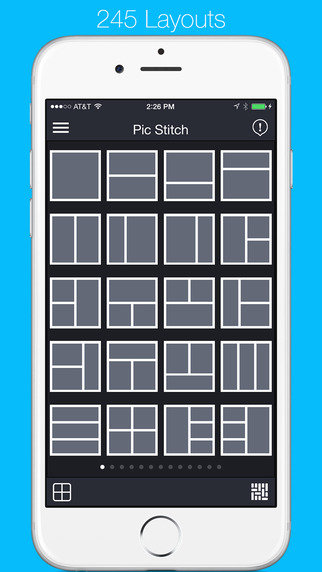
Pic Stitch claims to be #1 collage maker. However, it has only 245 layouts. Not that much comparing to LiveCollage. The procedure of making the collage is pretty much the same as with any of the previous app. Choose a layout, add pictures and make changes to them. You can zoom in, rotate or flip the image, add different filters and a frame.
Unfortunately, most of the layouts are not available for free. So, if you don’t want to pay, you’d better choose another app.
PicsArt Photo Studio
PicsArt Photo Studio is a fully functional photo editor. It does really have a lot of options for photo editing. You can literally do everything you need: cut, rotate, change colors, edit brightness, saturation, and other parameters. Moreover, you can use this app as a drawing tool. It offers a pretty nice variety of brushes. And of course there are layouts for collage making. Here you add pics, edit them in the way you need. Add text, filters or stickers and export your page to social networks or other apps.
PicsArt is great for all Photoshop fans. It looks like a pocket version of a famous picture editor.
What other apps do you use to make collages on iPhone? Share them with us in comments to this post.
Источник
Sync photos between your Mac and iPhone or iPad
You can sync photos on your Mac to your device. You can sync all or a selection of photos from your Photos library on your Mac. For example, you can sync a selection of favourite albums or photos of people.
You can also sync photos from your Pictures folder or another folder that you organise to hold photos. For example, you can import photos from a camera into a folder in the Finder. You can organise your photos in multiple folders within a folder and sync the folders to a device.
Synced photos appear in the Photos app on your device.
Important: If you already use iCloud Photos on your Mac and devices, your photos are updated automatically. You can’t use the syncing method described here unless you turn off iCloud Photos in Photos preferences. See Use iCloud Photos to store photos in iCloud and What is iCloud?
Sync photos to your device
Connect your device to your Mac.
You can connect your device using a USB or USB-C cable or using a Wi-Fi connection. See Sync content between your Mac and iPhone or iPad over Wi-Fi.
In the Finder  on your Mac, select the device in the Finder sidebar.

If you connect your device to your Mac using a USB cable and can’t see the device in the Finder sidebar, see If your device doesn’t appear in the sidebar.
Click Photos in the button bar.

Note: When iCloud Photos is turned on, no photo syncing options appear when you click Photos in the button bar.
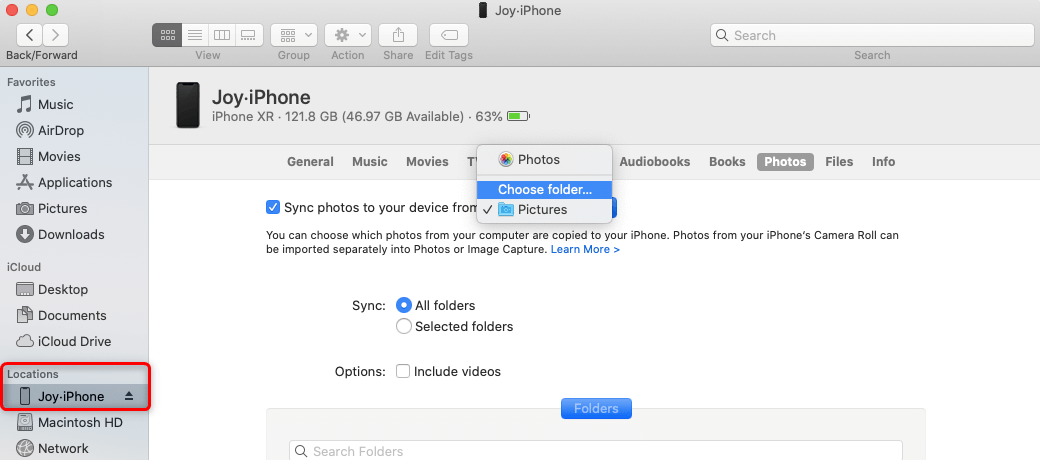
Select “Sync Photos to your device from” tickbox, then choose Photos, Pictures or a folder from the pop-up menu.
Do one of the following:
When syncing photos from the Photos app: Click “All photos and albums” or “Selected albums”. If you click the “Selected albums” button, select the tickboxes of the albums you want to sync in the Albums list.

Click Photos or People to see your photos organised by that category.
When syncing photos from a folder: Click “All folders” or “Selected folders”. If you clicked “Selected folders”, select the tickboxes of the folders you want to sync in the Folders list.
Select syncing options:
Select the “Include videos” tickbox to include videos when syncing from a folder or Photos library.
When syncing from the Photos app, select the “Only favourites” tickbox to sync only photos specified as favourites.
When syncing from the Photos app, select the “Automatically include photos from” tickbox and choose a time period from the pop-up menu to sync only photos taken within that period.
When you’re ready to sync, click Apply.
You can choose to sync your Mac and your device automatically whenever you connect them. See Turn automatic syncing on or off on Mac.
Before disconnecting your device from your Mac, click the Eject button  in the Finder sidebar.
Remove automatically synced photos from your device
To remove an unwanted folder of photos from your Mac and device, delete photos from the Photos app or delete the folder from your Mac and sync your device.
To remove an album or folder of photos from just your device while keeping it on your Mac, follow these steps:
Connect your device to your Mac.
You can connect your device using a USB or USB-C cable or using a Wi-Fi connection. See Sync content between your Mac and iPhone or iPad over Wi-Fi.
In the Finder on your Mac, select your device in the sidebar, then click Photos in the button bar.
In the folders list, deselect the tickbox of the albums or folders you want removed.
Sync your Mac with the device.
WARNING: If you delete an automatically synced item from your Mac, the deleted item is removed from your device the next time you sync.
Before disconnecting your device from your Mac, click the Eject button in the Finder sidebar.
Источник
How to Transfer Photos from iPhone to New iPhone (iPhone 12 Supported)
Got a new iPhone 12? Want to transfer your precious photos from the old iPhone to the new iPhone? Read on this guide to get 6 efficient ways to transfer pictures from iPhone to iPhone effortlessly. Applying to all iPhone models: iPhone 12/11/XS/XR/X/8/7/6/5/4.
iPhone to iPhone Transfer Tips
Transfer/Sync iPhone
Transfer Media Data
Transfer Personal Info
PhoneTrans – Full-Way iPhone Photos Transfer Tool
Free download PhoneTrans to transfer all photos (Camera Roll, Photo Library, Photo Stream, and Albums) from old iPhone toВ new iPhone simply.
According to our users’ report, they usually have the plan to transfer photos from iPhone to iPhone in the following cases:
- Get a new iPhone 12 series, and want to transfer photos to the new iPhone.
- Have some interesting photos, and want to share photos between your iPhone and your families’ or friends’ iPhone.
- Or just want to transfer photos from one iPhone to another for an extra backup.
No matter which situation you are in, you are totally on the right page. TransferringВ picturesВ from one iPhone to another is quite easy. In this post, weВ will show you how to transfer pictures from iPhone to iPhone iPad iPod touch in 6 different ways:В usingВ iTunes, iCloud, AirDrop, and professionalВ iPhone photos transfer tool.
Method 1:В Transfer Photos Videos with Photo Transfer Tools
Unlike transferring photos via iCloud, previewing and selectively transfer photos is possible if you use transfer software. Here are 2 of them recommended in this part. All of them are proved to be quite effective and can work out really well. Sure, with a tool, time will be saving and no skills are required.
#1. PhoneTrans –В Transfer Pictures from iPhone to iPhone inВ Minutes
PhoneTrans commits to providing a quick and easy way for data(photos) transfer between iPhones. No matter you want to transfer photos selectively or packed them in one to send, you can complete them with PhoneTrans with a few clicks. PhoneTrans supports 3 transfer options on iPhone switching.
- Quick TransferВ – It supports data (photos) transfer from iPhone to iPhone selectively and wholly within clicks.
- Phone Clone – It provides a perfect way to 1:1 copy the iPhone to the other iPhone.
- Phone Merge – Phone Merge can easily migrate iPhone data without any data loss, no overwritten, and no duplicates.
Each of them can help iPhone users to accomplish photos transfer quickly and safely. Let’s check out how PhoenTrans works on photo transfer from iPhone to iPhone.
Step 1. Download PhoneTrans and launch it on a computer. At the same time, you can connect both of your iPhones to the computer.
* 100% Clean & Safe
Step 2. Choose the Quick Transfer as it supports selectively transfer Photos between iPhones. Clone Phone can 1:1 copy your iPhone while the Merge Phone can remove duplicate photos. But both of them don’t provide a solution to transfer photos selectively.
![]()
Choose Phone to Phone – Quick Transfer
Step 3. Just follow the instructions on the screen, you need toВ select Photos and click on Transfer Now to start photos transfer from iPhone to iPhone.
![]()
Select Photos and Click on Transfer Now
Now all you can do is wait for a while, PhoneTrans will complete the photo transfer from iPhone to iPhone in minutes. Then there will pop up a window and tell you the Successfully Transferred.
#2.В AnyTrans – A Professional Data Management Tool
According to our test,В the iOS photos transfer tool –В AnyTrans can be the quickest and easiest way to do the task,В even transfer a large number of photos between iPhones.В No more annoying photo transfer from iPhone to iPhone limitations. Just open AnyTrans on your computer and follow its instructions, the photo transfer would complete in minutes.
AnyTrans – iPhone Photos Transfer
- Just a few minutes and 1 click to move all photos.
- The ONLY way to transfer photos in all albums.
- CopyВ everything to the new iPhone in 1 clickВ as you prefer.
- Work well with allВ iPhone models as well as iOS systems.
Now,В Free Download AnyTrans , then follow theВ steps below to learn how to transfer photos from iPhone to iPhone effortlessly.
Option 1. Selectively TransferВ with AnyTrans
Step 1. Connect your devices to transfer photos.
Install AnyTrans on yourВ Mac or PCВ > Run it > Connect both of your iPhones to the computer (PC or Mac) with USB cables > Click on the “Photos” category.
![]()
Click Photos in Device Manager
Step 2. Transfer photos to a new iPhone.
Pick up the album with the photos you want to transfer > Select the specific photos you want to transfer > Click on the “To iPhone” button to transfer photos to another iPhone.
![]()
Select the photos you want to transfer
Since iOS 11 and iPhone 7,В Apple started using HEIC photos to replace JPG for saving photos on iOS devices and Macs. While this new file format is remarkably more efficient in terms of storage space and high quality, it is not yet widely compatible.
But, don’t worry, AnyTrans fully supports this image format. And if you’d like to convert HEIC photos to JPG or other formats online,В iMobie HEIC Converter will help you. With it, you can view the HEIC file on Windows and Mac easily.
We have prepared a video tutorial here to show you how to transfer photos from iPhone to new iPhoneВ (iPhone 12 supported). After watching this video, you might have a better idea of how AnyTrans works.
Option 2. Transfer All Photos in 1-Click
Step 1. Connect your devices and choose Phone Switcher.
Free Download AnyTrans В and install it on your computer > Connect both of your iPhones to the computer with USB cables >В Choose “Phone Switcher” mode > Click on the “Phone to iPhone” option.
![]()
Choose Phone to iPhone on Phone Switcher
Step 2.В Confirm your target iPhone.
Confirm your source iPhone and target iPhone, and then click theВ “Next” button to continue.
![]()
Confirm the Source iPhone and the Target iPhone
Step 3. Transfer photos from iPhone to iPhone.
Uncheck the “Select All” button and check the “My Photos” and “My Photo Stream” category only > Click on theВ “Next” В button to start transferring photos to your new iPhone.
![]()
Check Photos Category to Transfer
Option 1 is perfect when you want to transfer part of photos from one iPhone to another, and Option 2 is suited for you when you need to transfer all photos from iPhone to iPhone.
If you just get a new iPhone, in addition to only transfer photos from an iPhone to another, you can actually transfer more data from old iPhone to new iPhone with AnyTrans.
Using iCloud Photos to Transfer Photos from iPhone to iPhone
iCloud Photos allows you to sync photos across all iOS devices. It replaced the traditional Camera Roll and Photo Stream options with an All Photos section. There is no 30 days or 1,000 photos restriction either. There areВ some tips to know before starting the tutorial about how to transfer photos from iPhone to iPhone via iCloud:
- The two iPhones need to be iOS 8.3 or later.
- You need to enable iCloud Photo Library on both iPhones.
- The two iPhones should log into the same Apple ID.
- You will need to be connected to a wireless network to upload the photos.
- You need to make sure there is enough iCloud storage space since iCloud Photo Library uses your iCloud storage allotment.
Let’s checkВ howВ toВ sync photos from iPhone to iPhone using iCloud:
-
- Head to Settings on your iPhone > [your name] > Tap on iCloud.
- Click on Photos which is Off now.
- Enable the iCloud Photos.
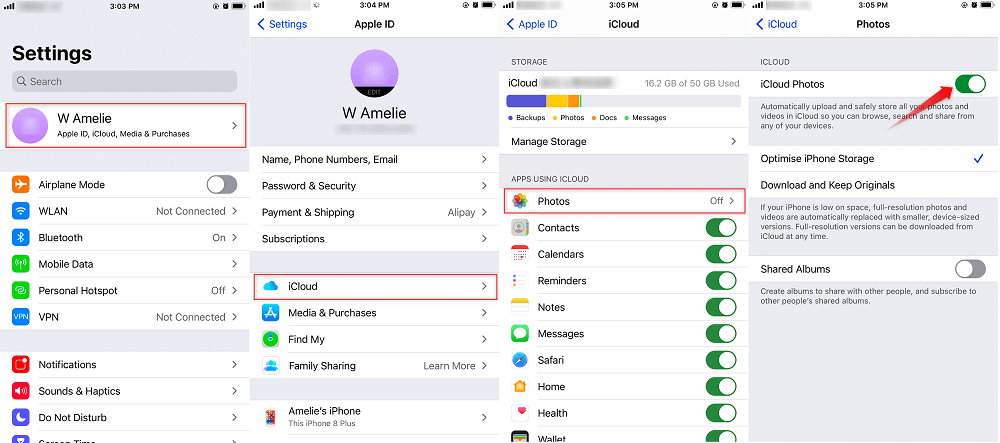
Transfer Photos from iPhone to iPhone Using iCloud
Once you completed all these steps, the iCloud Photos are enabled and the button already turned green.
How to Transfer Photos from the old iPhone to the new iPhone:
-
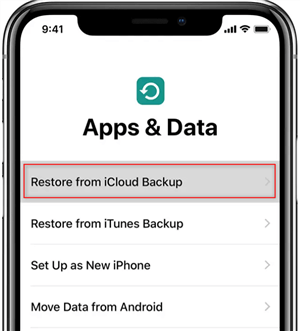
- Open the new iPhone > tap Restore from iCloud Backup on the Apps & Data page.
- В Log into the same iCloud ID(Apple ID) you have used to sync the photosВ > Choose a backup to restore.
Restore Photos from iCloud Backup
Method 3: Transfer Photos from iPhone to iPhoneВ UsingВ iTunes
iTunes can be one of the most common ways for iOS users to transfer files. But iTunes will erase the existing photos in Photo Library when you try to transfer pics to your new iPhone. Also, if you have turned on iCloud Photo Library on your iPhone when syncing photos from iDevice to iDevice with iTunes, you may get a pop up: “iCloud Photos is On. XXX can access photos in iCloud. Photos can be downloaded to your device via Wi-Fi or cellular network”.
In this case, you have to turn off the iCloud Photo Library on your iPhone, or you can’t finish the sync process via iTunes. But if you turn off the iCloud Photo Library on your device, all the photos stored in iCloud but not on your device will be erased.
Here’sВ how to transfer photos from iPhone to iPhone using iTunes:
- Connect your iPhone to the computer with a USB cable.
- For Mac users, launch the “Photos” app if it doesn’t open automatically.
- For Windows users, click Import Pictures and Videos when AutoPlay appears.
- Pick up the photos you want to transfer.
- Click “Import or Import Selected” toВ import photos from your iPhone to your PC or Mac computer.
- Connect your new iPhone, family, or friends’ iPhone to the computer with a USB cable.
- Launch “iTunes” on your computer.
- Click the “Device” button in the upper-right corner of iTunes.
- Click on the “Photos” option on the left panel.
- Select “Sync Photos” from Application or Folder.
- Click the “Apply” button to sync photos to your new iPhone.
Sync Photos from Mac to iPhone via Finder
AirDrop Photos from iPhone to iPhone
The AirDrop requires iOS 7 on iPhone 5 and later, if you have a few photos to transfer, it’s a good choice. But if you have hundreds or thousands of photos need to transfer, this method is not recommended. Now, let’s check how to transfer picturesВ from one iPhone to another using AirDrop:
Step 1. Enable AirDrop on two iPhones
- LaunchВ Control CenterВ by swiping up from the bottom bezel of your iPhone.
- Press and hold your finger on the upper-left box with the airplane buttons.
- TapВ AirDrop > ChooseВ Contacts OnlyВ orВ EveryoneВ to turn AirDrop on.
Step 2. Select photos you want to transfer from the Photos app
- Open the Photos app on your iPhone and find the pictures you want to send.
- Tap the Share icon in the lower-left corner.
- The AirDrop option will show and tap on it.
Step 3. Receive photos from the target iPhone
- AirDrop will pop up and ask if you want to receive photos just send from the iPhone.
- Receive the photos and they will be saved to the Photos app.
![]()
How to Transfer Photos from iPhone to iPhone with AirDrop
Send Photos from One iPhone to Another via Email
When there were no other transfer options available, people used to use the email feature to send and receive content including photos. In this method, what you do isВ that you email yourself all the photos you want to share and then you access your email account on the device where you want your photos. Since all it requires is sending an email, you should be done in no time.
Here’s how to send photos to a new iPhone using Email:
- Compose a new email in your favorite email client on your iPhone.
- When the compose screen opens, tap on the option to add a new attachment.
- Add all the photos that you want to transfer to your new iPhone.
- Send the email once all the photos have been attached.
- On your target iPhone, open the same email inbox and download the attachments.
- Your photos are now available for viewing on yourВ target iPhone.
- Your task is done.
![]()
How to Transfer Photos from iPhone to iPhone with Email
How to Transfer Photos from iPhone to iPhone via Copy iCloud Link
iOS 14 brings some more new features, you can share your files with the new function – Copy iCloud Link. It supports transferring photos from iPhone to iPhone with just a link. It’s quite easy which only requires your iPhone are updated to iOS 14. Keep on reading and knock out how to transfer photos with it.
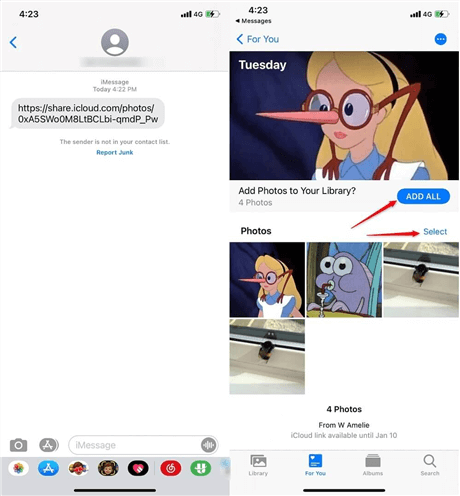
Open your iPhone and go to Photos > Choose the photos you want to transfer > Click on the Share button > Scroll down to the Copy iCloud Link > Give it seconds to prepare the Link.
![]()
Copy iCloud Link to Transfer Photos from iPhone to iPhone
Once it completed the link copy, you can go to the messages, email, WhatsApp, etc. to paste the link and send the link to the iPhone you want to share the photos with. Click on the ADD ALL or Choose the Select to save the pics to your Library.
Add Photos from iCloud Link
Our users sent us letters saying that they want some other info about how to transfer files to the new iPhone, and how to import photos to their Mac. So, here we would like to add a part to talk about these two topics.
For those users who want to import photos from iPhone to the Mac or PC, you have many options to do the task, like iCloud Photos, the Photos app on your computer, Email, etc. And the guideВ How to ImportВ Photos Videos from iPhone to Computer with 7 WaysВ collected all the possible ways to help you send your iPhone photos to your computer.
For the users who want to get the ideas to transfer data from iPhone to iPhone, you can refer to this guide to get more details:В How to Transfer Data from iPhone to New iPhone >
The Bottom Line
Apparently, compared with the iCloud and iTunes way, AnyTransВ and PhoneTrans both offer you a much easier way to transfer photos from iPhone to iPhone. Except for photo transfer, they also support transferring more than 20 files from iPhone to iPhone, includingВ contacts, messages, voice memos, notes, music, etc. Why not give them a try now?
Источник


