- If you can’t change the time or time zone on your iPhone, iPad or iPod touch
- Check your settings
- If you still need help
- How Apple’s iPhone has changed through the years
- The beginning — otherwise known as iPhone 2G
- iPhone 3G
- iPhone 4
- iPhone 5
- iPhone 6
- iPhone 7
- iPhone 8, 8 Plus and X
- Since then.
- If you forgot your iPhone passcode
- Step 1: Make sure that you have a computer (Mac or PC)
- Step 2: Turn off your iPhone
- Step 3: Put your iPhone in recovery mode
- Step 4: Restore your iPhone
- Need more help?
- Change the language on your iPhone, iPad, or iPod touch
- Open Settings
- Tap General
- Select Language & Region
- Tap Device language
- Select your language
- Confirm your selection
If you can’t change the time or time zone on your iPhone, iPad or iPod touch
You can use Date & Time settings to have your device adjust automatically for time zone changes and daylight saving time. If you see the wrong date, time, or time zone on your device, or if it doesn’t automatically adjust for daylight saving time, learn what to do.
Check your settings
See if you still need help after each step:
- Make sure that you have the latest version of iOS or iPadOS.
- Turn on Set Automatically 1 in Settings > General > Date & Time. This automatically sets your date and time based on your time zone. If there’s an available time zone update, your device lets you know.
- Allow your device to use its current location to determine the correct time zone. To do this, go to Settings > Privacy > Location Services > System Services and select Setting Time Zone.
- Check that your device shows the correct time zone in Settings > General > Date & Time > Time Zone.

If you still need help
If your device still shows an incorrect date, time, or time zone, 2 change each setting instead of using Set Automatically. For example, you might have iOS 9 or earlier, and your country or region, or government changes the time zone or the observance of daylight saving time. If so, follow these steps:
- Go to Settings > General > Date & Time.
- Turn off Set Automatically.
- Now you can change the time zone or the date and time: 3
- Tap Time Zone and enter a city with the time zone that you need. (Not sure which city to enter? Use the time zone map on timeanddate.com to find a city with a time zone that matches your needs.)
- Or tap the date to change the date and time.
1. The option to turn on Set Automatically might not be available with all carriers or in all countries and regions. If the device has a Screen Time passcode, then the option to turn on Set Automatically will be dimmed, or grayed out.
2. If the time on your device is wrong after you sync it with your computer, your computer’s time might be wrong. Check the time on your computer in System Preferences > Date & Time. You might want to select «Set date and time automatically.»
3. Manual adjustments to time settings to change app behavior (like game timers) aren’t recommended.
Источник
How Apple’s iPhone has changed through the years
He’s the key designer behind the iPhone, iMac and iPod: products which have helped make Apple the world’s most valuable company.
Despite some recent falls in sales, the iPhone is still a giant in the mobile market.
Now as the man largely responsible for the iconic phone leaves, we cast our minds back to the evolution of the handset.
Can you remember how we got to a point where an iPhone can cost more than a thousand pounds in just over eleven years of existence?
We’ve taken a look at the key changes — from its size and features to its fluctuating price.
The beginning — otherwise known as iPhone 2G
Let’s not get our Gs mixed up here — the 1st generation iPhone was released in the United States, June 2007.
Apple gave a $499 (ВЈ381) price tag for the 4GB model and $599 (ВЈ457) for the 8GB model.
Despite being the first generation it became known as the iPhone 2G because Apple decided only to make it work with the 2G data network, not the faster 3G.
It is now considered a collector’s item by some — and has been sold on eBay for significantly more than its original retail price.
iPhone 3G
The iPhone 3G was released in July 2008 across 22 different countries and sold over 1 million units in its first weekend.
The second generation phone came in two colours — black and white — and was priced significantly cheaper at ВЈ99 with a two-year contract.
The phone came with iOS 2.0 software and received a wave of other updates enabling features such as multimedia messaging (MMS) and copy and paste.
A year later the iPhone 3GS was released — the S stood for speed — the new slogan being: «The fastest, smartest phone yet.»
The iPhone 3G was discontinued in June 2010.
iPhone 4
Back in June 2010, the fourth generation iPhone was revealed at Apple’s Worldwide Developers Conference in San Francisco,
CEO Steve Jobs dubbed the iPhone 4 as the thinnest smartphone in the world at the time.
«This changes everything. Again,» was the slogan this time.
The phones newly introduced front-facing camera gave Apple an edge on other smartphone competitors — as it meant there was now FaceTime video chat.
The 16GB model would have cost you ВЈ499, and the 32GB version ВЈ599.
A fifth generation device, the iPhone 4S was released just over a year later — which introduced voice-assistant Siri for the very first time in October 2011.
iPhone 5
The iPhone 5 was released in September 2012 and was the last Apple device which had been overseen by Steve Jobs — he had died the year before in 2011.
When Apple had begun taking pre-orders they’d received over two million orders in 24 hours.
Its new features included being 4G enabled, being thinner, lighter and having a taller screen than its predecessors.
The iPhone 5 was priced at ВЈ529 (16GB), ВЈ599 (32G) and ВЈ699 (64GB).
The announcement of the iPhone 5C and 5S in 2013 signified Apple’s discontinuation of the original iPhone 5.
iPhone 6
The release of the iPhone 6 and 6 Plus in September 2014 saw Apple introduce a plus-size option.
The 6 and 6 Plus sported 4.7 and 5.5 inch displays respectively.
An upgraded camera, increased battery life and the introduction of Apple Pay were just some of the many features of the new device.
The iPhone 6 was priced at ВЈ539, sim-free.
The iPhone 6 and 6 Plus were Apple’s flagship phones for just under a year until they were replaced with the iPhone 6S and 6S Plus.
iPhone 7
The iPhone 7 was released in September 2016 — its starting price in the UK was ВЈ549.
For ВЈ669 you’d get the iPhone 7 Plus.
Both models came in either 32GB or 128GB sizes and were available in a range of colours — grey, black and red.
This generation of iPhone saw the headphone jack removed, the addition of water-resistant technology and a new and improved 12 mega-pixel camera.
iPhone 8, 8 Plus and X
The iPhone 8, 8 Plus and X were announced in September 2017 at the Steve Jobs Theater at Apple’s headquarters in California, US.
The iPhone 8 and 8 Plus were released later that September and were available in silver, space grey and a new gold colour.
Instead of the aluminium casing featured in the iPhone 7, Apple moved swiftly to an all-glass design for the iPhone 8 and 8 Plus.
Prices started at ВЈ699 for the 64GB iPhone 8 and ВЈ799 for the 64Gb version of the iPhone 8 Plus.
As for the iPhone X — it was released in November 2017, marking the tenth anniversary of the iPhone.
It featured the removal of the home button, an OLED display on a 5.8 inch screen and wireless charging.
Its new and improved features meant the anniversary phone was priced just under the thousand pound mark — at ВЈ999.
Since then.
Apple have released three more phones.
iPhone XR, iPhone XS and XS Max.
It would cost you ВЈ749 to buy the cheapest of the three and a whopping ВЈ1,449 to buy the most expensive.
But those prices could all change after Apple boss Tim Cook’s hint the firm could reduce its iPhone prices in the future — when, where, by how much? We don’t know yet.
And would a change in price bring a change in look now Sir Jony has moved on? Apple’s next iPhone announcements could be the most interesting yet.
Источник
If you forgot your iPhone passcode
Forgot your iPhone passcode? Learn how to get your iPhone into recovery mode so you can erase it and set it up again.
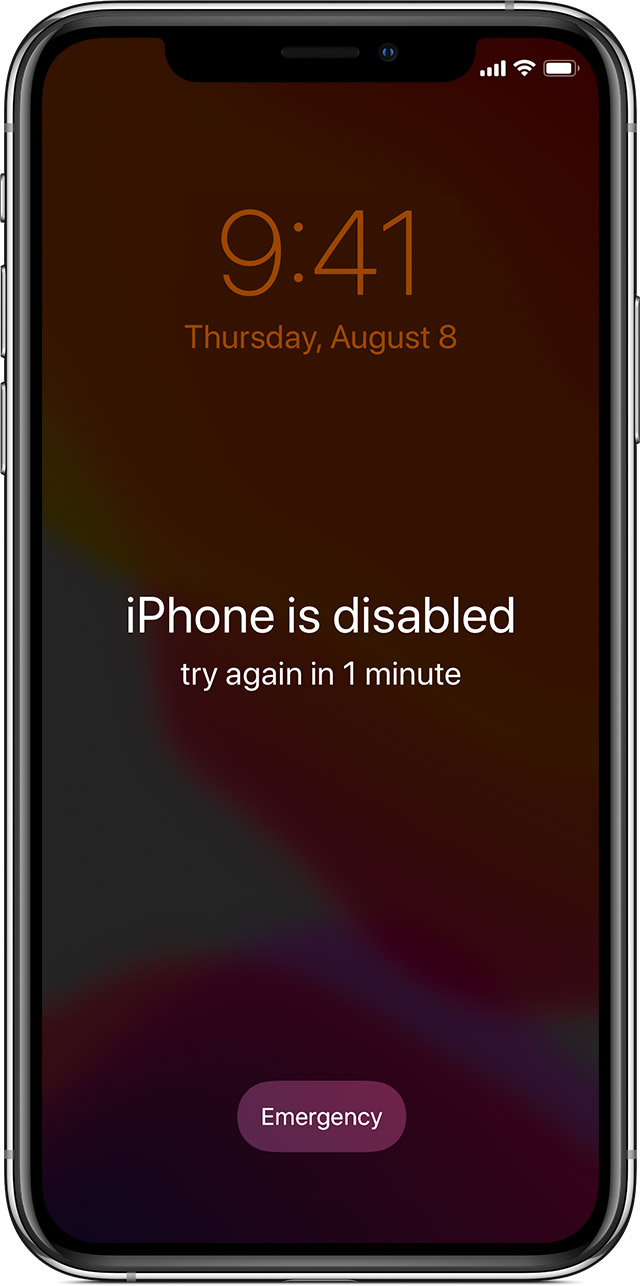
If you enter the wrong passcode on your iPhone Lock Screen too many times, an alert lets you know that your iPhone is disabled. If you can’t remember your passcode when you try again, you need to use a computer to put your iPhone in recovery mode. This process deletes your data and settings, including your passcode, giving you access to set up your iPhone again.
After you erase your iPhone, you can restore your data and settings from backup. If you didn’t back up your iPhone, you can set it up as a new device and then download any data that you have in iCloud.
![]()
Step 1: Make sure that you have a computer (Mac or PC)
This process requires a Mac or PC. If you’re using a PC, make sure that it has Windows 8 or later, and that iTunes is installed. You also need the cable that came with your iPhone, or another compatible cable, to connect your iPhone to the computer.
If you don’t have a computer and you can’t borrow one, you need to go to an Apple Retail Store or Apple Authorized Service Provider for help.
Step 2: Turn off your iPhone
- Unplug your iPhone from the computer if it’s connected.
- Turn off your iPhone using the method for your iPhone model:
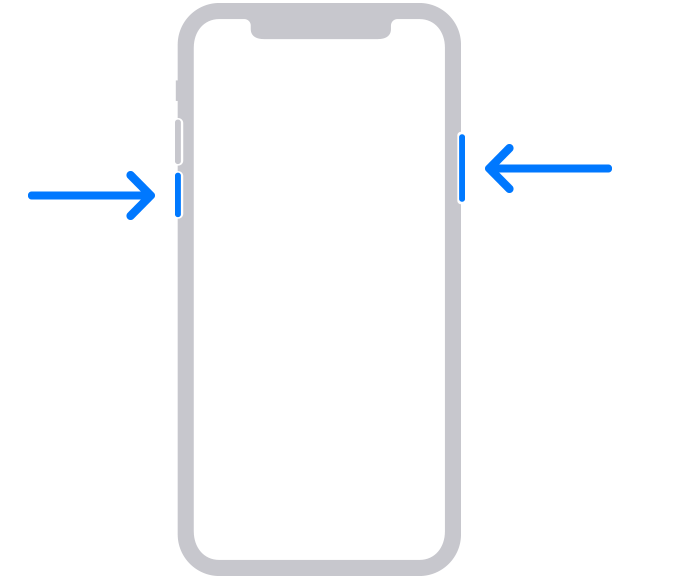
- iPhone X or later, iPhone SE (2nd generation), iPhone 8, and iPhone 8 Plus: Press and hold both the Side button and the Volume down button until the power off slider appears.

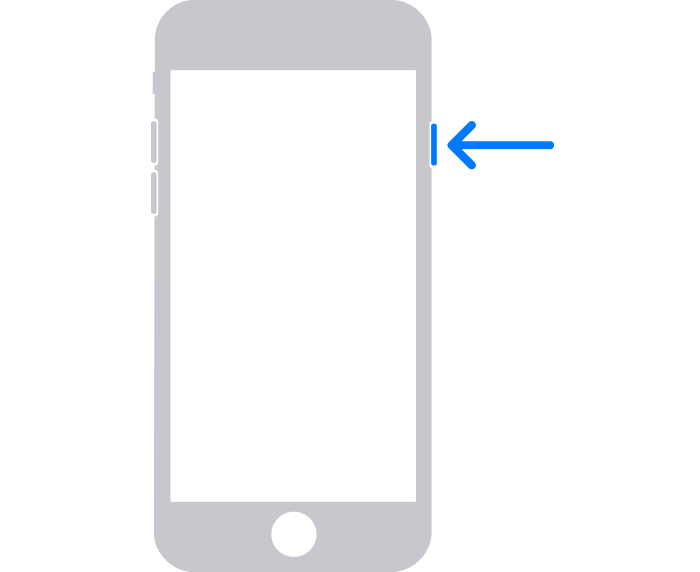
- iPhone 7 and iPhone 7 Plus: Press and hold the Side button until the power off slider appears.
- iPhone SE (1st generation), and iPhone 6s and earlier: Press and hold the Side (or Top) button until the power off slider appears.
- iPhone X or later, iPhone SE (2nd generation), iPhone 8, and iPhone 8 Plus: Press and hold both the Side button and the Volume down button until the power off slider appears.
- Drag the slider to turn off your iPhone, then wait a minute to make sure that it turns off completely.

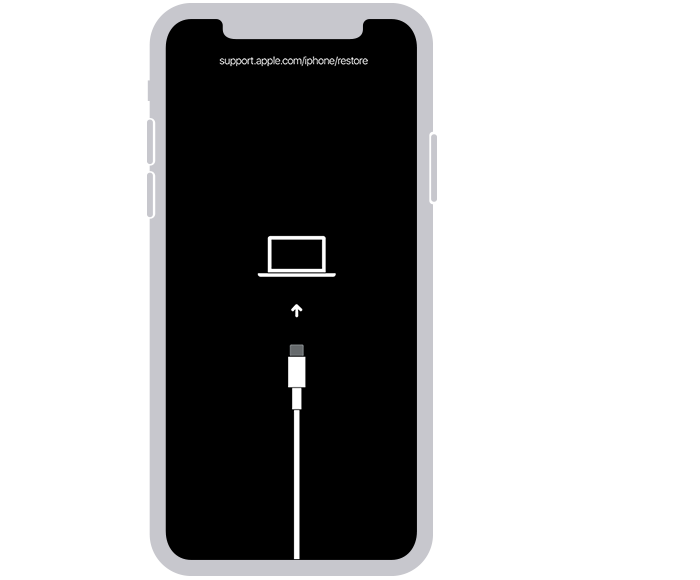
Step 3: Put your iPhone in recovery mode
- Get ready by finding the button on your iPhone that you’ll need to hold in the next step:
- iPhone X or later, iPhone SE (2nd generation), iPhone 8, and iPhone 8 Plus use the Side button.
- iPhone 7 and iPhone 7 Plus use the Volume down button.
- iPhone SE (1st generation), and iPhone 6s and earlier use the Home button.
- Press and hold the correct button for your iPhone while immediately connecting your iPhone to the computer. Don’t let go of the button.
- Keep holding the button until you see the recovery mode screen on your iPhone, then let go.
If you see the passcode screen, you need to turn off your iPhone and start again.
If you can’t get your iPhone to show the recovery mode screen and you need help, contact Apple Support.
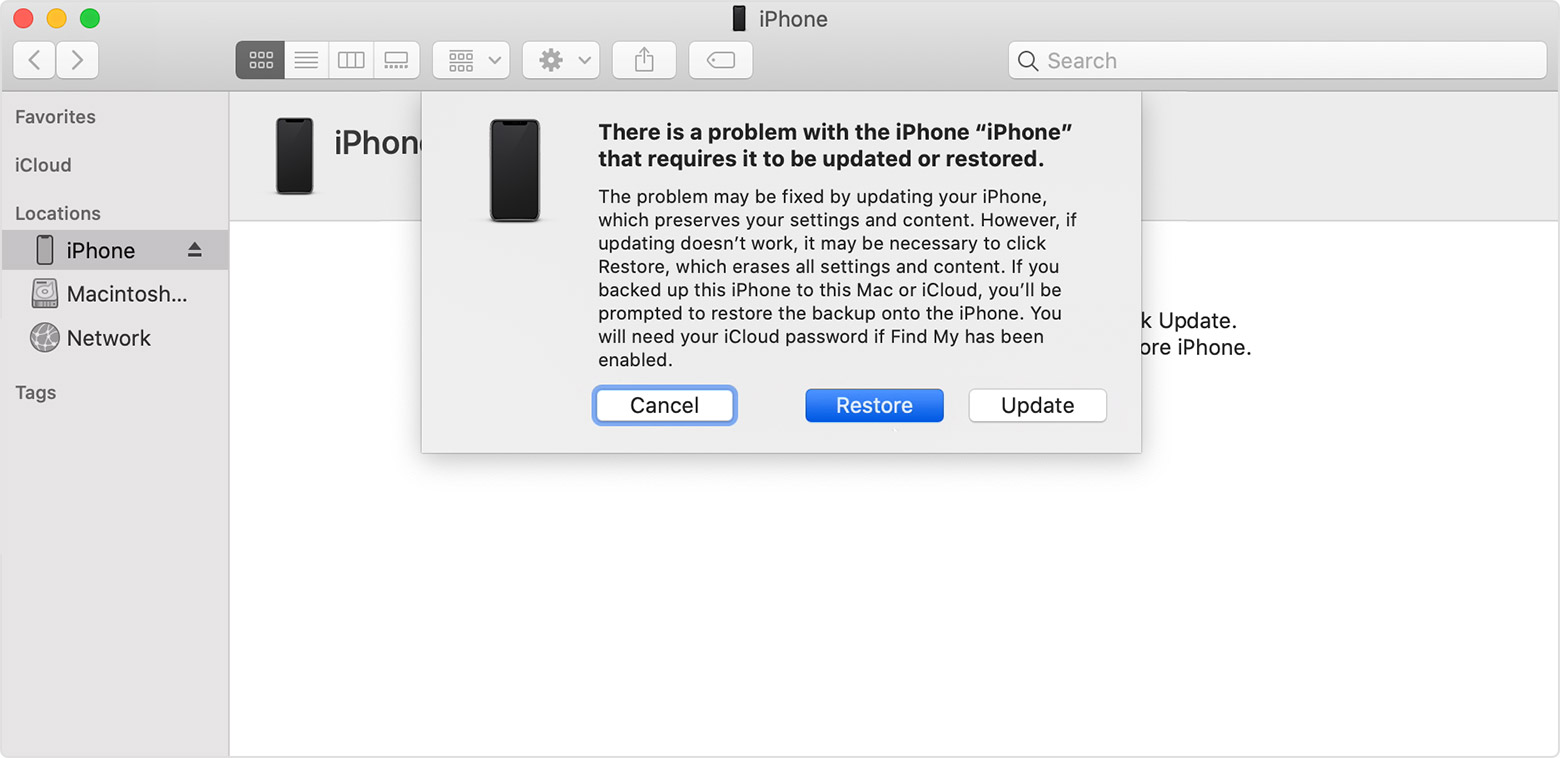
Step 4: Restore your iPhone
- Locate your iPhone in the Finder or in iTunes on the computer that it’s connected to. (Learn how to find your connected iPhone.)
- Choose Restore when you see the option to Restore or Update. Your computer downloads software for your iPhone and begins the restore process. If the download takes more than 15 minutes and your device exits the recovery mode screen, let the download finish, then turn off your iPhone and start again.
- Wait for the process to finish.
- Disconnect your iPhone from the computer, then set up and use your iPhone.
Need more help?
If you can’t complete any of these steps, if you’re still prompted for a passcode, or if you need any other assistance, contact Apple Support.
Источник
Change the language on your iPhone, iPad, or iPod touch
You can change the language setting on your iPhone, iPad, or iPod touch if it’s incorrect or if you’ve accidentally changed the language to one you don’t understand.
Open Settings
On the Home screen, tap Settings.
Tap General
On the next screen, tap General.
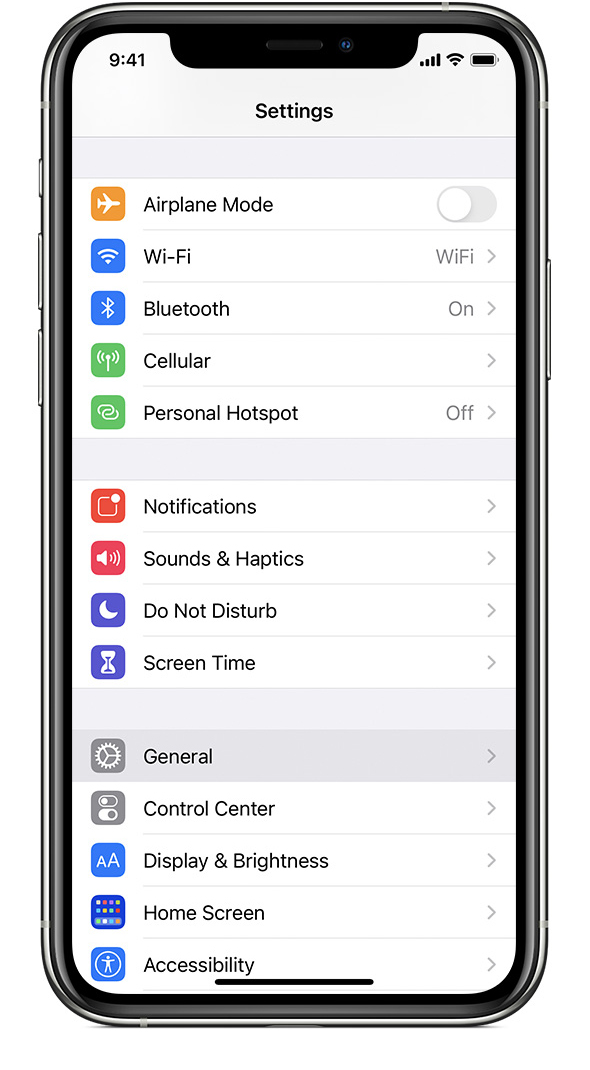
Select Language & Region
Scroll down and tap Language & Region.
Tap Device language
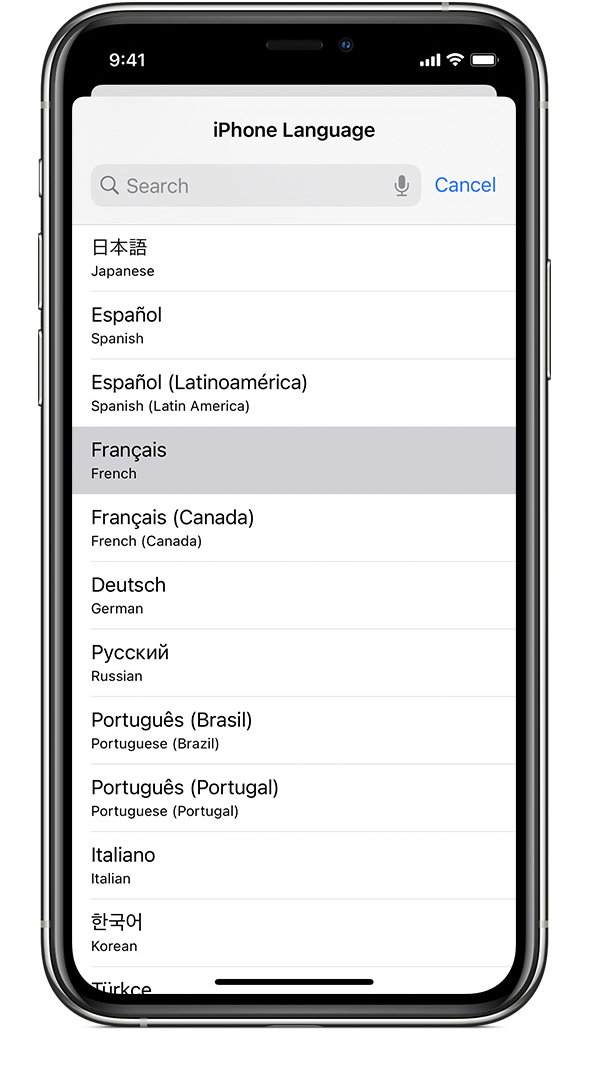
On the next screen, tap «[Device] Language».

Select your language
Pick your language from the list.
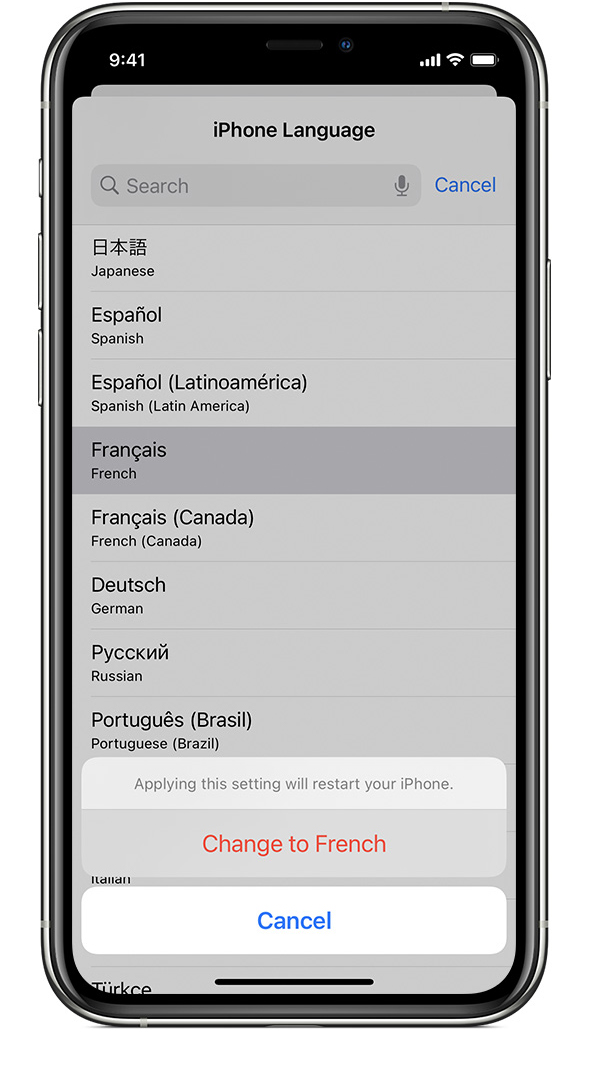
Confirm your selection
An alert will ask you to confirm the new language. Tap the first option.
After your device updates the language, your device should automatically display the language you selected.
Источник


