- What to do before you sell, give away, or trade in your iPhone, iPad, or iPod touch
- If you still have your iPhone, iPad, or iPod touch
- Transfer information to your new device
- Remove your personal information from your old device
- If you no longer have your iPhone, iPad, or iPod touch
- If you’re trading in an Android device to Apple
- Learn more
- How to Clear RAM on iOS 14/13 iPhone to Boost Performance
- Way 1: Manually Clear iPhone RAM on iOS 14/13
- Way 2: Force Reboot iPhone to Free up RAM Memory
- Way 3: 1 Click to Reset RAM on iOS 14/13 iPhone
- Why Does My iPhone Battery Die So Fast? Here’s The Real Fix!
- The vast majority of iPhone battery issues are software related.
- Your iPhone tracks and records your location everywhere you go. That uses a lot of battery life.
- The Real Reasons Your iPhone, iPad, or iPod Battery Dies So Fast
- 1. Push Mail
- How To Fix Push Mail
- 2. Turn Off Unnecessary Location Services
- How To Fix Location Services
- 4. Close Out Your Apps
- Don’t Apps Close When I Go Back To The Home Screen?
- How To Close Out Your Apps
- How Do I Know If Apps Have Been Crashing On My iPhone? Everything Seems Fine!
- The App Closing Controversy
- 5. Notifications: Only Use The Ones You Need
- How To Fix Notifications
- 6. Turn Off The Widgets You Don’t Use
- 7. Turn Off Your Phone Once A Week (The Right Way)
- How To Turn Off Your iPhone (The Right Way)
- 8. Background App Refresh
- How To Fix Background App Refresh
- 9. Keep Your iPhone Cool
- Can Cold Weather Damage My iPhone Battery?
- 10. Make Sure Auto-Lock Is Turned On
- 11. Disable Unnecessary Visual Effects
- 12. Turn On Optimized Battery Charging
- 13. Turn Off 5G
- 14. Turn On Dark Mode
- 15. Turn On Limit Frame Rate
- 16. DFU Restore & Restore From iCloud, Not iTunes
- Aren’t iCloud Backups and iTunes Backups Essentially The Same?
- 17. Erase Your iPhone And Set It Up As New
- 18. You May Have A Hardware Problem (But It Might Not Be The Battery)
- The Apple Store Battery Test
- In Conclusion
What to do before you sell, give away, or trade in your iPhone, iPad, or iPod touch
Use these steps to transfer information to your new device, then remove your personal information from your old device.
Before you sell, give away, or trade in your device, you should first transfer information to your new device, then remove your personal information from your old device.
You shouldn’t manually delete your contacts, calendars, reminders, documents, photos, or any other iCloud information while you’re signed in to iCloud with your Apple ID. This would delete your content from the iCloud servers and any of your devices signed in to iCloud.
If you still have your iPhone, iPad, or iPod touch
Follow these steps to transfer information to your new device, then remove your personal information from your old device.
Transfer information to your new device
If you have a new iPhone, iPad, or iPod touch, you can use Quick Start to automatically transfer information from your old device to your new device if you’re using iOS 11 or later. Use iCloud, iTunes, or the Finder to transfer information to your new device if you’re using iOS 10 or earlier.
If your phone number will change with your new device, add additional trusted phone numbers to your account to ensure you don’t lose access. If you no longer have access to your old phone number, you can generate a two-factor authentication code on your old device if needed.
Remove your personal information from your old device
- If you paired an Apple Watch with your iPhone, unpair your Apple Watch.
- Back up your device.
- Sign out of iCloud and the iTunes & App Store.
- If you’re using iOS 10.3 or later, tap Settings > [your name]. Scroll down and tap Sign Out. Enter your Apple ID password and tap Turn Off.
- If you’re using iOS 10.2 or earlier, tap Settings > iCloud > Sign Out. Tap Sign Out again, then tap Delete from My [device] and enter your Apple ID password. Then go to Settings > iTunes & App Store > Apple ID > Sign Out.
- If you’re switching to a non-Apple phone, deregister iMessage.
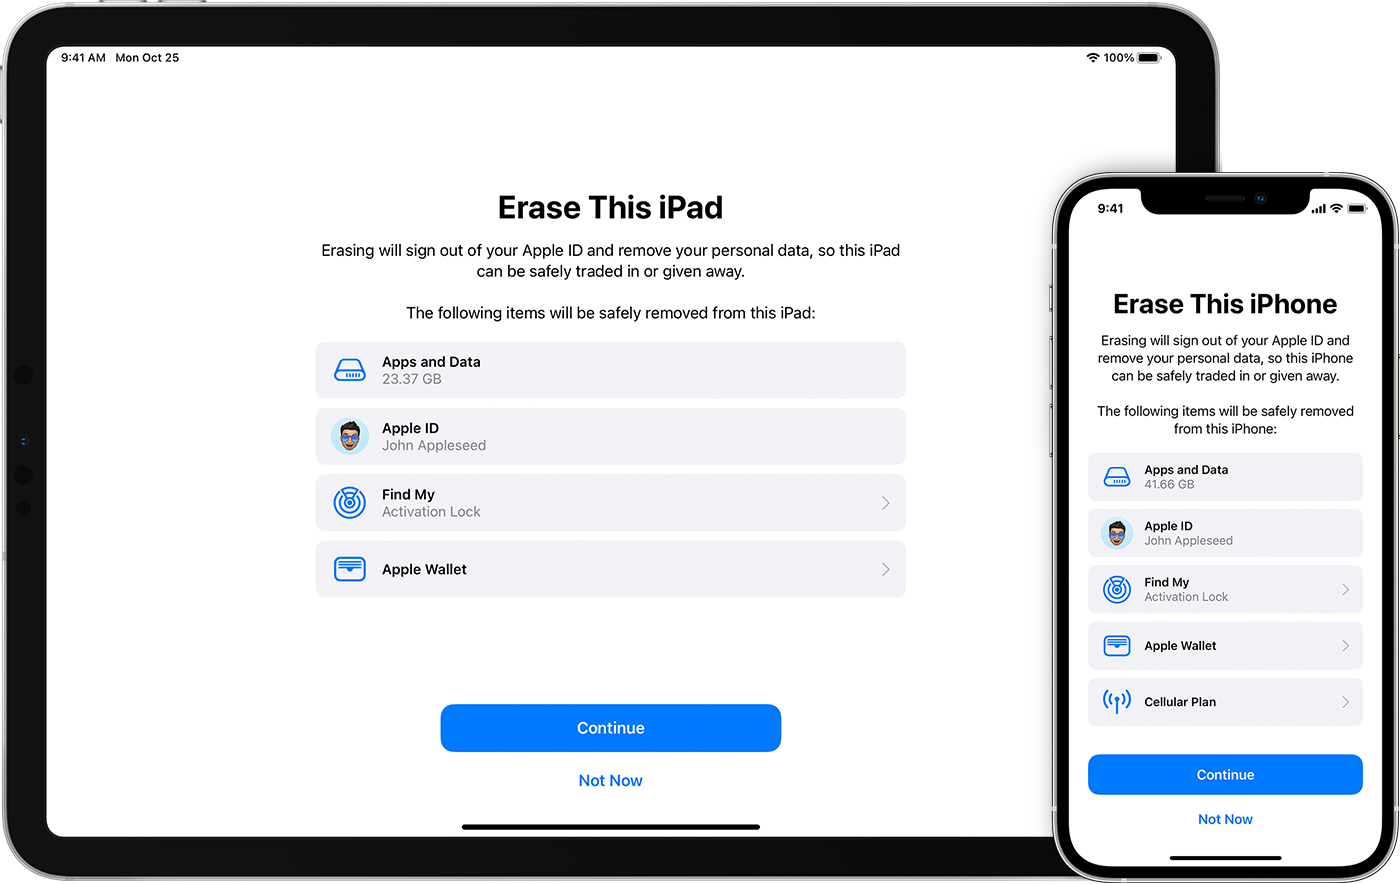
- Go back to Settings and tap General > Transfer or Reset [device] > Erase All Content and Settings. If you turned on Find My [device], you might need to enter your Apple ID and password. If your device uses eSIM, choose the option to erase your device and the eSIM profile when asked.
- If asked for your device passcode or Restrictions passcode, enter it. Then tap Erase [device].
- Contact your carrier for help transferring service to a new owner. If you aren’t using a SIM card with your device, you can contact them to get help transferring service to the new owner.
- Remove your old device from your list of trusted devices.
When you erase your iPhone, iPad, or iPod touch, Find My [device] and Activation Lock are turned off.

If you no longer have your iPhone, iPad, or iPod touch
If the steps above weren’t completed and you no longer have your device, use these steps:
- Ask the new owner to erase all content and settings using the above steps.
- If you’re using iCloud and Find My [device] on the device, sign in to iCloud.com/find or the Find My app on another device, select the device, and click Erase. After the device has been erased, click Remove from Account.
- If you can’t follow either of the above steps, change your Apple ID password. This won’t remove personal information that’s stored on your old device, but it prevents the new owner from deleting your information from iCloud.
- If you’re switching to a non-Apple phone, deregister iMessage.
- If you’re using Apple Pay, you can remove your credit or debit cards at iCloud.com. Choose Account Settings to see which devices are using Apple Pay, then click the device. Next to Apple Pay, click Remove.
- Remove your old device from your list of trusted devices.
If you’re trading in an Android device to Apple
Before you send in an Android device to Apple as a trade-in, be sure to do the following:
- Back up your data.
- Erase the device.
- Remove any SIM cards, memory cards, cases, and screen protectors.
Contact your device’s manufacturer if you need help.
Learn more
- Make a backup of your iPhone, iPad, or iPod touch or restore from a backup.
- Remove all of your cards from Apple Pay.
- Get help if your iPhone, iPad, or iPod touch is lost or stolen.
- Learn about Activation Lock.
- No matter the model or condition, we can turn your device into something good for you and good for the planet. Learn how to trade in or recycle your iPhone, iPad, or iPod touch with Apple Trade In.
When you tap Erase All Content and Settings, it completely erases your device, including any credit or debit cards you added for Apple Pay and any photos, contacts, music, or apps. It will also turn off iCloud, iMessage, FaceTime, Game Center, and other services. Your content won’t be deleted from iCloud when you erase your device.
Источник
How to Clear RAM on iOS 14/13 iPhone to Boost Performance
iPhone sometimes gets unbearably sluggish when the system is running too many apps at the same time. You can use app switcher to swipe apps out of multitasking temporarily to free up RAM on iOS 14/13 device. However, this is actually not the best solution to boost performance. Instead, you can try below 3 tips and tricks about how to clear RAM on iPhone X/8/7/6s/6/5s and more.
Way 1: Manually Clear iPhone RAM on iOS 14/13
So this is a simple trick many people don’t know. When you feel the iPhone become sluggish and lagging, just do the following.
On iPhone 8/8 Plus/7/6/6s with Home button:
- 1. Press and hold the Sleep/Wake button. Release when the Slide to power off appears.
- 2. Hold down the Home button for a few seconds till you return back to home screen. And when you open apps, you will find the app reloading itself.
However, we all know there is no Home button with iPhone X. Then how to clear RAM on iPhone X? Here is what you need to do.
On iPhone X without Home button:
- 1. Go to Settings > General > Accessibility > Turn on AssistiveTouch.
- 2. Return to Settings, scroll down to shut down your device.
- 3. Tap AssistiveTouch icon and long press virtual Home button.
Video guide on how to free up iPhone X RAM memory.
Way 2: Force Reboot iPhone to Free up RAM Memory
By force restarting your iOS 14/13 device, you can remove cached data and clear memory for iPhone. Depending on which iPhone you are using, the process also varies.
On iPhone X/8 (Plus): Quickly press the Volume up then the Volume down button. Long press the side button till Apple logo appears.
On iPhone 7 (Plus) earlier: Hold down both Volume down/Home button and power button together. Release when you see Apple logo screen.

Way 3: 1 Click to Reset RAM on iOS 14/13 iPhone
It’s inevitable that your iPhone is slower than before due to the accumulation of files, apps and other data. Restarting your device is far from enough to free up RAM on iPhone X/8/7/6/6s/5s. Therefore I strongly recommend you use Tenorshare iCareFone Cleaner to batch clean up app cache and regain memory space.


- 1. Connect your iOS 14/13 device with Tenorshare iCareFone Cleaner and start scanning junk files.
2. 5 types of files will be listed with specific memory size to be released. Click Clean button for each item to clean RAM on iPhone.
You should have a better understanding about how to clear iPhone RAM with iOS 14/13 after reading this post. If your iPhone is running slow, don’t hesitate to try these ways to give it a boost.
Updated on 2020-09-07 / Update for Cleanup iPhone
Источник
Why Does My iPhone Battery Die So Fast? Here’s The Real Fix!
I’m going to tell you exactly why your iPhone battery drains so quickly and exactly how to fix it. I’ll explain how you can get longer battery life out of your iPhone without sacrificing functionality. Take my word for it:
The vast majority of iPhone battery issues are software related.
We’ll cover a number of proven iPhone battery fixes that I learned from first-hand experience with hundreds of iPhones while I worked for Apple. Here’s one example:
Your iPhone tracks and records your location everywhere you go. That uses a lot of battery life.
A few years ago (and after a lot of people complained), Apple included a new section of Settings called Battery. It displays some useful information, but it won’t help you fix anything. I rewrote this article to improve iOS 15 battery life, and if you take these suggestions, I promise your battery life will improve, no matter which model iPhone you have.
I recently created a YouTube video to go along with the iPhone battery fixes I explain in this article. Whether you prefer to read or watch, you’ll find the same great information in the YouTube videos that you’ll read in this article.
Our first tip is a truly a sleeping giant and there’s a reason it’s #1: Fixing Push Mail can make a tremendous difference in the battery life of your iPhone.
The Real Reasons Your iPhone, iPad, or iPod Battery Dies So Fast
1. Push Mail
When your mail is set to push, it means that your iPhone maintains a constant connection to your email server so that the server can instantly push the mail to your iPhone as soon as it arrives. Sounds good, right? Wrong.
An Apple lead genius explained it to me like this: When your iPhone is set to push, it’s constantly asking the server, “Is there mail? Is there mail? Is there mail?”, and this flow of data causes your battery to drain very quickly. Exchange servers are the absolute worst offenders, but everyone can benefit from changing this setting.
How To Fix Push Mail
To fix this problem, we’re going to change your iPhone from push to fetch. You’ll save a lot of battery life by telling your iPhone to check for new mail every 15 minutes instead of all the time. Your iPhone will always check for new mail whenever you open the Mail app.
- Go to Settings -> Mail -> Accounts.
- Tap Fetch New Data.
- Turn off Push at the top of the screen.
- Scroll to the bottom and choose Every 15 Minutes under Fetch.
- Tap on each individual email account and, if possible, change it to Fetch.
Most people agree that waiting a few minutes for an email to arrive is worth the significant improvement in your iPhone’s battery life.
As an aside, if you’ve been having problems syncing contacts or calendars between your iPhone, Mac, and other devices, check out my other article called Why Are Some Of My Contacts Missing From My iPhone, iPad, or iPod? Here’s The Real Fix!
2. Turn Off Unnecessary Location Services
Location Services are part of what makes the iPhone such a great device, so I’d like to be clear: I don’t recommend that you turn off Location Services entirely.
I’ll show you the hidden services that constantly drain your battery, and I’m willing to bet you’ve never even heard of most of them. I believe it’s important for you to choose which programs and services can access your location, especially given the significant battery drain and personal privacy issues that come with your iPhone, right out of the box.
How To Fix Location Services
- Go to Settings -> Privacy -> Location Services.
- Tap Share My Location. If you want to be able to share your location with your family and friends in the Messages app, then leave this on, but be careful: If someone wanted to track you, this is how they’d do it.
- Scroll all the way to the bottom and tap System Services. Let’s clear up a common misconception right away: Most of these settings are all about sending data to Apple for marketing and research. When we turn them off, your iPhone will continue to function just as it always has.
- Turn off everything on the page except Emergency SOS, Find My iPhone (so you can locate it if it’s lost) and Motion Calibration & Distance (if you’d like to use your iPhone as a pedometer – otherwise, turn that off too). Your iPhone will work exactly as it had before. The compass will still work and you’ll connect to cell towers just fine — it’s just that Apple won’t be receiving data about your behavior.
- Tap Significant Locations. Did you know your iPhone has been tracking you everywhere you go? You can imagine the excess strain this puts on your battery. I recommend you turn off Significant Locations. Tap Privacy, scroll to the bottom, and open Analytics & Improvements. Turn off the switch next to Share iPhone Analytics and Share iCloud Analytics to stop your iPhone from automatically sending data to Apple about how you use your iPhone.
4. Close Out Your Apps
Once every day or two, it’s a good idea to close out your apps. In a perfect world, you would never have to do this and most Apple employees will never say you should. But the world of iPhones is not perfect — if it were, you wouldn’t be reading this article.
Don’t Apps Close When I Go Back To The Home Screen?
No, they don’t. They’re supposed to go into a suspended mode and stay loaded in memory so that when you reopen them, you pick up right where you left off. We don’t live in iPhone Utopia: It’s a fact that apps have bugs.
A lot of battery drain issues occur when an app is supposed to close, but doesn’t. Instead, the app crashes in the background and your iPhone battery beings to drain without you even knowing it.
A crashing app can also cause your iPhone to get hot. If that’s happening to you, check out my article called Why Does My iPhone Get Hot? to find out why and fix it for good.
How To Close Out Your Apps
Double-click the Home Button (iPhones without Face ID) or swipe up from the bottom to the center of the screen (iPhones with Face ID) to open the iPhone app switcher. The app switcher allows you to see all the apps that are stored in the memory of your iPhone. To browse through the list, swipe left or right with your finger. I bet you’ll be surprised by how many apps are open!
To close an app, use your finger to swipe up on the app and push it off the top of the screen. Now you’ve really closed the app and it can’t drain your battery in the background. Closing out your apps never deletes data or causes any negative side-effects — it can only help you get better battery life.
How Do I Know If Apps Have Been Crashing On My iPhone? Everything Seems Fine!
If you’d like proof, go to Settings -> Privacy -> Analytics & Improvements -> Analytics Data. It’s not necessarily a bad thing if an app is listed here, but if you see a lot of entries for the same app or any apps listed under LatestCrash, you might have a problem with that app.
The App Closing Controversy
Recently, I’ve seen articles that say closing out your apps is actually harmful to iPhone battery life. My article called Is Closing iPhone Apps A Bad Idea? No, And Here’s Why. explains both sides of the story, and why closing out your apps really is a good idea when you look at the big picture.
5. Notifications: Only Use The Ones You Need
We’ve all seen the question before when we open an app for the first time: “App Would Like To Send You Push Notifications”, and we choose OK or Don’t Allow. Few people realize how important it is to be careful about which apps you say OK to.
When you allow an app to send you Push Notifications, you’re giving that app permission to keep running in the background so that if something happens that you care about (like receiving a text message or your favorite team winning a game), that app can send you an alert to let you know.
Notifications are good, but they do drain battery life. We need to be notified when we receive text messages, but it’s important for us to choose which other apps are allowed to send us notifications.
How To Fix Notifications
Go to Settings -> Notifications and you’ll see a list of all your apps. Underneath the name of each app, you’ll see either Off or the kind of notifications that app is allowed to send you: Badges, Sounds, or Banners. Ignore the apps that say Off and take a look through the list. As you go, ask yourself this question: “Do I need to receive alerts from this app when it’s not open?”
If the answer is yes, leave everything as it is. It’s absolutely fine to allow some apps to notify you. If the answer is no, it’s a good idea to turn off notifications for that app.
To turn off notifications, tap the name of the app and turn off the switch next to Allow Notifications. There are other options in here too, but they don’t affect your iPhone’s battery life. It only matters if notifications are off or on.
6. Turn Off The Widgets You Don’t Use
Widgets are little “mini-apps” that continually run in the background of your iPhone to give you easy access to up-to-date information from your favorite apps. Over time, you’ll save a significant amount of battery life by turning off the widgets you don’t use. If you never use them, it’s OK to turn them all off.
If your iPhone is running iOS 14 or newer, press and hold on a widget you want to remove, then tap Remove Widget -> Remove.
If your iPhone is running iOS 13 or older, go to the Home screen swipe from left to right until you get to widgets. Then, scroll down and tap the circular Edit button to see a list of the widgets you can add or remove on your iPhone. To remove a widget, tap the red minus button to its left.
7. Turn Off Your Phone Once A Week (The Right Way)
It’s a simple tip but important nonetheless: Turning your iPhone off and back on again once a week can resolve hidden battery-life issues that accumulate with time. Apple would never tell you that because in iPhone Utopia, it wouldn’t.
In the real world, powering off your iPhone can help resolve issues with apps that have crashed or other, more technical problems that can occur when any computer has been on for a long time.
How To Turn Off Your iPhone (The Right Way)
To power off your iPhone, press and hold the power button until “slide to power off” appears. If your iPhone has Face ID, simultaneously press and hold the side button and either volume button.
Swipe the circular power icon across the screen with your finger and wait as your iPhone shuts down. It’s normal for the process to take several seconds. Next, turn your iPhone back on by pressing and holding the power or side button until you see the Apple logo appear.
8. Background App Refresh
Certain apps on your iPhone are allowed to use your Wi-Fi or cellular data connection to download new content even when you’re not using them. You can save a significant amount of battery life (and some of your data plan) by limiting the number of apps that are allowed to use this feature that Apple calls Background App Refresh.
How To Fix Background App Refresh
Go to Settings -> General -> Background App Refresh. At the top, you’ll see a toggle switch that turns off Background App Refresh entirely. I don’t recommend you do this, because Background App Refresh can be a good thing for certain apps. If you’re like me, you’ll be able to turn off almost every app on the list.
As you scroll through each app, ask yourself this question: “Do I want this app to be able to download new information even when I’m not using it?” If the answer is yes, leave Background App Refresh enabled. If not, turn it off and you’ll be saving more battery life each time you do.
9. Keep Your iPhone Cool
According to Apple, the iPhone, iPad, and iPod are designed to work from 32 degrees to 95 degrees fahrenheit (0 degrees to 35 degrees celsius). What they don’t always tell you is that exposing your iPhone to temperatures above 95 degrees fahrenheit can permanently damage your battery.
If it’s a hot day and you’re going for a walk, don’t worry about it — you’ll be fine. What we’re talking about here is prolonged exposure to extreme heat. Moral of the story: Just like your dog, don’t leave your iPhone in a hot car. (But if you had to choose, save the dog).
Can Cold Weather Damage My iPhone Battery?
Low temperatures won’t damage your iPhone battery, but something does happen: The colder it gets, the faster your battery level drops. If the temperature gets low enough, your iPhone might stop working entirely, but when it warms up again, your iPhone and battery level should return to normal.
10. Make Sure Auto-Lock Is Turned On
One quick way to prevent battery iPhone battery drain is by making sure auto-lock is turned on. Open the Settings app and tap Display & Brightness -> Auto-Lock. Then, select any option other than Never! This is the amount of time you can leave your iPhone on before the display turns off and goes into sleep mode.
11. Disable Unnecessary Visual Effects
iPhones are beautiful, from the hardware to the software. We understand the basic idea of manufacturing the hardware components, but what allows the software to display such beautiful images? Inside your iPhone, a tiny piece of hardware built into the logic board called a Graphics Processing Unit (or GPU) gives your iPhone the power to display its beautiful visual effects.
The problem with GPUs is that they’ve always been power-hungry. The fancier the visual effects, the faster the battery dies. By reducing the strain on your iPhone’s GPU, we can significantly increase the life of your battery. Ever since iOS 12 was released, you can accomplish everything I used to recommend in a few different tips by changing one setting in a place you probably wouldn’t think to look.
Go to Settings -> Accessibility -> Motion -> Reduce Motion and tap the switch to turn it on.
Aside from the parallax wallpaper effect on the home screen, you probably won’t notice any differences and you’ll save a significant amount of battery life.
12. Turn On Optimized Battery Charging
Optimized Battery charging lets your iPhone learn about your charging habits to cut down on battery aging. We recommend turning on this setting so you can get the most out of your iPhone battery for a longer period of time.
Open Settings and tap Battery -> Battery Health. Then, turn on the switch next to Optimized Battery Charging.
13. Turn Off 5G
Turning off 5G on your iPhone 12 or newer can help save battery life. The chips in 5G iPhones (and most Android smartphones) aren’t designed for 5G. Instead, there’s an additional 5G chip, which uses a lot of power.
Additionally, 5G infrastructure is still in its infancy. Your iPhone will usually need to use more power to connect and stay connected to 5G than it would to LTE.
Open Settings and tap Cellular -> Cellular Data Options -> Voice & Data. Tap LTE to turn off 5G. You’ll know 5G is off when a checkmark appears next to LTE.
If you don’t want to turn off 5G entirely, tap 5G Auto. According to Apple, 5G Auto only uses 5G “when it will not significantly reduce battery life.” So, it’ll still reduce battery life more quickly, just not as significantly as 5G On.
14. Turn On Dark Mode
Dark Mode was finally introduced with iOS 13. Not only does it look awesome, it can also save a bit a battery life, because darker colored pixels generally use less power than lighter colored pixels.
Open Settings and tap Display & Brightness. Tap Dark at the top of the menu under Appearance. Dark Mode will turn on immediately!
15. Turn On Limit Frame Rate
The iPhone 13 Pro and 13 Pro Max are the first with ProMotion, enabling to support adaptive refresh rates up to 120Hz. While this makes your display appear smoother, it can also use additional battery life.
Turning on Limit Frame Rate sets the maximum frame rate on your iPhone to 60Hz. Most people won’t notice the difference!
Open Settings and tap Accessibility -> Motion. Turn on the switch next to Limit Frame Rate.
16. DFU Restore & Restore From iCloud, Not iTunes
At this point, you’ve waited a day or two and your battery life still hasn’t improved. It’s time to restore your iPhone. We recommend doing a DFU restore. After the restore is finished, we recommend restoring from an iCloud backup if you can.
Let me be clear: Yes, you need to use iTunes to restore your iPhone — there’s no other way. We’re talking about the way you put your data back on your iPhone after it’s been restored to factory settings.
Some people are confused about exactly when it’s safe to disconnect your iPhone from your computer. As soon as you see the ‘Hello’ screen on your iPhone or ‘Set Up Your iPhone’ in iTunes, it’s absolutely safe to disconnect your iPhone.
Next, use the menus on your phone to connect to Wi-Fi and restore from your iCloud backup. If you’ve been having trouble backing up to iCloud and especially if you’re run out of storage, check out my article that’s all about how to fix iCloud backup.
Aren’t iCloud Backups and iTunes Backups Essentially The Same?
Yes, iCloud backups and iTunes backups do contain essentially the same content. The reason I recommend using iCloud is that it takes your computer and any problems it may have completely out of the picture.
17. Erase Your iPhone And Set It Up As New
If you’ve tried absolutely everything and you’re still having trouble, you may have a deeply-rooted software issue that can only be resolved by restoring your iPhone to factory settings and setting it up again as if it were brand new.
It’s not all bad. You’ll add your iCloud and other mail accounts to your iPhone as you set it up. Your contacts, calendars, notes, reminders, and bookmarks are often stored in those accounts, so all of that information should come right back.
What you will have to do is redownload your apps, reconfigure Wi-Fi and other settings, and transfer your photos and music back to your iPhone. It’s not that much work, but it does take some time to get everything back the way you like it.
To restore your iPhone to factory settings, open Settings -> General -> Reset -> Erase All Content and Settings. If your iPhone is running iOS 15 or newer, open Settings and tap General -> Transfer or Reset iPhone -> Erase All Content and Settings.
Enter your passcode, then tap Erase iPhone to confirm your decision.
18. You May Have A Hardware Problem (But It Might Not Be The Battery)
In the beginning of this article, I mentioned that the vast majority of issues related to iPhone battery life come from software, and that’s absolutely true. There are a few instances where a hardware issue can cause problems, but in almost every case the problem isn’t with the battery.
Drops and spills can cause damage to internal components that are involved in charging or maintaining the charge on your iPhone. The battery itself is designed to be quite resilient, because if it were punctured it could quite literally explode.
The Apple Store Battery Test
When you bring your iPhone to an Apple Store to be serviced, Apple techs run a quick diagnostic that reveals a fair amount of information about the overall health of your iPhone. One of these diagnostics is a battery test, and it’s pass/fail. In all my time at Apple, I believe I saw a total of two iPhones with batteries that did not pass that test — and I saw a lot of iPhones.
If your iPhone passes the battery test, and there’s a 99% chance it will, Apple will not replace your battery even if you’re under warranty. If you haven’t already taken the steps I’ve described in this article, they’ll send you home to do them. If you have done what I’ve suggested, you can say, “I tried that already, and it didn’t work.”
In Conclusion
I sincerely hope that you have enjoyed reading and learned from this article. Writing it has been a labor of love, and I’m grateful for each person that reads it and passes it on to their friends. If you’d like to, leave a comment below — I’d love to hear from you.
Источник


