- How to Fix iPhone 7 Won’t Charge
- Is It Hardware or Software Damage
- How to Fix iPhone 7 Not Charging
- Solution 1. Check Your Power Adapter
- Solution 2. Clean the Charging Port
- Solution 3. Hard Reboot iPhone 7
- Solution 4. Repair iOS to Fix System Related Charging Issue
- Solution 5. Put iPhone 7 In DFU Mode and Restore
- FAQs about iPhone 7 Charge
- 1. How can I make my iPhone 7 charge faster
- 2. How long does it take to fully charge an iPhone 7
- The Bottom Line
- If your iPhone or iPod touch won’t charge
- Plug into power
- Wall power outlet
- Computer
- Power accessory
- If your device charges slowly or won’t charge
- If your device stopped charging at 80 percent
- If an alert says that your accessory isn’t supported or certified
- iPhone 7 Charging Problem Repair Solution Charging Ways Jumper
- Before Disassembly First Clean Charging Port With Alcohol Or Liquid Like C.T.C Cleaner.How To Repair iPhone 7 Charging Problem :
How to Fix iPhone 7 Won’t Charge
Are you having issues with your iPhone 7 not charging? Yes, sometimes it happens that all of a sudden, your iPhone 7 stops charging and you begin to wonder why won’t my iPhone 7 charge. It takes two form. It can either be a software problem or a hardware problem. In this article we shall be seeing how first to determine where the problem is coming from, and then how we can address iPhone 7 won’t charge issues.
Is It Hardware or Software Damage
If you ever have issues with your iPhone 7 or iPhone 7 Plus won’t charge at any point when it should be charging, before looking out for solutions and subsequently carrying out such, the first important thing to do is first to detect whether it is a software damage or a hardware damage that is responsible for your iPhone 7 not charging.
Talking about the difference between software and hardware damage. Software damage is mostly caused by viruses majorly due to the external factor of which viruses are the prime cause. Hardware damage is not caused by a virus; it is mostly caused by physical things or mechanical fault. Software damage causes loss of file, due to the processing or via fixing. When the software damages, you will have to go on a system to flash the whole thing, although you may lose or compromise some files. Hardware damage doesn’t compromise your data or your files and it doesn’t cause loss of files since you are not tampering with the makeup of the phone.
Also software damage requires the service of software engineers and a particular level of expertise to correct the issue. So to be on the saver side when there is software damage, it is better that you employ the service of a software engineer who knows much about that particular thing, i.e. that particular software that is damaged. Hardware damage can be done by anybody. Just remove the spare part that got damaged and replaced with a better one.
How to Fix iPhone 7 Not Charging
Solution 1. Check Your Power Adapter
First of all, you look for any sign of wear and tear on the side of your cable. Check the phone’s power adapter and make sure the cable is working correctly. Look physically on the cable you are checking, is there any wear and tear there?
If it charges on your PC, then try connecting the adapter to the wall socket; and if it doesn’t charge, that means it’s your adapter that has an issue. The best thing to do is to get a new one immediately.
Solution 2. Clean the Charging Port
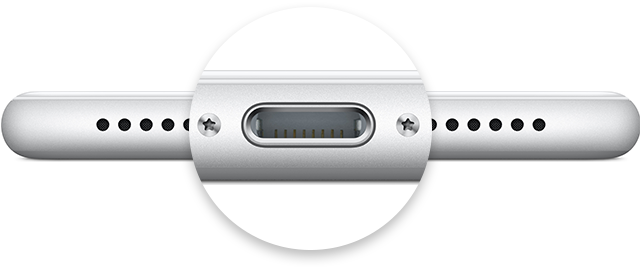
The charging port refers to that part on the bottom of the phone where you plug the charger into. So to check this, you might need a pen torch to check the charging port. Most of the time we discovered that the charging port might be blocked by accumulated dirt or debris. So, if it is blocked by such, then your iPhone 7 Plus won’t charge because there will be no connection between the cable and the iPhone. If you look at that charging port, there are about nine connectors, and if any one of them is blocked, then your iPhone will not charge. What you have to do is get a soft brush or a toothbrush that is soft, don’t go for the hard ones and make sure that the brush you are getting doesn’t conduct electricity; that is, it is an insulator.
Use the soft brush to brush off that charging port to get the debris off, and then you can blow at intervals. So after brushing, you can now try to charge it again. So after checking the debris and dirt and your iPhone still doesn’t charge, then you will have to try the hard reboot.
Solution 3. Hard Reboot iPhone 7
Hard rebooting iPhone 7 takes a different method from iPhone 6 and other models before it. To reboot iPhone 7, follow these steps:
- Step 1. Hold the power button and the lower part of the volume button together.
- Step 2. Simultaneously press these two buttons and hold down for a while until the Apple logo comes up on your iPhone 7.
- Step 3. Then release the two buttons and wait for the phone to reboot.
Step 4. When this is done, then you can try recharging your phone again.
Solution 4. Repair iOS to Fix System Related Charging Issue
If your iPhone 7 won’t charge or turn on because of a software issue and you have tried all that you can to fix it, and all seems to no avail, why not try an UltFone iOS System Repair Tool. UltFone iOS System Repair can be very helpful in repairing operating system issue without any data loss, including iPhone won’t charge or turn on, iPhone 7 battery draining fast after iOS 14 update, iPhone 7 black screen, spinning wheel, and many other issues.
Steps of how to repair iPhone 7 does not charge issue:
Step 1 Download and install this iOS system recovery tool to your PC or Mac computer, and then connect your iPhone 7 to computer with Apple cable.
Step 2 From the main interface, select Repair Operating System function.
Step 3 Click Fix Now button in the following screen, and then this program will detect and list the firmware version of your device. It is recommended to download the latest firmware online by clicking Download button.
Step 4 Wait for the firmware package to be downloaded completed, and then you can click Repair Now button to start fixing iPhone 7 charging problem.
Step 5 In a few minutes, your device will reboot. You can charge your iPhone 7 again to check whether everything is fine now. There is a high chance that this problem has been solved.
Here is a video guide of how to fix iOS stuck and system issues using this professional iOS repair tool.
Solution 5. Put iPhone 7 In DFU Mode and Restore
If after all the above, your iPhone 7 is still not charging, then you can put your iPhone in the DFU mode and restore to factory settings. Please note that putting your iPhone in the DFU mode is the same thing as doing restore factory settings. So, for your own good, it is better you back up your iPhone before going to DFU mode. DFU means (device film way update), so if you are doing DFU, it is equivalent to you flashing that particular update or restoring factory settings so that everything that is on it will vanish.
So after opening the iTunes on the computer, you then press the power and hold the home button for about 8 seconds on your iPhone. After the 8 seconds, you release the power button, but you still hold on to the home button until it shows that iTunes has detected an iPhone recovery mode. Then the iPhone 7 screen will turn completely black, and that is when you are to release the home button.
Note that immediately it shows iTunes as detected iPhone in recovery mode you release your hand from the home button so spontaneously your iPhone will completely black then at that point the DFU mode has been activated that your iPhone has entered DFU mode.
FAQs about iPhone 7 Charge
1. How can I make my iPhone 7 charge faster
Here are some tips that can help you charge iPhone 7 faster. The first tip is to put it in airplane mode. You can even power iPhone 7 off while charging. The less your iPhone is doing the faster it will be able to charge. And also you can use a wall charger if you have a choice.
2. How long does it take to fully charge an iPhone 7
If you do not use your iPhone 7 and turn off Wi-Fi, Bluetooth, and cellular data, it takes about 2 hours to charge from 0 up to 100%. However, if you are using the iPhone while charging, it will take more than 2 hours.
The Bottom Line
It happens that sometimes due to hardware or software issues iPhone 7 won’t charge. If your iPhone 7 ever cease charging, there is no cause for alarm. The first thing you should do at that point is to find out if your iPhone 7 won’t charge because of a software or hardware issue. Then you can make use of any of the above methods to solve the issue and ensure that your iPhone 7 begin charging again. A professional iOS system repair tool can help a lot to fix system related issues.
Источник
If your iPhone or iPod touch won’t charge
If your battery won’t charge or charges slowly, or if you see an alert message, learn what to do.
Plug into power
To charge your device, follow these steps:
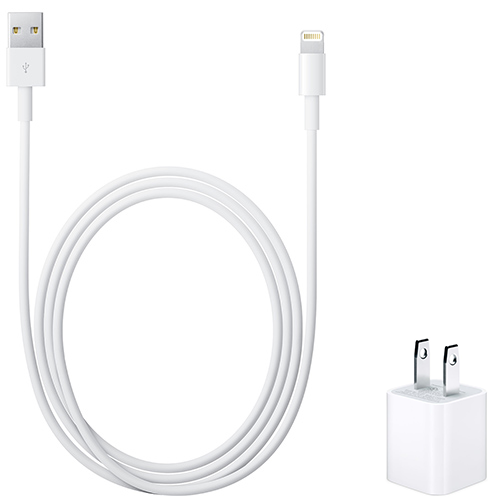
- Connect your device to the USB cable that comes with it.
- Plug into one of these three power sources:
Wall power outlet
Plug your USB charging cable into a USB power adapter, then plug the adapter into the wall.
Computer
Plug your charging cable into a USB 2.0 or 3.0 port on a computer that’s on and not in sleep mode. Don’t use the USB ports on your keyboard.
Power accessory
Plug your cable into a powered USB hub, docking station, or other Apple-certified accessory.
![]()
If you’re trying to charge wirelessly with an iPhone 8 or later, first make sure that you can charge with the USB adapter and cable that came with your device. If that works, then get help with wireless charging. For a third-party accessory, check that it’s Apple certified.
As your device charges, you’ll see a lightning bolt beside the battery icon in the status bar, or a large battery icon on your Lock screen.
![]()
My device charges slowly or won’t charge
My device stopped charging at 80 percent
I see Accessory Not Supported or Certified
If your device charges slowly or won’t charge
Follow these steps and try again after each:
- Check your charging cable and USB adapter for signs of damage, like breakage or bent prongs. Don’t use damaged accessories.

- Use a wall power outlet and check for firm connections between your charging cable, USB wall adapter, and wall outlet or AC power cable, or try a different outlet.
- Remove any debris from the charging port on the bottom of your device, then firmly plug your charging cable into your device. If the charging port is damaged, your device probably needs service.
- Let your device charge for a half hour.
- If your device is still unresponsive, force restart your device:
- iPhone 8 or later and iPhone SE (2nd generation): Press and quickly release the Volume Up button. Press and quickly release the Volume Down button. Press and hold the Side button until you see the Apple logo.
- iPhone 7, iPhone 7 Plus, and iPod touch (7th generation): Press and hold both the Side (or Top) button and the Volume Down button until you see the Apple logo.
- iPhone 6s or earlier, iPhone SE (1st generation), and iPod touch (6th generation) or earlier: Press and hold both the Side (or Top) button and the Home button until you see the Apple logo.
- Let your device charge for another half hour.
- If your device still won’t power on or charge, take your device, charging cable, and charging adapter to an Apple Retail Store or Apple Authorized Service Provider for evaluation. You can also contact Apple Support.

If your device stopped charging at 80 percent
Your iPhone might get slightly warmer while it charges. To extend the lifespan of your battery, if the battery gets too warm, software might limit charging above 80 percent. Your iPhone will charge again when the temperature drops. Try moving your iPhone and charger to a cooler location.
iOS 13 and later uses Optimized Battery Charging to slow the rate of battery aging by reducing the time that your iPhone spends fully charged. Your iPhone uses on-device machine learning to understand your daily charging routine so that it can wait until you need to use your iPhone to finish charging past 80 percent.* Optimized Battery Charging is active only when your iPhone predicts that it will be connected to a charger for a long period of time.
* Information regarding your charging routine is stored only on your iPhone. The information isn’t included in backups and isn’t shared with Apple.
If an alert says that your accessory isn’t supported or certified
These alerts can appear for a few reasons: Your iOS device might have a dirty or damaged charging port, your charging accessory is defective, damaged, or non Apple-certified, or your USB charger isn’t designed to charge devices. Follow these steps:
- Remove any debris from the charging port on the bottom of your device.
- Restart your device:
- iPhone
- iPod touch
- Try a different USB cable or charger.
- Make sure that you have the latest version of iOS.
- Contact Apple Support to set up service.
Источник
iPhone 7 Charging Problem Repair Solution Charging Ways Jumper
iPhone 7 Charging Problem Solution Repair Ways Jumper
Apple iPhone 7 that refuse to charge, or charge very slowly – like non-charging iPhones – are a sadly common cause of irritation among iPhone 7 customers. Before long the battery will be empty and you’ll be stuck with the world’s most expensive chopping board.
This isn’t a problem that’s unique to Apple products, in fact: for various reasons the charging port and cable are almost always a weak point on tablets and smartphones.
Some of the other most common causes of the problem of the charger on the Apple iPhone 7 and iPhone 7 Plus not working may be the following, including the iPhone 7 and iPhone 7 Plus not charging – grey battery problem:
- Bent, broken or pushed in connectors on the device or battery.
- Phone is defective.
- Damaged battery.
- Defective charging unit or cable.
- Temporary phone problem.
- Phone is defective.
Hardware Solution:

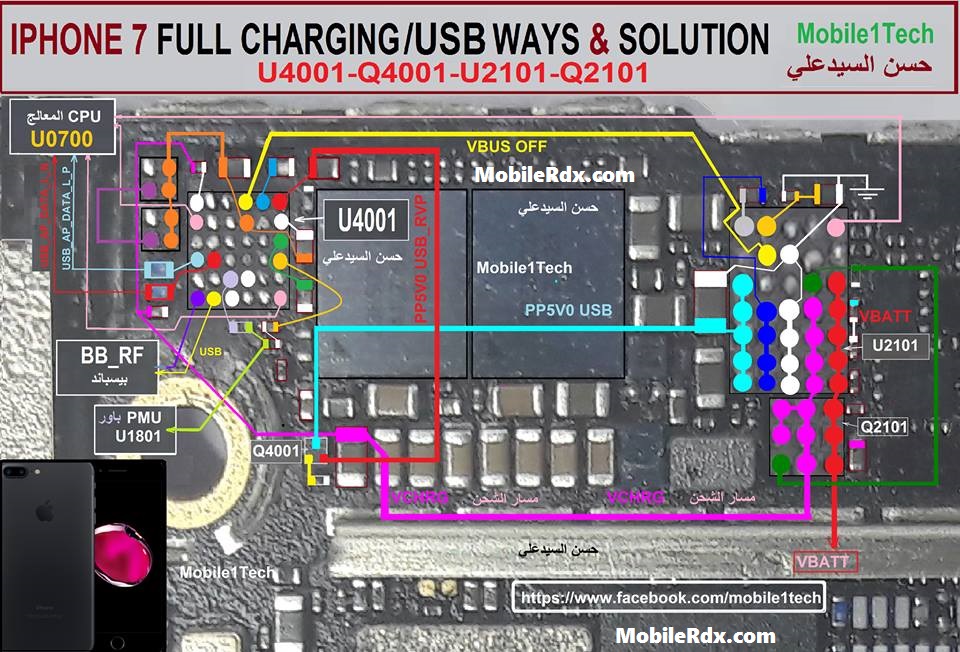
Before Disassembly First Clean Charging Port With Alcohol Or Liquid Like C.T.C Cleaner.How To Repair iPhone 7 Charging Problem :
- If Problem Still There Then Disassembly iPhone 7 For Charging Problem Solution.
- After Disassembly Clean iPhone 7 PCB Layout With C.T.C Cleaner And Remove Charging Port.
- Charging Port Wash Properly With C.T.C Cleaner After Clean Charging Port OfiPhone 7 Put Again.
- Check For Problem Resolved If Still There Then Replace Charging Port Of iPhone 7 For Complete Solution Of Samsung iPhone 7 Charging Pause,Battery Temperature Too High.
- Don’t Forgot To Like Our Page Facebook.com/MobileRdxdotcom
Note: Every repairing solution posted here is tested by at least one member of our team. Use the information available here at Your Own Risk. We are not responsible if any harm comes to your device during the repairing process.
iPhone 7 Charging Ways Solution Jumper Problem Ways No Charging Not Supported
Источник


