- Use iTunes to sync your iPhone, iPad, or iPod with your computer
- What you can sync with iTunes
- Sync or remove content using iTunes
- Sync your content using Wi-Fi
- Sync your photos manually using the Finder
- Turn on Finder syncing
- Turn off Finder syncing
- Stop syncing some albums
- Stop syncing all photos
- Keep your photos updated automatically with iCloud
- Learn more
- Используйте программу Finder для синхронизации iPhone, iPad или iPod с компьютером
- Какие данные можно синхронизировать с помощью Finder
- Синхронизация и удаление содержимого с помощью Finder
- Синхронизация содержимого по Wi-Fi
- Turn on Sync Library with Apple Music
- Here’s what you need
- Turn on Sync Library
- On your iPhone, iPad, or iPod touch
- On your Mac
- On your PC with iTunes for Windows
- On other devices
- If you don’t subscribe to Apple Music
- Need help?
- Learn more
Use iTunes to sync your iPhone, iPad, or iPod with your computer
Learn how to sync music, movies, and more using iTunes on your Mac or PC.
If you’re using macOS Mojave or earlier or a Windows PC, use iTunes to sync content to your devices. Before you use iTunes to sync content to your iOS or iPadOS device, consider using iCloud, Apple Music, or similar services to keep content from your Mac or PC in the cloud. This way, you can access your music, photos, and more on your devices when you aren’t near your computer. Learn more about using Apple Music or iCloud Photos instead of iTunes.
If you use iCloud or other services like Apple Music to keep your content up-to-date across all of your devices, some syncing features through iTunes might be turned off.
What you can sync with iTunes
- Albums, songs, playlists, movies, TV shows, podcasts, and audiobooks.
- Photos and videos.
- Contacts and calendars.
iTunes features might vary by country or region.
Sync or remove content using iTunes
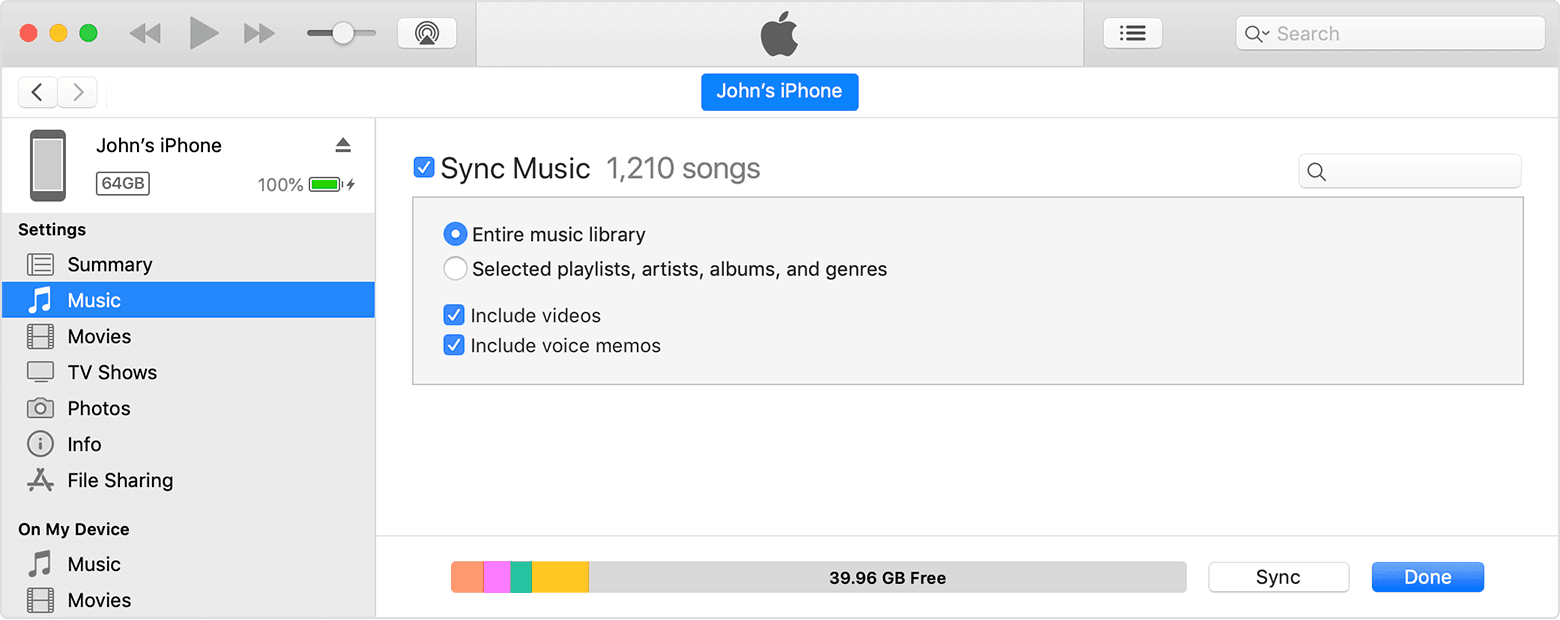
- Open iTunes and connect your device to your computer with a USB cable.
- Click the device icon in the upper-left corner of the iTunes window. Learn what to do if you don’t see the icon.
- From the list under Settings on the left side of the iTunes window, click the type of content that you want to sync or remove. * To turn syncing on for a content type, select the checkbox next to Sync.
- Select the checkbox next to each item that you want to sync.
- Click the Apply button in the lower-right corner of the window. If syncing doesn’t start automatically, click the Sync button.
* You can only sync your device with one iTunes library at a time. If you see a message that your device is synced with another iTunes library, your device was previously connected to another computer. If you click «Erase and Sync» in that message, all content of the selected type on your device will be erased and replaced with content from this computer.
Sync your content using Wi-Fi
After you set up syncing with iTunes using USB, you can set up iTunes to sync to your device with Wi-Fi instead of USB.
- Connect your device to your computer with a USB cable, then open iTunes and select your device. Learn what to do if your device doesn’t appear on your computer.
- Click Summary on the left side of the iTunes window.
- Select «Sync with this [device] over Wi-Fi.»
- Click Apply.
When the computer and the device are on the same Wi-Fi network, the device appears in iTunes. The device syncs automatically whenever it’s plugged in to power and iTunes is open on the computer.
Источник
Sync your photos manually using the Finder
If you don’t use iCloud Photos, you can manually sync your photos and videos from your Mac to your iPhone, iPad, or iPod touch using the Finder.
Turn on Finder syncing
You can use the Finder on your Mac to sync photos to your iPhone, iPad, or iPod touch from the Photos app, or from a folder on your computer. Each time that you sync your iOS device with your computer, the photos and videos on your iOS device update to match the albums on your computer. If you have photos on your iPhone, iPad, or iPod touch that aren’t on your computer, learn how to import them.
- Open a Finder window and connect your device to your computer using a USB cable.
- Unlock your device.
- Your device appears in the sidebar of the Finder window. Click the device to select it.
- If prompted, trust your device.
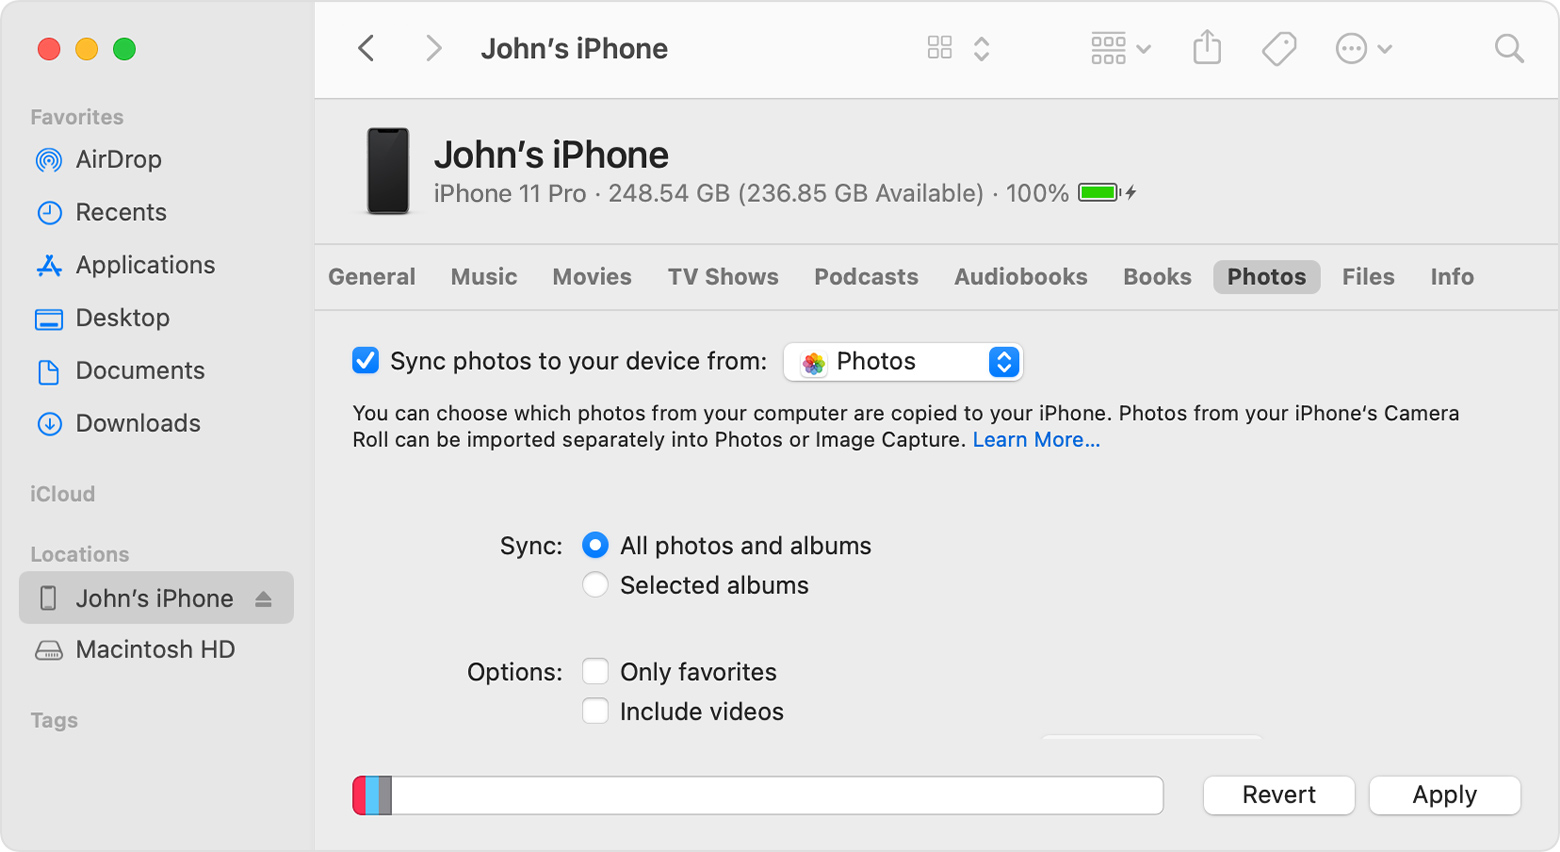
- Click the Photos tab below your device’s information.
- Select the checkbox next to Sync photos to your device from, then select Photos or a folder on your Mac.
- Choose between syncing all your photos and albums or only selected albums. You can also choose to sync only favorites, and whether to include videos.
- Click the Apply button in the lower-right corner of the window. If syncing doesn’t start automatically, click the Sync button.
You must import Slo-Mo and Time-Lapse videos through the Photos app or Image Capture in OS X Yosemite or later for their effect to be synced via the Finder. When you use iCloud Photos, Slo-Mo and Time-Lapse videos keep their effects.
Live Photos keep their effect when you import them to Photos in OS X El Capitan and later, but they lose their effect if you sync them back to your device via your computer. Use iCloud Photos so that Live Photos keep their effect, no matter what device you use.
You can sync your device only with the System Photo Library. If you have more than one photo library on your Mac, be sure that the correct one is designated as the System Photo Library.
Turn off Finder syncing
If you don’t want the synced photos on your iPhone, iPad, or iPod touch anymore, turn off syncing in the Finder and they’ll be removed from your device. You can turn off syncing for some of your photo albums or all of them at once.
Stop syncing some albums
- Open a Finder window and connect your device to your computer using a USB cable.
- Unlock your device.
- Your device appears in the sidebar of the Finder window. Click the device to select it.
- If prompted, trust your device.
- Click the Photos tab below your device’s information.
- Choose «Selected albums» and deselect the albums or collections that you want to stop syncing.
- Click Apply.
Stop syncing all photos
- Open a Finder window and connect your device to your computer using a USB cable.
- Unlock your device.
- Your device appears in the sidebar of the Finder window. Click the device to select it.
- If prompted, trust your device.
- Click the Photos tab below your device’s information.
- Deselect «Sync Photos» then click «Remove photos.»
- Click Apply.
Keep your photos updated automatically with iCloud
If you use iCloud Photos, you can keep all your photos and videos stored in iCloud. They sync seamlessly across all of your devices so you can access your library from your Mac, Apple TV, iPhone, iPad, and even your PC. Your newest shots and edits upload automatically when you’re connected to the internet.
Learn more
- iCloud Photos doesn’t upload photos and videos that you add to your device from your computer. If you’re missing photos after you turn on iCloud Photos, follow these steps.
- You can always make a copy of your photos and videos and keep them on your computer.
- Learn how to import photos and videos from your iPhone, iPad, or iPod touch to your computer.
Information about products not manufactured by Apple, or independent websites not controlled or tested by Apple, is provided without recommendation or endorsement. Apple assumes no responsibility with regard to the selection, performance, or use of third-party websites or products. Apple makes no representations regarding third-party website accuracy or reliability. Contact the vendor for additional information.
Источник
Используйте программу Finder для синхронизации iPhone, iPad или iPod с компьютером
Начиная с macOS Catalina синхронизация с помощью программы Finder похожа на процедуру синхронизации, выполняемую с помощью iTunes. Узнайте, как можно синхронизировать содержимое на устройстве.
Перед использованием Finder для синхронизации содержимого на устройстве с ОС iOS или iPadOS рекомендуется воспользоваться iCloud, Apple Music или похожей службой для сохранения содержимого компьютера Mac или компьютера с ОС Windows в облаке. Так вы сможете получать доступ к своей музыке, фото и другим файлам с устройства, когда компьютера нет рядом. Узнайте подробнее об использовании Apple Music или Фото iCloud вместо программы Finder.
Если для синхронизации используется iCloud или другие службы, такие как Apple Music, некоторые функции синхронизации через Finder могут быть отключены.
Какие данные можно синхронизировать с помощью Finder
- Альбомы, композиции, плейлисты, фильмы, телешоу, подкасты, книги и аудиокниги.
- Фотографии и видеозаписи.
- Контакты и календари.
Синхронизация и удаление содержимого с помощью Finder
- Откройте окно Finder и подключите устройство к компьютеру с помощью кабеля USB. Узнайте, что делать, если при подключении iPhone, iPad или iPod к компьютеру с помощью USB-кабеля компьютер не распознает устройство.
- Устройство отображается на боковой панели окна Finder. Чтобы выбрать устройство, щелкните его.
- Если отобразится соответствующий вопрос, нажмите «доверять этому устройству».
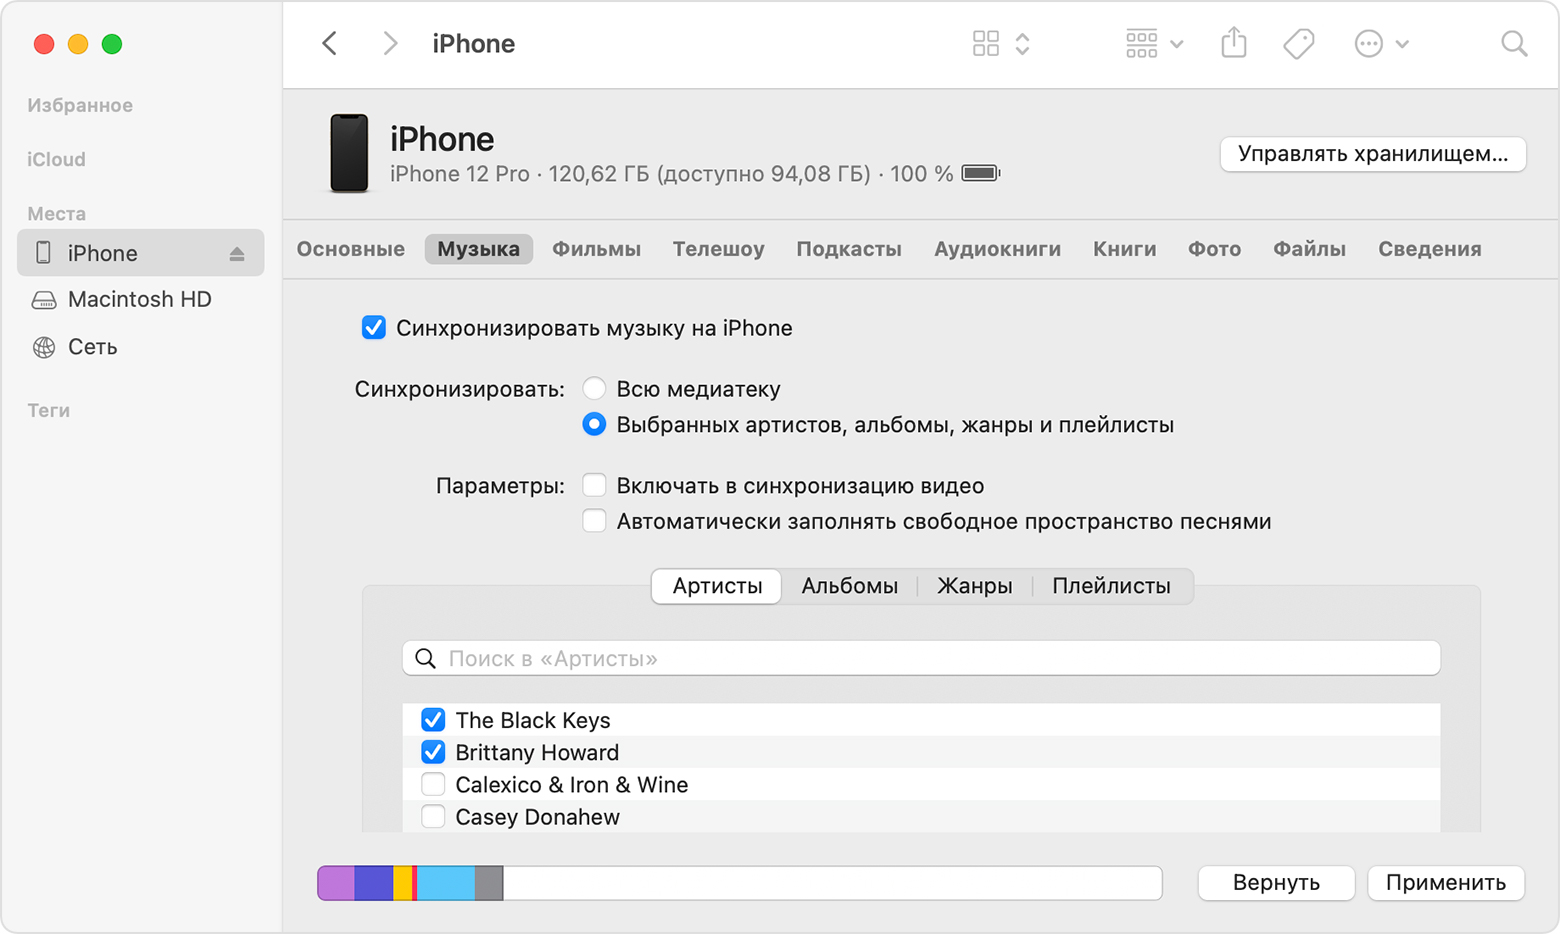
- Выберите тип содержимого для синхронизации или удаления. Чтобы включить синхронизацию для типа содержимого, установите флажок «Синхронизировать».
- Установите флажок рядом с каждым элементом, который нужно синхронизировать.
- Нажмите кнопку «Применить» в правом нижнем углу окна. Если синхронизация не начинается автоматически, нажмите кнопку «Синхронизировать».
*Синхронизировать устройство можно только с одной медиатекой Apple Music или Apple TV за раз. Если появляется сообщение, что устройство синхронизировано с другой медиатекой Apple Music или Apple TV, это означает, что его ранее подключали к другому компьютеру. Если нажать «Стереть и синхр.» в этом сообщении, все содержимое выбранного типа на устройстве будет стерто и заменено содержимым с компьютера.
Синхронизация содержимого по Wi-Fi
После настройки синхронизации с помощью Finder через USB вы можете настроить Finder для синхронизации устройства по Wi-Fi вместо USB.
- Подключите устройство к компьютеру с помощью кабеля USB, затем откройте окно Finder и выберите устройство.
- Выберите «Показывать этот [устройство], если он подключен к Wi-Fi».
- Нажмите кнопку «Применить».
Если компьютер и устройство подключены к одной сети Wi-Fi, устройство отобразится в программе Finder. При подключении к источнику питания устройство синхронизируется автоматически.
Источник
Turn on Sync Library with Apple Music
If you subscribe to Apple Music, you can turn on Sync Library to access your music library and music that you’ve downloaded from Apple Music on all of your devices.
Here’s what you need
- Update your iPhone or iPod touch to the latest version of iOS, iPad to the latest version of iPadOS, or Mac to the latest version of macOS. On a PC, make sure that you have the latest version of iTunes for Windows.
- Subscribe to Apple Music or iTunes Match.
- Sign in to all of your devices with the same Apple ID that you use with Apple Music or iTunes Match.
- Connect your devices to the Internet over a Wi-Fi or cellular network. On a Mac or PC, you can also connect to the Internet using Ethernet.
Apple Music availability varies by country and region. Learn what’s available in your country or region.
Turn on Sync Library
With the latest version of iOS, iPadOS, and macOS, Sync Library is turned on by default. If you turned off Sync Library, you can turn it back on. Just follow the steps below for your device.
On your iPhone, iPad, or iPod touch
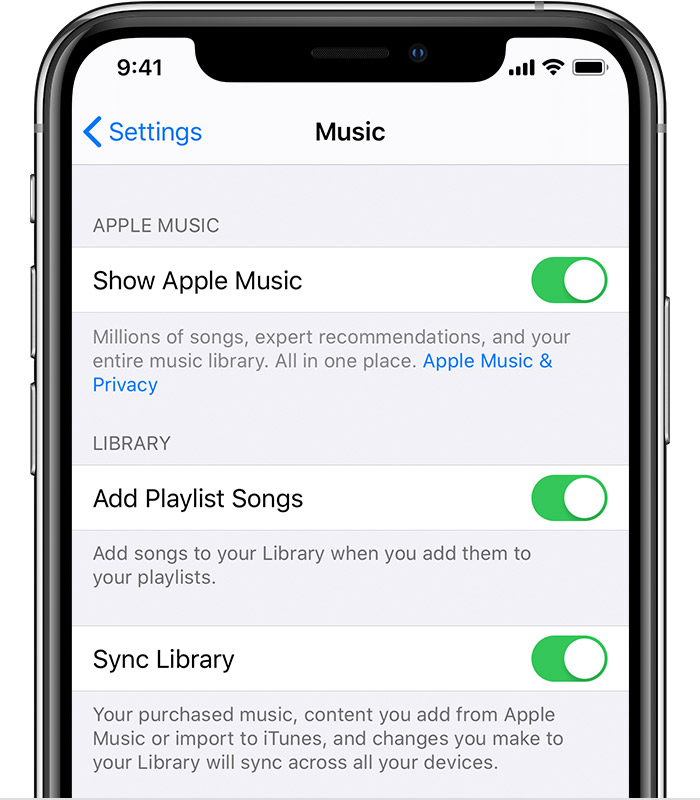
- Go to Settings > Music.
- Turn on Sync Library. If you don’t subscribe to Apple Music or iTunes Match, you won’t see an option to turn on Sync Library.
If Sync Library is updating or turned off, you’ll see a message at the top of the Library tab in the Apple Music app.
On your Mac
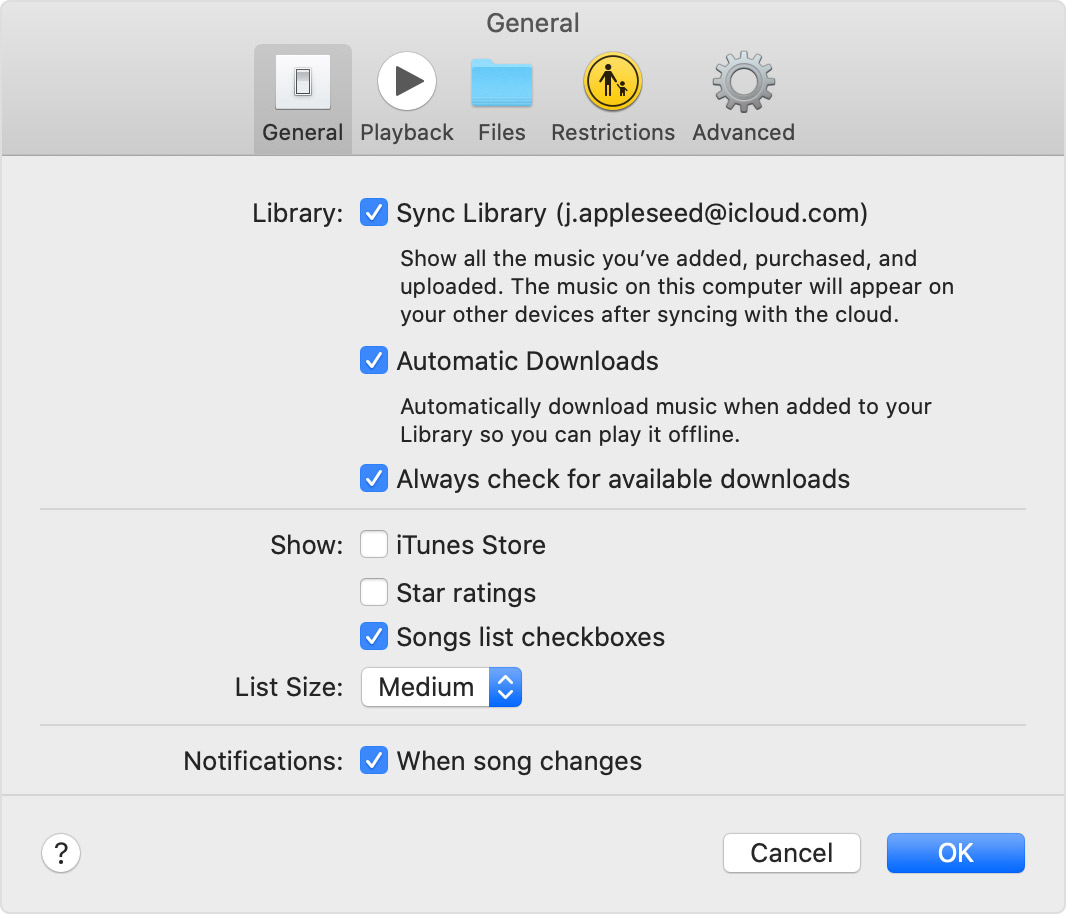
- Open the Apple Music app.
- From the menu bar at the top of your screen, choose Music > Preferences.
- Go to the General tab and select Sync Library to turn it on. If you don’t subscribe to Apple Music or iTunes Match, you won’t see an option to turn on Sync Library.
- Click OK.
If you have a large music library, it might take some time to upload and sync your music library across all of your devices.
On your PC with iTunes for Windows
In iTunes for Windows, iCloud Music Library isn’t turned on by default. To turn on iCloud Music Library:
- Open iTunes.
- From the menu bar at the top of your screen, choose Edit > Preferences.
- Go to the General tab and select iCloud Music Library to turn it on. If you don’t subscribe to Apple Music or iTunes Match, you won’t see an option to turn on iCloud Music Library.
- Click OK.
If you have a large music library, it might take some time to upload and sync your music library across all of your devices.
On other devices
If you subscribe to Apple Music, you can also access your music library — without having to turn on Sync Library — on other devices that support the Apple Music app and on music.apple.com.
If you don’t subscribe to Apple Music
- If you only want to sync your existing music library across all of your devices, and not any music from the Apple Music catalog, you can subscribe to iTunes Match on your computer. iTunes Match lets you access your music library on any Apple device or a PC with iTunes for Windows.
- If you buy music from the iTunes Store, you can redownload your past music purchases on your Apple device or a PC with iTunes for Windows.
- You can also manually sync music from your computer to your iPhone, iPad, or iPod touch.
Need help?
- If you sign out of your Apple ID or cancel your Apple Music or iTunes Match subscription, you won’t be able to access and sync your music library on all of your devices. The original song files will remain on the device that they were uploaded from.
- Apple Music isn’t a back up service. Make sure to back up your iPhone, iPad, iPod touch, Mac, or PC, so that you have a copy of your music and other information in case your device is ever replaced, lost, or damaged.
- You can have up to 100,000 songs in your music library. Songs that you buy from the iTunes Store don’t count against this limit.
- If a song is grayed out, incorrect music plays, or you can’t access your music library, learn what to do.
Learn more
- Learn how to join Apple Music.
- Learn about the icons that you might see next to songs when you turn on Sync Library.
- If Sync Library is turned on, a song that you delete from one device is deleted everywhere.
- Learn what to do if songs in your music library are grayed out.
Information about products not manufactured by Apple, or independent websites not controlled or tested by Apple, is provided without recommendation or endorsement. Apple assumes no responsibility with regard to the selection, performance, or use of third-party websites or products. Apple makes no representations regarding third-party website accuracy or reliability. Contact the vendor for additional information.
Источник

