- Mail server settings for iCloud email clients
- Do you need these mail server settings?
- Mail server settings
- IMAP information for the incoming mail server
- SMTP information for the outgoing mail server
- Set up an Outlook account in the iOS Mail app
- Set up work or school accounts that have additional requirements
- Need more help setting up Outlook for iOS?
Mail server settings for iCloud email clients
Use these mail server settings if you need to manually set up your email app (client) to use an iCloud email account.
Do you need these mail server settings?
You can use the mail server settings in this article to manually set up your email app to send and receive email with an iCloud email account. However, you shouldn’t need to do that if you meet iCloud system requirements and can use any of these setup methods:
- Use iCloud Preferences on your Mac in OS X Lion 10.7.4 or later.
- Use iCloud for Windows on your PC in Microsoft Windows with Outlook 2010 through Outlook 2016. Set up two-factor authentication and, if needed, generate an app-specific password* to use for iCloud Mail.
- Use iCloud settings on your iPhone, iPad, or iPod touch with iOS 7 or later.
Mail server settings
Refer to your email app’s documentation for information about how to use these settings. iCloud Mail uses the IMAP and SMTP standards supported by most modern email apps. iCloud does not support POP. If you set up an account using iCloud System Preferences or macOS Mail in 10.7.4 or later, you won’t see these settings because they’re automatically configured.
IMAP information for the incoming mail server
- Server name: imap.mail.me.com
- SSL Required: Yes
If you see an error message when using SSL, try using TLS instead. - Port: 993
- Username: This is usually the name part of your iCloud email address (for example, emilyparker, not emilyparker@icloud.com). If your email client can’t connect to iCloud using just the name part of your iCloud email address, try using the full address.
- Password: Generate an app-specific password.
SMTP information for the outgoing mail server
- Server name: smtp.mail.me.com
- SSL Required: Yes
If you see an error message when using SSL, try using TLS or STARTTLS instead. - Port: 587
- SMTP Authentication Required: Yes
- Username: Your full iCloud email address (for example, emilyparker@icloud.com, not emilyparker)
- Password: Use the app-specific password that you generated when you set up the incoming mail server.
* You only need to use an app-specific password if you’re manually setting up mail with your iCloud account in Windows, if you use Mac OS X Mail (10.7.4 and earlier), or if you use any other third-party mail client.
Information about products not manufactured by Apple, or independent websites not controlled or tested by Apple, is provided without recommendation or endorsement. Apple assumes no responsibility with regard to the selection, performance, or use of third-party websites or products. Apple makes no representations regarding third-party website accuracy or reliability. Contact the vendor for additional information.
Источник
Set up an Outlook account in the iOS Mail app
This article is for setting up your email account only! If you’re having trouble using the Outlook for iOS app, Open an in-app Outlook support ticket.
If you have a work or school account that uses Microsoft 365 for business or Exchange-based accounts, there may be additional requirements set by your IT admin. For example, if you have a company-managed device, an on-premises Exchange server configured for basic authentication, or your company requires mobile app management for app protection. See the section Set up work or school accounts that have additional requirements below for specific instructions.


Note: If you have a work account that requires the Intune Company Portal app, install it from the App Store before setting up Outlook for iOS. Your IT admin may or may not also require you to Enroll your iOS device in Intune.
Download Outlook for iOS from the iOS App Store and then open it. The icon looks like this:

Note: See system requirements for your iOS devices here.

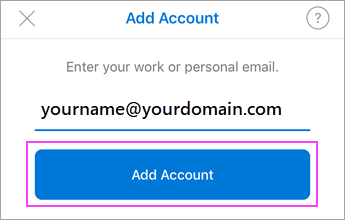
If it’s your first time using Outlook for iOS, enter your full email address, then tap Add Account.
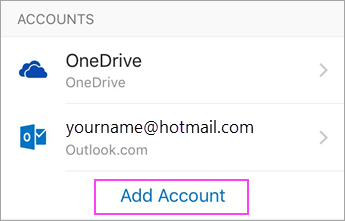
If not, open the Menu > tap Settings  > Add Account > Add Email Account.

If you’re asked to select your email provider, please contact your IT admin for support as there may be a misconfiguration.

Enter your email account password and tap Sign In.
Note: The sign in screen may look different for you depending on your email provider.


If multi-factor authentication is enabled, verify your identity. For more information, see Security info overview.
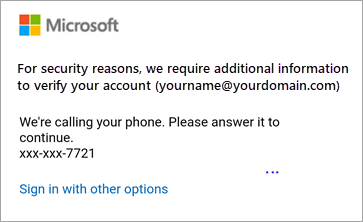

Accept any prompts for permission you may receive.
Swipe through the features and you’re now ready to use Outlook for iOS!
Set up work or school accounts that have additional requirements
Some work and school accounts have additional security requirements before you can use Outlook for iOS. If you’re not sure which of these situations applies to your work or school account, talk to your Microsoft 365 admin.
Click on an expander to open it:
Once you begin the enrollment process, you should complete the process in its entirety since pausing for more than a few minutes usually stops your progress and requires you to start over. If this process should fail, you need to return to the Company Portal app to try again.
Open the iOS App Store. Search for and download the Intune Company Portal app.
Next, search for and download the Microsoft Authenticator app.
Follow the procedure in the Set up access to your company resources article to enroll your iOS phone or tablet. Important: Once you begin the enrollment process, you should complete the process in its entirety since pausing for more than a few minutes usually stops your progress and requires you to start over. If this process should fail, you need to return to the Company Portal app to try again.
Note: In case you are prompted for multi-factor authentication, please refer to Security info overview.
Open the Outlook for iOS app. The icon looks like this:
Notes: When a device is enrolled, managed apps – including Outlook – can be installed in a couple of different ways:
You install the app from the Company Portal app
Your company may automatically install it during the enrollment process
If your account is found, tap Add Account.
Note: If your account is not automatically found, manually enter your company email address, then tap Add Account.
Enter your email account password, then tap Sign In.
Your company may have also implemented controls that will require you to Register before you can proceed. By registering, you are verifying your identity so the device can be validated by your organization. If prompted to register your device, tap Register.
After you open Outlook, your experience will be determined by a variety of factors including your company’s policy settings and whether you previously accessed corporate resources with your device. For example, you may be prompted to authenticate using the Microsoft Authenticator app. You may also be prompted to enter a PIN. Follow the prompts that appear on your device for your given circumstances.
You’re now ready to start using Outlook for iOS! Get the most out of Outlook:
Open the iOS App Store. Search for and download the Microsoft Authenticator app.
If you haven’t already, install the Outlook for iOS app from the iOS App Store or click here to enter your phone number and receive a download link.
Open the Outlook for iOS app. The icon looks like this:
If your account is found, tap Add Account.
Note: If your account is not automatically found, enter your company email address, then tap Add Account.
Enter your email account password and tap Sign In.
Note: Your experience may vary depending on your company’s requirements. For example, prompted to authenticate by using the Microsoft Authenticator app or verify yourself by text or phone. For details, see Security Info Overview.
Your company may have also implemented controls that will require you to Register before you can proceed. By registering, you are verifying your identity so the device can be validated by your organization. If prompted to register your device, tap Register.
If prompted to add another account, tap Maybe Later.
Tap Skip or swipe through the feature screens.
The message, Your organization is now protecting its data in this app. You need to restart the app to continue, appears. Tap OK.
Restart Outlook for iOS and set up a Personal Identification Number (PIN) when prompted.
You’re now ready to start using Outlook for iOS! Get the most out of Outlook:
If you haven’t already, install the Outlook for iOS app from the iOS App Store or click here to enter your phone number and receive a download link.
Open the Outlook for iOS app and tap Get Started if it’s your first time. Otherwise, open the Menu  in the upper left corner.

Tap Settings  > Add Account > Add Email Account.
Enter your company email address, then tap Add Account.
Enter your company email address and password to automatically configure your account. Tap Sign In.
Notes: If automatic configuration fails, tap Continue, then enter the following settings manually:
Server name: This is usually the same name you enter when checking your email on the web.
Domain: This is usually optional. If unsure, check with your IT administrator.
Username: This is your company email address.
Password: This is the password for your company email account.
Tap Next when finished and swipe through the features.
You’re now ready to start using Outlook for iOS! Get the most out of Outlook:
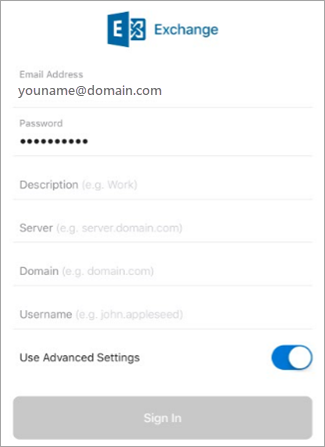
In Outlook for iOS, go to Settings > Add Account > Add Email Account.
Enter email address. Tap Add Account.
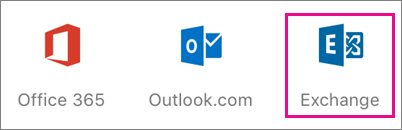
If you see the Select your email provider screen, choose Microsoft 365 or Exchange depending on your organization.
Enter your password and toggle on Use Advanced Settings.
Enter your server settings:
Incoming Server Settings
Domain\Username
Enter your full email address, such as yourname@yourdomain.com.
Password
Use the password that you use to access your email.
Exchange accounts — See the section, Find your Exchange mailbox server settings or ask your IT admin for your server information.
Microsoft 365 work or school accounts — Use outlook.office365.com.
Security type
Select SSL/TLS or make sure the Use secure connection (SSL) checkbox is checked, then tap Next.
Outgoing SMTP Server Settings
Exchange accounts — Ask your IT admin for your server info.
Microsoft 365 work or school accounts — Use smtp.office365.com.
Security Type
Choose TLS.
Port Number
Enter 587. Tap Next.
Need more help setting up Outlook for iOS?
This article was last updated on December 3, 2018 because of your feedback. If you still need help setting up email using Outlook for iOS, Open an in-app Outlook support ticket or tell us about your question in detail using the comment box below so we can address it in the future.
Click on an expander to open it:
If you want to set up an IMAP or POP email account, or don’t have an email account with Exchange ActiveSync, use these instructions . When you set up an email account using IMAP or POP, only your email will sync—not calendar or contacts. What is IMAP and POP?
Set up an IMAP account manually in Outlook for iOS
In Outlook for iOS, go to Settings > Add Account > Add Email Account.
Enter email address. Tap Add Account.
If you see the Select your email provider screen, choose IMAP.
Enter your password and toggle on Use Advanced Settings.
Enter the server setting information needed. Tap Sign In.
Note: If you don’t already know this info, you’ll need to get it from your email provider or administrator. For a list of common server settings and reference help, see Server settings you’ll need from your email provider.
To change your password you must go to your email provider’s website to change them.
Go to your email provider’s website.
For example, if you use a @hotmail.com email account, sign into outlook.com or if you use Gmail, go to Gmail.com.
Go to your account or profile settings.
Change your password.
Outlook for iOS will detect a sync error and will ask you to enter your password again.
If you are having difficulty getting Outlook for iOS to sync with your new password, delete your email account and then re-add it.
Note: If you change the password for your email account that is also your Microsoft account, you may need to login again on other Microsoft applications and websites.
First things first. If you’re using an Outlook.com (includes hotmail.com, msn.com, live.com, etc.) email account, check the server status of Outlook.com here. Now choose from the options below:
«I have Outlook set up, but I need help with something in the app.» — See Open an in-app Outlook support ticket and click on «Contact Support» to see how you chat with agents in the app.
«I need troubleshooting help for setting up my email.» — See Troubleshoot email setup on mobile.
«I’m setting up email for the first time and my calendar or contacts won’t sync.» — See Sync calendar with my phone or tablet.
Источник


