- Темная тема на iPhone и iPad: как включить и настроить автоматическое переключение по расписанию
- Как переключить темную тему на iPhone или iPad: 3 способа
- Способ 1
- Способ 2
- Способ 3
- Настройка темной темы в iOS для автоматического переключения в зависимости от времени суток
- Темный режим на iPhone и iPad в iOS 13 и выше: как включить и настроить
- Первый способ – В пункте управления
- Второй способ – В настройках Айфона
- Третий способ – На стадии первичной настройки iOS
- Настройка функции «Темный режим» для автоматического переключения по расписанию
- Добавить комментарий Отменить ответ
- Implement or Disable Dark Mode on iOS(Swift)
- Disable Dark Mode
- Adopting Dark mode
- Opt Out Only as Needed
- UI Element Colors
- Custom Colors
- Use of Custom Color-Sets
- Conclusion
- How to use Dark Mode on iPhone in iOS 13
- How to use Dark Mode on iPhone in iOS 13
- Iphone dark что это
- Dark Mode Colors
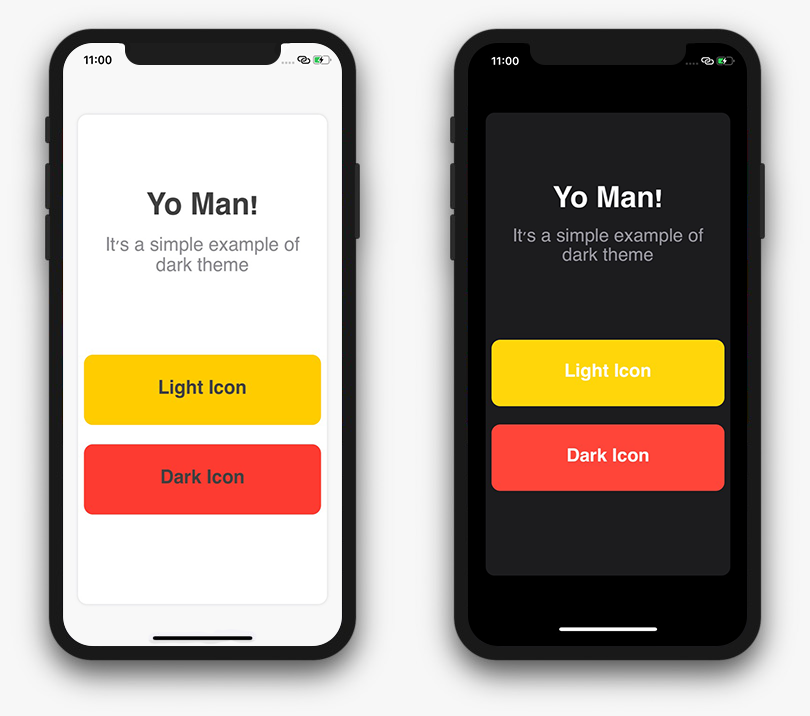
Темная тема на iPhone и iPad: как включить и настроить автоматическое переключение по расписанию
Ни для кого уже не секрет, что появившаяся темная тема интерфейса с выходом iOS 13 проектировалась разработчиками Apple задолго до релиза. Понять причины такой задержки несложно – компания Apple проделала огромную работу. Легко было просто перекрасить элементы интерфейса в черный цвет. Но дизайнеры адаптировали все оформление iOS под требования новой цветовой гаммы. Результат получился эффектным.
Как переключить темную тему на iPhone или iPad: 3 способа
Активировать ночную тему в iOS можно сразу несколькими способами.
Способ 1
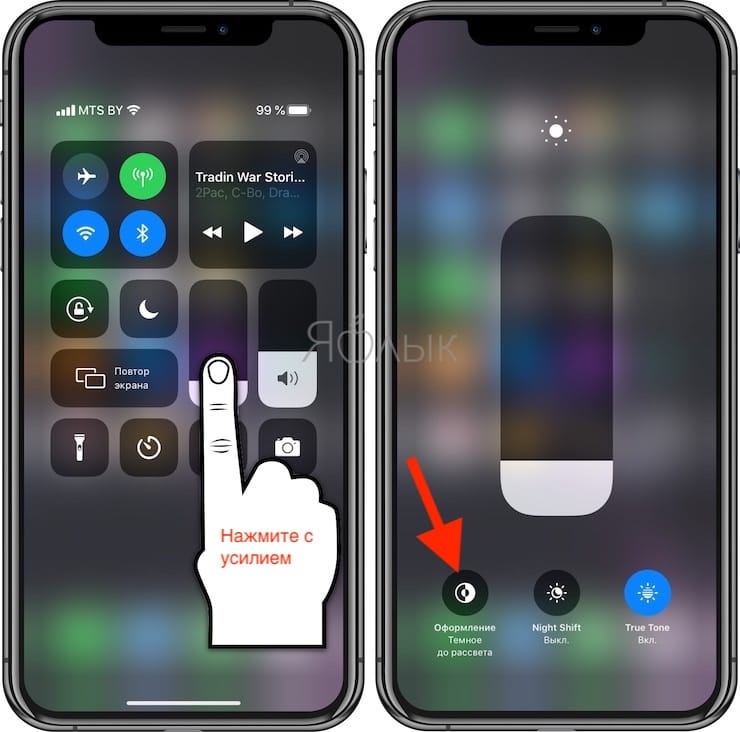
Самый быстрый способ предполагает использование «Пункта управления», в котором нажмите с усилием на индикатор уровня яркости экрана и в появившемся окне нажмите на значок переключения темы.
Способ 2
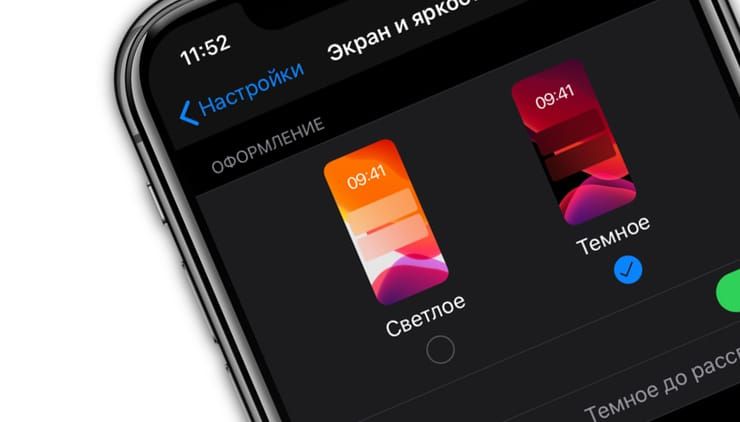
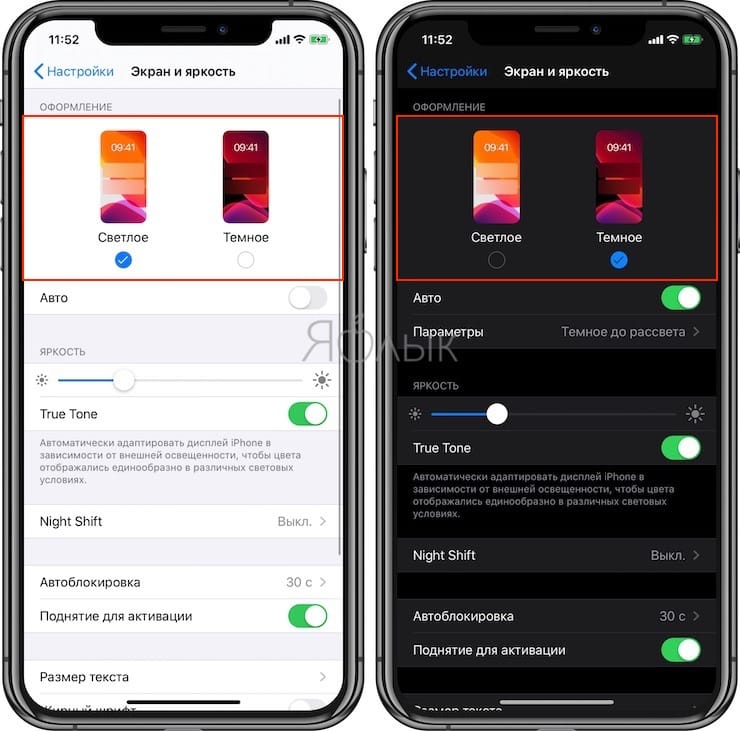
Можно осуществить переключение между темной и светлой темой через приложение «Настройки». Перейдите в раздел «Экран и яркость» и выберите подходящее оформление.
Способ 3
Кроме того, установка темной темы возможна и на стадии первичной настройки нового (или после восстановления заводских настроек) iPhone, iPad или iPod Touch.
Настройка темной темы в iOS для автоматического переключения в зависимости от времени суток
Ночную тему можно не просто активировать, но и настроить ее автоматическую активацию на основе принципа режима Night Shift. Пользователь имеет возможность задать временной интервал активности в настройках темы и работать с ней в темное время суток. Это поможет снизить нагрузку на глаза и уменьшит воздействие синего цвета на сетчатку глаза. Яркое свечение мешает выработке мелатонина, отвечающего как раз за сон.
Настройка темной темы производится по пути Настройки → «Экран и яркость».
Источник
Темный режим на iPhone и iPad в iOS 13 и выше: как включить и настроить
Темный режим (Dark Mode) является одной из самых популярных и востребованных функций на Айфоне. После включения этого функционала, который доступен в версии iOS 13 и выше, элементы экрана вашего iPhone меняются с ярких белых на темные серые и черные, что обеспечивает совершенно иной визуальный эффект. В этом пошаговом руководстве продемонстрировано, как включить тему «Dark Mode» на Айфоне. Так же среди пользователей прижилось название «Ночной режим».
Из статьи вы узнаете
Первый способ – В пункте управления
«Пункт управления» на Айфоне – это очень удобная программа, которая предоставляет быстрый доступ к часто используемым функциям системы iOS. При этом пользователь имеет возможность настроить все под свои требования. Можно добавлять или изменять элементы управления.
- Чтобы открыть «Пункт управления» в iOS 13 и более новых версиях, необходимо от нижнего края экрана вашего iPhone, провести пальцем вверх.
- Далее в перечне доступных опций нужно нажать на несколько секунд на индикатор яркости экрана.
- Появится окошко, в котором будет возможность включить темную тему.

Кроме того, вы также можете перейти в «Настройки»> «Центр управления»> «Настроить элементы управления» и добавить кнопку включения/выключения темной темы, которая будет отображаться в «Центре управления».
Второй способ – В настройках Айфона
Переключаться между темным и светлым режимом интерфейса Айфона можно и стандартным способом через меню «Настройки». Для этого следует перейти в раздел «Экран и яркость». Далее просто выберите нужный цветовой режим.
Пример работы представлен ниже на снимке:
Третий способ – На стадии первичной настройки iOS
Если вы только стали обладателем нового Айфона и осуществляете первичную настройку системы, то включить темный режим вы можете на этой стадии. Так же это касается и тех случаев, когда пользователь совершает настройку iOS после восстановления заводского состояния.
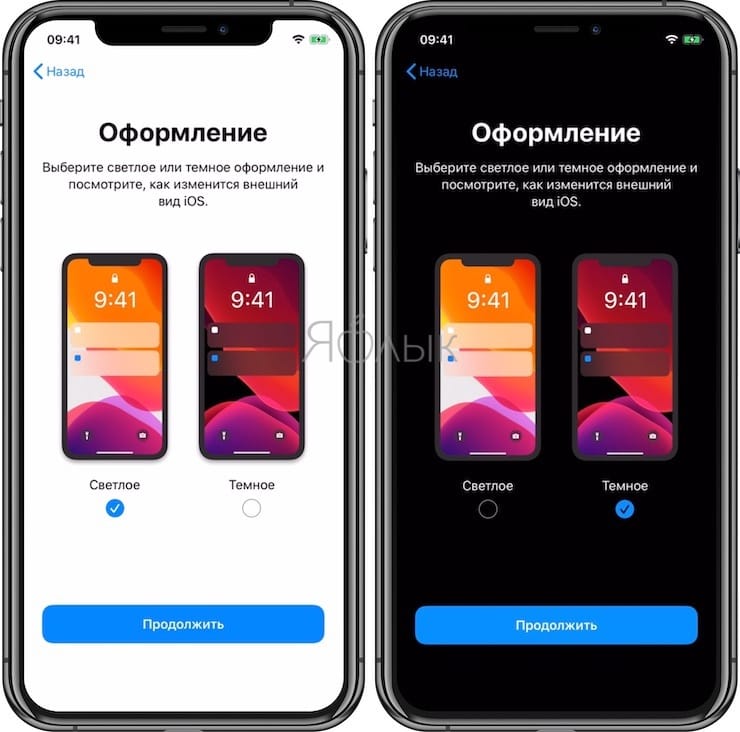
В таком случае на одном из этапов система предложит выбрать темное или светлое оформление интерфейса. Напротив нужного необходимо поставить галочку и нажать кнопку «Продолжить».
Настройка функции «Темный режим» для автоматического переключения по расписанию
Разработчики компании Apple предоставили возможность пользователю не только просто активировать ночную тему любым из выше рассмотренных способов, но и задать время автоматического включения и выключения. Это работает по аналогии режима под названием «Night Shift».
Чтобы уменьшить нагрузку на сетчатку глаз, вы можете задать свое временное расписание для оформления.
- Перейдите в «Настройки» Айфона.
- Найдите и откройте раздел «Экран и яркость».
- Выберите пункт «Параметры», а в нем «Настройка расписания».
- Ниже появятся два дополнительных пункта – «Светлое оформление» и «Темное оформление». Напротив каждого из них будет поле, в котором нужно выбрать время. Например, можно задать расписание, чтобы темный режим активировался автоматически в 21:00, а светлый в 08:00 времени суток.
Добавить комментарий Отменить ответ
Для отправки комментария вам необходимо авторизоваться.
Источник
Implement or Disable Dark Mode on iOS(Swift)

Dark Mode was introduced in iOS 13 and announced at WWDC 2019. It provides a darker theme to iOS and allows you to do the same for your app. Most of the users like to use a dark theme and It’s a great addition to give to your users so they can experience your app in a darker design.
Further, you will get a Git repo of a simple application in which I implemented a dark mode theme in two easy ways.
Disable Dark Mode
Before implementing Dark interface style I want to briefly tell you about a few things:
- Firstly, if you are building your app using Xcode 11 you’ll notice that the darker appearance is enabled by default.
- If you don’t want to use Dark interface style or you have an existing app and you don’t have much time to implement dark mode changes, in that case, you can simply disable it by adding the UIUserInterfaceStyle to your Info.plist and set it to Light .
- or add following code in didFinishLaunchingWithOptions override function of Appdelegate.

Adopting Dark mode
Opt Out Only as Needed
You can opt dark mode as per UIViewcontroller or UIView by setting overrideUserInterfaceStyle property to dark otherwise in Xcode 11 the by default it is dark.
Adopt a specific interface style for your views, view controllers, or app when it is inappropriate to support both light and dark variants

UI Element Colors
UIKit provides standard color objects for the foreground and background colors of your app’s UI elements. The names of these color objects reflect their intended use, rather than specific color values.
The standard color objects you can use for labels, text, backgrounds, links, and more.

You can use these adaptable colors which will automatically handle your application theme for you. For example:


Custom Colors
In case users want to use different color pattern in their application. They can create custom color in assets as we have options to add a new image set, new color set and so on.

Just create a new color set and in Attributes inspector we have appearances attribute with different properties and choose one as per requirement.

As I chose a property(Any, Dark) we got two appearance color boxes, one is for universal mode and other is for dark mode. In which you can set whatever color you want as per your wish. Make sure color-set name should be clear as per the component where you are going to use it.
Use of Custom Color-Sets
Color-sets are an amazing feature, very simple to make moreover very easy to use that too according to one’s design. One can make numerous sets as per their requirement. There are two ways to use color-sets:
- via Storyboard
- Programmatically
After saving, you will get it in color options with color names( given as per components where we can use it) so you can directly use it via storyboard further in your application.

You can do same programmatically and it is as simple as storyboard is.
if your deployment target fallback on earlier versions than iOS 13 and you are using system adaptive colors then you have to maintain it by availability check as you can see it in example.

Furthermore, you have to use name of color-set in named parameter of UIColor. Most importantly, make sure you are writing correct name else you will get crash for the same.
Conclusion
One can search about same from number of sources. But I would like to specify that when I tried to learn and implement dark theme feature, I faced many problems even though there were number of examples but the information was complex. Hence I tried to make it as simple and informative it could be. Hope you all will be able to understand and make your application blend into the theme of the user’s device effortlessly.
“While we teach, we learn,” said the Roman philosopher Seneca
You can get the source code on Github here. In the next article, we’ll be playing with functionalities of the application using this feature.
Источник
How to use Dark Mode on iPhone in iOS 13
— Jun. 4th 2019 4:26 pm PT
After years of anticipation for a system-wide dark theme, Apple has brought Dark Mode to iPhone with iOS 13. Read on for how to use the feature manually or with automatic switching between Light and Dark Modes.
Dark Mode in iOS 13 offers a gorgeous dark theme across the whole operating system. Whether you’d like to use it at night for a better viewing experience or prefer to use it all the time, it’s easy to customize the dark theme to your preferences on your iPhone and iPad (iPadOS 13 coming on September 30th).
When you install iOS 13 for the first time it will ask if you’d like to use Dark Mode as you complete the installation process. If you didn’t choose it then or want to tweak your settings, follow along with the steps below.
How to use Dark Mode on iPhone in iOS 13
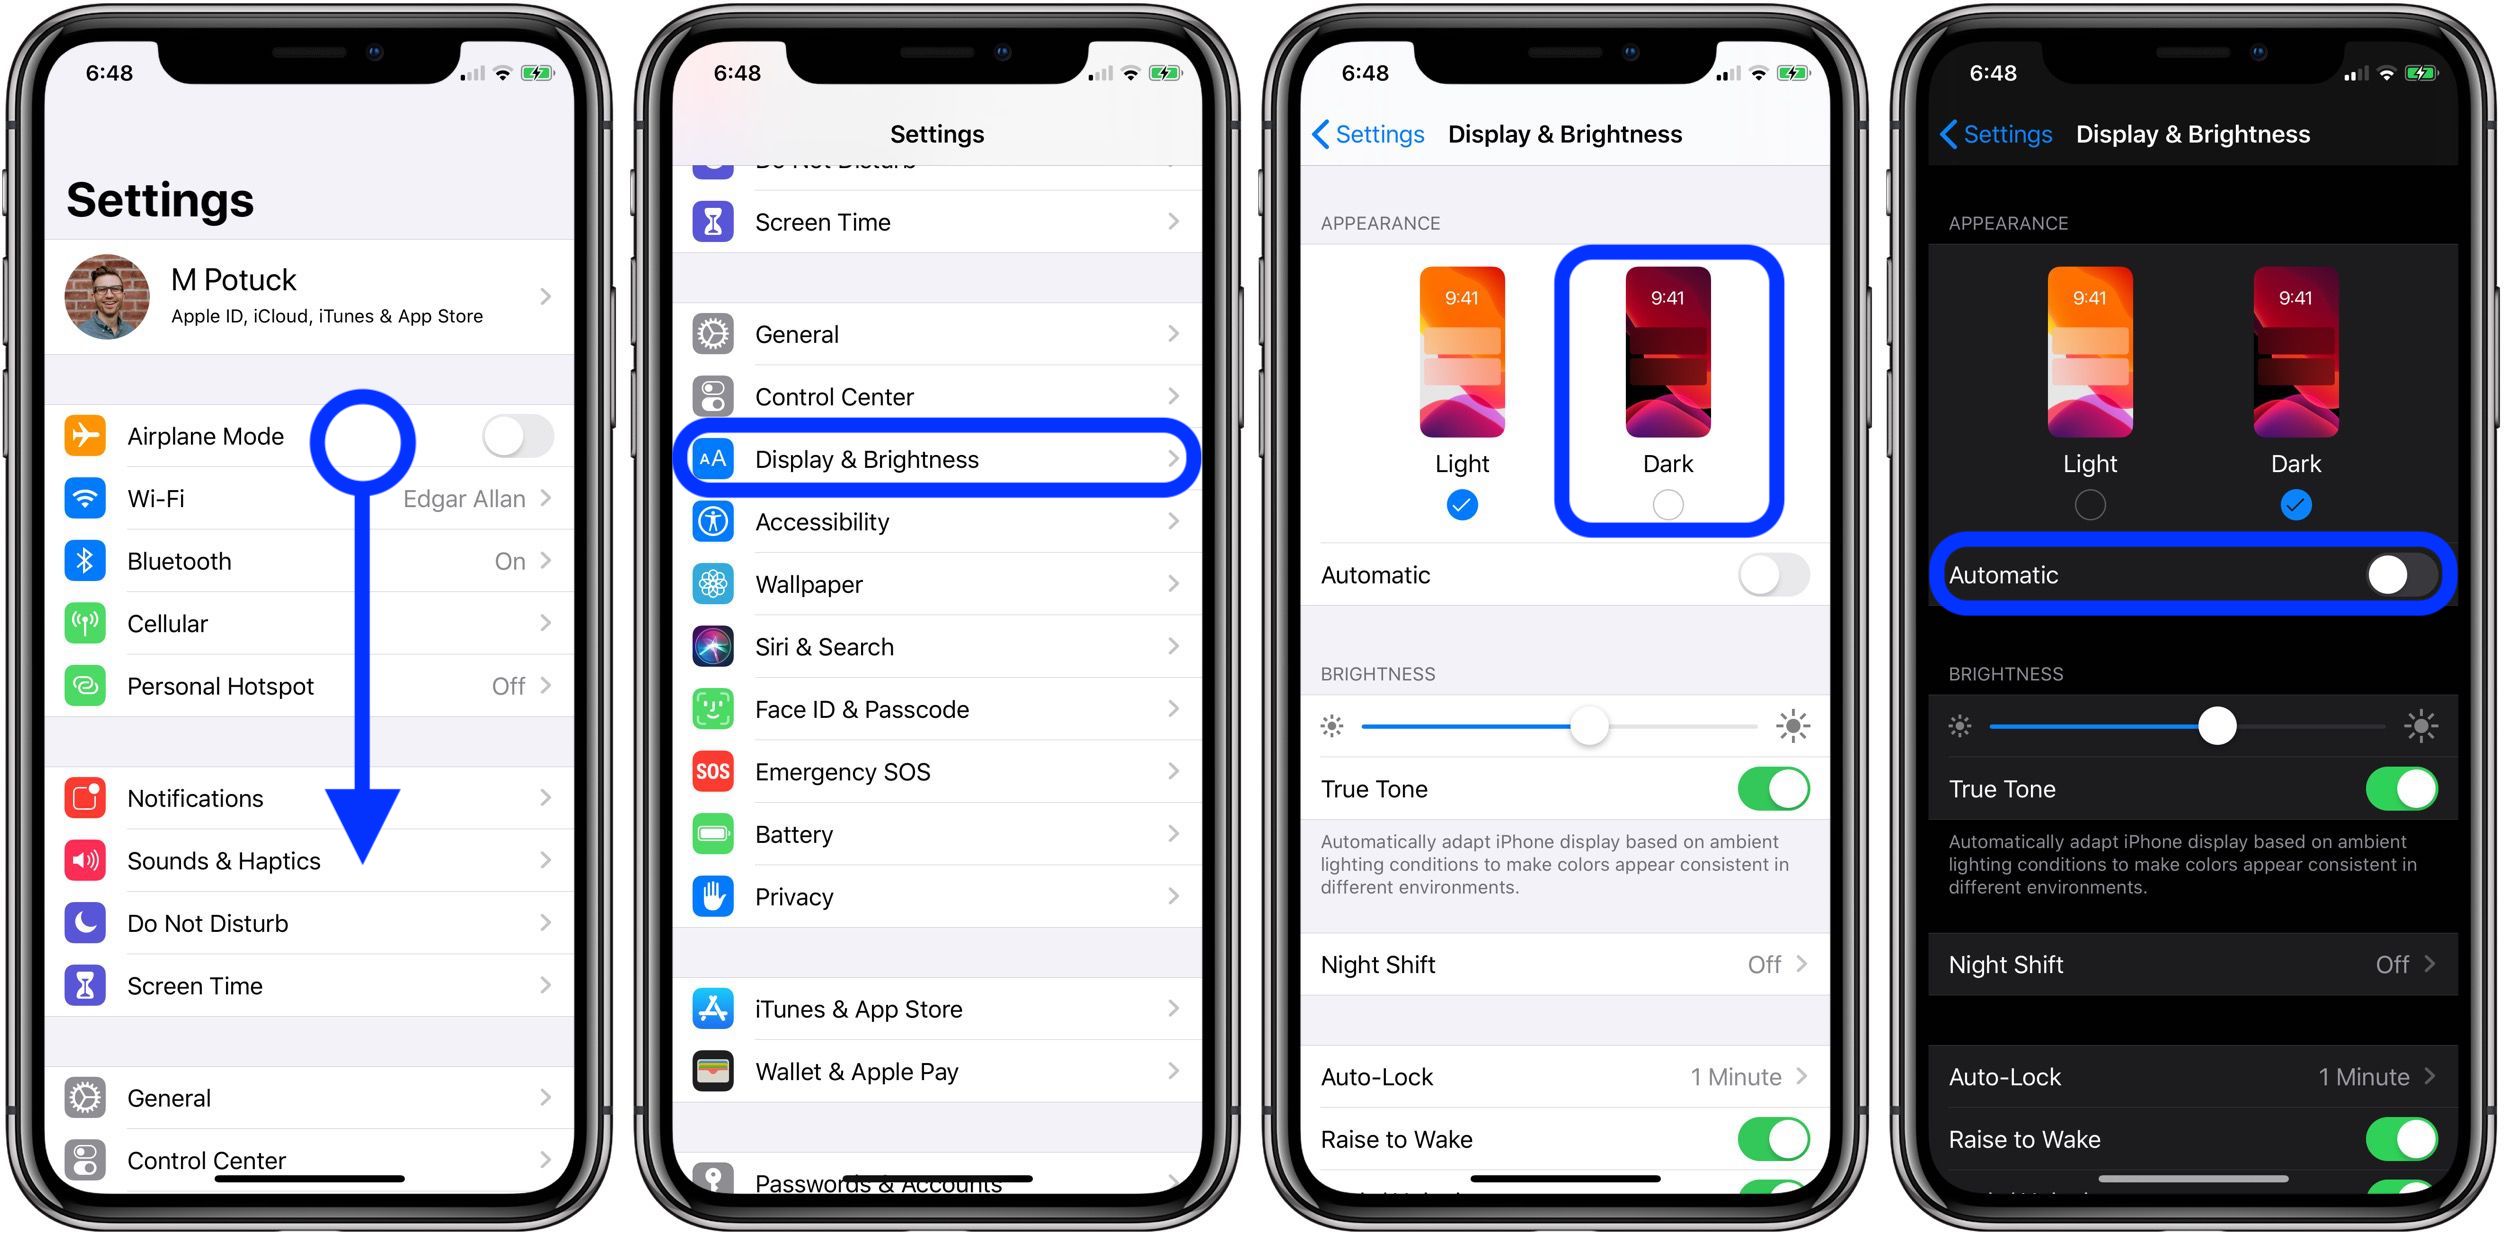
- Open Settings
- Swipe down and tap Display & Brightness
- At the top of your screen choose Dark
- Use the toggle next to Automaticif you’d like to switch between the dark and light theme automatically
- You can also tell Siri to turn Dark Mode on and off or quickly toggle Dark Mode it in Control Center.
Here’s how the process looks:
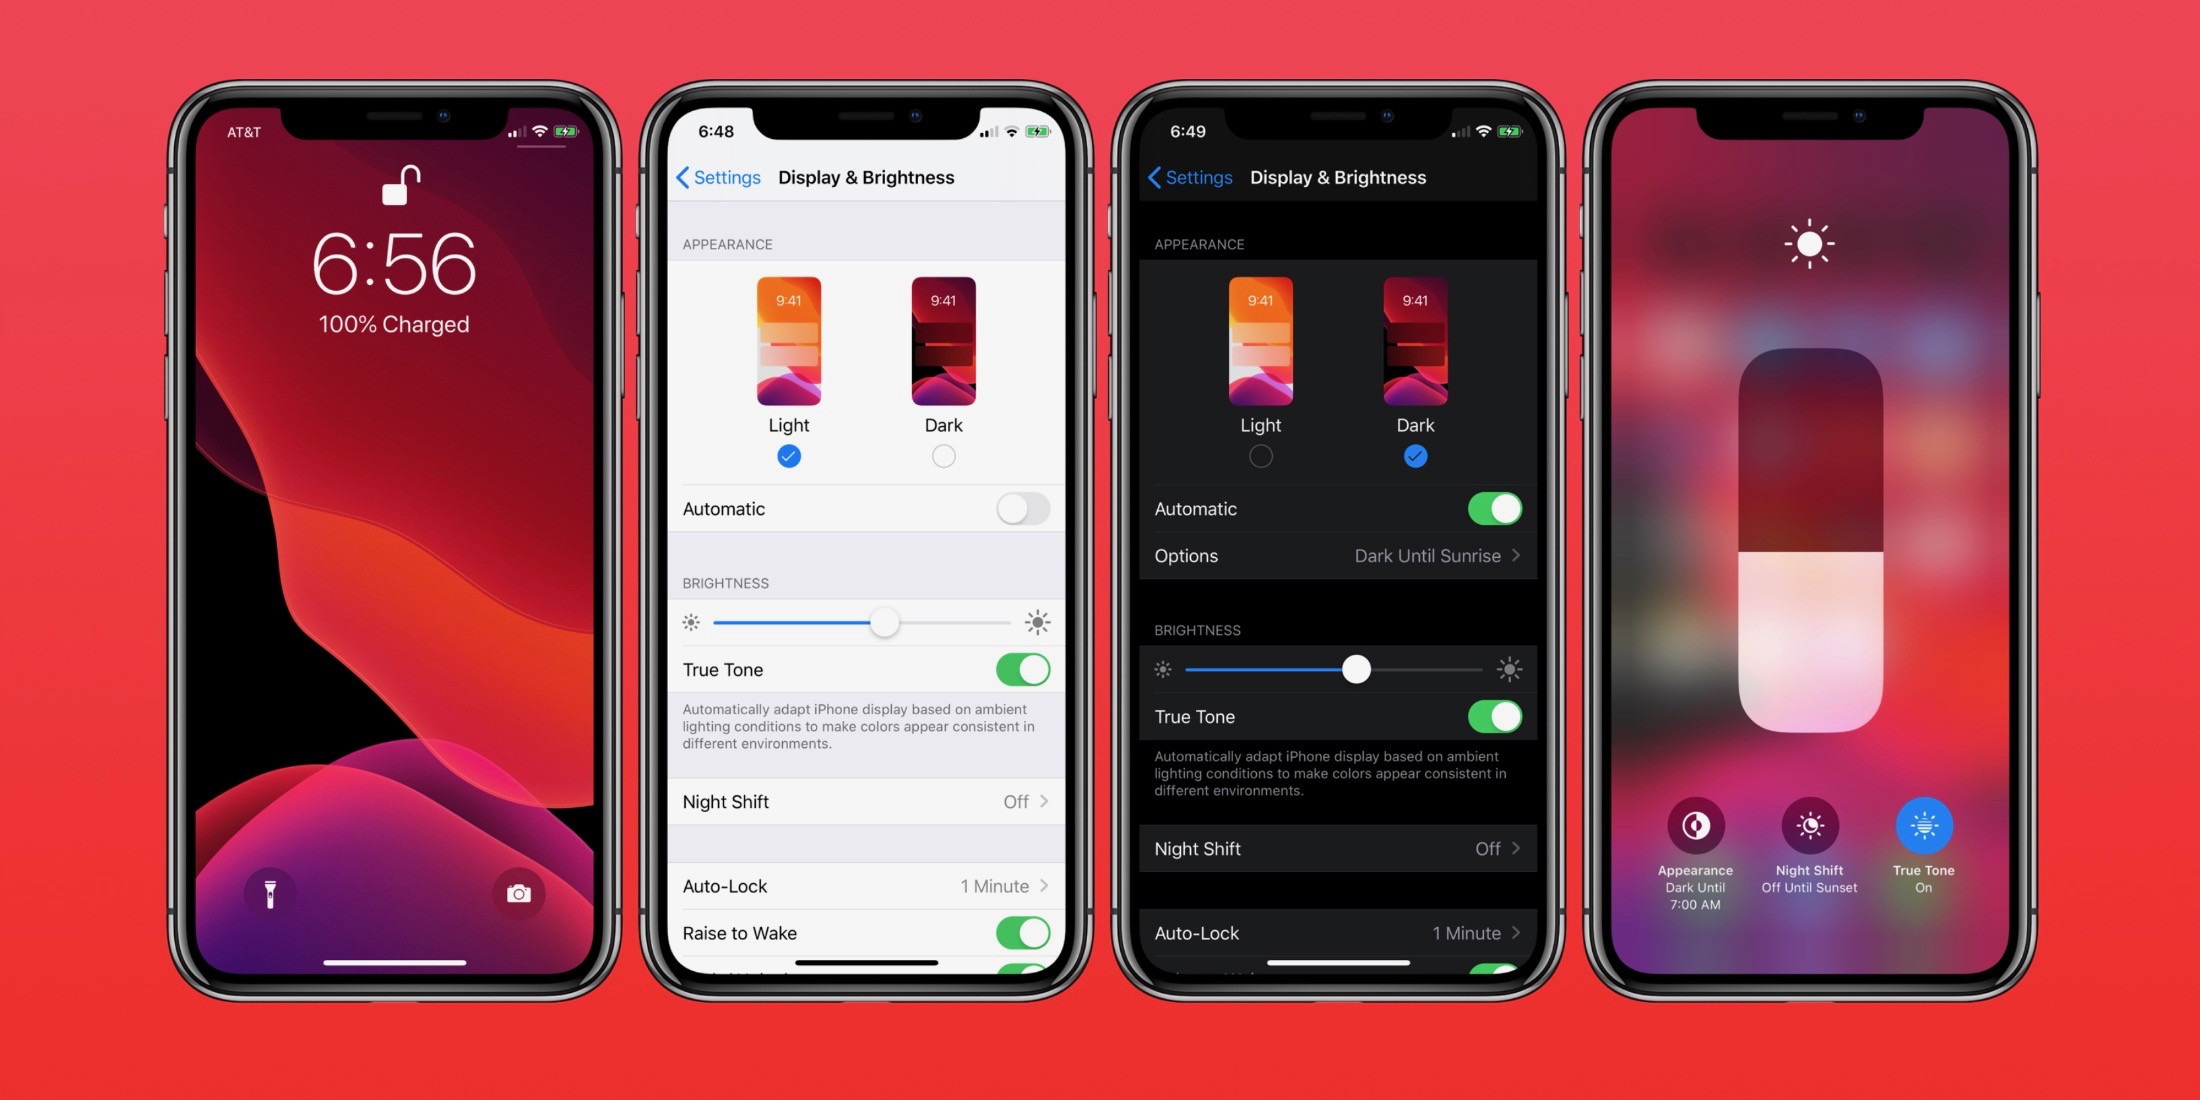
After toggling on Dark Mode, you can choose if you’d like to use it manually or turn it to automatic.
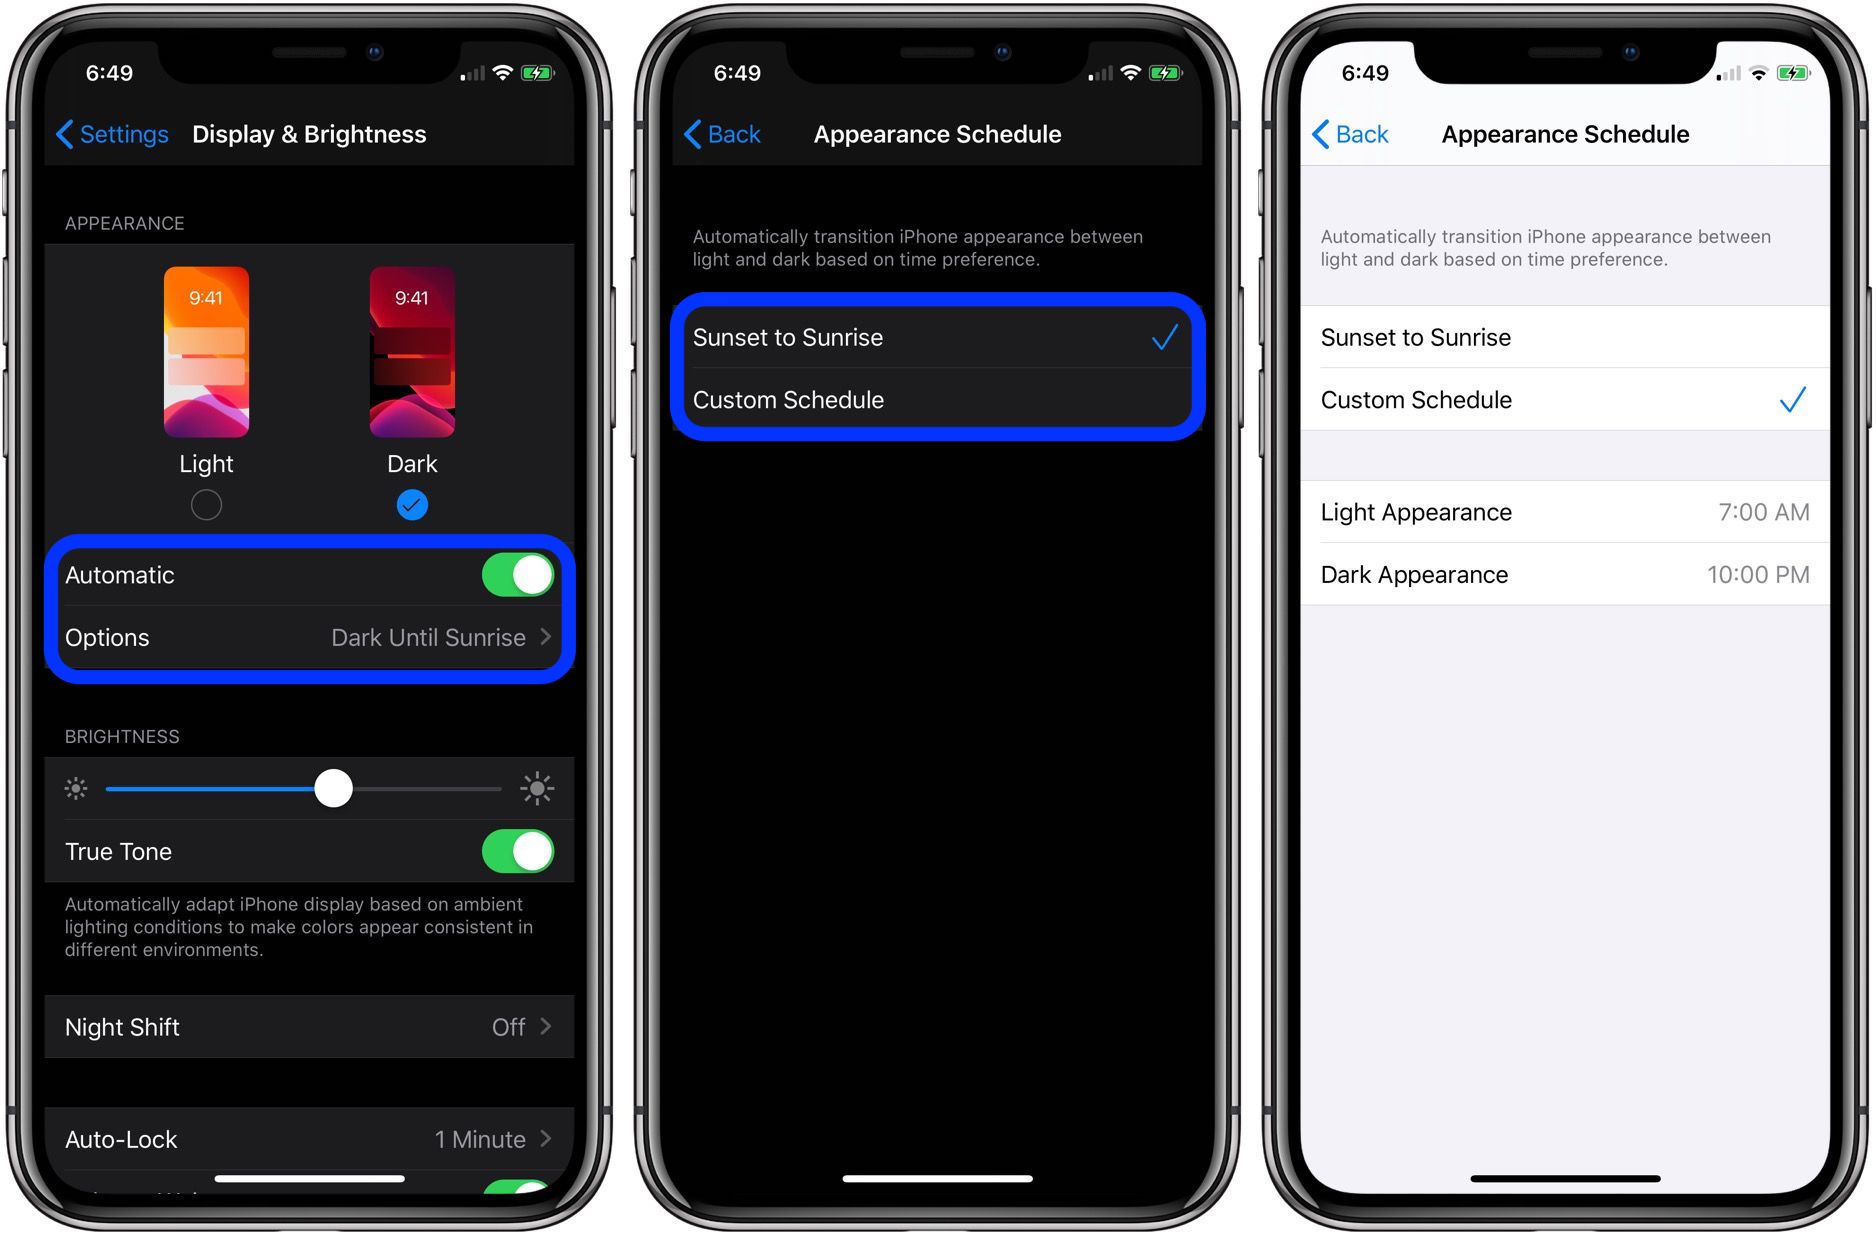
As shown above, you can set your appearance automatically in iOS 13 based on sunset to sunrise which will switch between the Light and Dark Mode based on the time of day, or set your own custom schedule.
You can also quickly toggle between Light and Dark Mode in Control Center.
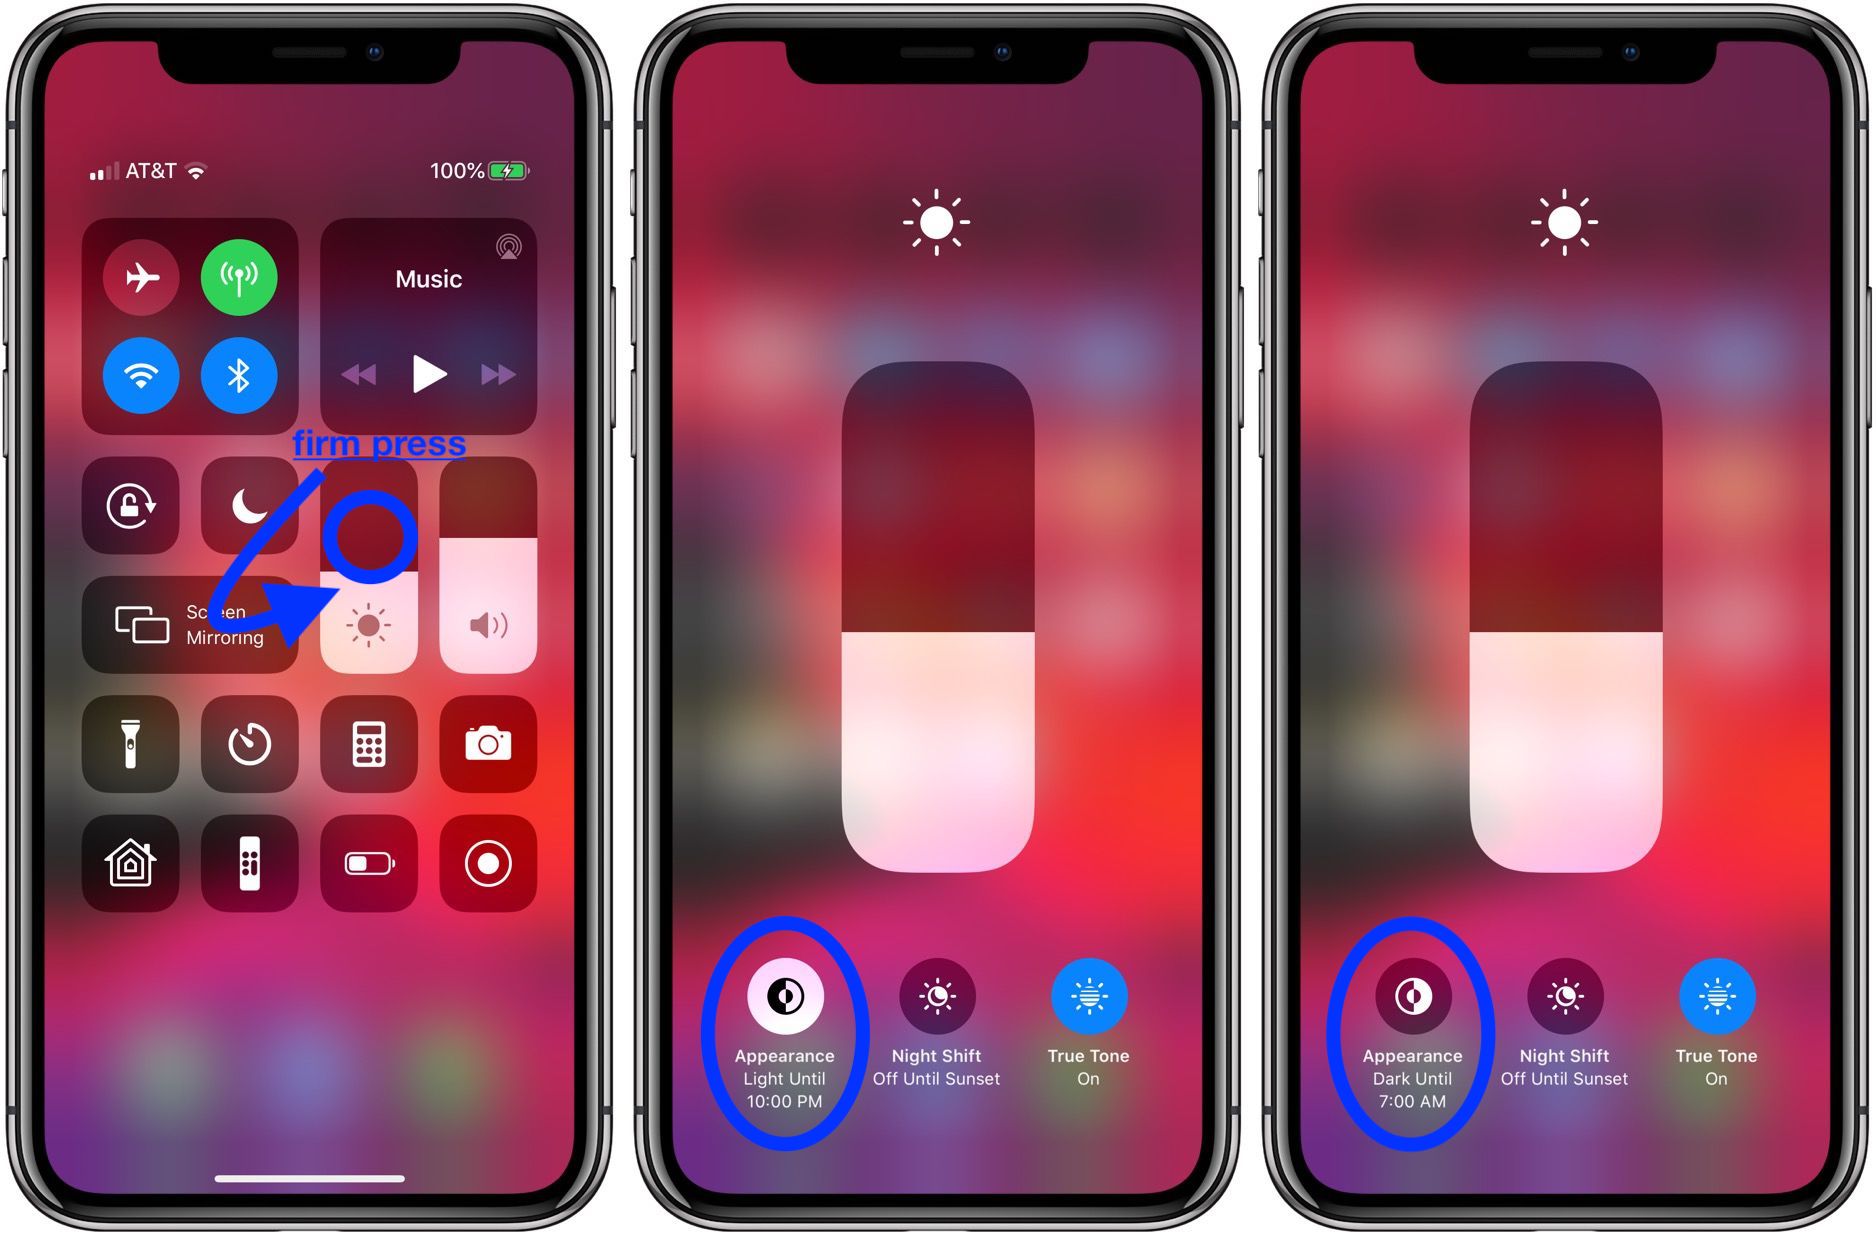
Just do a firm press on the brightness slider and you’ll find the Light and Dark toggle in the bottom left corner.
Alternately, you can add a dedicated button for toggling Dark Mode in Control Center.
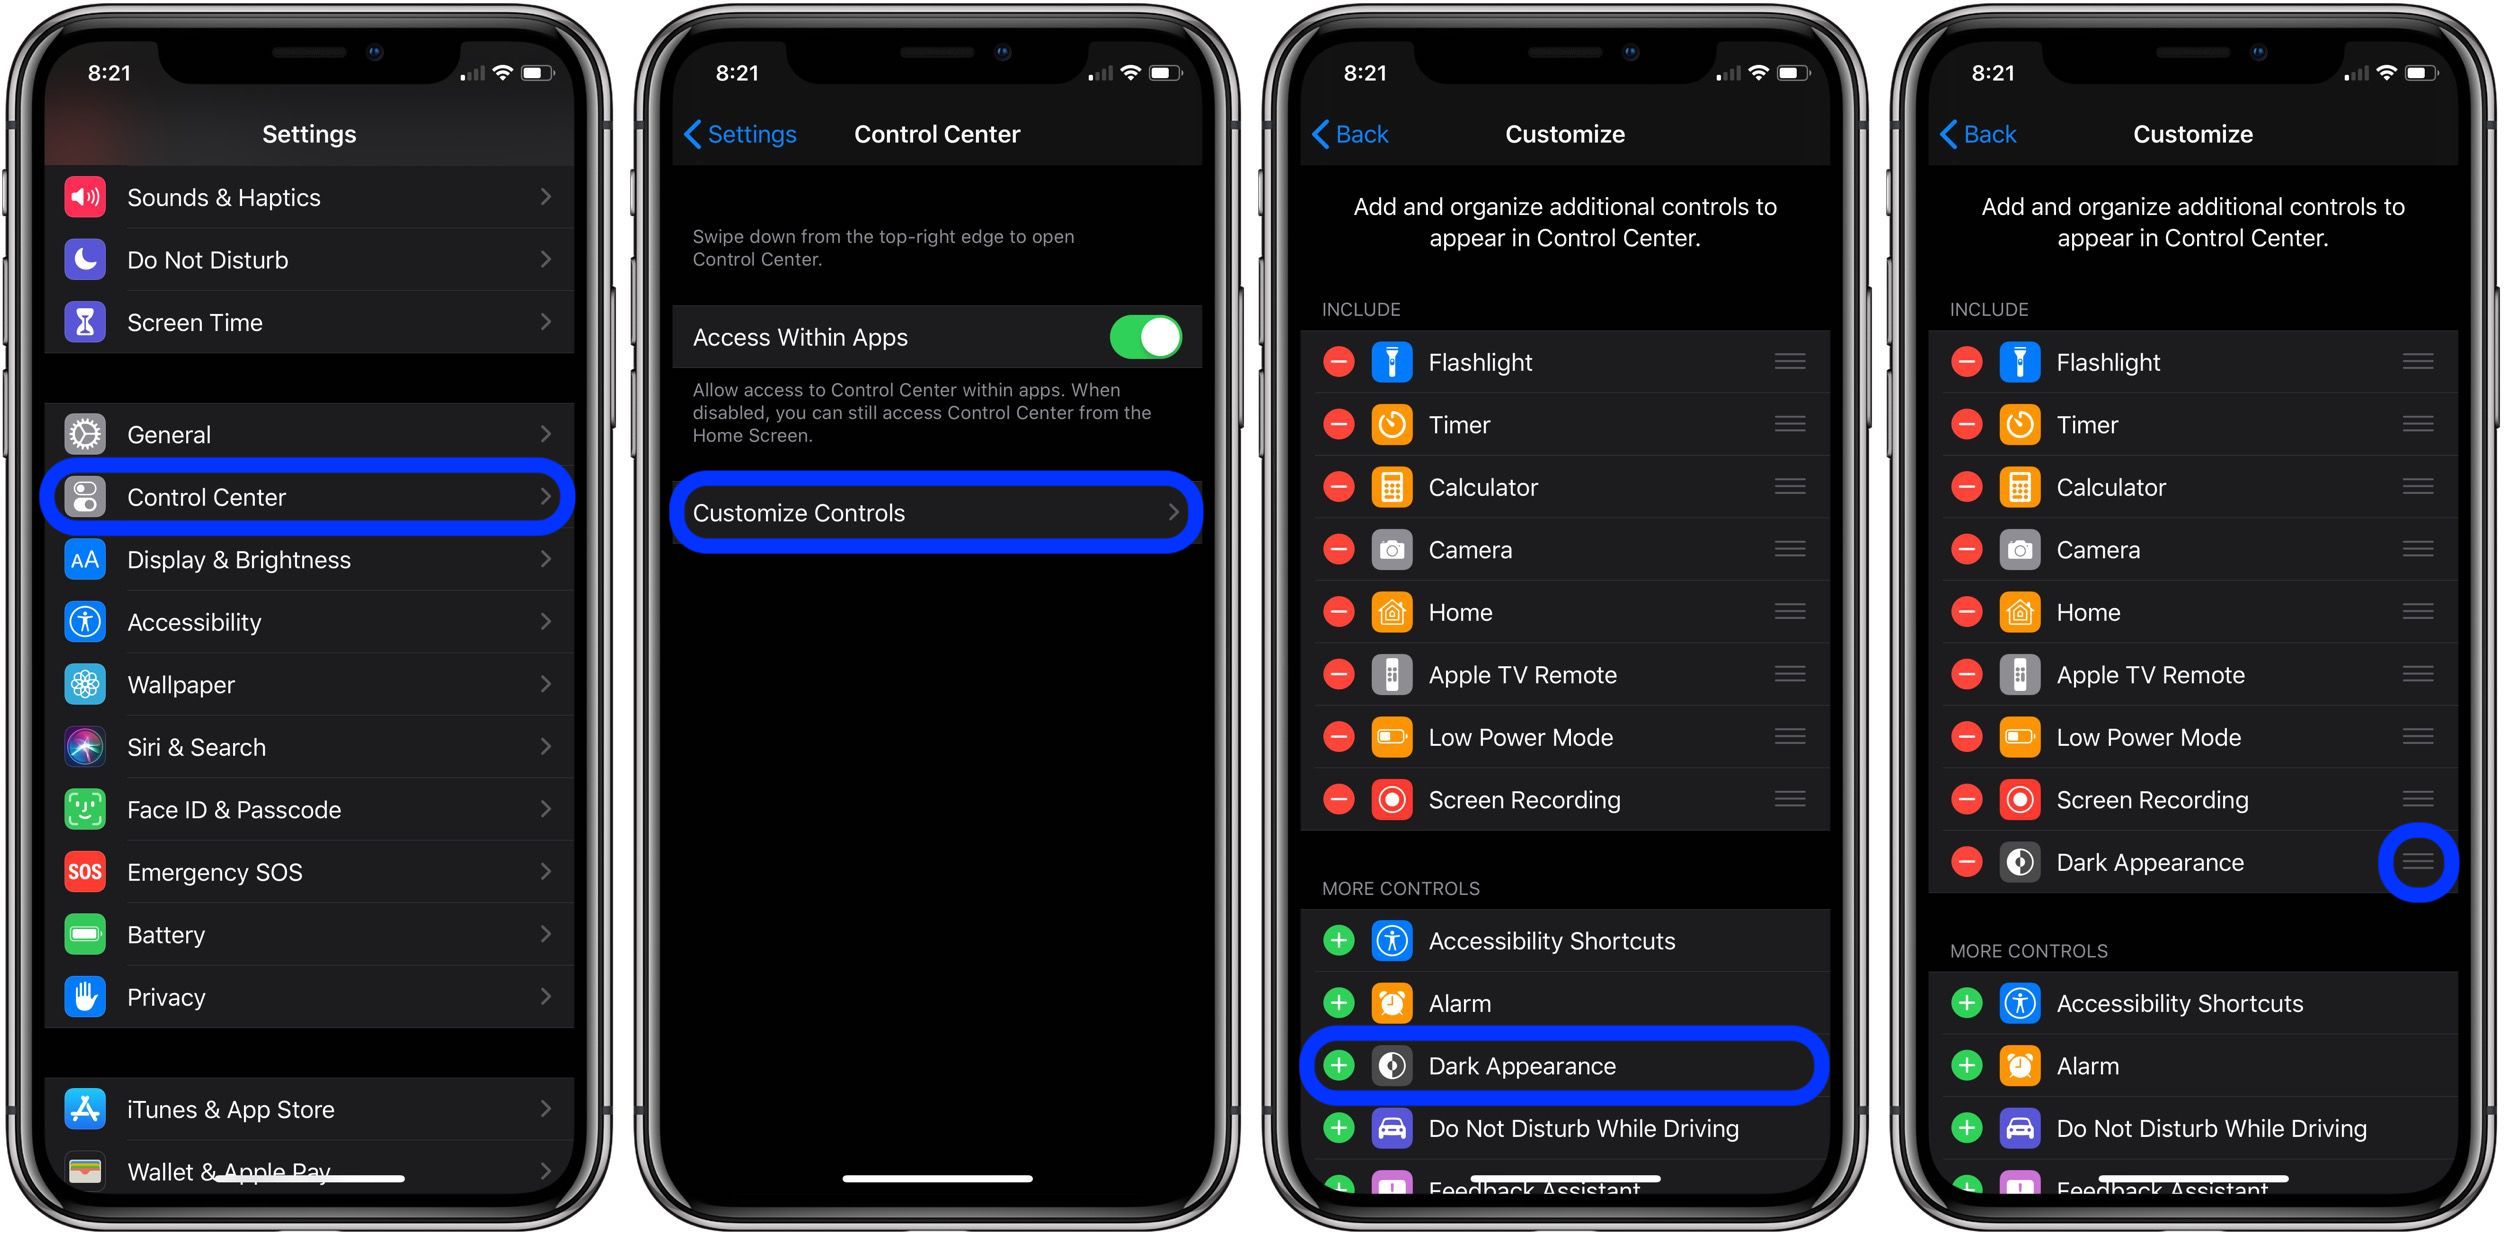
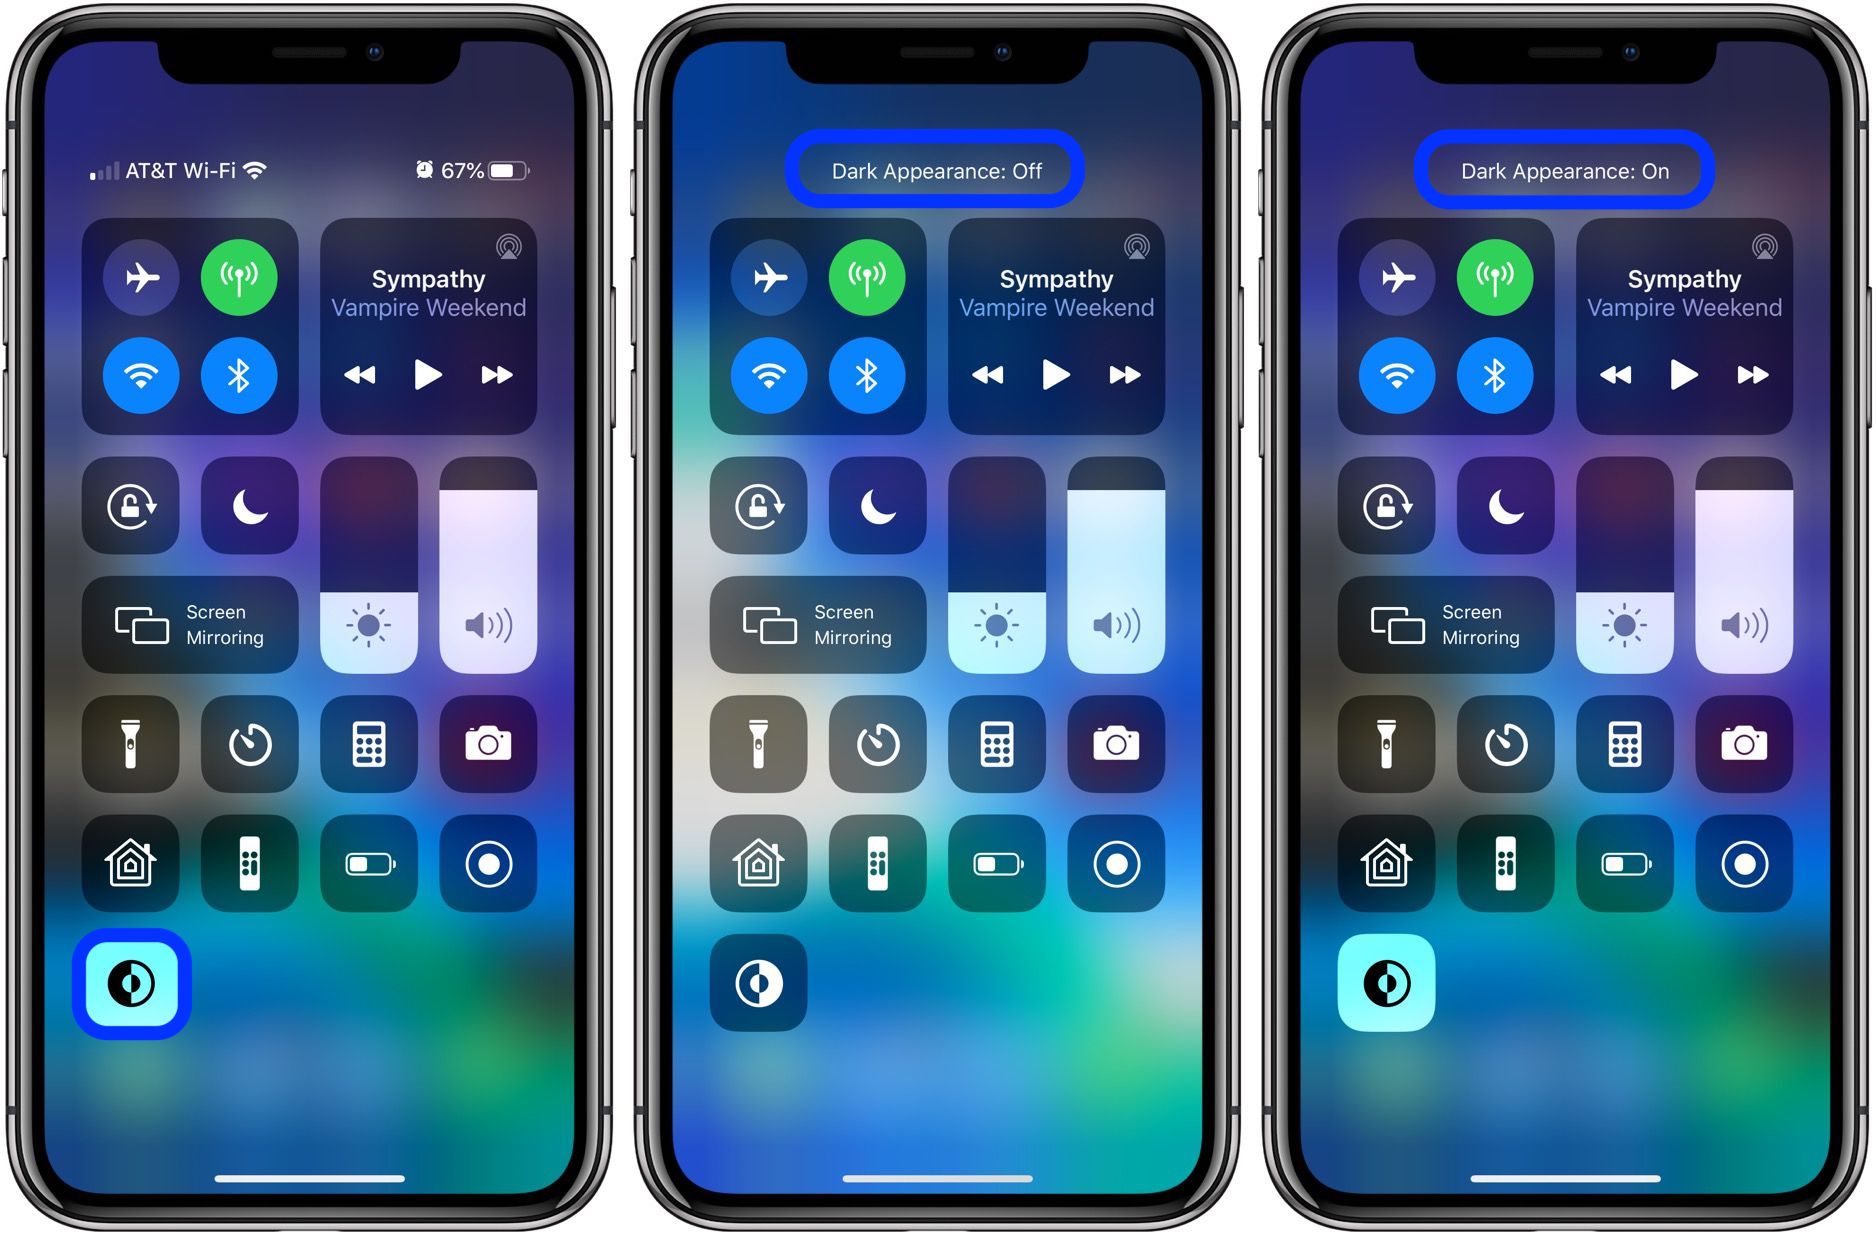
Now you’ll have quicker access to enabling and disabling Dark Mode.
For more help getting the most out of your Apple devices, check out our how to guide and the following articles on iOS 13:
FTC: We use income earning auto affiliate links. More.
Источник
Iphone dark что это
In iOS 13.0 and later, people can choose to adopt a dark system-wide appearance called Dark Mode. In Dark Mode, the system uses a darker color palette for all screens, views, menus, and controls, and it uses more vibrancy to make foreground content stand out against the darker backgrounds. Dark Mode supports all accessibility features.


In Settings, people can choose Dark Mode as their default interface style and schedule automatic changes between the appearance modes. Because people make these choices at a systemwide level, they generally expect all apps to respect their preferences.
Comply with the appearance mode people choose in Settings. If you offer an app-specific appearance mode option, you create more work for people because they have to adjust more than one setting. Worse, they may think your app is broken because it doesn’t respond to their systemwide appearance choice.
Test your designs in both light and dark appearances. See how your interface looks in both appearances, and adjust your designs as needed to accommodate each one. Designs that work well in one appearance might not work in the other.
Ensure that your content remains comfortably legible in Dark Mode when you adjust the contrast and transparency accessibility settings. In Dark Mode, you should test your content with Increase Contrast and Reduce Transparency turned on, both separately and together. You may find places where dark text is less legible when it’s on a dark background. You might also find that turning on Increase Contrast in Dark Mode can result in reduced visual contrast between dark text and a dark background. Although people with strong vision might still be able to read lower contrast text, such text could be illegible for people with visual disabilities. For guidance, see Color and Contrast.
Dark Mode Colors
The color palette in Dark Mode includes darker background colors and lighter foreground colors that are carefully selected to ensure contrast while maintaining a consistent feel between modes and across apps.
In Dark Mode, the system uses two sets of background colors — called base and elevated — to enhance the perception of depth when one dark interface is layered above another. The base colors are darker, making background interfaces appear to recede, and the elevated colors are lighter, making foreground interfaces appear to advance.
Prefer the system background colors. Dark Mode is dynamic, which means that the background color automatically changes from base to elevated when an interface is in the foreground, such as a popover or modal sheet. The system also uses the elevated background color to provide visual separation between apps in a multitasking environment and between windows in a multiple-window context. Using a custom background color can make it harder for people to perceive these system-provided visual distinctions.
Use dynamic colors that adapt to the current appearance. Semantic colors like separator automatically adapt to the current appearance (for guidance, see Dynamic System Colors). When you need a custom color, add a Color Set asset to your app’s asset catalog and specify the light and dark variants of the color so that it can adapt to the current appearance mode. Avoid using hard-coded color values or colors that don’t adapt.
Источник


