- Move apps and create folders on your iPhone, iPad, or iPod touch
- How to organize your apps
- How to put apps in a folder
- How to move an app to a different page
- Share folders with iCloud Drive
- On an iPhone, iPad, or iPod touch
- How to share a folder
- How to invite participants, remove participants, or change sharing settings
- On a Mac
- How to share a folder
- How to invite participants, remove participants, or change sharing settings
- On a PC
- How to share a folder
- How to invite participants, remove participants, or change sharing settings
- On iCloud.com
- How to share a folder
- How to invite participants, remove participants, or change sharing settings
- Delete a shared folder
- Learn more about folder sharing
- How to Make Folders and Group Apps on the iPhone
- Organize your iPhone to save time and avoid aggravation
- What to Know
- How to Create Folders and Group Apps on the iPhone
- How Default iPhone Folder Names Are Suggested
- How to Edit Folders On Your iPhone
- How to Remove Apps From Folders on iPhone
- How to Add Folders to the iPhone Dock
- How to Delete a Folder on the iPhone
Move apps and create folders on your iPhone, iPad, or iPod touch
You can organize the apps on your Home Screen, put them in folders, and move them to other pages, or screens. You can also reorder your pages.
How to organize your apps
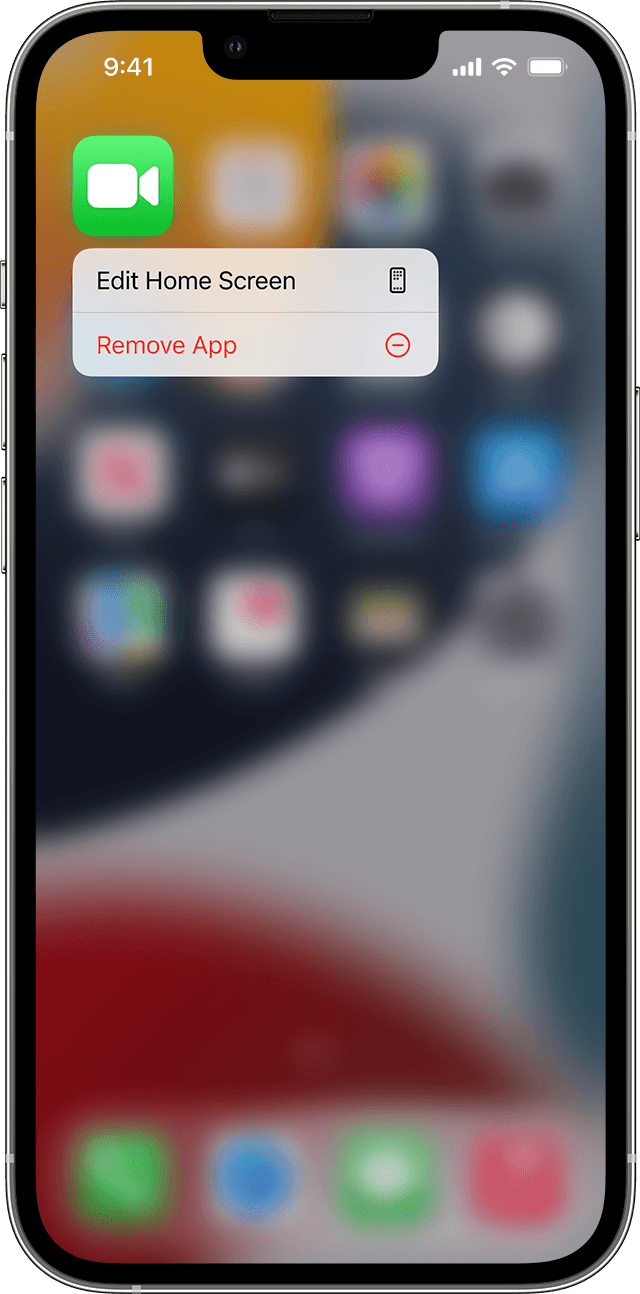
- Touch and hold any app on the screen, then tap Edit Home Screen .
- Drag the app to another spot, like the Dock at the bottom of the screen.
- On iPhone X and later, tap Done to save. On iPhone 8 and earlier, press the Home button.

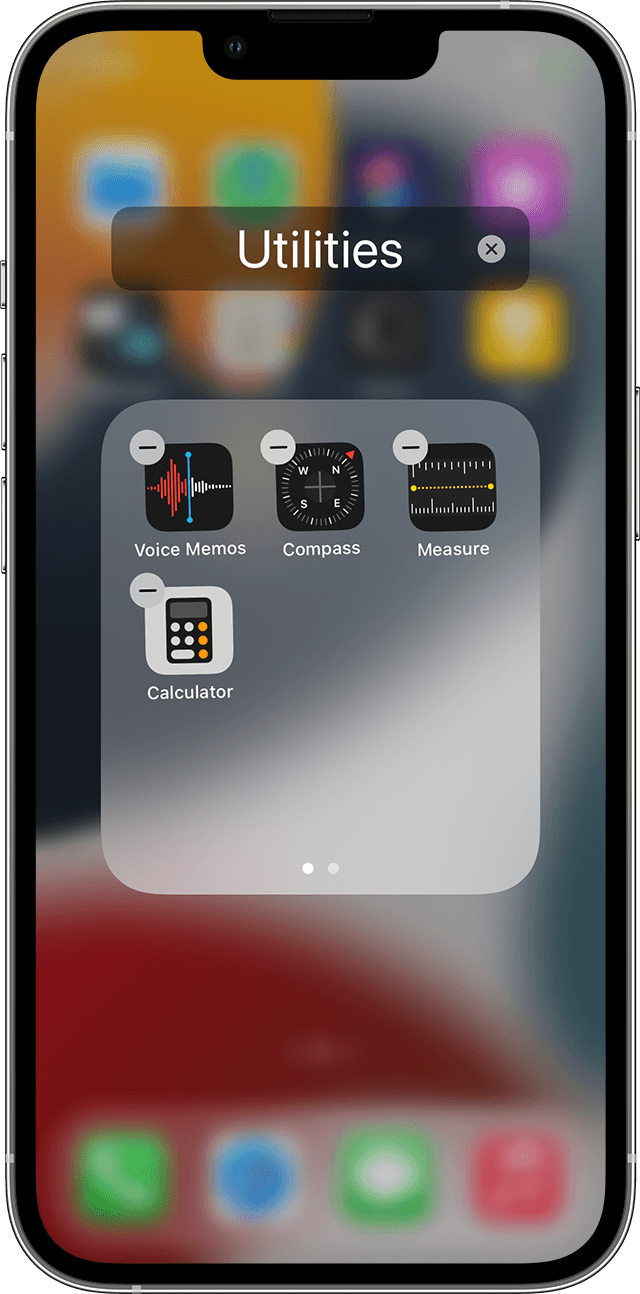
How to put apps in a folder
If you have a lot of apps, you can put your related apps in folders. Here’s how:
- To make a folder, drag an app onto another app.
- To rename the folder, tap the name field or the Close button , then enter the new name.
- Drag apps into the folder. Folders can have more than one page.
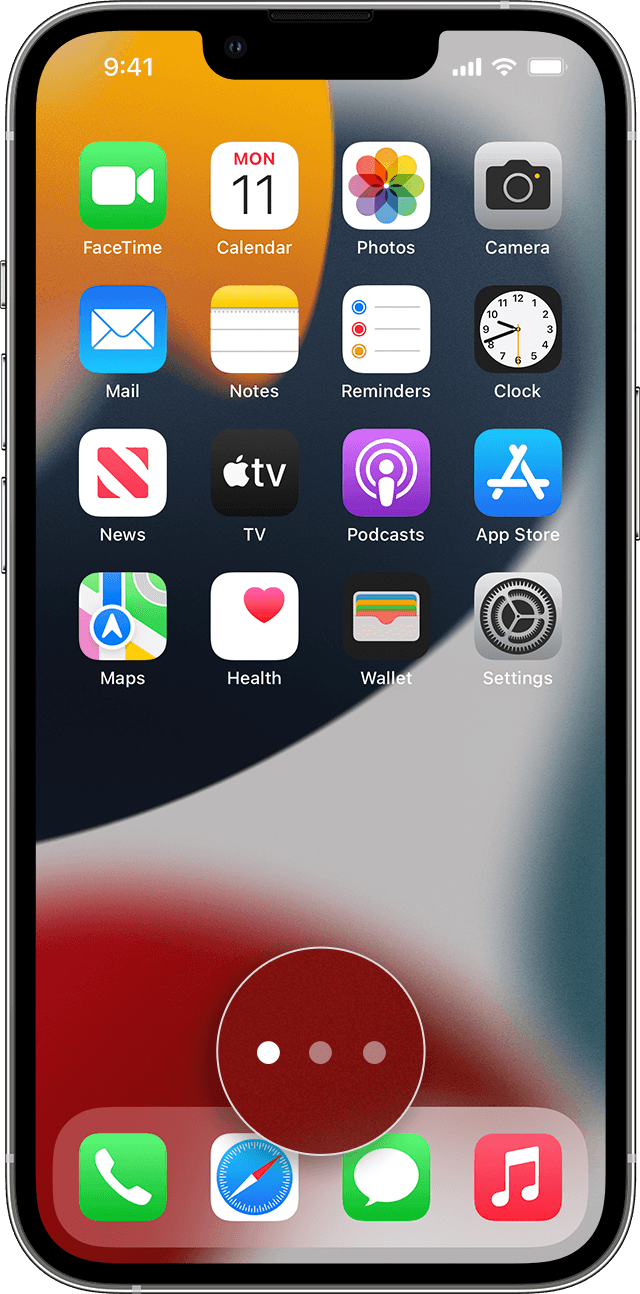
How to move an app to a different page
You start with one page of apps. To make a new page, touch and hold an app until the apps jiggle, then drag an app to the right edge of the screen. You might need to wait a second for the new page to appear. To delete a page, consolidate all of your apps to another Home Screen. When there are no apps present the page will delete.
When you have more than one page, a bright dot in a row of dots above the Dock shows you which page you’re on. You can move an app to a different page and create new pages:

If there are dots to the left or right of the bright dot, you can drag an app to the right side of the screen to move the app to the next page in that direction. Or swipe left to see the apps on that page.

If there are no dots to the right of the bright dot, dragging an app to that side of the screen makes a new page.
Источник
Share folders with iCloud Drive
With folder sharing in iCloud Drive, you can share entire folders of files with friends, family, or colleagues. Then, you can work together on your iPhone, iPad, iPod touch, Mac, PC, or iCloud.com.
When you create and share a folder in iCloud Drive, participants can access all the files in that folder. If you add a file to a shared folder, it’s automatically shared with all participants, too. You can also add or remove participants, edit sharing permissions, or stop sharing a folder anytime. Here’s how.
On an iPhone, iPad, or iPod touch
To share folders in iCloud Drive on your iPhone, iPad, or iPod touch, you need iOS 13.4 or iPadOS 13.4 or later.
How to share a folder
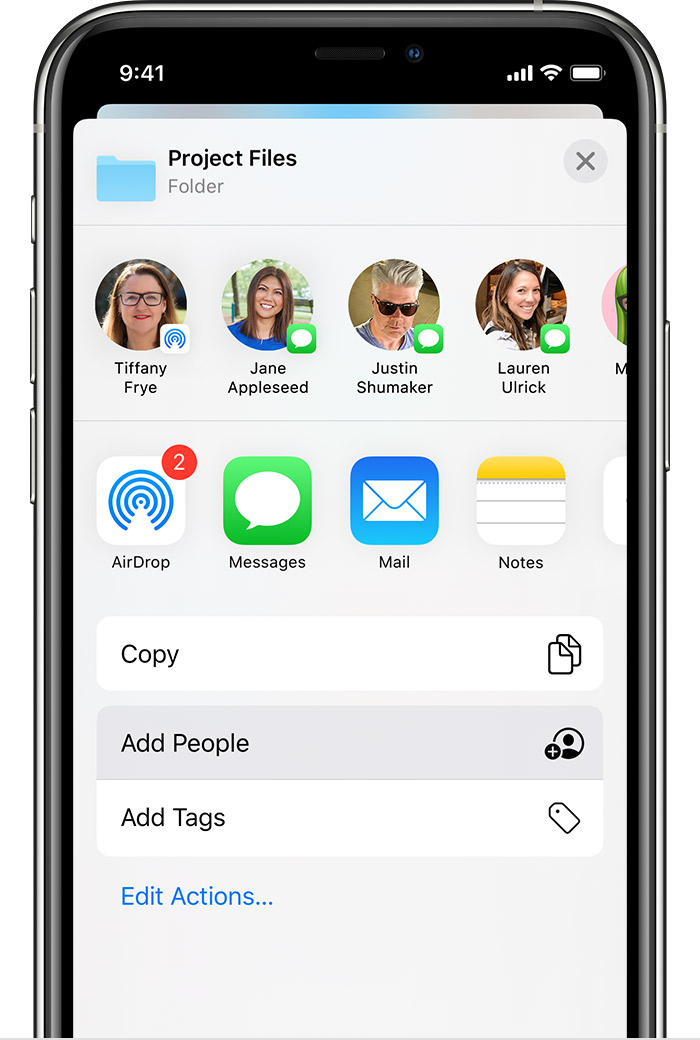
- Open the Files app.
- In the Browse tab, go to Locations, then tap iCloud Drive.
- Tap Select, then tap the folder you wish to share.
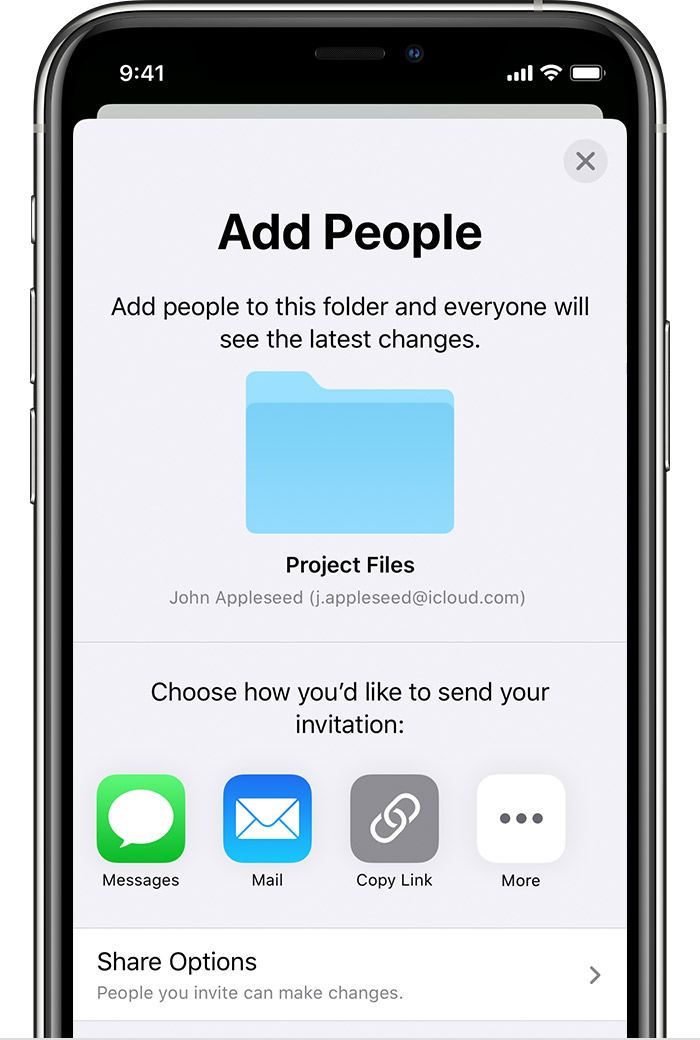
- Tap Share , then tap Add People . You may need to swipe up.

- Tap Share Options to edit who can access the folder and the permissions. You can share the folder with only people you invite, or anyone with the link. You can also give permission to make changes or view files only. Then choose among the icons how you’d like to send your invitation.
How to invite participants, remove participants, or change sharing settings
- Tap Select, then tap the shared folder in iCloud Drive.
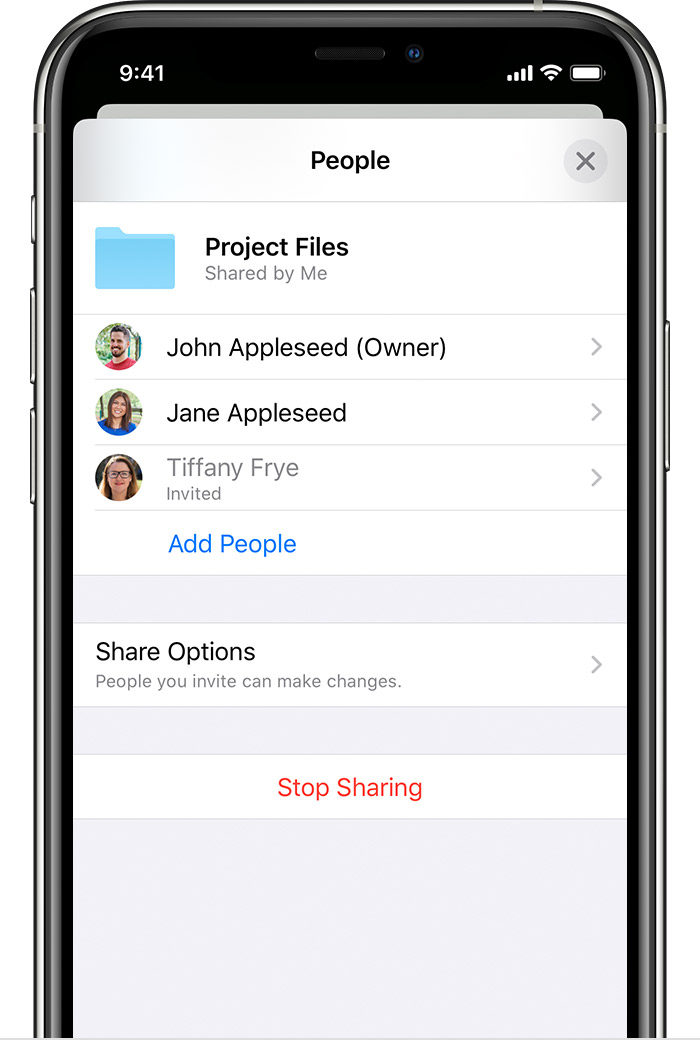
- Tap Share , then tap Show People .
- From here, you can do these things:
- Invite participants: Tap Copy Link, Add People, or Send Link (if access is set to anyone with the link), then select how you want to send the invitation: Mail, Messages, or Airdrop, for example, then choose how you’d like to send your invitation.
- Remove participants: If «Only people you invite» can access your shared folder, tap the participant’s name, then tap Remove Access. Then tap OK to confirm.
- Change sharing settings: To change sharing settings for everyone, tap Share Options. If «Only people you invite» is selected, you can control sharing settings for each participant. Just tap the person’s name, then change the permissions.
- Stop sharing: Tap Stop Sharing, then tap OK to confirm. You can also simply move or delete the folder from iCloud Drive, and participants will no longer be able to access the folder or its files.
On a Mac
To share folders in iCloud Drive on your Mac, you need macOS Catalina 10.15.4 or later.
How to share a folder
- In the Finder, select iCloud Drive from the sidebar.
- Select the folder you wish to share.
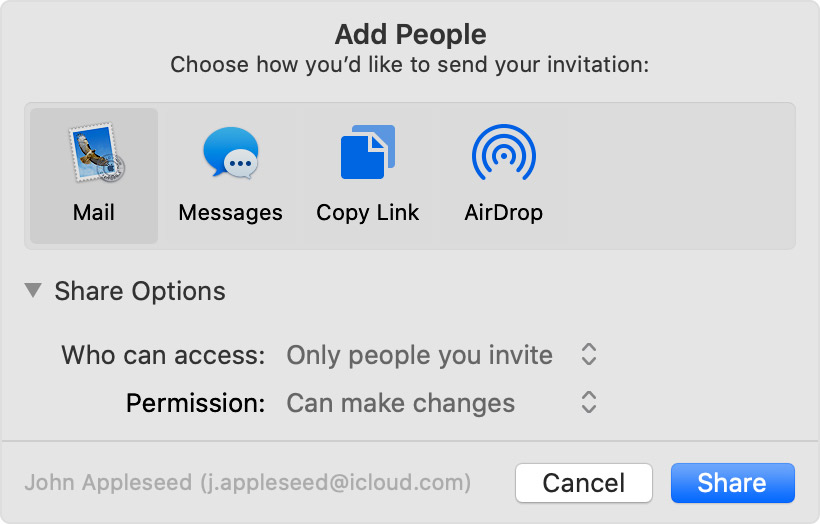
- Click Share , then choose Add People .
- Select how you want to send the invitation: Mail, Messages, Copy Link, or Airdrop, for example.
- To edit who can access the folder and the permissions, click Share Options. You can share the folder with only people you invite, or anyone with the link. You can also give permission to make changes or view files only.
- Click Share, then add the relevant contact information of the people you want to share with.
How to invite participants, remove participants, or change sharing settings
- Control-click on the shared folder in iCloud Drive, then click Share in the dropdown menu. You can also highlight the shared folder, then click Share.
- Click Show People .
- From here, you can do these things:
- Invite participants: Click Add People , then choose how you’d like to send your invitation.
- Remove participants: Hold the pointer over the participant’s name, then click More . Then choose Remove Access.
- Change sharing settings: Click the triangle next to Share Options. If «Only people you invite» can access your shared folder, you can control sharing settings for each participant. Hold the pointer over the person’s name, then click More to change the permissions.
- Stop sharing: Click the triangle next to Share Options, then click Stop Sharing. You can also simply move or delete the folder from iCloud Drive, and participants will no longer be able to access the folder or its files.
On a PC
To share folders in iCloud Drive on your PC, you need iCloud for Windows 11.1.
How to share a folder
- Open iCloud Drive from the Navigation pane of File Explorer.
- Right-click the folder you wish to share.
- Select iCloud Sharing.
- In the People field, enter the email addresses of the people you want to share with.
- Under Sharing Options, edit who can access the folder and the permissions. You can share the folder with only people you invite, or anyone with the link. You can also give permission to make changes or view files only.
- Click Apply.
How to invite participants, remove participants, or change sharing settings
- Right-click the folder in iCloud Drive.
- Select iCloud Sharing
- From here, you can do the following:
- Invite participants: Enter the email addresses of the people you want to share with in the People field, then click Add.
- Remove participants: Click the participant’s name, then select Remove. Click Apply.
- Change sharing settings: Under Sharing Options, edit the settings. If «Only people you invite» can access your shared folder, you can control sharing settings for each participant. Under People, click the participant’s name, then edit their permissions.
- Stop sharing: Click Stop Sharing. You can also simply move or delete the folder from iCloud Drive, and participants will no longer be able to access the folder or its files.
On iCloud.com
![]()
How to share a folder
- Sign into iCloud.com and open iCloud Drive.
- Select the folder you wish to share.
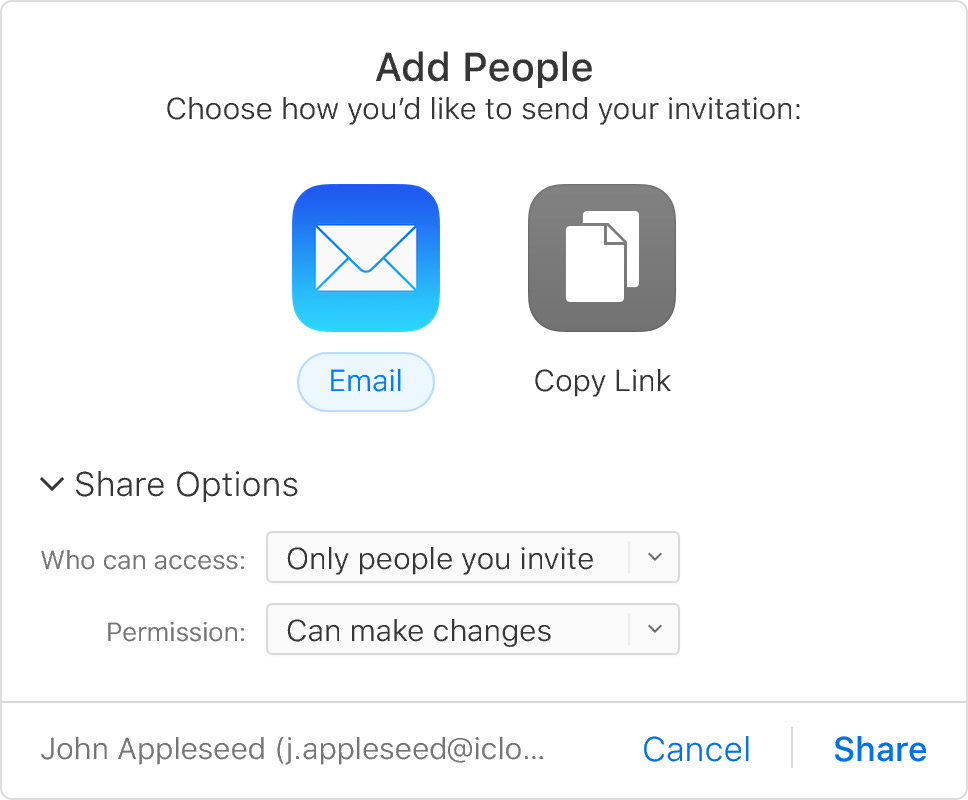
- Click Add People at the top of the screen.
- Choose a sharing option: Email or Copy Link.
- To edit who can access the folder and the permissions, click Share Options. You can share the folder with only people you invite, or anyone with the link. You can also give permission to make changes or view files only.
- If you select Copy Link, enter the email addresses of the people you want to share with.
- Click Share.
How to invite participants, remove participants, or change sharing settings
- Select the shared folder in iCloud Drive.
- Click Show People .
- From here, you can do the following:
- Invite participants: Click Copy Link, Add People , or Send Link (if access is set to anyone with the link), then choose how you’d like to send your invitation. Then click Share.
- Remove participants: If «Only people you invite» can access your shared folder, hover the pointer over a participant’s name, then click More . Then choose Remove Access.
- Change sharing settings: If «Only people you invite» can access your shared folder, you can control sharing settings for each participant. Hover the pointer over a participant’s name, then click More to change the permissions.
- Stop sharing: Click Share Options, then click Stop Sharing. You can also simply move or delete the folder from iCloud Drive, and participants will no longer be able to access the folder or its files.
Delete a shared folder
To delete a shared folder in iCloud Drive, select the folder that you don’t want anymore and tap Delete .
- If the owner of a shared folder deletes the folder, a sub-folder, or file in the shared folder, it deletes from both their devices and all participants’ devices. If you change your mind or accidentally delete a folder, you have 30 days to get it back.
- On your iPhone, iPad, or iPod touch: In the Browse tab, go to Locations > Recently Deleted. Then select the folder that you want to keep and tap Recover.
- On your Mac: Go to Trash, then drag the folder to your desktop or another location.
- On a PC: Go to the Recycle Bin, then drag the folder to your desktop or another location.
- On iCloud.com: Go to iCloud Drive and check Recently Deleted.*
- If a participant of a shared folder deletes the folder, it removes their access to the shared folder. The participant can regain access to the shared folder by clicking the original sharing invitation link.
- If a participant of a shared folder deletes a sub-folder or file within that shared folder, that sub-folder or file deletes from all participants’ devices, and recovery is not available.
If you’re worried about losing a file, be sure to keep a local copy in addition to the shared copy in iCloud Drive. Learn more about deleting files in iCloud Drive and how to recover deleted files on iCloud.com.
* If Recently Deleted doesn’t restore your files as expected, you can sign in to iCloud.com, click Account Settings, and under Advanced, click Restore Files. If you empty your Trash or use Delete All in Recently Deleted, you can’t recover your files.
Learn more about folder sharing
- Participants need an Apple ID to view or edit files in a shared folder. If you invite someone without an Apple ID, they’ll be prompted to create an Apple ID. Participants must click Add to iCloud Drive to open the shared folder on their device.
- You can share a folder with up to 100 total participants. All participants see changes to shared folders, including when someone renames a shared folder. If you apply tags to a shared folder, your tags aren’t seen by other participants. Learn more about folder sharing access and permissions in iCloud Drive.
- You can’t share system-created folders such as the top-level iCloud Drive folder, Desktop, and Documents, or folders created by apps that use iCloud Drive.
- A shared folder only takes up space in the owner’s iCloud storage. It does not count against the iCloud storage of participants in the shared folder. Learn how to manage your iCloud storage.
- Any Pages, Numbers, and Keynote documents in the folder become collaborative documents. Learn how collaboration for Pages, Numbers, and Keynote works.
Information about products not manufactured by Apple, or independent websites not controlled or tested by Apple, is provided without recommendation or endorsement. Apple assumes no responsibility with regard to the selection, performance, or use of third-party websites or products. Apple makes no representations regarding third-party website accuracy or reliability. Contact the vendor for additional information.
Источник
How to Make Folders and Group Apps on the iPhone
Organize your iPhone to save time and avoid aggravation
:max_bytes(150000):strip_icc()/SamCostello-d7fcf106ec2048ccb06d1e2190b3396d.jpg)
What to Know
- Tap and drag one app on top of another to put them in a folder together.
- Tap the X icon to clear the default name and enter a new one.
This article explains how to make app folders on all iPhone models running any iOS version and how to rename, edit, and delete folders.
:max_bytes(150000):strip_icc()/how-to-make-folders-and-group-apps-on-iphone-2000100-a0ae9cffaa72465b9c7ae07995545005.png)
How to Create Folders and Group Apps on the iPhone
Making folders on your iPhone is a terrific way to reduce clutter on your home screen. Grouping apps together can also make it easier to use your phone — if all of your music apps are in the same place, you won’t have to go hunting through folders or searching your phone when you want to use them.
How you create folders isn’t immediately obvious, but once you learn the trick, it’s simple. Here’s what you need to know about how to create a folder on your iPhone.
To create a folder, you’ll need at least two apps to put into the folder. Decide which two you want to use.
Lightly tap and hold one of the apps until all apps on the screen start shaking (this is the same process you use to re-arrange apps).
Making folders on the iPhone 6S and 7 series, the iPhone 8, iPhone X, XS and XR, and iPhone 11, 11 Pro, and 11 Pro Max is a little trickier. That’s because the 3D Touch screen on those models responds differently to different presses on the screen. If you have one of those phones, don’t press too hard or you’ll trigger a menu or shortcut. Just a light tap and hold is enough.
Drag one of the apps on top of the other. When the first app seems to merge into the second one, take your finger off the screen. Dropping one app into the other creates the folder.
What happens next depends on what version of the iOS you’re running.
- In iOS 7 and higher, the folder and its suggested name take up the entire screen.
- In iOS 4-6, you’ll see the two apps and a name for the folder in a strip across the screen.
Every folder has a name assigned to it by default (more on this in a minute), but you can change that name. Tap the x icon to clear the suggested name and then type the name you want.
:max_bytes(150000):strip_icc()/001_how-to-make-folders-and-group-apps-on-iphone-2000100-5bc793b04cedfd0026b75b02.jpg)
If you want to add more apps to the folder, tap the wallpaper to close the folder. Then drag more apps into the new folder.
When you’ve added all the apps you want and edited the name, click the Home button on the front center, and your changes will be saved (just like when re-arranging icons).
If you have an iPhone X, XS, XR, or newer, there’s no Home button to click. Instead, you should tap Done in the top right corner of the screen.
How Default iPhone Folder Names Are Suggested
When you first create a folder, the iPhone assigns a suggested name to it. That name is chosen based on the App Store category that the apps in the folder come from. For example, if the apps come from the Games category, the folder’s suggested name is Games. You can use the suggested name or add your own using the instructions in step 5 above.
How to Edit Folders On Your iPhone
If you’ve already created a folder on your iPhone, you may want to edit it by changing the name, adding or removing apps, and more. Here’s how:
To edit an existing folder, tap and hold the folder until it begins to move.
Tap it a second time, and the folder will open, and its contents will fill the screen.
You can make the following changes:
- Edit the folder’s name by tapping on the text.
- Remove apps from the folder by dragging them out.
Click the Home button or the Done button to save your changes.
How to Remove Apps From Folders on iPhone
If you want to remove an app from a folder on your iPhone or iPod touch, follow these steps:
Tap and hold the folder that you want to remove the app from.
When the apps and folders start wiggling, remove your finger from the screen.
Tap the folder you want to remove the app from.
Drag the app out of the folder and onto the home screen.
Click the Home or Done button to save the new arrangement.
How to Add Folders to the iPhone Dock
The four apps across the bottom of the iPhone live in what’s called the Dock. You can add folders to the dock if you want. To do that:
Move one of the apps currently in the dock out by tapping, holding, and dragging it to the home screen’s main area.
Drag a folder into an empty space.
:max_bytes(150000):strip_icc()/001_how-to-make-folders-and-group-apps-on-iphone-2000100-5c772d9dc9e77c000136a693.jpg)
Press the Home or Done button, depending on your iPhone model, to save the change.
How to Delete a Folder on the iPhone
Deleting a folder is similar to removing an app. Here’s what you need to do:
Drag all the apps out of the folder and onto the home screen.
When you do this, the folder disappears.
Press the Home or Done button to save the change, and you’re done.
Источник


