- If your AirPods won’t connect
- If you can’t connect to your iPhone, iPad, or iPod touch
- If you can’t connect to your Mac
- What you need
- How to Put On and Take Off an iPhone Case
- How to Put On an iPhone Case
- 1. Prepare by clearing off your workspace and laying down a soft surface
- 2. Slip the iPhone into the top-left edge of the case
- 3. Snap in the top-right corner, followed by the bottom-right corner
- 4. Secure and snap in the final, bottom-left corner
- 5. Confirm that all of the cut-outs and/or button covers align
- How to Take Off an iPhone Case
- 1. Prepare by clearing off your workspace and laying down a soft surface
- 2. Begin by removing the corner diagonally opposite to the volume buttons
- 3. Remove the directly adjacent corner
- 4. Grab the phone and slide it out of the case
- If your AirPods won’t connect
- If you can’t connect to your iPhone, iPad, or iPod touch
- If you can’t connect to your Mac
- What you need
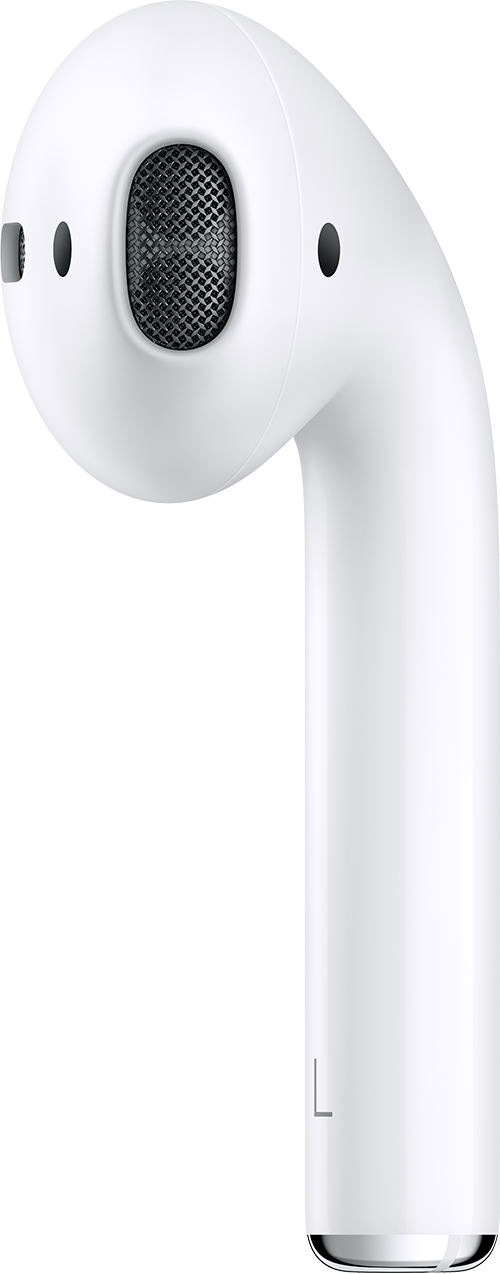
- If your left or right AirPod isn’t working
- If there’s no sound in one AirPod
- If there’s low volume in one AirPod
- Iphone open the case
If your AirPods won’t connect
If you need help connecting to your AirPods, learn what to do.
If you can’t connect to your iPhone, iPad, or iPod touch
- Make sure that you have an iPhone or iPod touch with the latest version of iOS, or an iPad with the latest version of iPadOS.
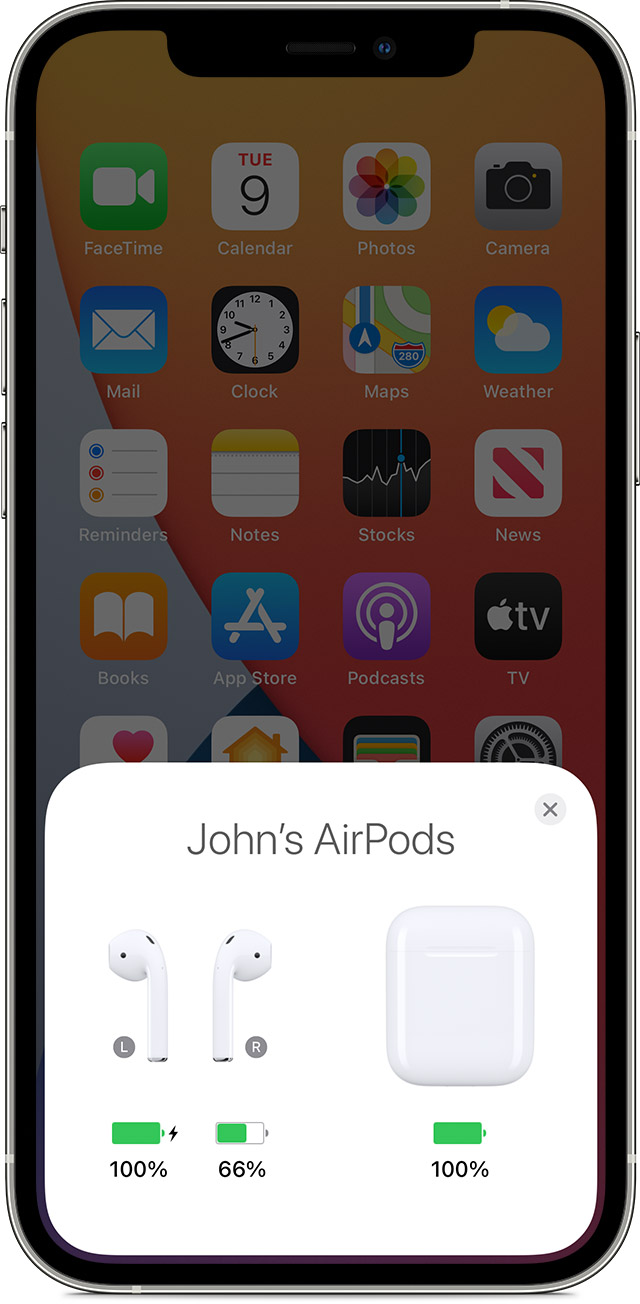
- Put both AirPods in the charging case and make sure that both AirPods are charging.
- To make sure that Bluetooth is on, go to Settings > Bluetooth.
- If your AirPods are connected, make sure that they’re selected as your audio device. If your AirPods appear in the list of devices but they don’t connect, go to the next step.
- Close the lid, wait 15 seconds, then open the lid. Press and hold the setup button on the charging case for up to 10 seconds. The status light should flash white, which means that your AirPods are ready to connect.
- Hold the charging case, with your AirPods inside and the lid open, next to your iPhone, iPad, or iPod touch.
- Follow the steps on the screen of your iPhone, iPad, or iPod touch.
- Test your AirPods. If you still can’t connect, reset your AirPods.

If you can’t connect to your Mac
- Make sure that you have a Mac with the latest version of macOS.
- Put both AirPods in the charging case and make sure that both AirPods are charging.
- To make sure that Bluetooth is on, choose Apple menu > System Preferences, then click Bluetooth.
- If your AirPods are connected, make sure that they’re selected as your audio device. If your AirPods appear in the list of devices but they don’t connect, click the X to the right of your AirPods to remove them from the list.
- Close the lid, wait 15 seconds, then open the lid. Press and hold the setup button on the charging case for up to 10 seconds. The status light should flash white, which means that your AirPods are ready to connect.
- Hold the charging case, with your AirPods inside and the lid open, next to your Mac.
- Follow the steps on the screen of your Mac.
- Test your AirPods. If you still can’t connect, reset your AirPods.
What you need
If you have AirPods (3rd generation), you need an iPhone or iPod touch with iOS 15.1 or later; an iPad with iPadOS 15.1 or later; an Apple Watch with watchOS 8.1 or later; an Apple TV with tvOS 15.1 or later; or a Mac with macOS 12 or later. Update your iPhone, iPad, or iPod touch; update your Apple Watch; update your Apple TV, or update your Mac.
If you have AirPods Pro, you need an iPhone or iPod touch with iOS 13.2 or later; an iPad with iPadOS 13.2 or later; an Apple Watch with watchOS 6.1 or later; an Apple TV with tvOS 13.2 or later; or a Mac with macOS 10.15.1 or later.
If you have AirPods (2nd generation), you need an iPhone, iPad, or iPod touch with iOS 12.2 or later; an Apple Watch with watchOS 5.2 or later; an Apple TV with tvOS 12.2 or later; or a Mac with macOS 10.14.4 or later.
If you have AirPods (1st generation), you need an iPhone, iPad, or iPod touch with iOS 10 or later; an Apple Watch with watchOS 3 or later; an Apple TV with tvOS 11 or later; or a Mac with macOS Sierra or later.
Источник
How to Put On and Take Off an iPhone Case
If you have an iPhone, you more than likely use or will use a case to protect it. That means, at some point you’ll have to figure out how to install your case and how to remove it. It may seem pretty straight forward but if your case is super form fitting and/or a snap-on case, it might be a little more difficult than it seems. Good news though – it’s not that difficult if you have some helpful tips. Better news – we have all those helpful tricks laid out below in our step-by-step guides.
How to Put On an iPhone Case

1. Prepare by clearing off your workspace and laying down a soft surface
Pull up a seat up at the table, move aside any unnecessary clutter and most importantly, cover your immediate workspace with something soft, like a folded towel. The last thing you want to do is drop your phone on the floor or a hard surface and damage your device. (Let’s not forget this the whole reason why you have a case to begin with)
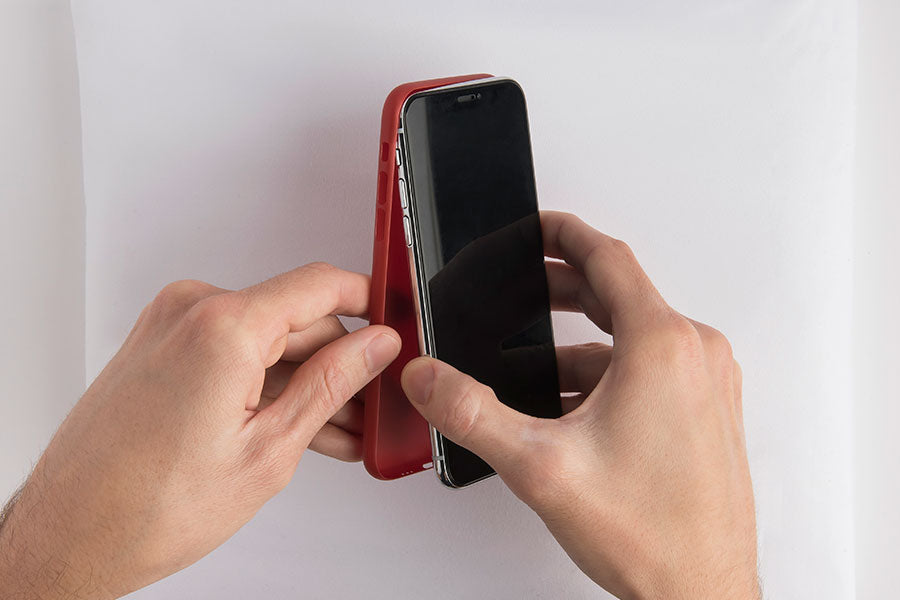
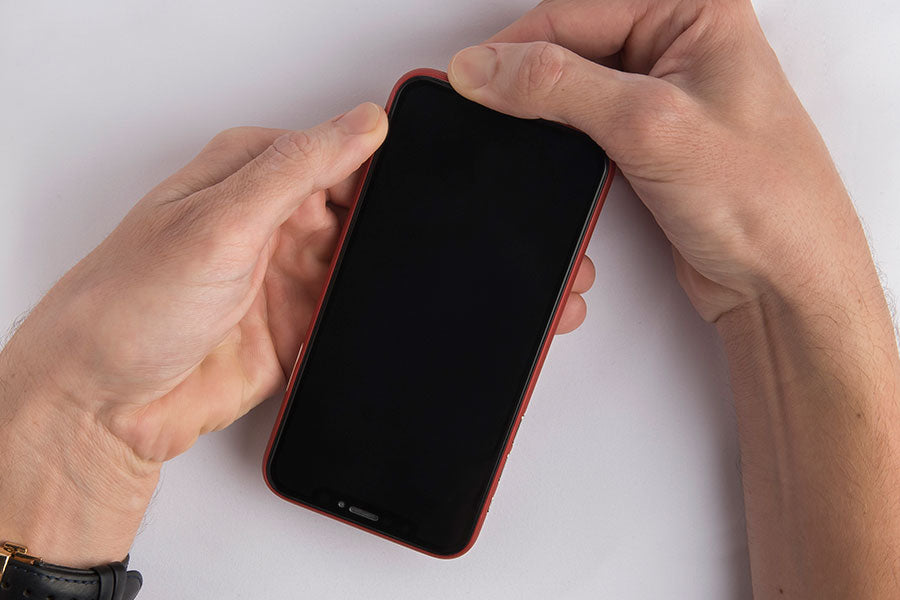
2. Slip the iPhone into the top-left edge of the case
Grab the case (opening side up) with your left hand and with your right, grab the phone (screen side up). Slowly slide the top left corner of your iPhone into the case towards the ringer and volume button cut-outs/button covers. Don’t worry if these elements aren’t perfectly aligned at the moment – they will snap in place a little later on. Gently pinch and hold this position with your left hand.
3. Snap in the top-right corner, followed by the bottom-right corner
With the top-left corner still insert and pinched, use your right hand to snap in the top-right corner of the case. Then, slide your right hand down the side of the phone and case applying constant pressure, until you get to the bottom-right corner. Now, give this corner a good strong pinch between your index finger and thumb. It should snap right into place.
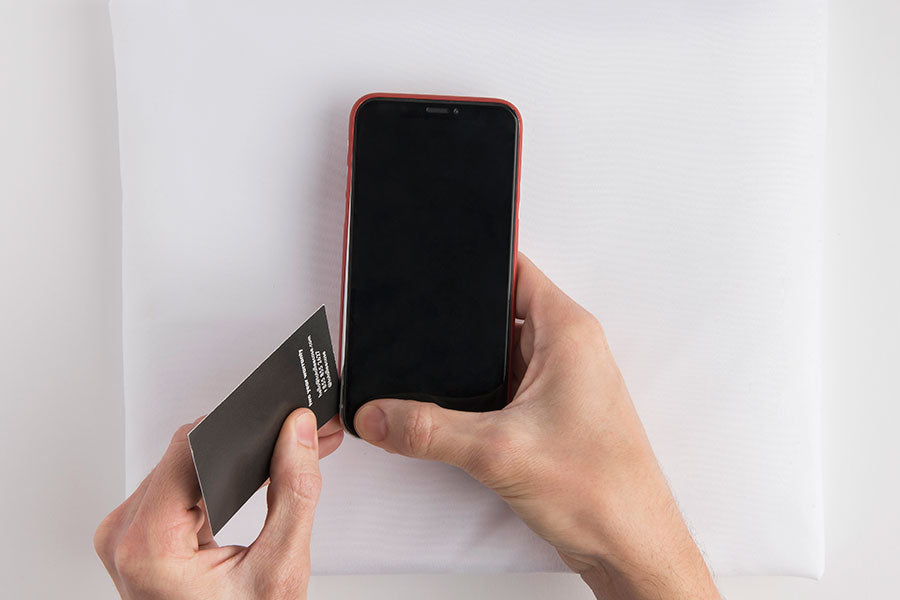
4. Secure and snap in the final, bottom-left corner
Depending on the phone case, securing the final corner may be as simple as a gentle pinch on the last edge. If not, and the corner of the case is folding underneath the phone, try using a business card to slide the case on the final edge. Slip the business card into the gap between the iPhone and case, and then slowly move it along the edge of the iPhone towards the final corner, while simultaneously working to snap the case on. This works sort of like a shoe horn.
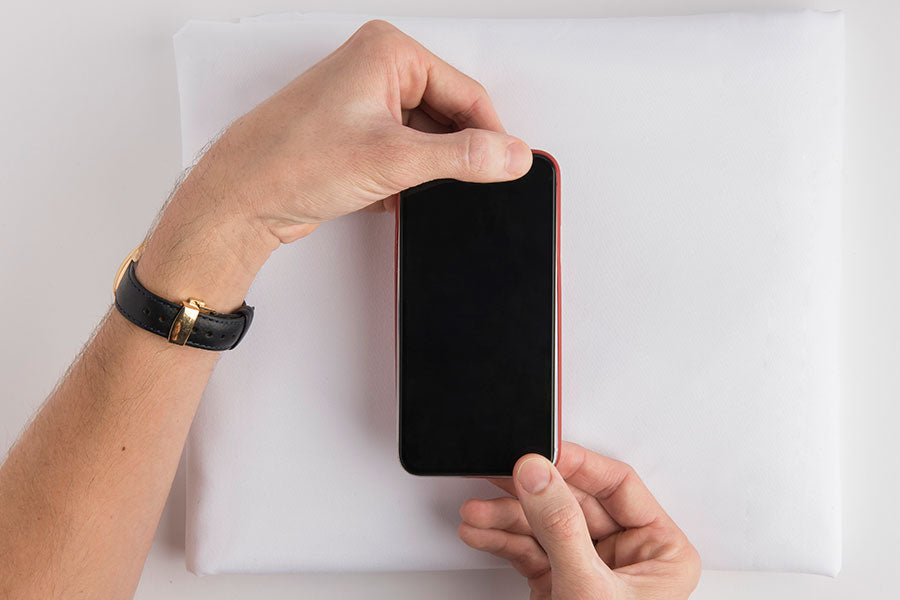
5. Confirm that all of the cut-outs and/or button covers align
At this point, the case should be fully installed, which means all of the cutouts/button covers properly align to all of the buttons and ports.
Pro-tip: Sometimes in the process of putting on your case, you may accidentally toggle the ringer on or off, so give that a quick check.
Now that you have the case on, it’s inevitable that you will have to take if off at some point in the future. Maybe you want to try a different case or maybe you’re looking to give yours a quick clean . Whatever the reason, if you need a simple how-to on safely removing your iPhone case, we can help with that too. We’re breaking down this process step-by-step.
How to Take Off an iPhone Case

1. Prepare by clearing off your workspace and laying down a soft surface
Much like removing a case, it’s important to get situated and properly set up. So grab a seat, clear off your workspace and lay down a towel to create a soft, flat working surface. The last thing you want to do when removing your case is to drop and crack your phone.
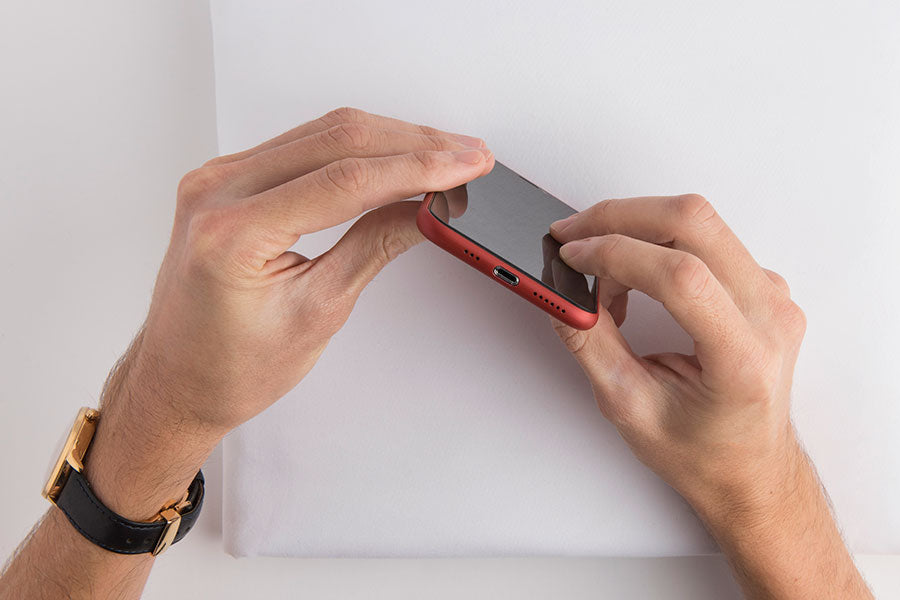
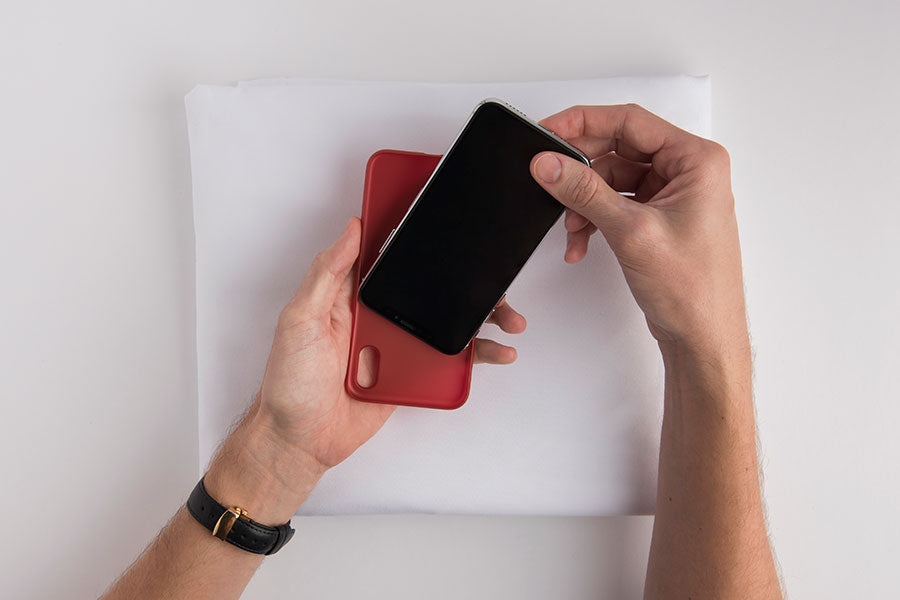
2. Begin by removing the corner diagonally opposite to the volume buttons
Start by removing the corner of the case that is catty-corner to the ringer switch and volume buttons. Grab your phone like you’re going to send a text and rotate it 180º, keeping the screen side up. On this new, top-left corner, place both thumbs on the front of the case and firmly pry the case away from the phone. If this doesn’t work, carefully try using your fingernails, or a dull object, to release the edges nearest to the corner.

3. Remove the directly adjacent corner
With the phone in the same position, apply the techniques mentioned above to remove the corner directly adjacent to the prior. The case should come off a little easier on this corner, so take extra precaution as to not drop your phone.
4. Grab the phone and slide it out of the case
With the two corners dislodged, gently hold the case with one hand and with the other, get a firm grip on the freed part of the phone. Now, simply slide the phone out and away from the case.
Pro-tip: Double check that you didn’t toggle the ringer switch or crank up the volume in the process of removing your case.
Источник
If your AirPods won’t connect
If you need help connecting to your AirPods, learn what to do.
If you can’t connect to your iPhone, iPad, or iPod touch
- Make sure that you have an iPhone or iPod touch with the latest version of iOS, or an iPad with the latest version of iPadOS.
- Put both AirPods in the charging case and make sure that both AirPods are charging.
- To make sure that Bluetooth is on, go to Settings > Bluetooth.
- If your AirPods are connected, make sure that they’re selected as your audio device. If your AirPods appear in the list of devices but they don’t connect, go to the next step.
- Close the lid, wait 15 seconds, then open the lid. Press and hold the setup button on the charging case for up to 10 seconds. The status light should flash white, which means that your AirPods are ready to connect.
- Hold the charging case, with your AirPods inside and the lid open, next to your iPhone, iPad, or iPod touch.
- Follow the steps on the screen of your iPhone, iPad, or iPod touch.
- Test your AirPods. If you still can’t connect, reset your AirPods.
If you can’t connect to your Mac
- Make sure that you have a Mac with the latest version of macOS.
- Put both AirPods in the charging case and make sure that both AirPods are charging.
- To make sure that Bluetooth is on, choose Apple menu > System Preferences, then click Bluetooth.
- If your AirPods are connected, make sure that they’re selected as your audio device. If your AirPods appear in the list of devices but they don’t connect, click the X to the right of your AirPods to remove them from the list.
- Close the lid, wait 15 seconds, then open the lid. Press and hold the setup button on the charging case for up to 10 seconds. The status light should flash white, which means that your AirPods are ready to connect.
- Hold the charging case, with your AirPods inside and the lid open, next to your Mac.
- Follow the steps on the screen of your Mac.
- Test your AirPods. If you still can’t connect, reset your AirPods.
What you need
If you have AirPods (3rd generation), you need an iPhone or iPod touch with iOS 15.1 or later; an iPad with iPadOS 15.1 or later; an Apple Watch with watchOS 8.1 or later; an Apple TV with tvOS 15.1 or later; or a Mac with macOS 12 or later. Update your iPhone, iPad, or iPod touch; update your Apple Watch; update your Apple TV, or update your Mac.
If you have AirPods Pro, you need an iPhone or iPod touch with iOS 13.2 or later; an iPad with iPadOS 13.2 or later; an Apple Watch with watchOS 6.1 or later; an Apple TV with tvOS 13.2 or later; or a Mac with macOS 10.15.1 or later.
If you have AirPods (2nd generation), you need an iPhone, iPad, or iPod touch with iOS 12.2 or later; an Apple Watch with watchOS 5.2 or later; an Apple TV with tvOS 12.2 or later; or a Mac with macOS 10.14.4 or later.
If you have AirPods (1st generation), you need an iPhone, iPad, or iPod touch with iOS 10 or later; an Apple Watch with watchOS 3 or later; an Apple TV with tvOS 11 or later; or a Mac with macOS Sierra or later.
Источник
If your left or right AirPod isn’t working
Learn what to do if your left or right AirPod doesn’t play audio.
If there’s no sound in one AirPod
- Make sure that your charging case is fully charged.
- Place both AirPods in your charging case and let them charge for 30 seconds.
- Open the charging case near your iPhone or iPad.

- Check the charge status on your iPhone or iPad to make sure that each AirPod is charging .
- Put both AirPods in your ears.
- Play audio to test both AirPods.
- If an AirPod still isn’t working, reset your AirPods.
If there’s low volume in one AirPod
If your left or right AirPod isn’t playing any sound, or if the volume is too quiet, follow these steps:
- Check the microphone and speaker mesh on each AirPod.
- If you see any debris, clean your AirPods using the guidelines in this article, and see if that fixes the issue.
- Go to Settings > Accessibility > Audio/Visual > Balance, and make sure that the balance is set in the middle.
Источник
Iphone open the case
◊ Apple Card Monthly Installments (ACMI) is a 0% APR payment option available to select at checkout for certain Apple products purchased at Apple Store locations, apple.com, the Apple Store app, or by calling 1-800-MY-APPLE, and is subject to credit approval and credit limit. See https://support.apple.com/kb/HT211204 for more information about eligible products. Variable APRs for Apple Card other than ACMI range from 10.99% to 21.99% based on creditworthiness. Rates as of April 1, 2020. If you choose the pay-in-full or one-time-payment option for an ACMI eligible purchase instead of choosing ACMI as the payment option at checkout, that purchase will be subject to the variable APR assigned to your Apple Card. Taxes and shipping are not included in ACMI and are subject to your card’s variable APR. See the Apple Card Customer Agreement for more information. ACMI is not available for purchases made online at the following special stores: Apple Employee Purchase Plan; participating corporate Employee Purchase Programs; Apple at Work for small businesses; Government, and Veterans and Military Purchase Programs, or on refurbished devices. iPhone activation required on iPhone purchases made at an Apple Store with one of these national carriers: AT&T, Sprint, Verizon, or T-Mobile.
* Monthly pricing is available when you select Apple Card Monthly Installments (ACMI) as payment type at checkout at Apple, and is subject to credit approval and credit limit. Financing terms vary by product. Taxes and shipping are not included in ACMI and are subject to your card’s variable APR. See the Apple Card Customer Agreement for more information. ACMI is not available for purchases made online at special storefronts. The last month’s payment for each product will be the product’s purchase price, less all other payments at the monthly payment amount.
To access and use all the features of Apple Card, you must add Apple Card to Wallet on an iPhone or iPad with the latest version of iOS or iPadOS. Update to the latest version by going to Settings > General > Software Update. Tap Download and Install.
Available for qualifying applicants in the United States.
Apple Card is issued by Goldman Sachs Bank USA, Salt Lake City Branch.
Источник


