- If you forgot your iPhone passcode
- Step 1: Make sure that you have a computer (Mac or PC)
- Step 2: Turn off your iPhone
- Step 3: Put your iPhone in recovery mode
- Step 4: Restore your iPhone
- Need more help?
- Use a passcode with your iPhone, iPad, or iPod touch
- Set up a passcode
- Change your passcode or passcode settings
- Get help
- If an alert says to change your passcode or you can’t adjust your passcode settings
- If you forgot your passcode
- If you forgot your iPad passcode
- Step 1: Make sure that you have a computer (Mac or PC)
- Step 2: Turn off your iPad
- Step 3: Put your iPad in recovery mode
- Step 4: Restore your iPad
- Need more help?
- iPhone is Disabled? How to Unlock Disabled iPhone
- Why My iPhone is Disabled?
- Solution 1: iPhone is Disabled, Try Again in XX Minutes?
- Solution 2: iPhone is Disabled; Connect to iTunes, How to Bypass?
- Solution 3: iPhone is Disabled, How to Fix Without iTunes?
- 1. Get iOS System Recovery on PC/Mac
- 2. Detect iPhone/iPad
- 3. Put Your Device into DFU Mode
- 4. Select Device’s Info
- 5. Fixing Your iPhone Back to Normal Status.
- Solution 4: Unlock Disabled iPhone in a Fast Way
- Solution 5: How to Unlock the Disabled iPhone without Computer
- iPhone is Enabled!
If you forgot your iPhone passcode
Forgot your iPhone passcode? Learn how to get your iPhone into recovery mode so you can erase it and set it up again.
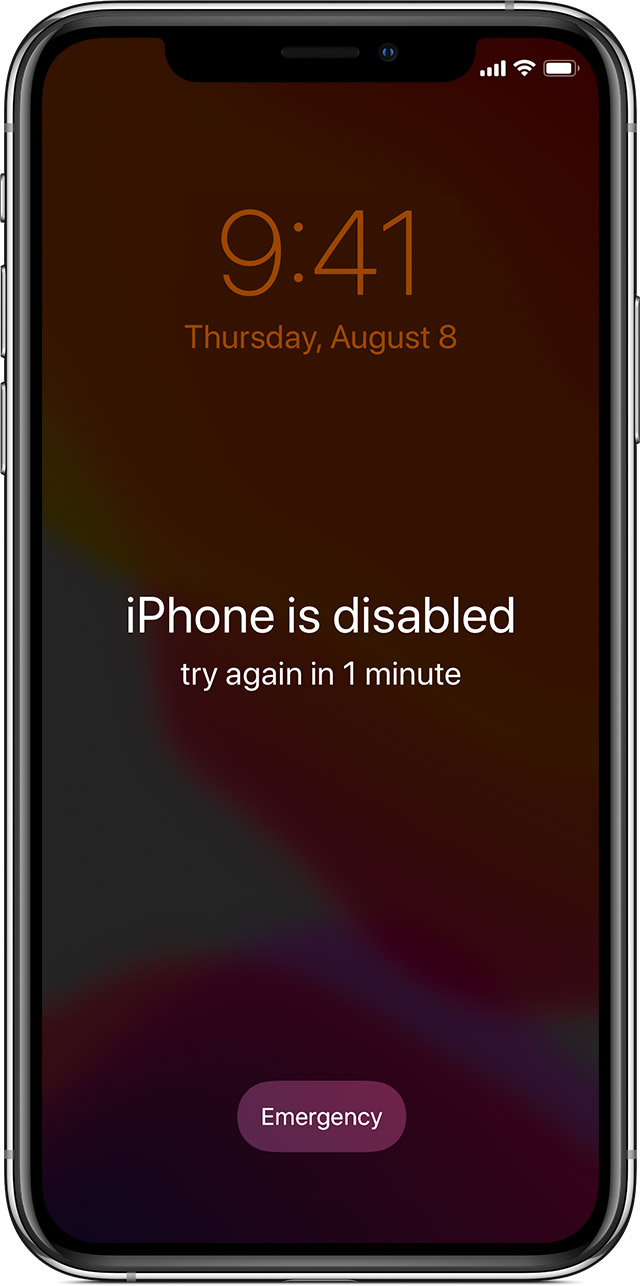
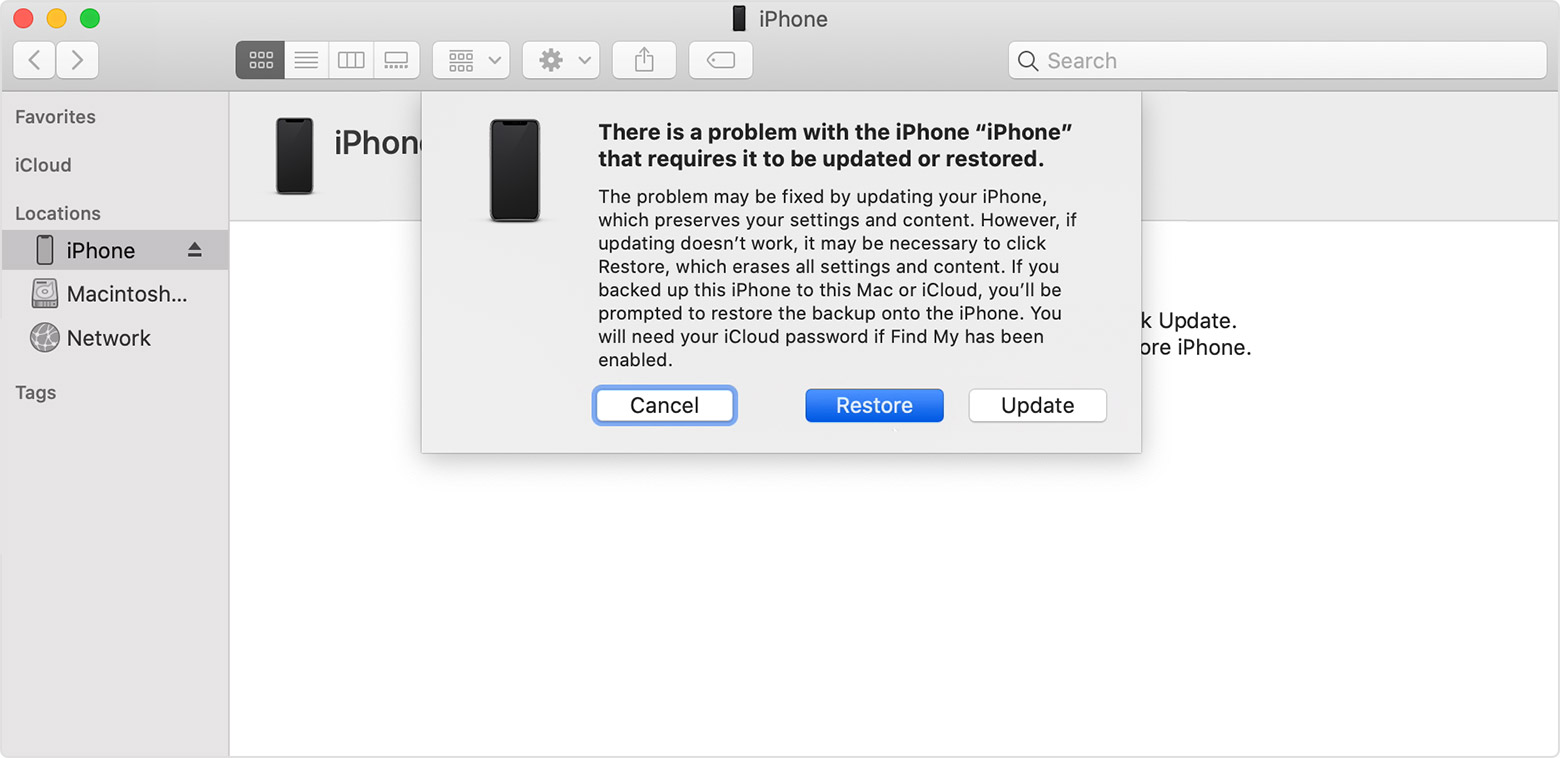
If you enter the wrong passcode on your iPhone Lock Screen too many times, an alert lets you know that your iPhone is disabled. If you can’t remember your passcode when you try again, you need to use a computer to put your iPhone in recovery mode. This process deletes your data and settings, including your passcode, giving you access to set up your iPhone again.
After you erase your iPhone, you can restore your data and settings from backup. If you didn’t back up your iPhone, you can set it up as a new device and then download any data that you have in iCloud.
![]()
Step 1: Make sure that you have a computer (Mac or PC)
This process requires a Mac or PC. If you’re using a PC, make sure that it has Windows 8 or later, and that iTunes is installed. You also need the cable that came with your iPhone, or another compatible cable, to connect your iPhone to the computer.
If you don’t have a computer and you can’t borrow one, you need to go to an Apple Retail Store or Apple Authorized Service Provider for help.

Step 2: Turn off your iPhone
- Unplug your iPhone from the computer if it’s connected.
- Turn off your iPhone using the method for your iPhone model:
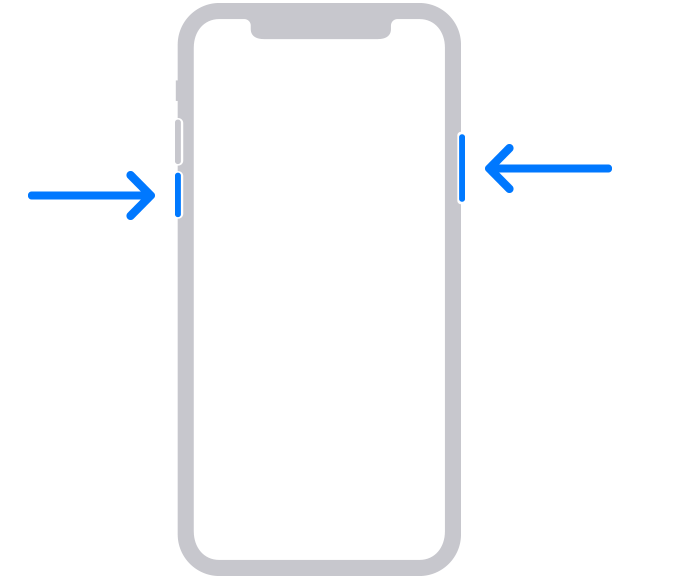
- iPhone X or later, iPhone SE (2nd generation), iPhone 8, and iPhone 8 Plus: Press and hold both the Side button and the Volume down button until the power off slider appears.

- iPhone 7 and iPhone 7 Plus: Press and hold the Side button until the power off slider appears.
- iPhone SE (1st generation), and iPhone 6s and earlier: Press and hold the Side (or Top) button until the power off slider appears.
- iPhone X or later, iPhone SE (2nd generation), iPhone 8, and iPhone 8 Plus: Press and hold both the Side button and the Volume down button until the power off slider appears.
- Drag the slider to turn off your iPhone, then wait a minute to make sure that it turns off completely.

Step 3: Put your iPhone in recovery mode
- Get ready by finding the button on your iPhone that you’ll need to hold in the next step:
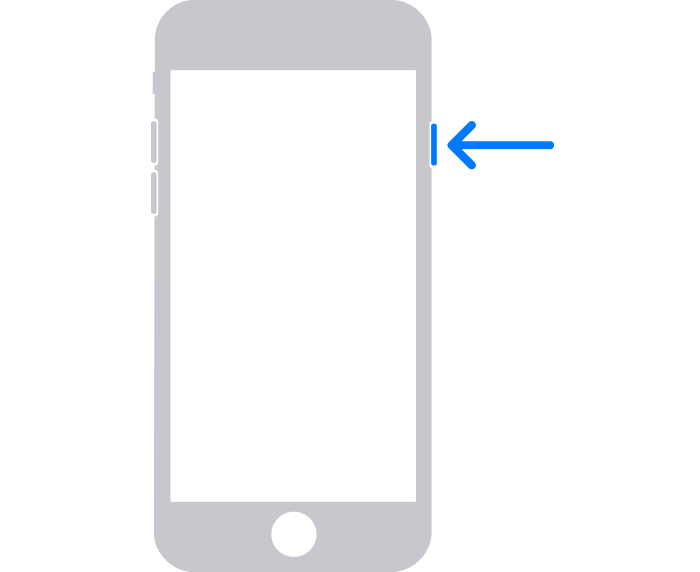
- iPhone X or later, iPhone SE (2nd generation), iPhone 8, and iPhone 8 Plus use the Side button.
- iPhone 7 and iPhone 7 Plus use the Volume down button.
- iPhone SE (1st generation), and iPhone 6s and earlier use the Home button.
- Press and hold the correct button for your iPhone while immediately connecting your iPhone to the computer. Don’t let go of the button.
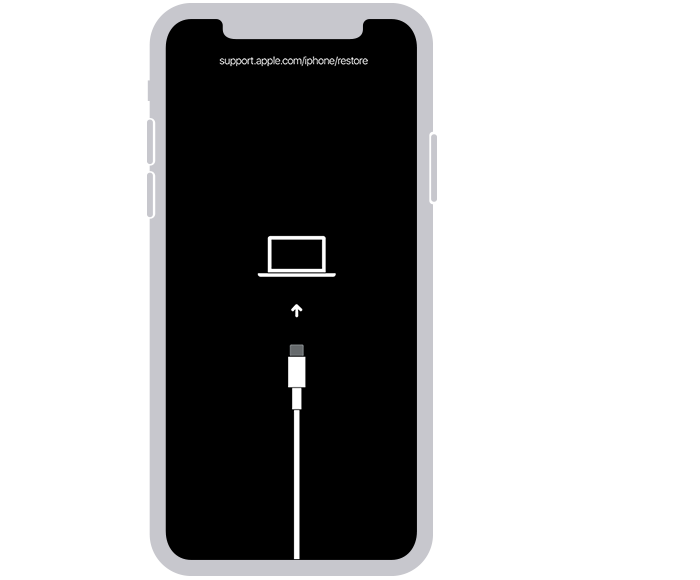
- Keep holding the button until you see the recovery mode screen on your iPhone, then let go.
If you see the passcode screen, you need to turn off your iPhone and start again.
If you can’t get your iPhone to show the recovery mode screen and you need help, contact Apple Support.
Step 4: Restore your iPhone
- Locate your iPhone in the Finder or in iTunes on the computer that it’s connected to. (Learn how to find your connected iPhone.)
- Choose Restore when you see the option to Restore or Update. Your computer downloads software for your iPhone and begins the restore process. If the download takes more than 15 minutes and your device exits the recovery mode screen, let the download finish, then turn off your iPhone and start again.
- Wait for the process to finish.
- Disconnect your iPhone from the computer, then set up and use your iPhone.
Need more help?
If you can’t complete any of these steps, if you’re still prompted for a passcode, or if you need any other assistance, contact Apple Support.
Источник
Use a passcode with your iPhone, iPad, or iPod touch
Learn how to set, use, and change a passcode on your iPhone, iPad, or iPod touch.
Set a passcode on your device to help protect your data. If your device supports Touch ID, you can often use your fingerprint instead of your passcode. If your device supports Face ID, you can use face recognition instead of your passcode. Your device will require your passcode when you do the following:
- Turn on or restart your device
- Press the Home button or swipe up to unlock your device (you can change this)
- Update your software
- Erase your device
- View or change passcode settings
- Install iOS or iPadOS Configuration profiles
![]()
Set up a passcode
Change your settings
Get help with passcode
Set up a passcode
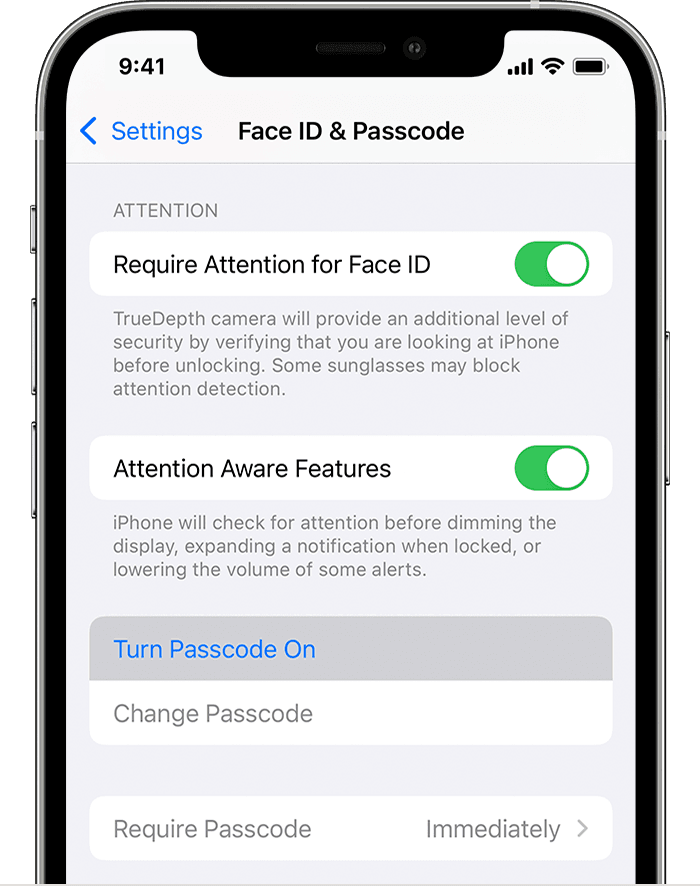
- On iPhone X and later, or iPad with Face ID, go to Settings > Face ID & Passcode. On earlier iPhone models, go to Touch ID & Passcode. On devices without Touch ID, go to Settings > Passcode.
- Tap Turn Passcode On.
- Enter a six-digit passcode. Or tap Passcode Options to switch to a four-digit numeric code, a custom numeric code, or a custom alphanumeric code.
- Enter your passcode again to confirm it and activate it.
Change your passcode or passcode settings
On iPhone X and later, or iPad with Face ID, go to Settings > Face ID & Passcode. On earlier iPhone models, go to Settings > Touch ID & Passcode. On devices without Touch ID, go to Settings > Passcode.
You’ll find several settings and options:
- Turn Passcode Off: Tap this option to turn off your passcode.
- Change Passcode: Enter a new six-digit passcode. Or tap Passcode Options to switch to a four-digit numeric code, a custom numeric code, or a custom alphanumeric code.
- Require Passcode: As soon as you lock your screen, the default for this setting will ask you to enter your passcode to unlock. If you don’t want an immediate passcode requirement, change this setting. (For your own security, if you use Touch ID or Apple Pay, you can’t change the immediate passcode requirement).
- Allow Access When Locked: Use this option to allow access to some features when your device is locked, including Today View, Notification Center, Control Center on iPhone and iPod touch or iPad, Siri, Reply with Message, Home Control, Wallet, Return Missed Calls, and USB accessories.
- Erase Data: Choose whether to erase your device automatically after ten failed passcode attempts. If you don’t enable this option, your device will need to be restored on a computer after ten failed attempts.
Get help
Follow the steps in this section for help with things like passcode settings, alerts, and forgotten passwords.
If an alert says to change your passcode or you can’t adjust your passcode settings
Configuration profiles and email accounts based on Microsoft Exchange (common with business or education devices) sometimes have passcode policies that cause issues like this:
- You can’t turn off your passcode.
- You can’t change passcode settings because they’re unavailable, gray, or dimmed.
- You see an alert about a Passcode Requirement. For example, you might see a message that says you must change your iPhone unlock passcode within 60 minutes.
Contact your IT administrator for help. If you don’t use a configuration profile or Microsoft Exchange account, or if your device is personally owned, make sure you update your device to the latest version of iOS or iPadOS.
If you forgot your passcode
If you or someone else enters the wrong passcode too many times, your device will disable itself temporarily. If so, get help with a forgotten passcode or disabled device. If you forgot your Restrictions passcode, learn what to do.
Источник
If you forgot your iPad passcode
Forgot your iPad passcode? Learn how to get your iPad into recovery mode so you can erase it and set it up again.
Forgot the passcode on your iPhone?
Forgot the passcode on your iPod touch?
![]()
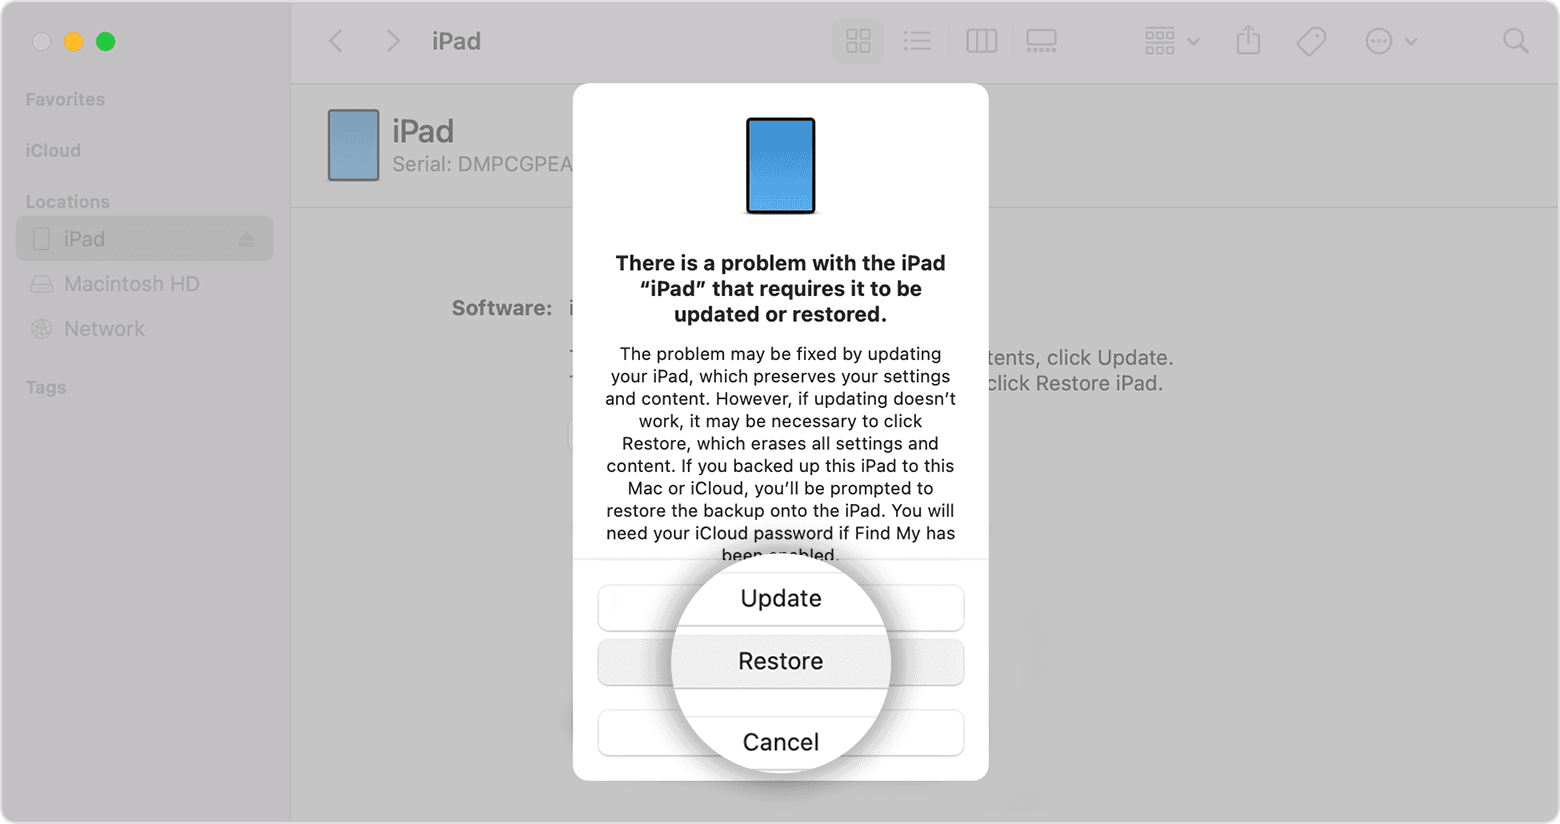
If you enter the wrong passcode on your iPad Lock Screen too many times, an alert lets you know that your iPad is disabled. If you can’t remember your passcode when you try again, you need to use a computer to put your iPad in recovery mode. This process deletes your data and settings, including your passcode, giving you access to set up your iPad again.
After you erase your iPad, you can restore your data and settings from backup. If you didn’t back up your iPad, you can set it up as a new device and then download any data that you have in iCloud.
Step 1: Make sure that you have a computer (Mac or PC)
This process requires a Mac or PC. If you’re using a PC, make sure that is has Windows 8 or later, and that iTunes is installed. You also need the cable that came with your iPad, or another compatible cable, to connect your iPad to the computer.
If you don’t have a computer and you can’t borrow one, you need to go to an Apple Store or Apple Authorized Service Provider for help.
Step 2: Turn off your iPad
- Unplug your iPad from the computer if it’s connected.
- Turn off your iPad using the method for your iPad model:
- If your iPad doesn’t have a Home button: Press and hold one of the volume buttons and the top button at the same time until the power off slider appears.
- If your iPad has a Home button: Press and hold the top button until the power off slider appears.
- If your iPad doesn’t have a Home button: Press and hold one of the volume buttons and the top button at the same time until the power off slider appears.
- Drag the slider to turn off your iPad, then wait a minute to make sure that it turns off completely.

Step 3: Put your iPad in recovery mode
- Get ready by finding the button on your iPad that you’ll need to hold in the next step:
- iPad models that don’t have a Home button use the top button.
- iPad models that have a Home button use the Home button.
- iPad models that don’t have a Home button use the top button.
- Press and hold the correct button for your iPad while immediately connecting your iPad to the computer. Don’t let go of the button.
- Keep holding the button until you see the recovery mode screen on your iPad, then let go.
If you see the passcode screen, you need to turn off your iPad and start again.


If you can’t get your iPad to show the recovery mode screen and you need help, contact Apple Support.
Step 4: Restore your iPad
- Locate your iPad in the Finder or in iTunes on the computer that it’s connected to. (Learn how to find your connected iPad.)
- Choose Restore when you see the option to Restore or Update. Your computer downloads software for your iPad and begins the restore process. If the download takes more than 15 minutes and your device exits the recovery mode screen, let the download finish, then turn off your iPad and start again.
- Wait for the process to finish.
- Disconnect your iPad from the computer, then set up and use your iPad.
Need more help?
If you can’t complete any of these steps, if you’re still prompted for a passcode, or if you need any other assistance, contact Apple Support.
Источник
iPhone is Disabled? How to Unlock Disabled iPhone
Your iPhone is locked when you see on the lock screen this message: iPhone is disabled. In some cases, the message says: «iPhone is disabled, try again in 1/5/15/60 minutes.» And some people even see the crazy «iPhone is disabled for 24 million minutes»! And in other cases, you see «iPhone is disabled, connect to iTunes.» So why is your iPhone disabled? And how to unlock disabled iPhone 12/11/X/8/7/6 so that you can access to your phone again. Here are the answers.
Why My iPhone is Disabled?
Your iPhone is disabled because of too many wrong passcode entries. Normally, if you enter 5 incorrect passcodes in a row, the iPhone will be disabled for 1 minute. And for 7 incorrect entries, 5 minutes; 8 incorrect entries, 15 minutes; 9 incorrect entries, 60 minutes. And for 10 incorrect passcode entries at a time, iPhone is disabled and asks you to connect to iTunes.
- If you have enabled Erase Data in Touch ID & Passcode, it will delete all data on the iPhone after entering the wrong passcode for 10 times.
There are many situations that your iPhone has been tried with wrong passcodes and disabled. For example:
You forget the iPhone passcode and enter different incorrect passcodes up to 6 times.
You leave your iPhone to your kid and she/he pushes the buttons of the locked screen randomly for lots of times.
Someone tries to guess your iPhone passcode and unlock your phone.
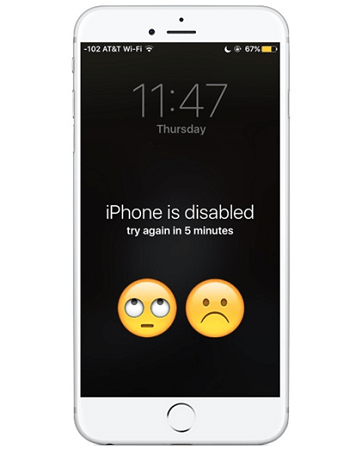
Solution 1: iPhone is Disabled, Try Again in XX Minutes?
When you see iPhone is disabled, try again in 5, 15, 60 minutes, you can simply wait for 5/15/60 minutes and then unlock your iPhone with correct passcode or Touch ID. If you have forgotten the passcode, you can bypass the locked iPhone with the following methods.
In those extreme cases when iPhone is disabled for 23/24/25 million minutes, the iPhone usually had a broken screen or had been jailbreak. You can fix it with Solution 2 and Solution 3.
Solution 2: iPhone is Disabled; Connect to iTunes, How to Bypass?
If iPhone 12/11/X, 8/8 Plus, 7/7 Plus, SE/6s/6/5s says: iPhone is disabled, connect to iTunes, you should connect the iPhone to iTunes and restore the device. A restore will erase everything on the iPhone, including its passcode. Since restoring iPhone with iTunes will delete all data, you should connect the phone to a Mac or PC that you have previously synced your iPhone with and make a backup before the restore.
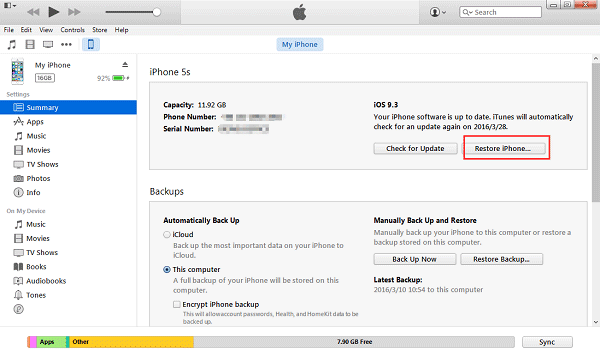
Step 1 Connect the device to the computer (the one you’ve previously synced the device too). Then, open iTunes.
Step 2 Click your iPhone icon, then tap «Summary» at the left pane and click Back Up Now to create an iTunes backup.
Step 3 Click «Restore iPhone». Follow the on-screen instructions to complete the restore process.
Step 4 After restoring, your device will be wiped clean and restored as a new device. When the iOS Setup Assistant asks to set up your iPhone, choose «Restore from iTunes backup.» Just select your device in iTunes and choose the most recent backup of your iPhone.

If you’ve never synced your iPhone with iTunes, you’re going to see some errors: «iTunes can’t connect to the device because it has a passcode applied. Enter the passcode before it can connect to iTunes». If so, you can bypass the disabled screen with iTunes in these steps.
Step 1 Turn off the iPhone.
Step 2 Connect the USB cable to the iPhone but don’t connect it to the computer. Launch iTunes.
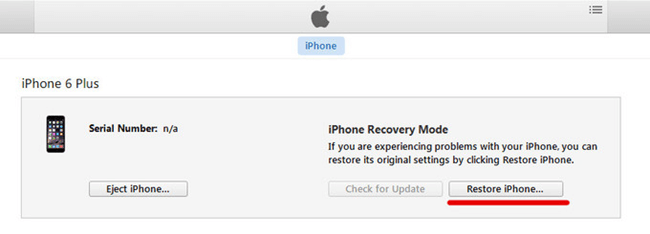
Step 3 Then put the disabled iPhone in recovery mode: press and hold the Power + Home buttons while plugging iDevice back into the computer (make sure iTunes is open).
Step 4 Release the power button and keep holding the home button until you see the «Connect to iTunes» screen like this:

Step 5 When you see the option to Restore or Update, choose Restore.
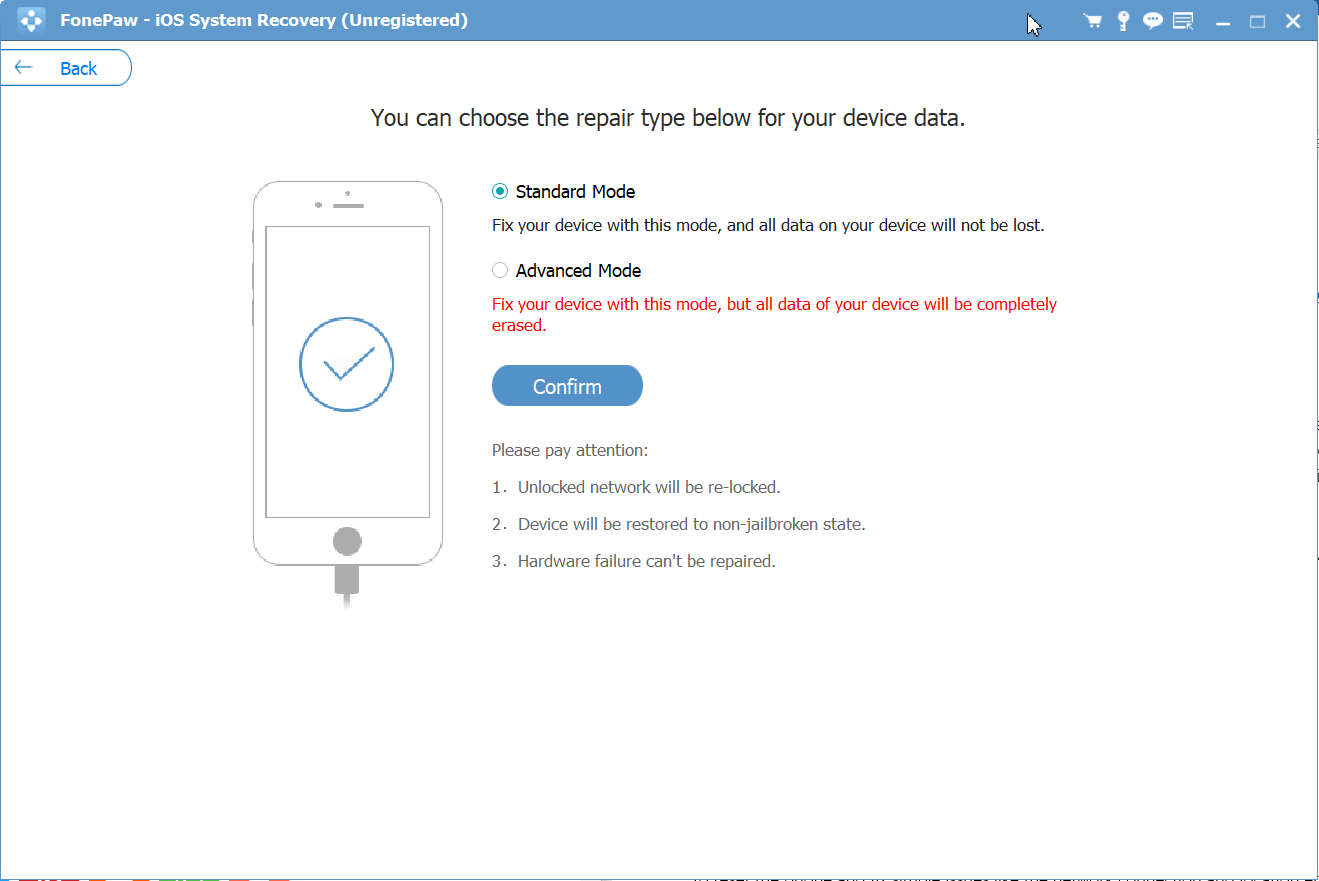
Solution 3: iPhone is Disabled, How to Fix Without iTunes?
If you can’t use iTunes to unlock iPhone, you can use iOS System Recovery
(opens new window) to fix your iPhone/iPad’s disabled error.
Note: This method works for those who don’t need the data anymore since it may erase your phone contents.
1. Get iOS System Recovery on PC/Mac
Click the following button to get the program on your PC/Mac and move to the «iOS System Recovery» interface.
2. Detect iPhone/iPad
When you connect the device into the PC, the program will detect it with ease. Thus, click «Advanced mode» to fix the disabled iPhone.
3. Put Your Device into DFU Mode
To get started in this way, it is in need to get your iPhone into DFU mode so that the program will go on fixing your case.

4. Select Device’s Info
After detecting, the program will show your device information. Double-check the details and confirm whether it is correct. Once it shows any wrong info, please select it manually.

Tip: There is a guide for you to check the model details if you click the question mark next to the «Device model».
5. Fixing Your iPhone Back to Normal Status.
In this step, you have to keep the mobile connected to the computer. The screen will display the repairing process. As «Repair completed» comes, you can now access your iPhone

- If your device is set with an iCloud activation lock, this guide cannot deal with this but you could refer to How to Bypass iCloud Activation Lock
Solution 4: Unlock Disabled iPhone in a Fast Way
If you want an easy and fast way to get into the disabled iPhone, Fone Paw iOS Unlocker
(opens new window) is also a good way to try. It is a new program that focuses on wiping the locked iPhone passcode, removing Apple ID
(opens new window) , and retrieving Screen Time passcode.
It helps you unlock the disabled iPhone so quickly and safely that you will be surprised at how convenient it is.
Second, enable the program and you will see three options on the homepage.
Wipe Screen helps you get into the disabled iPhone quickly.
Remove Apple allows you to reset the Apple ID or log in with a new account.
Screen Time enables you to retrieve the Screen Time and Restrictions passcode.

Third, tap Wipe Passcode and connect your iPhone to the computer. Check if the information of your device is correct and click Start to continue.
It will begin downloading a firmware package for your device.

Fourth, when the firmware package is downloaded, a prompt will ask you to enter «0000» to confirm the unlocking.
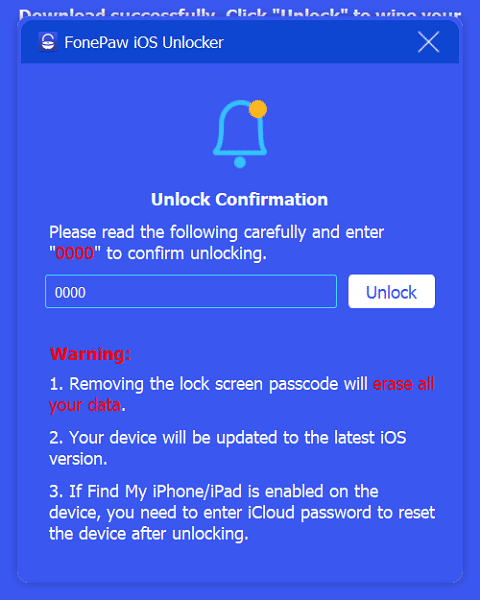
Enter it and click Unlock to continue. When the progress goes to 20%, you will need to put your phone into Recovery Mode to continue.
The program will show you detailed instructions to teach you how to do. So you don’t need to worry about the process.

Finally, when your phone enters Recovery mode, the process will go on. Wait till it finishes and your disabled iPhone will be unlocked successfully.

Notice:
(opens new window) is a fast way to unlock the disabled iPhone, there are several things that you should keep in mind before using it:
You will need to register before unlocking.
Removing the lock screen will erase the data and settings on your device as well.
You’d better turn off Find My iPhone before unlocking. If it is enabled, you will need to enter the iCloud password to reset your device after the unlocking.
Your device will be updated to the latest iOS version after the unlocking.
Solution 5: How to Unlock the Disabled iPhone without Computer
If you have «Find My iPhone» enabled on your iPhone, you can use «Remote Wipe» to erase the contents and passcode of your device. Then you can unlock the iPhone.
Step 1. Go to icloud.com with your Apple ID and passcode (the one you use with iCloud rather than your iPhone passcode that you do not remember).
Step 2. Click «Find My iPhone», then «All Devices» at the top of your browser window. Then, select the device you want to erase.
Step 3. Click «Erase iPhone» to remote wipe the device and its password.

Step 4. When iOS Setup Assistant on your iPhone asks to set up your iPhone, choose «Restore from iCloud backup» or «Restore from iTunes backup.»
- If you tend to recover data on disabled iPhone 6/6s/7, you are allowed to use iPhone Data Recovery to regain the deleted data and existing files from iCloud/iTunes backups.
iPhone is Enabled!
Now the iPhone is unlocked. Nevertheless, if you don’t want your iPhone to get disabled after you forgot the iPhone passcode, you should either 1) enable Touch ID on your iPhone 12/11/X/8/8 Plus/7/7 Plus/SE/6s/6/5s; 2) be sure backup your iPhone with iTunes or iCloud
Источник


