- Reset HomePod
- Use the Home app to reset HomePod
- Press the top of HomePod to reset it
- Your home at your command.
- One app for all your home accessories.
- Get your house in order. Room by room.
- Keep an eye on your home. And keep other eyes out.
- HomeKit routers make your home
- Set several things in motion with a tap. Or your voice.
- Good Morning
- Arrive Home
- Good Night
- Siri makes your voice the on/off switch.
- Control your house from just about anywhere.
- Put your home on autopilot.
- Location
- Action
- Occupancy
- Getting started is easy.
- Как кнопками сделать жесткую перезагрузку iPhone и iPad — все модели!
- Стандартная жесткая перезагрузка iOS-устройства
- Как выполнить жесткую перезагрузку iPhone 7
- Как жестко перезагрузить iPhone 8 и iPhone X
- Как сделать Hard Reset на iPhone XS, XS Max и XR? Инструкция!
- Жесткая перезагрузка iPhone 11, iPhone 11 Pro, iPhone 11 Pro Max и iPhone SE 2 (2020)
- Как принудительно перезагрузить iPhone 12 mini, iPhone 12, iPhone 12 Pro и iPhone 12 Pro Max
- Жесткая перезагрузка iPhone 13 mini, iPhone 13, iPhone 13 Pro и iPhone 13 Pro Max
Reset HomePod
Learn how to reset your HomePod or HomePod mini to its factory settings.
If HomePod isn’t responding, first try to restart it with the Home app. If HomePod still doesn’t respond, reset it. You should only reset HomePod when:
- You want to reset HomePod to factory settings.
- You need to send your HomePod in for service.
- You want to sell or give away your HomePod.
If you have two HomePod speakers set up as a stereo pair, you’ll need to ungroup the stereo pair before you can reset HomePod.
Use the Home app to reset HomePod
Make sure that you’re signed in to the Home app on your iPhone, iPad, iPod touch, or Mac with the Apple ID that you used to set up your HomePod. To reset HomePod to its factory settings and remove it from the Home app, use the following steps.
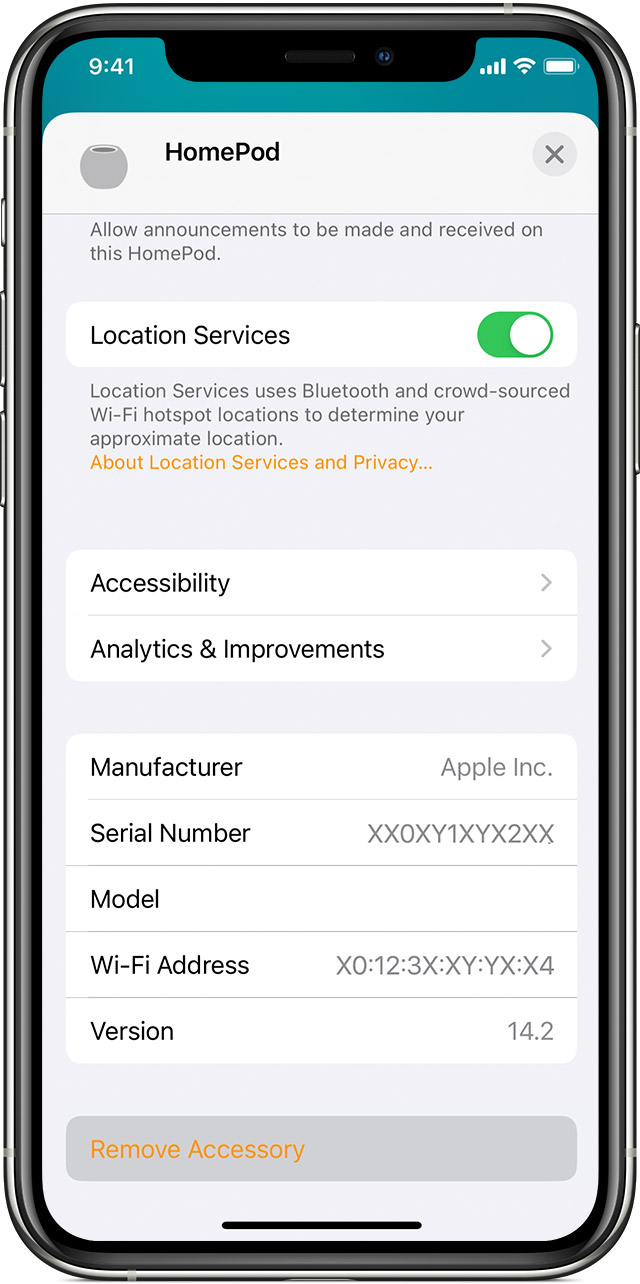
- Open the Home app on your iPhone, iPad, iPod touch, or Mac.
- On iPhone, iPad, or iPod touch, press and hold HomePod. On Mac, double-click HomePod. Then scroll to the bottom and tap or click Remove Accessory.
- Tap or click Remove.

Press the top of HomePod to reset it
If you can’t remove HomePod from the Home app, you can press the top of HomePod to reset it to its factory settings. Here’s how:
- Unplug HomePod or unplug the power adapter for HomePod mini, wait 10 seconds, then plug it back in.
- Wait 10 seconds, then touch your finger to the top of HomePod and hold it there.
- The white spinning light will turn red. Keep your finger down.
- Siri will say that your HomePod is about to reset. When you hear three beeps, you can lift your finger.
If you still see HomePod in the Home app after you reset it, then you’ll need to manually remove it from the Home app.
Источник
Your home at your command.
With the Home app, you can easily and securely control your HomeKit accessories from all your Apple devices. Turn off the lights, see who’s at the front door, adjust your living room temperature, turn up the music, and so much more. And with the new HomeKit Secure Video capability and HomeKit‑enabled routers, it’s all even more secure. The Home app makes all your connected devices work harder — and smarter — for you.
One app for all your home accessories.
No matter which compatible accessories you choose, the Home app makes it easy to set up and control all of them, all from one place. Over 100 brands worldwide are committed to providing accessories that are compatible with the HomeKit framework, and the number available is growing every day. Each of these accessories is reviewed and approved by Apple to help ensure your security when you use it.
Look for this symbol in stores and online.
Get your house in order. Room by room.
The Home app groups accessories by room, so you can easily control devices in any part of your house with a tap or a click. You can even tell Siri things like “Turn off my bedroom lights” or “Start heating the upstairs.” You can press an icon to perform more complex tasks like dimming the lights or adjusting the thermostat. And you can add your AirPlay 2–enabled TV 1 to the Home app and control it like any other accessory — turn it
on and off, change the volume, and switch inputs.
Keep an eye on your home.
And keep other eyes out.
Footage from home security cameras contains your most personal and sensitive data. With HomeKit Secure Video, activity detected by supported cameras is privately analyzed by your home hub using on‑device intelligence to determine if people, pets, or cars are present. When important activity is detected, you and anyone you share your Home app with will receive a rich notification that lets you view the clip right from the Lock Screen. Recorded video is available to view for ten days from the Home app. It’s securely stored for free in supported iCloud accounts and doesn’t count against your storage limit. 2 Leading camera manufacturers like Eufy, Logitech, and Netatmo have announced support for HomeKit Secure Video.
HomeKit routers make your home
as secure as it is smart.
Smart home accessories that connect to the internet can be vulnerable to attack. That’s why HomeKit‑enabled routers are available as a foundational layer of security for your smart home. HomeKit routers can firewall off each of your accessories so even if one were to be compromised, it wouldn’t be able to access your other devices or personal information. You can use the Home app to control which services your HomeKit accessories can communicate with in your network and on the internet.
Set several things
in motion with a tap. Or your voice.
Home allows you to set scenes, which enable multiple accessories to work in
combination — all with a single command. So you can create a scene named “Leaving Home” that turns off the lights, locks your doors, and lowers the thermostat. Or a scene called “Movie Night” that turns on
your AirPlay 2–enabled TV, lowers the shades, and dims the lights.
Good Morning
Greet the day with a custom scene that warms up your house, opens the blinds, and fires up the coffee maker.
Arrive Home
Prep your home for your arrival with a scene that opens the garage, unlocks your door, and turns on the lights.
Good Night
When you’re ready to turn in, a custom scene can turn off the lights, lower the thermostat, and secure the doors.
Siri makes your voice
the on/off switch.
Siri knows which HomeKit‑enabled accessories you have in your home as well as their status. 3 So you can ask Siri to turn an appliance on or off, dim your lights, change the song, set one of your scenes, or play movies and music on your AirPlay 2–enabled TV from your iPhone or iPad. With Apple TV or HomePod, you don’t even have to be home — for example, you can ask Siri to set the “I’m Home” scene while you’re driving. When you arrive, your house will be bright and warm, waiting for you to settle in.
Hey Siri, turn off the lights downstairs
Control your HomeKit accessories.
Hey Siri, set my bedtime scene
Use multiple HomeKit accessories to create a scene.
Hey Siri, play Killing Eve in the living room
Control your AirPlay 2–enabled TVs with HomeKit.
Control your HomeKit accessories.
Hey Siri, play some jazz in the kitchen
Control your AirPlay 2–enabled speakers.
Control your house from just about anywhere.
Using the Home app, you can access all of your home’s smart accessories remotely through Apple TV, HomePod, or iPad. 4 You can do things like shut your garage door, view live camera video of the doorway, or even ask Siri to lower the thermostat — anything you normally do while using the Home app at home.
Put your home on autopilot.
Apple TV, HomePod, and iPad also enable your home to carry out certain tasks automatically. For example, you can trigger an accessory or scene based on the time of day, your location, sensor detection, and more. Set it up once and you’re done.
Location
Set your lights to turn on as soon as you pull up to the house.
Have your home turn up the heat at 6:00 a.m., before you get out of bed.
Action
Use a motion sensor in the doorway to turn your kitchen lights on when you walk in.
Occupancy
Trigger a scene based on who’s home, like automatically turning the lights off as you leave if nobody else is there.
Getting started is easy.
Setting up a HomeKit accessory to work with the Home app is simple and secure. Just tap the accessory or scan the HomeKit setup code found directly on the accessory or in its instructions, and it’s instantly paired with your iOS or iPadOS device. The Home app will also recognize existing HomeKit accessories that
have been set up using other apps.
Источник
Как кнопками сделать жесткую перезагрузку iPhone и iPad — все модели!
Всем привет! Во многих статьях я пишу о том, что для решения некоторых проблем (да и просто для профилактики) операционной системы iOS необходимо выполнить жесткую перезагрузку устройства. Причем из статьи в статью я постоянно коротко описываю как это сделать. Честно говоря, мне это надоело.
Ну сколько можно писать одно и тоже?:)
Поэтому, было принято стратегическое решение — один раз написать подробную инструкцию о том, как выполнить жесткую перезагрузку (Hard Reset, как называют некоторые) iPhone и iPad, а потом просто давать ссылку на нее. По-моему, это просто гениальный ход мысли — ведь до такого практически невозможно додуматься! Как у меня это получилось… не знаю:) Ладно, хватит шутки-шутить, давайте уже переходить к главному.
Итак, жесткий сброс — это принудительная перезагрузка, которая может понадобиться в следующих случаях:
- Устройство зависло, тормозит и медленно работает.
- Вылетают какие-либо ошибки.
- Проблемы с беспроводными сетями, клавиатурой, программами, приложениями и т.д.
Обращаю ваше внимание, что подобная процедура не затрагивает никакие пользовательские данные, вся информация останется на своем месте, ничего не удалится. Если цель, которую вы преследуете делая жесткую перезагрузку, это стереть все с iPhone или iPad, то вам необходимо выполнить немного другую операцию, а именно, полный сброс настроек и контента — подробней тут.
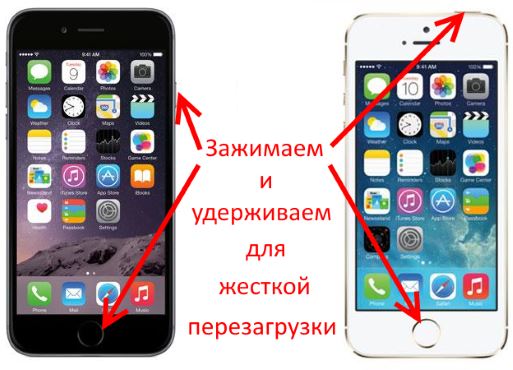
Стандартная жесткая перезагрузка iOS-устройства
Почему в заголовке указано слово стандартная? Потому что до выхода iPhone седьмой модели, у всех iOS устройств обязательно присутствовали эти две механические кнопки. Так что если Ваш гаджет младше «семерки», то вот способ принудительно перезагрузить его:
- iPhone или iPad должен быть включен.
- Одновременно зажимаем две кнопки — Home (круглая под экраном) + Power (включения и блокировки).
- Не отпуская их, ждем того момента, пока iPhone или iPad не отключится.
- Продолжаем удерживать их до того пока не загорится экран.
Как выполнить жесткую перезагрузку iPhone 7
В iPhone 7 Apple добавила многое, но и убрала тоже не мало. В частности, клавиша Home перестала быть механической и скорей всего, так теперь будет во всех новых моделях. Так что старый способ, с зажатием кнопки домой не работает (нажимать то нечего). Как же теперь жестко перезагрузить iPhone?
- Устройство должно быть включено.
- Одновременно зажимаем и удерживаем две кнопки — Power (включения) и «Громкость вниз».
- Продолжаем держать обе клавиши до тех пор, пока экран не станет черным, а затем появится логотип Apple.
- Отпускаем кнопки.
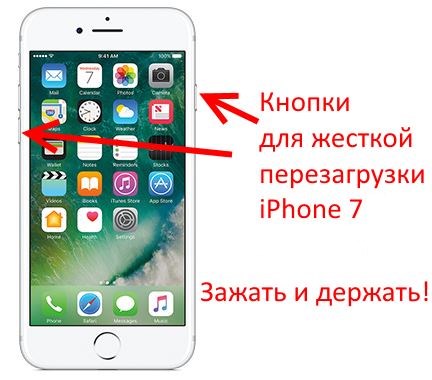
Таким образом, все манипуляции практически такие же как и в старых моделях, за исключением того, что теперь вместо клавиши Home используется кнопка «уменьшение громкости».
Как жестко перезагрузить iPhone 8 и iPhone X
Apple, выпустив iPhone 8 и iPhone X, полностью поменяла комбинацию кнопок для принудительного перезапуска этих устройств. Теперь, для того чтобы сделать Hard Reset нужно задействовать аж три кнопки, да еще и нажимать их в определенной последовательности. Готовы размять пальцы? Поехали!
Итак, жесткая перезагрузка iPhone 8 и iPhone X выполняется вот таким вот образом:
- Нажать и отпустить кнопку «увеличения громкости».
- Нажать и отпустить кнопку «уменьшения громкости».
- Зажать и держать боковую кнопку (включения) до того момента, пока на экране не появится логотип компании Apple.

Обратите внимание, что все нужно делать достаточно быстро. Нажали — отпустили, нажали — отпустили, зажали и держим.
Как сделать Hard Reset на iPhone XS, XS Max и XR? Инструкция!
В этот раз Apple не стала ничего придумывать — кнопки для жёсткой перезагрузки новых моделей iPhone 2018 года остались точно такими же, как и в iPhone X.
Ваш iPhone завис, вы не может пролистать эту статью чуть выше и посмотреть как делается Hard Reset? Ничего страшного! Я могу рассказать еще раз. Мне не тяжело.
Итак, инструкция. Принудительно и жестко перезагружаем iPhone XS, iPhone XS Max и iPhone XR:
- Нажимаем и отпускаем «Громкость вверх».
- Сразу же нажимаем и отпускаем «Громкость вниз».
- Сразу же жмем и держим кнопку «Включения» до момента появления «яблочка» (это займет около 10 секунд).
Повторюсь, все действия полностью идентичны iPhone X (см. картинку чуть выше).
Жесткая перезагрузка iPhone 11, iPhone 11 Pro, iPhone 11 Pro Max и iPhone SE 2 (2020)
Ждали чего-то нового и необычного? Не дождались.
Принудительная перезагрузка iPhone 11 (Pro Max) и iPhone SE 2 (2020) выполняется точно так же, как и в предыдущих моделях (начиная с iPhone 8).
Да-да-да, кнопки и порядок действий не изменился. Три простых шага:
- Нажать и отпустить «Громкость вверх».
- Нажать и отпустить «Громкость вниз».
- Удерживать кнопку включения.
Через секунд 10-15 ваш iPhone 11 (Pro Max) или iPhone SE 2 (2020) перезапустится. Поздравляю — вы успешно сделали Hard Reset!
Как принудительно перезагрузить iPhone 12 mini, iPhone 12, iPhone 12 Pro и iPhone 12 Pro Max
Стоит отметить, что Apple в очередной раз не придумала ничего нового.
Хотя… наверное, это правильно — ведь люди привыкли к определённой комбинации. Зачем что-то менять?
Итак, вот инструкция, как сделать жесткую перезагрузку всех моделей iPhone 12:
- Нажать и отпустить «Громкость вверх».
- Нажать и отпустить «Громкость вниз».
- Нажать и удерживать кнопку включения.
Через некоторое время (секунд 10-15) ваш iPhone 12 (mini, Pro, Pro Max) перезагрузится. Победа!
Жесткая перезагрузка iPhone 13 mini, iPhone 13, iPhone 13 Pro и iPhone 13 Pro Max
Не буду ходить вокруг да около, а сразу сообщу, что принудительная перезагрузка iPhone 13 производится точно так же, как и в большинстве предыдущих моделей iPhone.
Работаем, так сказать, по старой схеме.
Вы скажите: «Автор, завязывай с загадками. Какая такая «старая схема»? Где комбинация кнопок? Куда нажимать-то?»
Я отвечу: «Всё, больше не буду. А по поводу комбинации и куда нажимать…»
Вот максимально подробная инструкция, как сделать жесткую перезагрузку всех моделей iPhone 13:
- Нажать и отпустить «Громкость вверх».
- Нажать и отпустить «Громкость вниз».
- Нажать и удерживать кнопку включения.
Через некоторое время (секунд 10-15) ваш iPhone 13 (mini, Pro, Pro Max) успешно перезагрузится. Ура!
Согласитесь, что ничего сложного во всех вышеперечисленных манипуляциях нет — всё очень просто, быстро и легко.
Да и действительно, что может быть трудного в том, чтобы в определённой последовательности нажать (зажать или удерживать) две-три кнопки?:)
Но, несмотря на эту простоту, недооценивать значимость этой процедуры никак нельзя — сколько раз я использовал её для лечения зависших iPhone… Эх, были времена! Но это, конечно, немного другая история.
Источник


